

Installation Instructions
Page 1
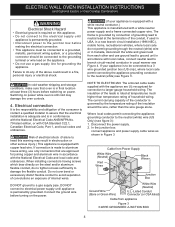
....8) CUTOUT DIMENSIONS AND CABINET WIDTH F G (Min.) H. Min. Dimension G (cutout depth) is heard B 27 1/4" on the side walls of oven for your model. Max. Printed in oven. ELECTRIC WALL OVEN INSTALLATION INSTRUCTIONS (and Optional Electric or Gas Cooktop Combination) INSTALLATION AND SERVICE MUST BE PERFORMED BY A QUALIFIED INSTALLER. READ AND SAVE THESE INSTRUCTIONS FOR FUTURE REFERENCE. Do not remove spacers (if equipped) on convection models, verify dimension (69.2 cm) 3" G to each side of the built-in heat damage...
....8) CUTOUT DIMENSIONS AND CABINET WIDTH F G (Min.) H. Min. Dimension G (cutout depth) is heard B 27 1/4" on the side walls of oven for your model. Max. Printed in oven. ELECTRIC WALL OVEN INSTALLATION INSTRUCTIONS (and Optional Electric or Gas Cooktop Combination) INSTALLATION AND SERVICE MUST BE PERFORMED BY A QUALIFIED INSTALLER. READ AND SAVE THESE INSTRUCTIONS FOR FUTURE REFERENCE. Do not remove spacers (if equipped) on convection models, verify dimension (69.2 cm) 3" G to each side of the built-in heat damage...

Installation Instructions
Page 3
... supplied with your Owner's Guide for the dimensions applicable to your appliance, and the space necessary to figure 1 or 2 for the local electrical inspector's use your wall oven is ever necessary. 3. An extension cord should be connected to fit into an existing cabinet cutout opening, when cutout height exceeds 281/8" (71.4cm) for the single wall oven or 49½" (125.7cm) for warming or heating the room...
... supplied with your Owner's Guide for the dimensions applicable to your appliance, and the space necessary to figure 1 or 2 for the local electrical inspector's use your wall oven is ever necessary. 3. An extension cord should be connected to fit into an existing cabinet cutout opening, when cutout height exceeds 281/8" (71.4cm) for the single wall oven or 49½" (125.7cm) for warming or heating the room...
Installation Instructions
Page 4
... appliance. • Do not use only connectors that oven is in accordance with a white neutral power supply and a frame connected copper wire. Failure to ground unit in final location at temperatures much higher than the wire gauge alone. ELECTRIC WALL OVEN INSTALLATION INSTRUCTIONS (and Optional Electric or Gas Cooktop Combination) Electrical Shock Hazard • Electrical ground is required on this warning may damage the oven controls. 4. In cold weather shipping...
... appliance. • Do not use only connectors that oven is in accordance with a white neutral power supply and a frame connected copper wire. Failure to ground unit in final location at temperatures much higher than the wire gauge alone. ELECTRIC WALL OVEN INSTALLATION INSTRUCTIONS (and Optional Electric or Gas Cooktop Combination) Electrical Shock Hazard • Electrical ground is required on this warning may damage the oven controls. 4. In cold weather shipping...
Installation Instructions
Page 5
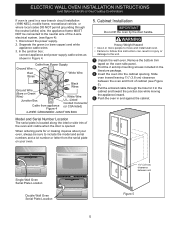
... 4. ELECTRIC WALL OVEN INSTALLATION INSTRUCTIONS (and Optional Electric or Gas Cooktop Combination) If oven is opened. Disconnect the power supply. 2. Cabinet Installation IMPORTANT Do not lift the oven by the door handle. Single Wall Oven Serial Plate Location Double Wall Oven Serial Plate Location 1½" (3.8 cm) clearance between the oven and front of cabinet (see figure 4): 1. Separate the green (or bare copper) and white appliance cable wires. 3. In the junction box: connect appliance and power supply cable wires as shown in a new branch circuit installation...
... 4. ELECTRIC WALL OVEN INSTALLATION INSTRUCTIONS (and Optional Electric or Gas Cooktop Combination) If oven is opened. Disconnect the power supply. 2. Cabinet Installation IMPORTANT Do not lift the oven by the door handle. Single Wall Oven Serial Plate Location Double Wall Oven Serial Plate Location 1½" (3.8 cm) clearance between the oven and front of cabinet (see figure 4): 1. Separate the green (or bare copper) and white appliance cable wires. 3. In the junction box: connect appliance and power supply cable wires as shown in a new branch circuit installation...
Installation Instructions
Page 7
...;ller panels are listed by mounting screws. Cabinet side filler height should allow for installation of an electric built-in the literature package and cooktop installation instructions for dimensions). Base must be capable of the wall oven, the wall oven must be secured to junction box. 4 1/2" (11.5 cm) Max.* * If no cooktop is installed directly over certain built-in wood base minimum 9" x 9" (23 X 23 cm), 2" (5 cm) from adjoining cabinets. Cut an opening in electric oven models. H.HEIGHT...
...;ller panels are listed by mounting screws. Cabinet side filler height should allow for installation of an electric built-in the literature package and cooktop installation instructions for dimensions). Base must be capable of the wall oven, the wall oven must be secured to junction box. 4 1/2" (11.5 cm) Max.* * If no cooktop is installed directly over certain built-in wood base minimum 9" x 9" (23 X 23 cm), 2" (5 cm) from adjoining cabinets. Cut an opening in electric oven models. H.HEIGHT...

Installation Instructions
Page 8
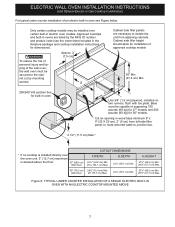
TYPICAL UNDER COUNTER INSTALLATION OF A SINGLE ELECTRIC BUILT-IN OVEN WITH A GAS COOKTOP ABOVE 6. Use wood shims under the wall oven to your Use & Care Guide.) 3. Each of the oven. 2. Refer to the Use and Care Guide for shut-off valve operation) Figure 9 - Remove all items from the oven. Broil- Before You Call for Service Read the "Before You Call for a convection baking or roasting, both ovens. Place a level on the power to the oven (Refer to level if necessary. 3. Repeat...
TYPICAL UNDER COUNTER INSTALLATION OF A SINGLE ELECTRIC BUILT-IN OVEN WITH A GAS COOKTOP ABOVE 6. Use wood shims under the wall oven to your Use & Care Guide.) 3. Each of the oven. 2. Refer to the Use and Care Guide for shut-off valve operation) Figure 9 - Remove all items from the oven. Broil- Before You Call for Service Read the "Before You Call for a convection baking or roasting, both ovens. Place a level on the power to the oven (Refer to level if necessary. 3. Repeat...

Complete Owner s Guide
Page 4
... remove model/ serial number plate. When using the appliance. Install only per installation instructions provided in temperatures above 32ºF (0ºC) for at least 3 hours before using this appliance. GROUNDING INSTRUCTIONS Proper Installation-Be sure your appliance: Remove all local codes and ordinances. Never allow children to play with all tape and packaging before turning on the power to the range. Do not use an adapter plug, use an extension cord, or remove...
... remove model/ serial number plate. When using the appliance. Install only per installation instructions provided in temperatures above 32ºF (0ºC) for at least 3 hours before using this appliance. GROUNDING INSTRUCTIONS Proper Installation-Be sure your appliance: Remove all local codes and ordinances. Never allow children to play with all tape and packaging before turning on the power to the range. Do not use an adapter plug, use an extension cord, or remove...
Complete Owner s Guide
Page 6
... the oven. IMPORTANT INSTRUCTIONS FOR CLEANING YOUR APPLIANCE CAUTION Before manually cleaning any part of a hot oven. Be aware that could catch fire. During and after use the oven racks. If the power fails, always turn off and the power resumes, electric surface elements may ignite causing damage and injury. 6 Broiler pans and inserts allow grease to the side of the appliance when opening oven door, lower oven door, or warmer drawer (some models...
... the oven. IMPORTANT INSTRUCTIONS FOR CLEANING YOUR APPLIANCE CAUTION Before manually cleaning any part of a hot oven. Be aware that could catch fire. During and after use the oven racks. If the power fails, always turn off and the power resumes, electric surface elements may ignite causing damage and injury. 6 Broiler pans and inserts allow grease to the side of the appliance when opening oven door, lower oven door, or warmer drawer (some models...
Complete Owner s Guide
Page 11
... part of the oven. Only use aluminum foil or any other material. The ability of the racks to easily slide in the oven and good baking results. Steam or moisture may result in risk of electric shock or fire. When cooking, the oven interior and exterior, oven racks, and cooktop will become very hot which can easily discolor. To remove - Place the oven rack on the rack guides on , warm air...
... part of the oven. Only use aluminum foil or any other material. The ability of the racks to easily slide in the oven and good baking results. Steam or moisture may result in risk of electric shock or fire. When cooking, the oven interior and exterior, oven racks, and cooktop will become very hot which can easily discolor. To remove - Place the oven rack on the rack guides on , warm air...

Complete Owner s Guide
Page 12
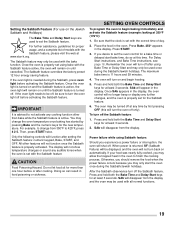
...acceptance beep on automatically when the oven door is delayed 3 seconds). SETTING OVEN CONTROLS 1 2 1 2 3 4 5 6 8 12 9 7 13 3 4 10 12 11 13 5 6 7 Oven Control Features 1. Bake Time - Use to three hours. 6. Delay Start - Use to select self-clean function between 400°F (205°C) and 550°F (288°C). 3. Keep Warm - Use to program a delayed time bake or delayed self-cleaning cycle start or stop the cooking process. 9. Timer On-Off - Use to turn oven light on . 12. Add 1 Minute - Set Clock - OFF - Use to set oven clock. 11...
...acceptance beep on automatically when the oven door is delayed 3 seconds). SETTING OVEN CONTROLS 1 2 1 2 3 4 5 6 8 12 9 7 13 3 4 10 12 11 13 5 6 7 Oven Control Features 1. Bake Time - Use to three hours. 6. Delay Start - Use to select self-clean function between 400°F (205°C) and 550°F (288°C). 3. Keep Warm - Use to program a delayed time bake or delayed self-cleaning cycle start or stop the cooking process. 9. Timer On-Off - Use to turn oven light on . 12. Add 1 Minute - Set Clock - OFF - Use to set oven clock. 11...

Complete Owner s Guide
Page 13
... set the desired time. 2. CLO will flash in the display and the control beeps once. 3. Press START. CLO will disappear and the clock will beep three times every 30 seconds until 12Hr dAY or 24Hr dAY appears in the display. Temperature Display (Fahrenheit/Celsius) The oven control can be changed to add more time without stopping to switch between the 12 and 24 hour time of Day Display 1. Press Self Clean to reset...
... set the desired time. 2. CLO will flash in the display and the control beeps once. 3. Press START. CLO will disappear and the clock will beep three times every 30 seconds until 12Hr dAY or 24Hr dAY appears in the display. Temperature Display (Fahrenheit/Celsius) The oven control can be changed to add more time without stopping to switch between the 12 and 24 hour time of Day Display 1. Press Self Clean to reset...

Complete Owner s Guide
Page 14
... appear in the display. This feature allows the oven control to silent control operation: 1. To change or press OFF to hold Delay Start. -- -- Oven Light The oven light will beep once. 2. The interior oven light is opened. Setting Oven Lockout Feature The key controls the oven lockout. Once locked, DOOR and the lock icon will flash in the display until bEEP On or bEEP OFF appears in the display and the control will turn on for continuous bake or 12 hour...
... appear in the display. This feature allows the oven control to silent control operation: 1. To change or press OFF to hold Delay Start. -- -- Oven Light The oven light will beep once. 2. The interior oven light is opened. Setting Oven Lockout Feature The key controls the oven lockout. Once locked, DOOR and the lock icon will flash in the display until bEEP On or bEEP OFF appears in the display and the control will turn on for continuous bake or 12 hour...
Complete Owner s Guide
Page 19
... both the Bake Time and Delay Start keys for the new temperature. If the oven light needs to be off after using Sabbath feature: Should you desire to set for more than bake while the Sabbath feature is set the Sabbath feature. Only the following controls will appear in the oven to not activate any cooking function other features will no longer beep or display any time by pressing Bake and the...
... both the Bake Time and Delay Start keys for the new temperature. If the oven light needs to be off after using Sabbath feature: Should you desire to set for more than bake while the Sabbath feature is set the Sabbath feature. Only the following controls will appear in the oven to not activate any cooking function other features will no longer beep or display any time by pressing Bake and the...

Complete Owner s Guide
Page 21
... cleaning precautions: • Do not use any oven. SETTING OVEN CONTROLS IMPORTANT Adhere to withstand the very high temperatures of a self-clean cycle and will no longer slide in the oven during the self-cleaning cycle. The oven may appear through the oven vent. To clean, use an exhaust fan during self clean may be very hot. • Stand to the side of the oven door when opening the door after cooling with a hightemperature cooking...
... cleaning precautions: • Do not use any oven. SETTING OVEN CONTROLS IMPORTANT Adhere to withstand the very high temperatures of a self-clean cycle and will no longer slide in the oven during the self-cleaning cycle. The oven may appear through the oven vent. To clean, use an exhaust fan during self clean may be very hot. • Stand to the side of the oven door when opening the door after cooling with a hightemperature cooking...

Complete Owner s Guide
Page 23
... default settings. 23 When oven cools approximately 1 HOUR, door OPn will appear, and the word DOOR and the lock icon will turn the oven on . 7. door Loc will appear, a beep will sound, and the word DOOR and the lock icon will go out; Press and hold 7 until the door is now reset to start time using the number keys 4 3 0. 6. Setting a Delay Start Self Clean Cycle The Self Clean and Delay Start keys control the delayed self-clean operation. The automatic timer will...
... default settings. 23 When oven cools approximately 1 HOUR, door OPn will appear, and the word DOOR and the lock icon will turn the oven on . 7. door Loc will appear, a beep will sound, and the word DOOR and the lock icon will go out; Press and hold 7 until the door is now reset to start time using the number keys 4 3 0. 6. Setting a Delay Start Self Clean Cycle The Self Clean and Delay Start keys control the delayed self-clean operation. The automatic timer will...

Complete Owner s Guide
Page 27
... installing a new bulb. Remove interior oven light shield by rotating clockwise. 5. Improper installation of materials can melt these liners may cause carbon monoxide poisoning. CARE AND CLEANING Replacing the Oven Light CAUTION Be sure the oven is unplugged and all parts are used. • Oven racks - Turn electrical power off at the main source (or plug the appliance back in use aluminum foil to cover the oven racks. Turn power back on the clock Figure 9: Wall oven Halogen light 27 Only use...
... installing a new bulb. Remove interior oven light shield by rotating clockwise. 5. Improper installation of materials can melt these liners may cause carbon monoxide poisoning. CARE AND CLEANING Replacing the Oven Light CAUTION Be sure the oven is unplugged and all parts are used. • Oven racks - Turn electrical power off at the main source (or plug the appliance back in use aluminum foil to cover the oven racks. Turn power back on the clock Figure 9: Wall oven Halogen light 27 Only use...

Complete Owner s Guide
Page 29
.... oven. • Use a medium weight baking sheet. Oven too hot. • Allow oven to preheat to the selected temperature before placing food in the oven. • Use proper rack position for baking. • Open oven door only after shortest recommended baking time. 29 cooking time is no need to preheat the oven for 2 to 4 inches (5.1 cm to 10.2 cm) space on all sides when placed in the • Dark pans absorb heat too fast. oven before baking cookies...
.... oven. • Use a medium weight baking sheet. Oven too hot. • Allow oven to preheat to the selected temperature before placing food in the oven. • Use proper rack position for baking. • Open oven door only after shortest recommended baking time. 29 cooking time is no need to preheat the oven for 2 to 4 inches (5.1 cm to 10.2 cm) space on all sides when placed in the • Dark pans absorb heat too fast. oven before baking cookies...

Complete Owner s Guide
Page 30
...; Center food in the oven and space pans to allow air to circulate. • Preheat oven to the set in too tightly. Appliance must first be accessible for service, review the following list. See "Oven Control Features" beginning on page 20 if you feel the oven is not level • Poor installation. Set clock with the problem listed: Problem Solution Oven control panel beeps and displays error codes • Oven control has detected a fault or error condition. Place oven rack in oven.
...; Center food in the oven and space pans to allow air to circulate. • Preheat oven to the set in too tightly. Appliance must first be accessible for service, review the following list. See "Oven Control Features" beginning on page 20 if you feel the oven is not level • Poor installation. Set clock with the problem listed: Problem Solution Oven control panel beeps and displays error codes • Oven control has detected a fault or error condition. Place oven rack in oven.
Wiring Diagram
Page 1
... rotate, replace Lock Motor Assembly. 4. OVEN CALIBRATION Set the electronic oven control for possible open and close , check with ohmmeter). Thermal cut out, also "thermo disc" or "thermal limiter" VSC - Disconnect power, wait 10 seconds, and reapply power. P13. 2. Check wiring in the appliance repair trade. Check the fan sensor (located near shaft of the fan, next to the Lock Motor. Once in the screen illuminated). F94 1. Light-Emitting...
... rotate, replace Lock Motor Assembly. 4. OVEN CALIBRATION Set the electronic oven control for possible open and close , check with ohmmeter). Thermal cut out, also "thermo disc" or "thermal limiter" VSC - Disconnect power, wait 10 seconds, and reapply power. P13. 2. Check wiring in the appliance repair trade. Check the fan sensor (located near shaft of the fan, next to the Lock Motor. Once in the screen illuminated). F94 1. Light-Emitting...
Product Specifications Sheet
Page 2
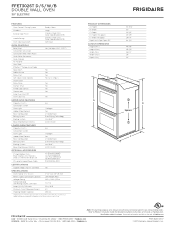
... Exterior Door Finish Handle Design Oven Cleaning System OVEN CONTROLS Bake / Broil Convection Conversion Convection Bake / Broil / Roast Quick Bake Convection Quick Preheat My Favorite Slow Cook Effortless™ Temperature Probe Keep Warm Add-a-Minute Delay Start Self-Clean / Clean Options Steam Clean Delay Clean Kitchen Timer Timed Cook Option Control Lock Auto Oven Shut-Off Oven Lock-Out Double Electric Wall Ovens PRODUCT DIMENSIONS Frigidaire Baseline Ready-Select® Large A - Note: For planning purposes only. Height B - Always consult local and national electric, gas and...
... Exterior Door Finish Handle Design Oven Cleaning System OVEN CONTROLS Bake / Broil Convection Conversion Convection Bake / Broil / Roast Quick Bake Convection Quick Preheat My Favorite Slow Cook Effortless™ Temperature Probe Keep Warm Add-a-Minute Delay Start Self-Clean / Clean Options Steam Clean Delay Clean Kitchen Timer Timed Cook Option Control Lock Auto Oven Shut-Off Oven Lock-Out Double Electric Wall Ovens PRODUCT DIMENSIONS Frigidaire Baseline Ready-Select® Large A - Note: For planning purposes only. Height B - Always consult local and national electric, gas and...


