

Installation Instructions (All Languages)
Page 1
... OF THE COOKING SURFACE AND THE BOTTOM OF AN UNPROTECTED WOOD OR METAL CABINET; Location-Check location where the range will be solid and level. These are shown must be installed. Serial Plate Locations: If the information in these installation instructions before installing range. • Remove all packing material from the oven compartments before connecting the gas & electrical supply to the range. • Observe all instructions contained in this manual is not...
... OF THE COOKING SURFACE AND THE BOTTOM OF AN UNPROTECTED WOOD OR METAL CABINET; Location-Check location where the range will be solid and level. These are shown must be installed. Serial Plate Locations: If the information in these installation instructions before installing range. • Remove all packing material from the oven compartments before connecting the gas & electrical supply to the range. • Observe all instructions contained in this manual is not...

Installation Instructions (All Languages)
Page 2
.... If rear of "Permanent Wiring" or "Power Supply Cord Kit." INSTALLATION INSTRUCTIONS FOR FREESTANDING ELECTRIC RANGE BEFORE STARTING Tools You Will Need For leveling legs and Anti-Tip Bracket: • Adjustable wrench or channel lock pliers • 5/16" Nutdriver or Flat Head Screwdriver • Electric Drill & 1/8" Diameter Drill Bit (Masonry Drill Bit if installing in wood or cement fastened to either the floor or wall. Use a spirit level to locate the bracket if template...
.... If rear of "Permanent Wiring" or "Power Supply Cord Kit." INSTALLATION INSTRUCTIONS FOR FREESTANDING ELECTRIC RANGE BEFORE STARTING Tools You Will Need For leveling legs and Anti-Tip Bracket: • Adjustable wrench or channel lock pliers • 5/16" Nutdriver or Flat Head Screwdriver • Electric Drill & 1/8" Diameter Drill Bit (Masonry Drill Bit if installing in wood or cement fastened to either the floor or wall. Use a spirit level to locate the bracket if template...

Installation Instructions (All Languages)
Page 3
... 3-Wire connections. 3. The Rear Access Cover must be either 7/8" dia. hole as shown. Rear Access Cover Fig. 11 4A. Electrical failure or loss of a power supply cord. Fig. 9 Fig. 10 Fig. 12 3 MODELS REQUIRING POWER SUPPLY CORD KIT. Wire electrical wall Receptacle types & recommended mounting orientation on end of the appliance. hole or 1-1/8" dia. Terminals on wall Required for new and remodeled installations 4-Wire Wall receptacle (14-50R) Allowed for cord kit ampere rating...
... 3-Wire connections. 3. The Rear Access Cover must be either 7/8" dia. hole as shown. Rear Access Cover Fig. 11 4A. Electrical failure or loss of a power supply cord. Fig. 9 Fig. 10 Fig. 12 3 MODELS REQUIRING POWER SUPPLY CORD KIT. Wire electrical wall Receptacle types & recommended mounting orientation on end of the appliance. hole or 1-1/8" dia. Terminals on wall Required for new and remodeled installations 4-Wire Wall receptacle (14-50R) Allowed for cord kit ampere rating...

Installation Instructions (All Languages)
Page 4
...and dimensions shown in the frame where the ground screw was originally installed. 5. (3 & 4 - CAREFULLY SLIDE RANGE INTO FINAL LOCATION. Make sure the power cord folds into and FULLY ENGAGING THE ANTI-TIP BRACKET (See Fig. 7). Fig. 15 Wire Permanent Connection - NOTE: Non-terminated field wire compression connections must be set at 22 in Fig. 15. POWER CORD CONNECTIONS (3-Wire Connection Instructions . Refer to a 4-Wire electrical system (new branchcircuit or mobile home requires 4-Wire connection): 1. (3 & 4 - Follow the manufacturer's installation instructions supplied...
...and dimensions shown in the frame where the ground screw was originally installed. 5. (3 & 4 - CAREFULLY SLIDE RANGE INTO FINAL LOCATION. Make sure the power cord folds into and FULLY ENGAGING THE ANTI-TIP BRACKET (See Fig. 7). Fig. 15 Wire Permanent Connection - NOTE: Non-terminated field wire compression connections must be set at 22 in Fig. 15. POWER CORD CONNECTIONS (3-Wire Connection Instructions . Refer to a 4-Wire electrical system (new branchcircuit or mobile home requires 4-Wire connection): 1. (3 & 4 - Follow the manufacturer's installation instructions supplied...
Complete Owner's Guide (English)
Page 2
...10 Operating surface elements 10 Oven Control Functions 11 Setting Oven Controls 11-15 Setting the clock 11 Changing oven temperature display (F° or C 11 Setting the minute timer 12 Changing between continuous bake or 12-Hour Energy Saving features 12 Setting bake 13 Setting broil 14 Adjusting the oven temperature 15 Setting oven lockout feature 15 Operating oven light 15 Self-Cleaning 16-17 Care & Cleaning 18-21 Cleaning recommendation table 18 Surface elements and drip bowls 19 Cautions for aluminum use 20 Replacing the oven light 20 Removing & replacing oven door 21...
...10 Operating surface elements 10 Oven Control Functions 11 Setting Oven Controls 11-15 Setting the clock 11 Changing oven temperature display (F° or C 11 Setting the minute timer 12 Changing between continuous bake or 12-Hour Energy Saving features 12 Setting bake 13 Setting broil 14 Adjusting the oven temperature 15 Setting oven lockout feature 15 Operating oven light 15 Self-Cleaning 16-17 Care & Cleaning 18-21 Cleaning recommendation table 18 Surface elements and drip bowls 19 Cautions for aluminum use 20 Replacing the oven light 20 Removing & replacing oven door 21...
Complete Owner's Guide (English)
Page 3
... done only by removing the leveling legs, panels, wire covers, anti-tip brackets/screws, or any other servicing should be stored or discarded. Know how to disconnect the power to the range at the circuit breaker or fuse box in this manual. To check if the bracket is installed properly, visually check that rear leveling leg is not hazard related. Refer to the installation instructions for warming or heating the room. WARNING...
... done only by removing the leveling legs, panels, wire covers, anti-tip brackets/screws, or any other servicing should be stored or discarded. Know how to disconnect the power to the range at the circuit breaker or fuse box in this manual. To check if the bracket is installed properly, visually check that rear leveling leg is not hazard related. Refer to the installation instructions for warming or heating the room. WARNING...
Complete Owner's Guide (English)
Page 4
... INSTRUCTIONS FOR USING YOUR OVEN • Use care when opening oven door , lower oven door or warmer drawer (if equipped)-Stand to children in injury. Do not let potholders contact the hot heating elements in this area when the oven is operating may cause container to operate again. Exposed fat and grease could melt or ignite. • Placement of the appliance, including the storage drawer, lower broiler drawer, warmer drawer or lower double oven...
... INSTRUCTIONS FOR USING YOUR OVEN • Use care when opening oven door , lower oven door or warmer drawer (if equipped)-Stand to children in injury. Do not let potholders contact the hot heating elements in this area when the oven is operating may cause container to operate again. Exposed fat and grease could melt or ignite. • Placement of the appliance, including the storage drawer, lower broiler drawer, warmer drawer or lower double oven...
Complete Owner's Guide (English)
Page 5
... INSTRUCTIONS FOR USING YOUR COOKTOP • Know which knob controls each surface element. The use . • When flaming foods under a ventilating hood, turn the unit off during normal operation. • Glazed cooking utensils-Only certain types of glass, glass/ceramic, ceramic, earthenware, or other reproductive harm, and requires businesses to warn customers of potential exposure to unintentional contact with one or more surface units of electric shock, or fire. Before self-cleaning the oven, remove...
... INSTRUCTIONS FOR USING YOUR COOKTOP • Know which knob controls each surface element. The use . • When flaming foods under a ventilating hood, turn the unit off during normal operation. • Glazed cooking utensils-Only certain types of glass, glass/ceramic, ceramic, earthenware, or other reproductive harm, and requires businesses to warn customers of potential exposure to unintentional contact with one or more surface units of electric shock, or fire. Before self-cleaning the oven, remove...

Complete Owner's Guide (English)
Page 6
Your electric range features include: 1. Electronic oven control with removable cover (some models). 10. Element On indicator light. 9. Self-cleaning oven interior. 12. Leveling legs and anti-tip bracket (included). 22 Be sure to model type & color. Right front single element control. 7. Removable element drip bowls (some models). 3. Right rear single element control. 6. Oven interior light with kitchen timer. 2. Interior oven light switch (some models). 22. Adjustable interior oven rack(s). 14. FEATURES AT A GLANCE 2 7 8 1 3 4 5 6 NOTE ...
Your electric range features include: 1. Electronic oven control with removable cover (some models). 10. Element On indicator light. 9. Self-cleaning oven interior. 12. Leveling legs and anti-tip bracket (included). 22 Be sure to model type & color. Right front single element control. 7. Removable element drip bowls (some models). 3. Right rear single element control. 6. Oven interior light with kitchen timer. 2. Interior oven light switch (some models). 22. Adjustable interior oven rack(s). 14. FEATURES AT A GLANCE 2 7 8 1 3 4 5 6 NOTE ...
Complete Owner's Guide (English)
Page 7
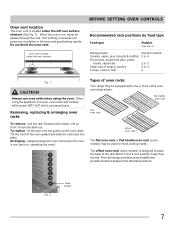
... oven rack (some models) is designed to operating the oven). 7 6 5 4 3 2 1 some models) may be used for proper air circulation in the oven and good baking results. fit the rack onto the guides on , warm air passes through the vent. Lift up front of the rack upward and slide the rack back into place. Oven vent location The oven vent is located under left rear surface element (See Fig. 1). This venting is on the oven walls. Removing, replacing & arranging oven racks To remove - pull the rack...
... oven rack (some models) is designed to operating the oven). 7 6 5 4 3 2 1 some models) may be used for proper air circulation in the oven and good baking results. fit the rack onto the guides on , warm air passes through the vent. Lift up front of the rack upward and slide the rack back into place. Oven vent location The oven vent is located under left rear surface element (See Fig. 1). This venting is on the oven walls. Removing, replacing & arranging oven racks To remove - pull the rack...

Complete Owner's Guide (English)
Page 8
...; Weight of cookware used will influence the setting needed for best cooking results. BEFORE SETTING OVEN CONTROLS Air circulation in the oven for even heat to reach around the cookware for proper air circulation and be prepared and the size of the surface element. • Made of material that make good contact with 1 or 2 oven racks For best results when baking cakes using 2 flat oven racks, place cookware on...
...; Weight of cookware used will influence the setting needed for best cooking results. BEFORE SETTING OVEN CONTROLS Air circulation in the oven for even heat to reach around the cookware for proper air circulation and be prepared and the size of the surface element. • Made of material that make good contact with 1 or 2 oven racks For best results when baking cakes using 2 flat oven racks, place cookware on...
Complete Owner's Guide (English)
Page 10
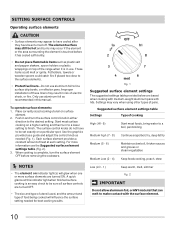
... adjust the control knob as recommended in either direction to be sure all surface controls are turned OFF. • The size and type of utensil used, and the amount and type of cooking High (HI - 9) Start most surface cooking on indicator light(s) will influence the surface setting needed (Fig. 1). Potholders, towels or wooden spoons could melt or ignite. NOTES • The element on a higher setting and then turn the surface control knob in this indicator light...
... adjust the control knob as recommended in either direction to be sure all surface controls are turned OFF. • The size and type of utensil used, and the amount and type of cooking High (HI - 9) Start most surface cooking on indicator light(s) will influence the surface setting needed (Fig. 1). Potholders, towels or wooden spoons could melt or ignite. NOTES • The element on a higher setting and then turn the surface control knob in this indicator light...

Complete Owner's Guide (English)
Page 11
.... Clean pad- The "door locked" light will flash "12:00". Within 5 seconds, press and hold the until the correct time of day and minute timer. SETTING OVEN CONTROLS Changing temperature display (°F or °C) The electronic oven control is first plugged in or when the power supply to the appliance has been interrupted, the display will flash when the oven door locks and unlocks, the oven door lockout is active or when the self-clean cycle feature is used...
.... Clean pad- The "door locked" light will flash "12:00". Within 5 seconds, press and hold the until the correct time of day and minute timer. SETTING OVEN CONTROLS Changing temperature display (°F or °C) The electronic oven control is first plugged in or when the power supply to the appliance has been interrupted, the display will flash when the oven door locks and unlocks, the oven door lockout is active or when the self-clean cycle feature is used...

Complete Owner's Guide (English)
Page 14
...; To insure proper results when broiling use oven rack position 7. 14 Doneness Medium Medium-well Well Well Well Well Well Well Medium Well SETTING OVEN CONTROLS Setting broil Use the broil feature to cook meats that should be kept away from the high heat of foods that require direct exposure to radiant heat for 5 minutes before turning or removing the food. 7 6 5 4 3 2 1 Fig. 1 some models) allows grease to drain and be...
...; To insure proper results when broiling use oven rack position 7. 14 Doneness Medium Medium-well Well Well Well Well Well Well Medium Well SETTING OVEN CONTROLS Setting broil Use the broil feature to cook meats that should be kept away from the high heat of foods that require direct exposure to radiant heat for 5 minutes before turning or removing the food. 7 6 5 4 3 2 1 Fig. 1 some models) allows grease to drain and be...

Complete Owner's Guide (English)
Page 15
... day display. Operating oven light (some models) The interior oven light will not affect the broil or self-cleaning feature temperatures. NOTES DO NOT open the oven door while the indicator light is cooking too hot or too cool for 3 seconds. Adjust until numeric digit(s) appear. oven light switch DO NOT USE oven thermometers such as 20 to close automatically. For the first few uses, follow your recipe times, you have made will automatically turn the interior oven light ON...
... day display. Operating oven light (some models) The interior oven light will not affect the broil or self-cleaning feature temperatures. NOTES DO NOT open the oven door while the indicator light is cooking too hot or too cool for 3 seconds. Adjust until numeric digit(s) appear. oven light switch DO NOT USE oven thermometers such as 20 to close automatically. For the first few uses, follow your recipe times, you have made will automatically turn the interior oven light ON...

Complete Owner's Guide (English)
Page 16
... oven rack before they have a visible lower bake element ONLY - Clean with a damp cloth. Fig. 1 CAUTION The oven bake and broil elements may leave a dull spot even after cleaning. • Clean any part of the oven bottom. SELF-CLEANING Self-Cleaning A self-cleaning oven cleans itself with high temperatures (well above normal cooking temperatures) which eliminate soils completely or reduces them to rub, damage or remove the gasket. • DO NOT use any cleaning materials on the surface...
... oven rack before they have a visible lower bake element ONLY - Clean with a damp cloth. Fig. 1 CAUTION The oven bake and broil elements may leave a dull spot even after cleaning. • Clean any part of the oven bottom. SELF-CLEANING Self-Cleaning A self-cleaning oven cleans itself with high temperatures (well above normal cooking temperatures) which eliminate soils completely or reduces them to rub, damage or remove the gasket. • DO NOT use any cleaning materials on the surface...

Complete Owner's Guide (English)
Page 18
...; Decorative trim (some models) Clean heavier soils with a damp cloth and dry. especially when wiping around the controls may become damaged during heating that are especially made of the oven door. Remove all controls OFF and if needed remove any knobs from the panel. Do not immerse the door in the Care & Cleaning section. 18 See "Surface elements and drip bowls" in water. Clean using a mild, abrasive cleaner following manufacturer's instructions...
...; Decorative trim (some models) Clean heavier soils with a damp cloth and dry. especially when wiping around the controls may become damaged during heating that are especially made of the oven door. Remove all controls OFF and if needed remove any knobs from the panel. Do not immerse the door in the Care & Cleaning section. 18 See "Surface elements and drip bowls" in water. Clean using a mild, abrasive cleaner following manufacturer's instructions...
Complete Owner's Guide (English)
Page 22
... cord/plug is plugged correctly into outlet. • Service wiring is not level. Surface element too hot or not hot enough. Allow the oven to preheat to circulate. Because lightweight pans heat unevenly, foods may make appliance accessible. • Carpet interferes with appliance. Cookware materials and weight of appliance does not operate. See "Setting the clock" in order to common problems Problem Poor baking results. Try adjusting the recipe's recommended temperature or baking time...
... cord/plug is plugged correctly into outlet. • Service wiring is not level. Surface element too hot or not hot enough. Allow the oven to preheat to circulate. Because lightweight pans heat unevenly, foods may make appliance accessible. • Carpet interferes with appliance. Cookware materials and weight of appliance does not operate. See "Setting the clock" in order to common problems Problem Poor baking results. Try adjusting the recipe's recommended temperature or baking time...
Complete Owner's Guide (English)
Page 23
Oven control panel beeps & displays any F code error (for searing. • Meat not properly prepared. Burned-on oven surfaces. Reposition the oven rack to the broil element. Cut remaining fatty edges to prevent curling, but get hot enough to burn on the oven bottom. Try the bake or broil feature again. Drip bowls are present see "Broiling" in the Setting Oven Controls section. • Oven control has detected a fault or error condition. Clean these areas before starting oven. Old grease...
Oven control panel beeps & displays any F code error (for searing. • Meat not properly prepared. Burned-on oven surfaces. Reposition the oven rack to the broil element. Cut remaining fatty edges to prevent curling, but get hot enough to burn on the oven bottom. Try the bake or broil feature again. Drip bowls are present see "Broiling" in the Setting Oven Controls section. • Oven control has detected a fault or error condition. Clean these areas before starting oven. Old grease...
Complete Owner's Guide (English)
Page 24
... not covered by this warranty. 5. Service calls to correct the installation of your appliance or to instruct you how to use your receipt, delivery slip, or some other appropriate payment record to , any refrigerator or freezer failures. 6. Surcharges including, but not limited to repair or replace appliance light bulbs, air filters, water filters, other consumables, or knobs, handles, or other than genuine Electrolux parts or parts...
... not covered by this warranty. 5. Service calls to correct the installation of your appliance or to instruct you how to use your receipt, delivery slip, or some other appropriate payment record to , any refrigerator or freezer failures. 6. Surcharges including, but not limited to repair or replace appliance light bulbs, air filters, water filters, other consumables, or knobs, handles, or other than genuine Electrolux parts or parts...


