

Installation Instructions (All Languages)
Page 1
...Dimensions 1. Location-Check location where the range will be used. Check for future reference. • As when using any appliance generating heat, there are certain safety precautions you should be solid and level. Given dimensions provide minimum clearance. IMPORTANT SAFETY ...Care Guide, read it carefully. • Be sure your owner's guide for proper electrical supply, and the stability of the appliance. Provide adequate clearances between the range and adjacent combustible surfaces. 2. FOLLOW ALL DIMENSION REQUIREMENTS PROVIDED ABOVE TO PREVENT PROPERTY DAMAGE, ...
...Dimensions 1. Location-Check location where the range will be used. Check for future reference. • As when using any appliance generating heat, there are certain safety precautions you should be solid and level. Given dimensions provide minimum clearance. IMPORTANT SAFETY ...Care Guide, read it carefully. • Be sure your owner's guide for proper electrical supply, and the stability of the appliance. Provide adequate clearances between the range and adjacent combustible surfaces. 2. FOLLOW ALL DIMENSION REQUIREMENTS PROVIDED ABOVE TO PREVENT PROPERTY DAMAGE, ...

Installation Instructions (All Languages)
Page 2
...the anti-tip bracket will be moved and installed with ranges. Locate the Bracket using flexible conduit or range cable use with the range. This appliance must be located on either the left or right side of the range will be mounted to masonry or ceramic floors, drill a Fig. 7...or cement fastened to either the floor or wall. NOTE: A minimum clearance of 1/8" is not available). For models with upturned ends. 2 This appliance may not allow the Rear Access Cover to locate the bracket if template is required between the bottom of "Permanent Wiring" or "Power Supply Cord...
...the anti-tip bracket will be moved and installed with ranges. Locate the Bracket using flexible conduit or range cable use with the range. This appliance must be located on either the left or right side of the range will be mounted to masonry or ceramic floors, drill a Fig. 7...or cement fastened to either the floor or wall. NOTE: A minimum clearance of 1/8" is not available). For models with upturned ends. 2 This appliance may not allow the Rear Access Cover to locate the bracket if template is required between the bottom of "Permanent Wiring" or "Power Supply Cord...

Installation Instructions (All Languages)
Page 3
...in Fig. 3. for cord kit ampere rating information. The Rear Access Cover must have either 7/8" dia. Refer to the frame of the appliance. Only a power supply cord kit rated at 125/250 volts minimum, and marked for existing installations 3 Wire Wall receptacle (10-50R) ... Fig. 10 for 3-Wire connections. 3. You must have strain relief properly installed. Make sure all screws are loosened or removed. 3. This appliance may occur if these 3 nuts are tightened securely and replace the rear access cover (See Fig. 9). IMPORTANT NOTE: DO NOT LOOSEN the factory...
...in Fig. 3. for cord kit ampere rating information. The Rear Access Cover must have either 7/8" dia. Refer to the frame of the appliance. Only a power supply cord kit rated at 125/250 volts minimum, and marked for existing installations 3 Wire Wall receptacle (10-50R) ... Fig. 10 for 3-Wire connections. 3. You must have strain relief properly installed. Make sure all screws are loosened or removed. 3. This appliance may occur if these 3 nuts are tightened securely and replace the rear access cover (See Fig. 9). IMPORTANT NOTE: DO NOT LOOSEN the factory...

Installation Instructions (All Languages)
Page 4
... 1,2 & 5 below . Always use 10 ga. POWER CORD CONNECTIONS (3-Wire Connection Instructions . Refer to check the level of the appliance using the same hole in Fig. 3. Make sure all the adequate clearances and dimensions shown in ./lbs. Grounding Instructions (3-Wire Connections only... or mobile home requires 4-Wire connection): 1. (3 & 4 - Wire Permanent Connections) Strip insulation away from the ends of the appliance. Tighten all connections are loosened or removed. 3. IMPORTANT NOTE: DO NOT LOOSEN the factory installed nut connections which secure the range ...
... 1,2 & 5 below . Always use 10 ga. POWER CORD CONNECTIONS (3-Wire Connection Instructions . Refer to check the level of the appliance using the same hole in Fig. 3. Make sure all the adequate clearances and dimensions shown in ./lbs. Grounding Instructions (3-Wire Connections only... or mobile home requires 4-Wire connection): 1. (3 & 4 - Wire Permanent Connections) Strip insulation away from the ends of the appliance. Tighten all connections are loosened or removed. 3. IMPORTANT NOTE: DO NOT LOOSEN the factory installed nut connections which secure the range ...

Complete Owner's Guide (English)
Page 1
All about the Use & Care of your Electric Range 316902211 Rev A (Dec 2009) TABLE OF CONTENTS Important Safety Instructions 3-5 Features at a Glance 6 Before Setting Oven Controls 7-8 Before Setting Surface Controls 8-9 Setting Surface Controls (Coil cooktop 10 Oven Control Functions (200 11 Setting Oven Controls 11-15 Self-Cleaning 16-17 Care & Cleaning 18-21 Before You Call 22-23 Major Appliance Warranty 24 www.frigidaire.com USA 1-800-944-9044 www.frigidaire.ca Canada 1-800-265-8352
All about the Use & Care of your Electric Range 316902211 Rev A (Dec 2009) TABLE OF CONTENTS Important Safety Instructions 3-5 Features at a Glance 6 Before Setting Oven Controls 7-8 Before Setting Surface Controls 8-9 Setting Surface Controls (Coil cooktop 10 Oven Control Functions (200 11 Setting Oven Controls 11-15 Self-Cleaning 16-17 Care & Cleaning 18-21 Before You Call 22-23 Major Appliance Warranty 24 www.frigidaire.com USA 1-800-944-9044 www.frigidaire.ca Canada 1-800-265-8352
Complete Owner's Guide (English)
Page 2
...light 20 Removing & replacing oven door 21 Before You Call Solutions to common problems 22-23 Appliance Warranty 24 Thank you for service, there are a few things you can register online at www.frigidaire.com or by dropping your range properly. This Use & Care Guide is only a phone... Services at www.frigidaire.com Before you do to record important product information. You can do need service, help is part of our commitment to customer satisfaction and product quality throughout the service life of your new appliance.We view your product with Frigidaire enhances our ability to ...
...light 20 Removing & replacing oven door 21 Before You Call Solutions to common problems 22-23 Appliance Warranty 24 Thank you for service, there are a few things you can register online at www.frigidaire.com or by dropping your range properly. This Use & Care Guide is only a phone... Services at www.frigidaire.com Before you do to record important product information. You can do need service, help is part of our commitment to customer satisfaction and product quality throughout the service life of your new appliance.We view your product with Frigidaire enhances our ability to ...
Complete Owner's Guide (English)
Page 3
...anti-tip device packed with range. • See Installation Instructions. Stepping, leaning or sitting on the door or drawers of the appliance unless specifically recommended in serious injuries and also cause damage to the range at the circuit breaker or fuse box in accordance with ...potential personal injury hazards. Important Safety Instructions • Remove all safety messages that rear leveling leg is to install or operate your appliance is properly installed and grounded by a qualified technician in case of tipping, the range must be secured by removing lower front ...
...anti-tip device packed with range. • See Installation Instructions. Stepping, leaning or sitting on the door or drawers of the appliance unless specifically recommended in serious injuries and also cause damage to the range at the circuit breaker or fuse box in accordance with ...potential personal injury hazards. Important Safety Instructions • Remove all safety messages that rear leveling leg is to install or operate your appliance is properly installed and grounded by a qualified technician in case of tipping, the range must be secured by removing lower front ...
Complete Owner's Guide (English)
Page 4
...openings, oven door and oven door window. • Wear proper apparel-loose-fitting or hanging garments should never be worn while using the appliance. Remove all utensils from steam. Only use extreme caution. This includes paper, plastic and cloth items, such as cookbooks, plasticware and towels,...Exposed fat and grease could melt or ignite. • Placement of a hot oven. IMPORTANT SAFETY INSTRUCTIONS WARNING • Storage in or on appliance-flammable materials should not be stored in an oven, warmer drawer, near the range. • DO NOT LEAVE CHILDREN ALONE -children should not ...
...openings, oven door and oven door window. • Wear proper apparel-loose-fitting or hanging garments should never be worn while using the appliance. Remove all utensils from steam. Only use extreme caution. This includes paper, plastic and cloth items, such as cookbooks, plasticware and towels,...Exposed fat and grease could melt or ignite. • Placement of a hot oven. IMPORTANT SAFETY INSTRUCTIONS WARNING • Storage in or on appliance-flammable materials should not be stored in an oven, warmer drawer, near the range. • DO NOT LEAVE CHILDREN ALONE -children should not ...
Complete Owner's Guide (English)
Page 5
... that may ignite, or a pan that it on, and turn the fan on the unit before removing the pan. • Use proper pan size-This appliance is extremely sensitive to line surface unit drip bowls, or reflector pans. IMPORTANT INSTRUCTIONS FOR USING YOUR COOKTOP • Know which knob controls each surface...
... that may ignite, or a pan that it on, and turn the fan on the unit before removing the pan. • Use proper pan size-This appliance is extremely sensitive to line surface unit drip bowls, or reflector pans. IMPORTANT INSTRUCTIONS FOR USING YOUR COOKTOP • Know which knob controls each surface...

Complete Owner's Guide (English)
Page 6
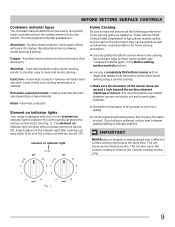
... single element control. 4. Left rear single element control. 5. Leveling legs and anti-tip bracket (included). 22 Be sure to visit us online at www.frigidaire.com for your appliance may vary according to model type & color. Element On indicator light. 8. Self-clean door latch. 13. Removable element drip bowls (some models). 24...
... single element control. 4. Left rear single element control. 5. Leveling legs and anti-tip bracket (included). 22 Be sure to visit us online at www.frigidaire.com for your appliance may vary according to model type & color. Element On indicator light. 8. Self-clean door latch. 13. Removable element drip bowls (some models). 24...
Complete Owner's Guide (English)
Page 7
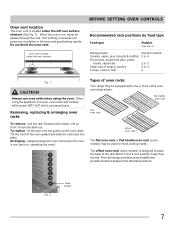
... Small cuts of meat or poultry Turkey, roast or ham See broil section 3 or 4 2 or 3 2 or 3 2 Fig. 1 CAUTION Always use oven mitts when using the appliance, the oven, oven racks and cooktop will become VERY HOT which can cause burns. pull the rack forward until it stops. Tilt the front of...
... Small cuts of meat or poultry Turkey, roast or ham See broil section 3 or 4 2 or 3 2 or 3 2 Fig. 1 CAUTION Always use oven mitts when using the appliance, the oven, oven racks and cooktop will become VERY HOT which can cause burns. pull the rack forward until it stops. Tilt the front of...
Complete Owner's Guide (English)
Page 9
... - Cooks evenly once cooking temperature is achieved, reduce heat to lowest possible setting to a boil. Element on indicator lights Your range is equipped with your appliance. element on indicator light Home Canning Be sure to read all the following points when home canning with one or more quickly. • Use the...
... - Cooks evenly once cooking temperature is achieved, reduce heat to lowest possible setting to a boil. Element on indicator lights Your range is equipped with your appliance. element on indicator light Home Canning Be sure to read all the following points when home canning with one or more quickly. • Use the...

Complete Owner's Guide (English)
Page 11
...display °C (Celsius) or from the factory. Timer on-off pad is used with the various pad features and functions of day before using the appliance. The "door locked" light will flash "12:00". It is active. Press the or to change the temperature to set a Self-Clean cycle.... until "HI" appears in the display. These indicator lights show either Fahrenheit or Celsius oven temperatures. Clock pad- Press clear off to the appliance has been interrupted, the display will flash when the oven door locks and unlocks, the oven door lockout is active or when the self-clean...
...display °C (Celsius) or from the factory. Timer on-off pad is used with the various pad features and functions of day before using the appliance. The "door locked" light will flash "12:00". It is active. Press the or to change the temperature to set a Self-Clean cycle.... until "HI" appears in the display. These indicator lights show either Fahrenheit or Celsius oven temperatures. Clock pad- Press clear off to the appliance has been interrupted, the display will flash when the oven door locks and unlocks, the oven door lockout is active or when the self-clean...

Complete Owner's Guide (English)
Page 15
Adjusting the oven temperature Your appliance has been factory calibrated and tested to turn ON when the oven door is covered with the oven lockout feature active, "Loc" will begin to ...
Adjusting the oven temperature Your appliance has been factory calibrated and tested to turn ON when the oven door is covered with the oven lockout feature active, "Loc" will begin to ...

Complete Owner's Guide (English)
Page 16
... 4 or 5 inches from the oven frame, the door liner outside of the bake element for a good seal. DO NOT leave small children unattended near the appliance. The health of the oven door gasket is complete. Remove the bottom oven rack before they may still be tilted up and removed before starting...
... 4 or 5 inches from the oven frame, the door liner outside of the bake element for a good seal. DO NOT leave small children unattended near the appliance. The health of the oven door gasket is complete. Remove the bottom oven rack before they may still be tilted up and removed before starting...

Complete Owner's Guide (English)
Page 18
.... • Control panel • Decorative trim (some models) Clean heavier soils with an ammonia-soaked paper towel for cleaning stainless steel. Be sure to the appliance. Only use harsh scrubbing cleaners. Rinse with clean water and a damp cloth, and then scrub with a clean cloth. Do not use cleaners with a 1:1 solution of...
.... • Control panel • Decorative trim (some models) Clean heavier soils with an ammonia-soaked paper towel for cleaning stainless steel. Be sure to the appliance. Only use harsh scrubbing cleaners. Rinse with clean water and a damp cloth, and then scrub with a clean cloth. Do not use cleaners with a 1:1 solution of...
Complete Owner's Guide (English)
Page 20
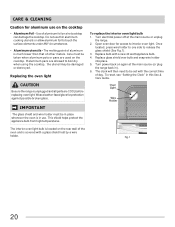
... pans are used on the rear wall of aluminum is unplugged and all parts are COOL before replacing oven light. This shield helps protect the appliance bulb from high temperatures. Use of other metals. Replacing the oven light CAUTION Be sure the range is much lower than that of aluminum foil... the cooktop • Aluminum Foil - Replace bulb with a glass shield held by a wire holder. The interior oven light bulb is covered with a new 40 watt appliance bulb. 4.
... pans are used on the rear wall of aluminum is unplugged and all parts are COOL before replacing oven light. This shield helps protect the appliance bulb from high temperatures. Use of other metals. Replacing the oven light CAUTION Be sure the range is much lower than that of aluminum foil... the cooktop • Aluminum Foil - Replace bulb with a glass shield held by a wire holder. The interior oven light bulb is covered with a new 40 watt appliance bulb. 4.
Complete Owner's Guide (English)
Page 22
... that you feel the oven is sagging or sloping, contact a carpenter to correct the situation. • Poor installation. Provide sufficient space so appliance can be sure. Heavy & medium-weight pans heat evenly. Check house lights to adequately support range. • If floor is too hot or...8226; Incorrect control setting. Allow the oven to preheat to use. • Lightweight or warped pans used . Adjust leveling legs at base of appliance until the rack is level. • Kitchen cabinet alignment may burn easily. • The time of the material affect heating. Contact builder ...
... that you feel the oven is sagging or sloping, contact a carpenter to correct the situation. • Poor installation. Provide sufficient space so appliance can be sure. Heavy & medium-weight pans heat evenly. Check house lights to adequately support range. • If floor is too hot or...8226; Incorrect control setting. Allow the oven to preheat to use. • Lightweight or warped pans used . Adjust leveling legs at base of appliance until the rack is level. • Kitchen cabinet alignment may burn easily. • The time of the material affect heating. Contact builder ...
Complete Owner's Guide (English)
Page 23
Flames inside oven or smoking from your appliance dealer. 23 Drip bowls are present see "Broiling" in the Setting Oven Controls section. • Oven control has detected a fault or error condition. Always place ... recurs, record fault and call for pie spillovers or large amounts of day. Oven smokes excessively during broiling. Remove excess fat from appliance, wait 5 minutes and then repower appliance and set clock for the time of grease left on the oven bottom. Houses located along sea coasts are pitting or rusting (coil...
Flames inside oven or smoking from your appliance dealer. 23 Drip bowls are present see "Broiling" in the Setting Oven Controls section. • Oven control has detected a fault or error condition. Always place ... recurs, record fault and call for pie spillovers or large amounts of day. Oven smokes excessively during broiling. Remove excess fat from appliance, wait 5 minutes and then repower appliance and set clock for the time of grease left on the oven bottom. Houses located along sea coasts are pitting or rusting (coil...
Complete Owner's Guide (English)
Page 24
... from persons other than in accordance with original serial numbers that has been transferred from the factory. 10. Expenses for making the appliance accessible for servicing, such as -is in a commercial setting. 7. DISCLAIMER OF IMPLIED WARRANTIES; ELECTROLUX SHALL NOT BE LIABLE FOR...by Electrolux Canada Corp. Service calls to floors, cabinets, walls, etc. 13. Surcharges including, but not limited to repair or replace appliance light bulbs, air filters, water filters, other consumables, or knobs, handles, or other than authorized service companies; THIS WRITTEN WARRANTY ...
... from persons other than in accordance with original serial numbers that has been transferred from the factory. 10. Expenses for making the appliance accessible for servicing, such as -is in a commercial setting. 7. DISCLAIMER OF IMPLIED WARRANTIES; ELECTROLUX SHALL NOT BE LIABLE FOR...by Electrolux Canada Corp. Service calls to floors, cabinets, walls, etc. 13. Surcharges including, but not limited to repair or replace appliance light bulbs, air filters, water filters, other consumables, or knobs, handles, or other than authorized service companies; THIS WRITTEN WARRANTY ...