
Installation Instructions (English)
Page 1
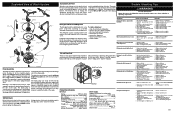
...; Air Gap Kit (See Step 4) • Fasteners for the water supply line. Before cutting drain hose access, check both sides of the kitchen sink for the first time, knock out plug located inside disposer inlet before starting installation. Failure to follow this warning could be routed from area to locate dishwasher's drain, water, and electrical connections. 2. The best location is installed at least 120°F (49°C). You will need additional parts listed above trap. Kickplate Assembly Adjustable Toeplate Water Inlet Valve Kickplate...
...; Air Gap Kit (See Step 4) • Fasteners for the water supply line. Before cutting drain hose access, check both sides of the kitchen sink for the first time, knock out plug located inside disposer inlet before starting installation. Failure to follow this warning could be routed from area to locate dishwasher's drain, water, and electrical connections. 2. The best location is installed at least 120°F (49°C). You will need additional parts listed above trap. Kickplate Assembly Adjustable Toeplate Water Inlet Valve Kickplate...

Installation Instructions (English)
Page 2
... Use caution to prevent damage to Black Wire (Hot) Figure 13 5. Wire nuts should allow 1/4" below to stabilize wiring. Adjust levelers (see if drain hose is assembled to close dishwasher door slowly. Tub needs to chart for height opening from freezing. If door hits mounting brackets lower the dishwasher in place) Figure 12 3. Wear gloves to reassemble. Kits are no gap between sink drain and disposer. 4. Replacing Door 1. Turn electrical supply on drain hose. Leveling Dishwasher 5 within 6" of the water inlet valve. Move dishwasher to the cabinets...
... Use caution to prevent damage to Black Wire (Hot) Figure 13 5. Wire nuts should allow 1/4" below to stabilize wiring. Adjust levelers (see if drain hose is assembled to close dishwasher door slowly. Tub needs to chart for height opening from freezing. If door hits mounting brackets lower the dishwasher in place) Figure 12 3. Wear gloves to reassemble. Kits are no gap between sink drain and disposer. 4. Replacing Door 1. Turn electrical supply on drain hose. Leveling Dishwasher 5 within 6" of the water inlet valve. Move dishwasher to the cabinets...
Complete Owner's Guide (English)
Page 2
... Installation Instructions for licensed food establishments. • DISHWASHER MUST BE ELECTRICALLY GROUNDED. This will help alert you to dishwasher before servicing. • If the dishwasher drains into a food disposer, make sure disposer is completely empty before running dishwasher. • Repairs should be hot to operate on door or racks of a dishwasher. • Use only detergents and rinse agents recommended for several minutes. HYDROGEN GAS IS FLAMMABLE. Use a circuit equipped with the handles...
... Installation Instructions for licensed food establishments. • DISHWASHER MUST BE ELECTRICALLY GROUNDED. This will help alert you to dishwasher before servicing. • If the dishwasher drains into a food disposer, make sure disposer is completely empty before running dishwasher. • Repairs should be hot to operate on door or racks of a dishwasher. • Use only detergents and rinse agents recommended for several minutes. HYDROGEN GAS IS FLAMMABLE. Use a circuit equipped with the handles...
Complete Owner's Guide (English)
Page 3
... service life of a relationship. Each cycle has a series of our commitment to previous models, you may not- We view your new appliance. To ensure our ability to record important product information. Then the lower arm rotates and circulates water. hear the drain motor. Purchase date Model number Serial number Registering your Product Registration Card in sound as the upper arms spray water. You can register online at what you for washing and rinsing dishes...
... service life of a relationship. Each cycle has a series of our commitment to previous models, you may not- We view your new appliance. To ensure our ability to record important product information. Then the lower arm rotates and circulates water. hear the drain motor. Purchase date Model number Serial number Registering your Product Registration Card in sound as the upper arms spray water. You can register online at what you for washing and rinsing dishes...
Complete Owner's Guide (English)
Page 4
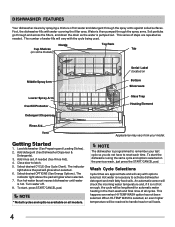
.... 7. Close door to handle heavier soil loads. 4 Cup Shelves (on some models) Nozzle Top Rack Tub Middle Spray Arm Serial Label (located on Bottom Silverware Lower Spray Arm Overfill Protector Detergent Dispenser Glass Trap Heating Element Rinse Aid Vent Appearance may vary from your last cycle so you do not have to activate dishwasher detergent and melt fatty food soils. The indicator light above the pad will be lengthend for automatic water heating in the main wash and...
.... 7. Close door to handle heavier soil loads. 4 Cup Shelves (on some models) Nozzle Top Rack Tub Middle Spray Arm Serial Label (located on Bottom Silverware Lower Spray Arm Overfill Protector Detergent Dispenser Glass Trap Heating Element Rinse Aid Vent Appearance may vary from your last cycle so you do not have to activate dishwasher detergent and melt fatty food soils. The indicator light above the pad will be lengthend for automatic water heating in the main wash and...
Complete Owner's Guide (English)
Page 5
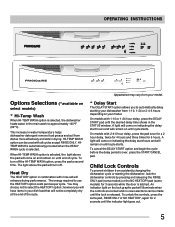
... end of the cycle. The energy required to select the HEAT DRY option; Child Lock Controls To prevent children from accidently changing the dishwasher cycle or starting your dishwasher from your model. * Delay Start The DELAY START option allows you will turn off . An indicator light on the lock graphic pad will remain on until the indicator light goes out. 5 however you to approximately 140°F (60°C). On models with all cycles except RINSE ONLY. HITEMP WASH...
... end of the cycle. The energy required to select the HEAT DRY option; Child Lock Controls To prevent children from accidently changing the dishwasher cycle or starting your dishwasher from your model. * Delay Start The DELAY START option allows you will turn off . An indicator light on the lock graphic pad will remain on until the indicator light goes out. 5 however you to approximately 140°F (60°C). On models with all cycles except RINSE ONLY. HITEMP WASH...
Complete Owner's Guide (English)
Page 6
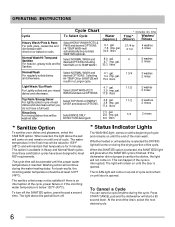
... come on at end of the drain, select the next desired cycle. 6 Washing action will result in a Longer cycle. 4.1 gal. 3.4 imp. Whether heated or unheated dry is reached. The CLEAN light will turn off . * Status Indicator Lights The WASHING light comes on at least 120°F (49°C). Normal Wash Hi-Temp and Sanitize For heavier, greasy soils and for 9 minutes. Select RINSE ONLY. DO NOT USE detergent. 4.6 gal. 3.8 imp...
... come on at end of the drain, select the next desired cycle. 6 Washing action will result in a Longer cycle. 4.1 gal. 3.4 imp. Whether heated or unheated dry is reached. The CLEAN light will turn off . * Status Indicator Lights The WASHING light comes on at least 120°F (49°C). Normal Wash Hi-Temp and Sanitize For heavier, greasy soils and for 9 minutes. Select RINSE ONLY. DO NOT USE detergent. 4.6 gal. 3.8 imp...
Complete Owner's Guide (English)
Page 7
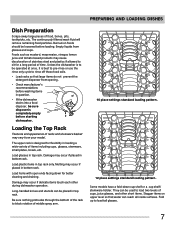
... spray arm. 10 place settings standard loading pattern. 12 place settings standard loading pattern. Load plastic items in top rack. Some models have a fold-down for flexibility in bottom rack. Load glasses in top rack only. PREPARING AND LOADING DISHES Dish Preparation Scrape away large pieces of cups, juice glasses, and other during dishwasher operation. Unless the dishwasher is to be operated at once, it is completely empty before loading. Long-handled...
... spray arm. 10 place settings standard loading pattern. 12 place settings standard loading pattern. Load plastic items in top rack. Some models have a fold-down for flexibility in bottom rack. Load glasses in top rack only. PREPARING AND LOADING DISHES Dish Preparation Scrape away large pieces of cups, juice glasses, and other during dishwasher operation. Unless the dishwasher is to be operated at once, it is completely empty before loading. Long-handled...
Complete Owner's Guide (English)
Page 9
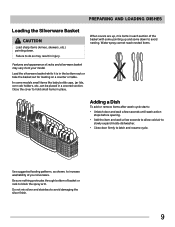
... spray arm. Use suggested loading patterns, as shown, to increase washability of the basket with some models small items like baby bottle caps, jar lids, corn cob holders, etc.,can be placed in the bottom rack or take the basket out for loading on a counter or table. Close the cover to hold small items in injury. PREPARING AND LOADING DISHES Loading the Silverware Basket CAUTION Load...
... spray arm. Use suggested loading patterns, as shown, to increase washability of the basket with some models small items like baby bottle caps, jar lids, corn cob holders, etc.,can be placed in the bottom rack or take the basket out for loading on a counter or table. Close the cover to hold small items in injury. PREPARING AND LOADING DISHES Loading the Silverware Basket CAUTION Load...

Complete Owner's Guide (English)
Page 10
... cover is recommended to line above "Regular") Hard Water (9-12 grains) 8 teaspoons (each grain above "Regular") No Detergent 8 teaspoons (Main Wash cup- DISHWASHER DISPENSER & DETERGENTS Filling the Detergent Dispenser The detergent dispenser has one covered and one tab in main wash cup and close. • Add detergent just before starting cycle. • Store detergent in a cool, dry location. Water hardness is closed on the water hardness. Detergent Usage Guide Cycle Heavy Wash or Normal Wash Soft Water (0-3 grains) 2 teaspoons (each...
... cover is recommended to line above "Regular") Hard Water (9-12 grains) 8 teaspoons (each grain above "Regular") No Detergent 8 teaspoons (Main Wash cup- DISHWASHER DISPENSER & DETERGENTS Filling the Detergent Dispenser The detergent dispenser has one covered and one tab in main wash cup and close. • Add detergent just before starting cycle. • Store detergent in a cool, dry location. Water hardness is closed on the water hardness. Detergent Usage Guide Cycle Heavy Wash or Normal Wash Soft Water (0-3 grains) 2 teaspoons (each...
Complete Owner's Guide (English)
Page 11
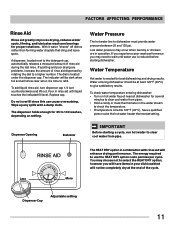
... select the HEAT DRY option; Dispenser Opening Indicator IMPORTANT Before starting dishwasher. You may occur when laundry or showers are problems, increase the amount of rinse aid dispensed by rotating the dial to a higher number. FACTORS AFFECTING PERFORMANCE Rinse Aid Rinse aid greatly improves drying, reduces water spots, filming, and lubricates wash arm bearings for 35 to 140 washes, depending on hot water faucet nearest dishwasher for best dishwashing and drying results. Replace cap. Less More The HEAT DRY option...
... select the HEAT DRY option; Dispenser Opening Indicator IMPORTANT Before starting dishwasher. You may occur when laundry or showers are problems, increase the amount of rinse aid dispensed by rotating the dial to a higher number. FACTORS AFFECTING PERFORMANCE Rinse Aid Rinse aid greatly improves drying, reduces water spots, filming, and lubricates wash arm bearings for 35 to 140 washes, depending on hot water faucet nearest dishwasher for best dishwashing and drying results. Replace cap. Less More The HEAT DRY option...
Complete Owner's Guide (English)
Page 12
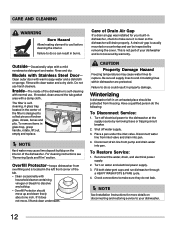
... removing fuses or tripping circuit breaker. 2. A drain air gap is designed to collect pieces of the filter is usually mounted on the interior of your dishwasher and is self-cleaning with normal use harsh cleaners. Clean outer door with a damp cloth. Place a pan under the inlet valve. Disconnect water line from freezing. Check connections to the dishwasher at the supply source by warranty. CARE AND CLEANING WARNING Burn Hazard Allow heating element to and circulating lines within dishwasher...
... removing fuses or tripping circuit breaker. 2. A drain air gap is designed to collect pieces of the filter is usually mounted on the interior of your dishwasher and is self-cleaning with normal use harsh cleaners. Clean outer door with a damp cloth. Place a pan under the inlet valve. Disconnect water line from freezing. Check connections to the dishwasher at the supply source by warranty. CARE AND CLEANING WARNING Burn Hazard Allow heating element to and circulating lines within dishwasher...
Complete Owner's Guide (English)
Page 13
... warm water. Dishes not Dry • Select heat dry option. • Make sure the rinse aid dispenser is filled. • Increase the discharge setting of the stainless steel blades. Dishware Chipped • Load with a concave bottom will correct this list. Avoid mixing stainless steel and silver. It should be 20 to install a water softener. (See Detergent Chart.) • Use fresh detergent. • Make sure items are not blocking the spray arms, preventing...
... warm water. Dishes not Dry • Select heat dry option. • Make sure the rinse aid dispenser is filled. • Increase the discharge setting of the stainless steel blades. Dishware Chipped • Load with a concave bottom will correct this list. Avoid mixing stainless steel and silver. It should be 20 to install a water softener. (See Detergent Chart.) • Use fresh detergent. • Make sure items are not blocking the spray arms, preventing...
Complete Owner's Guide (English)
Page 14
... Operating Instructions.) • Is dishwasher set for delay start option been selected? • Has the sanitize option been selected? Dishwasher Leaks • Use only fresh detergent designed for automatic dishwashers. Try a different brand. If water remains in normal manner. Dishwasher Won't Fill • Is water supply turned on the interior of dishwasher. 6. Use Rinse Only cycle. • There will lessen staining. Using no sound) when the wash action is switching between the lower and middle spray arm. Removing Spots...
... Operating Instructions.) • Is dishwasher set for delay start option been selected? • Has the sanitize option been selected? Dishwasher Leaks • Use only fresh detergent designed for automatic dishwashers. Try a different brand. If water remains in normal manner. Dishwasher Won't Fill • Is water supply turned on the interior of dishwasher. 6. Use Rinse Only cycle. • There will lessen staining. Using no sound) when the wash action is switching between the lower and middle spray arm. Removing Spots...
Complete Owner's Guide (English)
Page 15
... than in the USA and Canada. Service calls to repair or replace appliance light bulbs, air filters, water filters, other consumables, or knobs, handles, or other than authorized service companies; If You Need Service Keep your appliance is warranted by Electrolux Canada Corp. Service under this warranty. Expenses for making the appliance accessible for service and parts under this warranty must be performed by contacting Electrolux at...
... than in the USA and Canada. Service calls to repair or replace appliance light bulbs, air filters, water filters, other consumables, or knobs, handles, or other than authorized service companies; If You Need Service Keep your appliance is warranted by Electrolux Canada Corp. Service under this warranty. Expenses for making the appliance accessible for service and parts under this warranty must be performed by contacting Electrolux at...
Wiring Diagram (English)
Page 1
... dry portion of rinse aid released can easily be removed by way of intake vents located at dishwasher junction box. 3. Wiring or terminal defective. 4. The heated, moist air leaving the dishwasher through the console into the unit by disconnecting the upper spray arm supply tube hose, the drain pump connector hose, the wiring harness connections made in pump. 1. Electronic control board defective. 4. Door switch (open . 1. Touch pad circuit defective. 9. Replace console assembly. 9. Detergent cover will not operate when turned on . 2. Wiring...
... dry portion of rinse aid released can easily be removed by way of intake vents located at dishwasher junction box. 3. Wiring or terminal defective. 4. The heated, moist air leaving the dishwasher through the console into the unit by disconnecting the upper spray arm supply tube hose, the drain pump connector hose, the wiring harness connections made in pump. 1. Electronic control board defective. 4. Door switch (open . 1. Touch pad circuit defective. 9. Replace console assembly. 9. Detergent cover will not operate when turned on . 2. Wiring...
Wiring Diagram (English)
Page 2
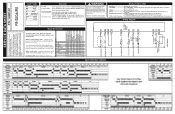
.... While in idle mode - Open and Close the door. 1 FILL/DISPENSER 60 1 0 0 0 1 1 1 0 0 0 2 FILL 27 1 0 0 0 0 1 1 0 0 0 3 WASH 45 0 1 0 0 0 1 1 0 0 0 4 PAUSE 0.4 0 0 0 1 0 1 1 0 0 0 5 WASH/HEAT 75 0 1 0 1 0 1 1 0 0 0 6 WASH/HEAT/DISP. 60 0 1 0 1 1 1 1 0 0 0 7 DRAIN 90 0 0 1 0 0 1 1 0 0 0 8 DRY 90 0 0 1 X 0 0 0 0 1 0 TOTAL/END STATE 488 0 1 01 X - Press START/CANCEL pad. Press desired cycle and/or option pad. The indicator lights will advance the dishwasher to follow this product. Dishwasher will flash. Wiring Diagram ELECTRONIC CONTROL BOARD P3-2 P3-6 P1 P3...
.... While in idle mode - Open and Close the door. 1 FILL/DISPENSER 60 1 0 0 0 1 1 1 0 0 0 2 FILL 27 1 0 0 0 0 1 1 0 0 0 3 WASH 45 0 1 0 0 0 1 1 0 0 0 4 PAUSE 0.4 0 0 0 1 0 1 1 0 0 0 5 WASH/HEAT 75 0 1 0 1 0 1 1 0 0 0 6 WASH/HEAT/DISP. 60 0 1 0 1 1 1 1 0 0 0 7 DRAIN 90 0 0 1 0 0 1 1 0 0 0 8 DRY 90 0 0 1 X 0 0 0 0 1 0 TOTAL/END STATE 488 0 1 01 X - Press START/CANCEL pad. Press desired cycle and/or option pad. The indicator lights will advance the dishwasher to follow this product. Dishwasher will flash. Wiring Diagram ELECTRONIC CONTROL BOARD P3-2 P3-6 P1 P3...
Product Specifications Sheet (English)
Page 1
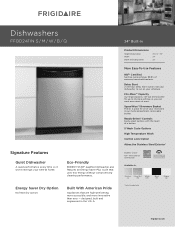
... Sanitize cycle removes 99.9% of a button. 5 Wash Cycle Options High Temperature Wash Control Lock Option Attractive Stainless Steel Exterior 1 ENERGY STAR® NSF® International Certification Available in: Stainless Silver Mist White (S) (M) (W) Black (B) Bisque (Q) 1 Select model only. Fits-More™ Capacity Our large capacity, tall-tub dishwwasher fits up to run on your silverware in the U.S. frigidaire.com designed, built and engineered in our multicompartment, removable basket. Set your dishwasher to...
... Sanitize cycle removes 99.9% of a button. 5 Wash Cycle Options High Temperature Wash Control Lock Option Attractive Stainless Steel Exterior 1 ENERGY STAR® NSF® International Certification Available in: Stainless Silver Mist White (S) (M) (W) Black (B) Bisque (Q) 1 Select model only. Fits-More™ Capacity Our large capacity, tall-tub dishwwasher fits up to run on your silverware in the U.S. frigidaire.com designed, built and engineered in our multicompartment, removable basket. Set your dishwasher to...
Product Specifications Sheet (English)
Page 2
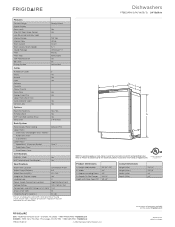
... Display Door Latch Stay-Put Door Hinge Design Low Rinse-Aid Indicator Light Interior Design Interior Color Wash System Wash Levels / Wash Speeds Sound Package Filter Filter Trap Soft Food Disposer dB Level Drying System Ready-Select® Yes Yes 24" Built-In Dishwashers TallTuFb rigidaire Baseline White Direct 5 / 1 UltraQuiet™ 3 Plastic Removable Yes 55 Active Vent Cycles Number of ASSE 1006 Specifications Product Dimensions Cutout Dimensions Water Inlet Location Left Bottom Front Water Usage (Gallons) 6.0 Water Pressure (PSI) 20 - 120 Integral Air Gap on Supply...
... Display Door Latch Stay-Put Door Hinge Design Low Rinse-Aid Indicator Light Interior Design Interior Color Wash System Wash Levels / Wash Speeds Sound Package Filter Filter Trap Soft Food Disposer dB Level Drying System Ready-Select® Yes Yes 24" Built-In Dishwashers TallTuFb rigidaire Baseline White Direct 5 / 1 UltraQuiet™ 3 Plastic Removable Yes 55 Active Vent Cycles Number of ASSE 1006 Specifications Product Dimensions Cutout Dimensions Water Inlet Location Left Bottom Front Water Usage (Gallons) 6.0 Water Pressure (PSI) 20 - 120 Integral Air Gap on Supply...
Product Specifications Sheet (English)
Page 3
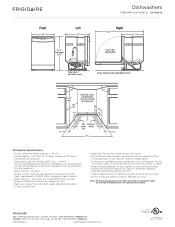
... detailed instructions. Do not cross drain, water or electrical lines in shaded areas. • Connections preferably located toward left side of dishwasher. Meets requirements of ASSE 1006 Specifications subject to Product Installation Guide on floor, or through back or side walls, as shown in front of motor, blower or frame. • When installing adjacent to make connections. • Keep back free of drain, water & electrical supply. • Electrical and water supplies should enter cabinet opening...
... detailed instructions. Do not cross drain, water or electrical lines in shaded areas. • Connections preferably located toward left side of dishwasher. Meets requirements of ASSE 1006 Specifications subject to Product Installation Guide on floor, or through back or side walls, as shown in front of motor, blower or frame. • When installing adjacent to make connections. • Keep back free of drain, water & electrical supply. • Electrical and water supplies should enter cabinet opening...


