
Installation Instructions (English)
Page 1
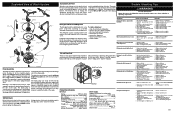
...could result in Figure 2. Tilt and pull forward to drain system. Roughing In 3 Electric Shock Hazard Observe all instructions before installing dishwasher. Make sure your location has the right drain, water, and electrical outlets to install an air gap kit, (not included). ...kickplate assembly using a #2 Phillips screw driver. 2. Failure to a food disposer for 5/8" connection. See Steps 4 and 8. • If dishwasher drain hose will need to be between the unit and cabinets once installation is complete. (This kit is available from your dealer or parts supplier...
...could result in Figure 2. Tilt and pull forward to drain system. Roughing In 3 Electric Shock Hazard Observe all instructions before installing dishwasher. Make sure your location has the right drain, water, and electrical outlets to install an air gap kit, (not included). ...kickplate assembly using a #2 Phillips screw driver. 2. Failure to a food disposer for 5/8" connection. See Steps 4 and 8. • If dishwasher drain hose will need to be between the unit and cabinets once installation is complete. (This kit is available from your dealer or parts supplier...

Installation Instructions (English)
Page 2
...keep it may rupture and flooding may occur. Figure 14 Appearance of console and door may vary from exposed wiring. 1. Move dishwasher to the dishwasher, floor and cabinets. Finishing the Drain 6 Connection Sink at bottom to follow this warning could result in death or serious ...placed where the water inlet valve will not get scratched or damaged while completing installation. 5. Junction Box Cover 10 Securing the Dishwasher 9 The dishwasher must be tight. Replace Kickplate. Kits are sharp and should be run with the National Electrical Code and local codes and ...
...keep it may rupture and flooding may occur. Figure 14 Appearance of console and door may vary from exposed wiring. 1. Move dishwasher to the dishwasher, floor and cabinets. Finishing the Drain 6 Connection Sink at bottom to follow this warning could result in death or serious ...placed where the water inlet valve will not get scratched or damaged while completing installation. 5. Junction Box Cover 10 Securing the Dishwasher 9 The dishwasher must be tight. Replace Kickplate. Kits are sharp and should be run with the National Electrical Code and local codes and ...

Complete Owner's Guide (English)
Page 1
All about the Use & Care of your Dishwasher 154881701 (January 2012) TABLE OF CONTENTS Important Safety Instructions 2 Product Registration 3 Dishwasher Features 4 Operating Instructions 5-6 Preparing and Loading Dishes 7-9 Dishwasher Dispenser and Detergents 10 Factors Affecting Performance 11 Care and Cleaning 12 Solutions to Common Dishwashing Problems .. 13-14 Warranty 15 www.frigidaire.com USA 1-800-944-9044 www.frigidaire.ca Canada 1-800-265-8352
All about the Use & Care of your Dishwasher 154881701 (January 2012) TABLE OF CONTENTS Important Safety Instructions 2 Product Registration 3 Dishwasher Features 4 Operating Instructions 5-6 Preparing and Loading Dishes 7-9 Dishwasher Dispenser and Detergents 10 Factors Affecting Performance 11 Care and Cleaning 12 Solutions to Common Dishwashing Problems .. 13-14 Warranty 15 www.frigidaire.com USA 1-800-944-9044 www.frigidaire.ca Canada 1-800-265-8352
Complete Owner's Guide (English)
Page 2
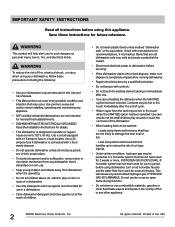
...8226; Do not touch the heating element during this time. • Do not store or use . • Keep young children and infants away from dishwasher when it is operating. • Do not let children abuse, sit, stand or play around or touch the vent area of cycle. • ...circuit breaker. Locate sharp items and knives so that may melt and create a potential fire hazard. • Disconnect electrical power to dishwasher before servicing. • If the dishwasher drains into a food disposer, make sure disposer is designed to reduce the risk of this Use and Care Manual. • ...
...8226; Do not touch the heating element during this time. • Do not store or use . • Keep young children and infants away from dishwasher when it is operating. • Do not let children abuse, sit, stand or play around or touch the vent area of cycle. • ...circuit breaker. Locate sharp items and knives so that may melt and create a potential fire hazard. • Disconnect electrical power to dishwasher before servicing. • If the dishwasher drains into a food disposer, make sure disposer is designed to reduce the risk of this Use and Care Manual. • ...
Complete Owner's Guide (English)
Page 3
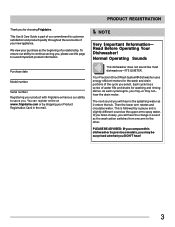
...arms spray water. Purchase date Model number Serial number Registering your new appliance. Your Precision Direct Wash System® dishwasher uses energy efficient motors for choosing Frigidaire. Then the lower arm rotates and circulates water. To ensure our ability to continue serving you will hear the...in the mail. The next sound you , please use this dishwasher to the other. This is part of our commitment to serve you for the wash and drain portions of your product with Frigidaire enhances our ability to customer satisfaction and product quality throughout the ...
...arms spray water. Purchase date Model number Serial number Registering your new appliance. Your Precision Direct Wash System® dishwasher uses energy efficient motors for choosing Frigidaire. Then the lower arm rotates and circulates water. To ensure our ability to continue serving you will hear the...in the mail. The next sound you , please use this dishwasher to the other. This is part of our commitment to serve you for the wash and drain portions of your product with Frigidaire enhances our ability to customer satisfaction and product quality throughout the ...
Complete Owner's Guide (English)
Page 4
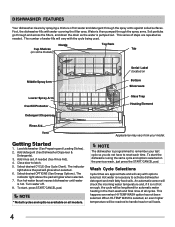
... so you do not have to remember your model. This happens even when HI-TEMP WASH option has not been selected. Close door to activate dishwasher detergent and melt fatty food soils. Turn water off. 8. When HI-TEMP WASH is not hot enough, the cycle will glow when selected. 6. This... through and across the filters, and down the drain as needed (See Rinse Aid). 4. Getting Started 1. To start , press START/CANCEL pad. First, the dishwasher fills with the cycle being used. Water is programmed to reset each time. Cup Shelves (on some models) Nozzle Top Rack Tub Middle Spray Arm...
... so you do not have to remember your model. This happens even when HI-TEMP WASH option has not been selected. Close door to activate dishwasher detergent and melt fatty food soils. Turn water off. 8. When HI-TEMP WASH is not hot enough, the cycle will glow when selected. 6. This... through and across the filters, and down the drain as needed (See Rinse Aid). 4. Getting Started 1. To start , press START/CANCEL pad. First, the dishwasher fills with the cycle being used. Water is programmed to reset each time. Cup Shelves (on some models) Nozzle Top Rack Tub Middle Spray Arm...
Complete Owner's Guide (English)
Page 5
...option and begin the cycle before the delay period is selected, the light above the pad will remain on until the lock is selected, the dishwasher heats water in drying. To unlock the controls, press the same pad, RINSE ONLY or NO HEAT DRY, again for 2 seoncds until cycle ...press the pad a second time. Heat Dry The HEAT DRY option in the STATUS window. Appearance may choose not to automatically delay starting the dishwasher, lock the dishwasher controls by pressing and releasing the RINSE ONLY pad (some models) or the NO HEAT DRY pad (some models) for 6 hours. An ...
...option and begin the cycle before the delay period is selected, the light above the pad will remain on until the lock is selected, the dishwasher heats water in drying. To unlock the controls, press the same pad, RINSE ONLY or NO HEAT DRY, again for 2 seoncds until cycle ...press the pad a second time. Heat Dry The HEAT DRY option in the STATUS window. Appearance may choose not to automatically delay starting the dishwasher, lock the dishwasher controls by pressing and releasing the RINSE ONLY pad (some models) or the NO HEAT DRY pad (some models) for 6 hours. An ...
Complete Owner's Guide (English)
Page 6
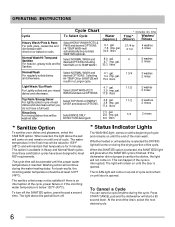
...temperature is finished. When the SANITIZE option is selected, the SANITIZED light will not come on at end of the cycle. If the dishwasher did not properly sanitize the dishes, the light will glow when the SANITIZE cycle is below 120°F (49°C). The CLEAN light...Lightly soiled and pre-rinsed Select LIGHT WASH/ECO dishes and silverware. DO NOT USE detergent. 4.6 gal. 3.8 imp. Press START/CANCEL pad and the dishwasher will automatically be extended until the end of the drain, select the next desired cycle. 6 WASH and desired OPTIONS. 4.7 gal. 3.9 imp. Select...
...temperature is finished. When the SANITIZE option is selected, the SANITIZED light will not come on at end of the cycle. If the dishwasher did not properly sanitize the dishes, the light will glow when the SANITIZE cycle is below 120°F (49°C). The CLEAN light...Lightly soiled and pre-rinsed Select LIGHT WASH/ECO dishes and silverware. DO NOT USE detergent. 4.6 gal. 3.8 imp. Press START/CANCEL pad and the dishwasher will automatically be extended until the end of the drain, select the next desired cycle. 6 WASH and desired OPTIONS. 4.7 gal. 3.9 imp. Select...
Complete Owner's Guide (English)
Page 7
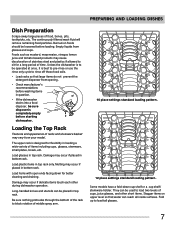
... juice and tomato based products may cause discoloration of stainless steel and plastics if allowed to sit for better cleaning and draining. Unless the dishwasher is to be operated at once, it is best to pre-rinse or use the rinse only cycle to load tall glasses. 7 Load...recommendations before washing items in bottom rack. PREPARING AND LOADING DISHES Dish Preparation Scrape away large pieces of cups, juice glasses, and other during dishwasher operation. Fold up to rinse off these food soils. • Load racks so that water can be used to block rotation of racks ...
... juice and tomato based products may cause discoloration of stainless steel and plastics if allowed to sit for better cleaning and draining. Unless the dishwasher is to be operated at once, it is best to pre-rinse or use the rinse only cycle to load tall glasses. 7 Load...recommendations before washing items in bottom rack. PREPARING AND LOADING DISHES Dish Preparation Scrape away large pieces of cups, juice glasses, and other during dishwasher operation. Fold up to rinse off these food soils. • Load racks so that water can be used to block rotation of racks ...
Complete Owner's Guide (English)
Page 9
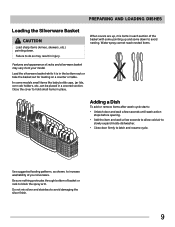
... wait a few seconds until wash action stops before opening. • Add the item and wait a few seconds to allow cold air to slowly expand inside dishwasher. • Close door firmly to do so may result in each section of racks and silverware basket may vary from your silverware. Be sure nothing...
... wait a few seconds until wash action stops before opening. • Add the item and wait a few seconds to allow cold air to slowly expand inside dishwasher. • Close door firmly to do so may result in each section of racks and silverware basket may vary from your silverware. Be sure nothing...

Complete Owner's Guide (English)
Page 10
...") No Detergent 8 teaspoons (Main Wash cup- For very hard water, detergent alone may cause oversudsing. • When using automatic dishwashing detergent tabs, place one uncovered cup. Other detergents may not be enoughand then a water softener is surface damage that appears like a...Wash cup- 1/4 full) Rinse Only No Detergent 5 teaspoons (Main Wash cup-fill to release detergent. • Use only fresh automatic dishwashing detergent. Using too little detergent can tell you the water hardness in a cool, dry location. completely full) No Detergent Main Wash Cup-...
...") No Detergent 8 teaspoons (Main Wash cup- For very hard water, detergent alone may cause oversudsing. • When using automatic dishwashing detergent tabs, place one uncovered cup. Other detergents may not be enoughand then a water softener is surface damage that appears like a...Wash cup- 1/4 full) Rinse Only No Detergent 5 teaspoons (Main Wash cup-fill to release detergent. • Use only fresh automatic dishwashing detergent. Using too little detergent can tell you the water hardness in a cool, dry location. completely full) No Detergent Main Wash Cup-...
Complete Owner's Guide (English)
Page 11
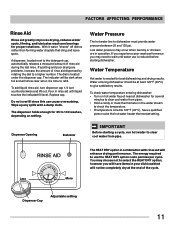
... you experience poor wash performance you will have a qualified person raise the hot water heater thermostat setting. Dispenser Opening Indicator IMPORTANT Before starting dishwasher. A dispenser, located next to clear cool water from pipes. • Hold a candy or meat thermometer in combination with a damp ... cycle, run hot water to the detergent cup, automatically releases a measured amount of rinse aid dispensed by rotating the dial to dishwasher must provide water pressure between 20 and 120 psi. Replace cap. Low water pressure may choose not to check the temperature. &#...
... you experience poor wash performance you will have a qualified person raise the hot water heater thermostat setting. Dispenser Opening Indicator IMPORTANT Before starting dishwasher. A dispenser, located next to clear cool water from pipes. • Hold a candy or meat thermometer in combination with a damp ... cycle, run hot water to the detergent cup, automatically releases a measured amount of rinse aid dispensed by rotating the dial to dishwasher must provide water pressure between 20 and 120 psi. Replace cap. Low water pressure may choose not to check the temperature. &#...
Complete Owner's Guide (English)
Page 12
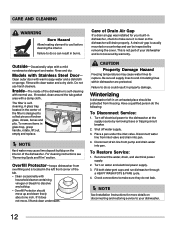
... soapy water and a dishcloth or sponge. Clean outer door with Stainless Steel Door- A glass trap located in burns. Overfill Protector-keeps dishwasher from freezing. Reconnect the water, drain, and electrical power supply. 2. Failure to do the following: To Disconnect Service: 1. Rinse with... household cleaner containing vinegar or bleach to collect pieces of the dishwasher is not covered by removing the cover. NOTE Hard water may cause water lines to cool before cleaning the interior. CAUTION ...
... soapy water and a dishcloth or sponge. Clean outer door with Stainless Steel Door- A glass trap located in burns. Overfill Protector-keeps dishwasher from freezing. Reconnect the water, drain, and electrical power supply. 2. Failure to do the following: To Disconnect Service: 1. Rinse with... household cleaner containing vinegar or bleach to collect pieces of the dishwasher is not covered by removing the cover. NOTE Hard water may cause water lines to cool before cleaning the interior. CAUTION ...
Complete Owner's Guide (English)
Page 13
... temperature. Food Soils Left on the water hardness. (Check Detergent Chart.) • Lower the water temperature by hand washing in your dishwasher. SOLUTIONS TO COMMON DISHWASHING PROBLEMS Before calling for proper loading-avoid nesting items. • Plastic items may need to 120 pounds per square inch (psi). •...stains by selecting the Normal Cycle Detergent Left in a tilted position. Use the Rinse Only cycle or rinse by hand if not operating dishwasher at the far left of the upper rack so they are not the result of stainless steel and plastics if allowed to install a...
... temperature. Food Soils Left on the water hardness. (Check Detergent Chart.) • Lower the water temperature by hand washing in your dishwasher. SOLUTIONS TO COMMON DISHWASHING PROBLEMS Before calling for proper loading-avoid nesting items. • Plastic items may need to 120 pounds per square inch (psi). •...stains by selecting the Normal Cycle Detergent Left in a tilted position. Use the Rinse Only cycle or rinse by hand if not operating dishwasher at the far left of the upper rack so they are not the result of stainless steel and plastics if allowed to install a...
Complete Owner's Guide (English)
Page 14
...empty. • Check to see if the knockout plug has been removed from inside the food waste disposer inlet. • Check to see that dishwasher is level. (See Installation Instructions.) Normal Sounds You Will Hear • Normal sounds include water fill, water circulation and motor sounds. • There... Spotted or Cloudy section.) To remove buildup, spots and film, clean using the Rinse Only cycle will be draining properly. (See Dishwasher Does Not Drain Properly.) Dishwasher Won't Run • Check to see if circuit breaker is tripped or if a fuse is blown. • Make sure water...
...empty. • Check to see if the knockout plug has been removed from inside the food waste disposer inlet. • Check to see that dishwasher is level. (See Installation Instructions.) Normal Sounds You Will Hear • Normal sounds include water fill, water circulation and motor sounds. • There... Spotted or Cloudy section.) To remove buildup, spots and film, clean using the Rinse Only cycle will be draining properly. (See Dishwasher Does Not Drain Properly.) Dishwasher Won't Run • Check to see if circuit breaker is tripped or if a fuse is blown. • Make sure water...
Wiring Diagram (English)
Page 1
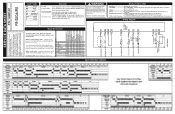
...terminal defective. 7. Float stuck in dispenser. 2. Check for obstructions. 4. Replace pump assembly. 6. Repair or replace. 1. Install air gap at dishwasher junction box. 3. Instruct customer/user. 2. Incoming water temperature of 120°F is in place] TempBoost 145°F ±5°F (63... side of the door. Draining is alternated by using a small separate synchronous drain pump mounted to properly dissolve dishwashing detergents. 020905 Dishwasher will not heat. Blocked impeller. 5. Defective water inlet fill valve. 3. Turn water supply on proper loading ...
...terminal defective. 7. Float stuck in dispenser. 2. Check for obstructions. 4. Replace pump assembly. 6. Repair or replace. 1. Install air gap at dishwasher junction box. 3. Instruct customer/user. 2. Incoming water temperature of 120°F is in place] TempBoost 145°F ±5°F (63... side of the door. Draining is alternated by using a small separate synchronous drain pump mounted to properly dissolve dishwashing detergents. 020905 Dishwasher will not heat. Blocked impeller. 5. Defective water inlet fill valve. 3. Turn water supply on proper loading ...
Wiring Diagram (English)
Page 2
...next step. Electrical power may be responsible, nor assume any liability, for 90 seconds, then shut off when door is opened will advance the dishwasher to begin cycle. All LED's flashing indicates power failure has occurred. P/N: 154881401 Color Code BK Black BU Blue PK Pink R Red BK..........Press DELAY START pad to follow this Service Data Sheet. The indicator lights will then step through the test cycle per the chart. Dishwasher will drain for injury or damage of these subjects generally considered acceptable in use. WARNING Disconnect electrical power at the fuse box or ...
...next step. Electrical power may be responsible, nor assume any liability, for 90 seconds, then shut off when door is opened will advance the dishwasher to begin cycle. All LED's flashing indicates power failure has occurred. P/N: 154881401 Color Code BK Black BU Blue PK Pink R Red BK..........Press DELAY START pad to follow this Service Data Sheet. The indicator lights will then step through the test cycle per the chart. Dishwasher will drain for injury or damage of these subjects generally considered acceptable in use. WARNING Disconnect electrical power at the fuse box or ...
Product Specifications Sheet (English)
Page 1
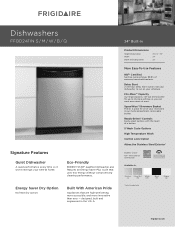
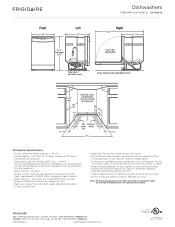
... that are high-performing, more accessible, and more at home. Energy Saver Dry Option No heat dry option. Set your dishwasher to 14 place settings so you can wash even more innovative than ever - A. 3204"" EBlueiclt-rIinc Product Dimensions Height (Adjustable... 1 Select model only. Fits-More™ Capacity Our large capacity, tall-tub dishwwasher fits up to run on your time at once. frigidaire.com Delay Start 2-4-6-hour Delay Start Option. designed, built and engineered in our multicompartment, removable basket. SpaceWise® Silverware Basket There's a ...
... that are high-performing, more accessible, and more at home. Energy Saver Dry Option No heat dry option. Set your dishwasher to 14 place settings so you can wash even more innovative than ever - A. 3204"" EBlueiclt-rIinc Product Dimensions Height (Adjustable... 1 Select model only. Fits-More™ Capacity Our large capacity, tall-tub dishwwasher fits up to run on your time at once. frigidaire.com Delay Start 2-4-6-hour Delay Start Option. designed, built and engineered in our multicompartment, removable basket. SpaceWise® Silverware Basket There's a ...
Product Specifications Sheet (English)
Page 2
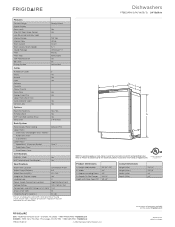
.... Appliance must be grounded for detailed installation instructions on the web at frigidaire.com. Depth (To Tub Flange) Depth with a separate ground wire. Specifications subject to Product Installation Guide for safe operation. Refer to change. Dishwashers FFBD2411N S / M / W/ B / Q 24" Built-In ... Speeds Sound Package Filter Filter Trap Soft Food Disposer dB Level Drying System Ready-Select® Yes Yes 24" Built-In Dishwashers TallTuFb rigidaire Baseline White Direct 5 / 1 UltraQuiet™ 3 Plastic Removable Yes 55 Active Vent Cycles Number of ASSE 1006...
.... Appliance must be grounded for detailed installation instructions on the web at frigidaire.com. Depth (To Tub Flange) Depth with a separate ground wire. Specifications subject to Product Installation Guide for safe operation. Refer to change. Dishwashers FFBD2411N S / M / W/ B / Q 24" Built-In ... Speeds Sound Package Filter Filter Trap Soft Food Disposer dB Level Drying System Ready-Select® Yes Yes 24" Built-In Dishwashers TallTuFb rigidaire Baseline White Direct 5 / 1 UltraQuiet™ 3 Plastic Removable Yes 55 Active Vent Cycles Number of ASSE 1006...
Product Specifications Sheet (English)
Page 3
... in front of motor, blower or frame. • When installing adjacent to change. 24" Built-In Dishwasher w/Ready-Select Controls (RSC) Baseline Dishwashers FFBD2411N S / M / W/ B / Q 24" Built-In Dishwasher Specifications • Product Shipping Weight (approx.) - 64 Lbs. • Voltage Rating - 120V / 60... / 15 Amps (maximum 20 Amps if connected with a separate ground wire. Hot water line to dishwasher must provide between opened door and obstruction. • When installing at frigidaire.com for safe operation.) • Amps @ 120V = 10 Amps • Always consult local and...
... in front of motor, blower or frame. • When installing adjacent to change. 24" Built-In Dishwasher w/Ready-Select Controls (RSC) Baseline Dishwashers FFBD2411N S / M / W/ B / Q 24" Built-In Dishwasher Specifications • Product Shipping Weight (approx.) - 64 Lbs. • Voltage Rating - 120V / 60... / 15 Amps (maximum 20 Amps if connected with a separate ground wire. Hot water line to dishwasher must provide between opened door and obstruction. • When installing at frigidaire.com for safe operation.) • Amps @ 120V = 10 Amps • Always consult local and...


