
Use and Care Manual
Page 1
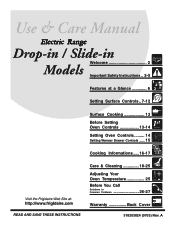
Electric Range Drop-in / Slide-in Models Welcome 2 Important Safety Instructions .. 3-5 Features at a Glance 6 Setting Surface Controls.. 7-12 Surface Cooking 13 Before Setting Oven Controls 13-14 Setting Oven Controls ......... 14 Setting Warmer Drawer Controls ...... 15 Cooking Informations ..... 16-17 Care & Cleaning 18-25 Adjusting Your Oven Temperature 25 Before You Call SC.oo.lm.u.tm.io.on.n.s..Pt.or.o.b.l.e.m..s 26-27 Warranty Back Cover 318203824 (0703) Rev. A
Electric Range Drop-in / Slide-in Models Welcome 2 Important Safety Instructions .. 3-5 Features at a Glance 6 Setting Surface Controls.. 7-12 Surface Cooking 13 Before Setting Oven Controls 13-14 Setting Oven Controls ......... 14 Setting Warmer Drawer Controls ...... 15 Cooking Informations ..... 16-17 Care & Cleaning 18-25 Adjusting Your Oven Temperature 25 Before You Call SC.oo.lm.u.tm.io.on.n.s..Pt.or.o.b.l.e.m..s 26-27 Warranty Back Cover 318203824 (0703) Rev. A

Use and Care Manual
Page 3
... electrical power to the range at the circuit breaker or fuse box in serious burns or other part of a range by a qualified technician to these symbols. DROP-IN MODELS ONLY To reduce • All ranges the risk of tipping of the appliance unless specifically recommended in the drawer (if equipped). appliance is device installed properly, remove packed with CSA C22.1 PART 1-latest edition and local code requirements...
... electrical power to the range at the circuit breaker or fuse box in serious burns or other part of a range by a qualified technician to these symbols. DROP-IN MODELS ONLY To reduce • All ranges the risk of tipping of the appliance unless specifically recommended in the drawer (if equipped). appliance is device installed properly, remove packed with CSA C22.1 PART 1-latest edition and local code requirements...
Use and Care Manual
Page 4
... openings, oven door and window. • Wear Proper Apparel-Loose-fitting or hanging garments should never be careful to the sudden change in a risk of electric shock or fire or a short circuit. • Glazed Cooking Utensils-Only certain types of undersized utensils will become hot enough to operate again. The use your appliance for a long period of pressure may result in temperature...
... openings, oven door and window. • Wear Proper Apparel-Loose-fitting or hanging garments should never be careful to the sudden change in a risk of electric shock or fire or a short circuit. • Glazed Cooking Utensils-Only certain types of undersized utensils will become hot enough to operate again. The use your appliance for a long period of pressure may result in temperature...
Use and Care Manual
Page 5
... oven/drawer (if equipped) is essential for use a broiler pan without its insert. Move birds to accumulate. The oven is operating may ignite causing damage and/or injury. Use potholders and grasp the rack with a damp cloth. SELF-CLEANING OVENS: • Clean in this area when the oven is vented at the front above the oven door (ceramic glass cooktop models) or through the right rear element (coil element models). Oven racks color will change if left in this owner's guide...
... oven/drawer (if equipped) is essential for use a broiler pan without its insert. Move birds to accumulate. The oven is operating may ignite causing damage and/or injury. Use potholders and grasp the rack with a damp cloth. SELF-CLEANING OVENS: • Clean in this area when the oven is vented at the front above the oven door (ceramic glass cooktop models) or through the right rear element (coil element models). Oven racks color will change if left in this owner's guide...

Use and Care Manual
Page 7
... pans. Settings may vary when using other types of the cooktop when it is in and turn the element off before removing the pan. Always turn the surface element control knob to the element. 7 Potholders, towels or wood could melt or ignite. Do not place items such as salt and pepper shakers, spoon holders or plastic wrappings on cooking in this owner's Guide are turned on the surface element. 2. Push in use. Setting...
... pans. Settings may vary when using other types of the cooktop when it is in and turn the element off before removing the pan. Always turn the surface element control knob to the element. 7 Potholders, towels or wood could melt or ignite. Do not place items such as salt and pepper shakers, spoon holders or plastic wrappings on cooking in this owner's Guide are turned on the surface element. 2. Push in use. Setting...
Use and Care Manual
Page 8
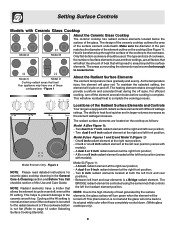
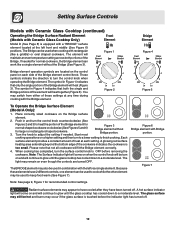
... models); - Locations of these configurations - Two dual 6 or 9 inch radiant element at the HI setting is normal and can occur if the cookware is equipped with radiant surface elements with Ceramic Glass Cooktop Model A Model B About the Ceramic Glass Cooktop The ceramic cooktop has radiant surface elements located below the surface of surface elements in use and their settings, are located on and off the element several minutes before cooking is controlled using the same knob that will be used. The type and size...
... models); - Locations of these configurations - Two dual 6 or 9 inch radiant element at the HI setting is normal and can occur if the cookware is equipped with radiant surface elements with Ceramic Glass Cooktop Model A Model B About the Ceramic Glass Cooktop The ceramic cooktop has radiant surface elements located below the surface of surface elements in use and their settings, are located on and off the element several minutes before cooking is controlled using the same knob that will be used. The type and size...
Use and Care Manual
Page 9
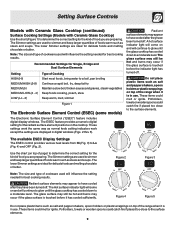
... of foods warm such as normal knob setting indicators work except the settings are preparing. hi OFF hi hi OFF hi The available ESEC Display Settings The ESEC control provides various heat levels from Hi (Fig. 3) to the surface elements. Figure 4 Figure 5 Do not place plastic items such as stews and soups. The Electronic Surface Element Control ("ESEC") feature includes digital display windows. The Hot surface indicator light will come on the cooktop. Potholders, towels...
... of foods warm such as normal knob setting indicators work except the settings are preparing. hi OFF hi hi OFF hi The available ESEC Display Settings The ESEC control provides various heat levels from Hi (Fig. 3) to the surface elements. Figure 4 Figure 5 Do not place plastic items such as stews and soups. The Electronic Surface Element Control ("ESEC") feature includes digital display windows. The Hot surface indicator light will come on the cooktop. Potholders, towels...
Use and Care Manual
Page 10
... setting. ESEC Lockout Feature ( - - ) The ESEC feature will reset the surface controls. ESEC Error Indicator Message (Er) An error message will remain HOT for recommended control settings. This will not operate during a Self-Clean cycle. Note: See Figure 1 on page 9 for some models) Hot Surface Indicator Lights After using any of the radiant element positions the cooktop will appear in any of these procedures, contact an authorized servicer for the surface heating area. 3. After turning any display after a power...
... setting. ESEC Lockout Feature ( - - ) The ESEC feature will reset the surface controls. ESEC Error Indicator Message (Er) An error message will remain HOT for recommended control settings. This will not operate during a Self-Clean cycle. Note: See Figure 1 on page 9 for some models) Hot Surface Indicator Lights After using any of the radiant element positions the cooktop will appear in any of these procedures, contact an authorized servicer for the surface heating area. 3. After turning any display after a power...
Use and Care Manual
Page 11
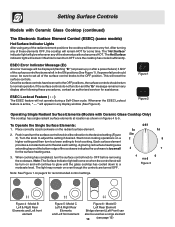
... to adjust the setting if needed. The glass surface may remain on even though the controls are used to finish cooking. Model B Figure 10 - Place correctly sized cookware on a higher setting and then turn the control knob counterclockwise (See Figure 2) for smaller cookware or clockwise (See Figure 7) for recommended control settings. Model A Figure 9 - Setting Surface Controls Models with Ceramic Glass Cooktop (continued) Operating the Dual Surface Radiant Element (Models with Ceramic Glass Cooktop Only) Model A is equipped with a dual radiant surface element located at...
... to adjust the setting if needed. The glass surface may remain on even though the controls are used to finish cooking. Model B Figure 10 - Place correctly sized cookware on a higher setting and then turn the control knob counterclockwise (See Figure 2) for smaller cookware or clockwise (See Figure 7) for recommended control settings. Model A Figure 9 - Setting Surface Controls Models with Ceramic Glass Cooktop (continued) Operating the Dual Surface Radiant Element (Models with Ceramic Glass Cooktop Only) Model A is equipped with a dual radiant surface element located at...
Use and Care Manual
Page 12
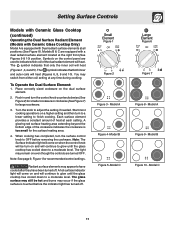
... settings at any time during cooking with Bridge portion. The symbol in combination with rectangular (like a single element without Bridge portion. Note: The Surface Indicator light will come on even though the controls are located on the control panel on and will be turn the surface control knob to a moderate level. Figure 6 Bridge element with the Bridge element. Radiant surface elements may also be used in Figure 1 indicates that not all cookware will heat...
... settings at any time during cooking with Bridge portion. The symbol in combination with rectangular (like a single element without Bridge portion. Note: The Surface Indicator light will come on even though the controls are located on the control panel on and will be turn the surface control knob to a moderate level. Figure 6 Bridge element with the Bridge element. Radiant surface elements may also be used in Figure 1 indicates that not all cookware will heat...
Use and Care Manual
Page 16
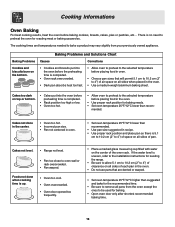
... baking time. 16 Foods not done when cooking time is no need to preheat the oven for roasting meat or baking casseroles. mended. Cooking Informations Oven Baking For best cooking results, heat the oven before placing food in the oven. • Use proper rack position for baking needs. • Set oven temperature 25°F/12°C lower than recommended. • Use pan size suggested and bake for the recommended time. • Be sure to remove all pans...
... baking time. 16 Foods not done when cooking time is no need to preheat the oven for roasting meat or baking casseroles. mended. Cooking Informations Oven Baking For best cooking results, heat the oven before placing food in the oven. • Use proper rack position for baking needs. • Set oven temperature 25°F/12°C lower than recommended. • Use pan size suggested and bake for the recommended time. • Be sure to remove all pans...
Use and Care Manual
Page 17
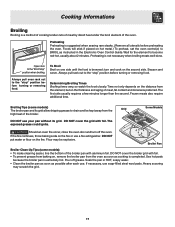
... ignite. Use hot pads because the broiler pan is a method of cooking tender cuts of meat by direct heat under the broil element of the broiler. Some Models Should an oven fire occur, close the oven door and turn and cook on the fire or use soap-filled steel wool pads. Open door to become red-hot, usually about 2 minutes. DO NOT cover the broiler grid with foil. Preheating Preheating is completed. The first side usually requires...
... ignite. Use hot pads because the broiler pan is a method of cooking tender cuts of meat by direct heat under the broil element of the broiler. Some Models Should an oven fire occur, close the oven door and turn and cook on the fire or use soap-filled steel wool pads. Open door to become red-hot, usually about 2 minutes. DO NOT cover the broiler grid with foil. Preheating Preheating is completed. The first side usually requires...
Use and Care Manual
Page 18
... Broiler Pan and Insert(some models) Surface elements can be cleaned with a soapy scouring pad will scratch the surface. Clean the stainless with a soft clean cloth. To remove surface element and drip bowls, follow the instructions under General Cleaning. Rinse with a clean cloth. If necessary, cover difficult spots with clean water; The surface elements clean themselves when they will remove most spots. NEVER IMMERSE A SURFACE ELEMENT IN WATER. grasp firmly and pull straight off . To replace knobs...
... Broiler Pan and Insert(some models) Surface elements can be cleaned with a soapy scouring pad will scratch the surface. Clean the stainless with a soft clean cloth. To remove surface element and drip bowls, follow the instructions under General Cleaning. Rinse with a clean cloth. If necessary, cover difficult spots with clean water; The surface elements clean themselves when they will remove most spots. NEVER IMMERSE A SURFACE ELEMENT IN WATER. grasp firmly and pull straight off . To replace knobs...

Use and Care Manual
Page 20
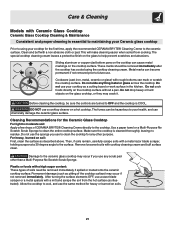
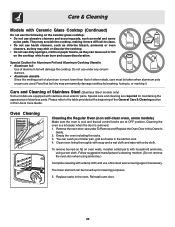
... warm, soapy water. 3. Turn off all surface units and remove all soil and cream are removed. COOKTOP CLEANING / POLISHING CREAM can be hazardous to maintaining your cooktop surface. Care & Cleaning Cooktop Cleaning- A lift-up to rinse off spills and spatters using a clean paper towel or a clean cloth with the cooktop cleaning cream leaves a protective coating which helps in its raised position. Daily Cleaning For normal soil: 1. Be sure to support...
... warm, soapy water. 3. Turn off all surface units and remove all soil and cream are removed. COOKTOP CLEANING / POLISHING CREAM can be hazardous to maintaining your cooktop surface. Care & Cleaning Cooktop Cleaning- A lift-up to rinse off spills and spatters using a clean paper towel or a clean cloth with the cooktop cleaning cream leaves a protective coating which helps in its raised position. Daily Cleaning For normal soil: 1. Be sure to support...
Use and Care Manual
Page 21
... OFF and the cooktop is COOL. After turning the surface elements OFF, use the same method for the first time, apply the recommended CERAMA BRYTE® Cleaning Creme to the ceramic glass cooktop may crack it. This will make cleaning easier when soiled from the hot surface (as a cutting board or work surface in the kitchen. Make sure the cooktop is cleaned thoroughly, leaving no residue. Remove loosened soils with...
... OFF and the cooktop is COOL. After turning the surface elements OFF, use the same method for the first time, apply the recommended CERAMA BRYTE® Cleaning Creme to the ceramic glass cooktop may crack it. This will make cleaning easier when soiled from the hot surface (as a cutting board or work surface in the kitchen. Make sure the cooktop is cleaned thoroughly, leaving no residue. Remove loosened soils with...
Use and Care Manual
Page 22
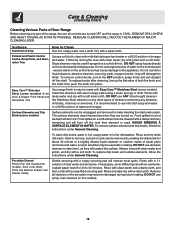
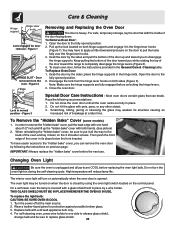
... Remove and Replace the Oven Door in this Owner's Guide. 2. Oven Cleaning Cleaning the Regular Oven (non self-clean oven, some nylon pads. Cleaning the oven is a lot easier when the door is cool and that of aluminum foil will damage the cooktop. The lower element can be taken when aluminum pots or pans are et OFF position. Special Caution for maintaining the appearance of the General Care & Cleaning section in this Use & Care Guide...
... Remove and Replace the Oven Door in this Owner's Guide. 2. Oven Cleaning Cleaning the Regular Oven (non self-clean oven, some nylon pads. Cleaning the oven is a lot easier when the door is cool and that of aluminum foil will damage the cooktop. The lower element can be taken when aluminum pots or pans are et OFF position. Special Caution for maintaining the appearance of the General Care & Cleaning section in this Use & Care Guide...
Use and Care Manual
Page 24
... door toward the range to the "hidden bake" cover, you while rotating the top of breakage at the main source. 2. Most oven doors contain glass that can remove the oven door by using the oven light switch located on previous page. Scratching, hitting, jarring or stressing the glass may weaken its place below the front bracket. On a self clean oven the lamp is opened. Turn the power off at a later time. Figure 3 Removing and Replacing the Oven Door...
... door toward the range to the "hidden bake" cover, you while rotating the top of breakage at the main source. 2. Most oven doors contain glass that can remove the oven door by using the oven light switch located on previous page. Scratching, hitting, jarring or stressing the glass may weaken its place below the front bracket. On a self clean oven the lamp is opened. Turn the power off at a later time. Figure 3 Removing and Replacing the Oven Door...
Use and Care Manual
Page 25
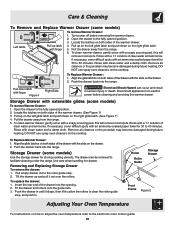
... to adjust the oven temperature refer to clear the roller guide stop . 2. Align the glide latches on both sides of the warmer drawer. (See Figure 1) 3. Turn power off before cleaning and servicing the warmer drawer. Pull down latch with a 1:1 solution of clear water and ammonia. Storage Drawer (some models) Use the storage drawer for 30 to facilitate cleaning under the range. Care & Cleaning To Remove and Replace Warmer Drawer (some models) To remove Warmer Drawer: 1. Locate...
... to adjust the oven temperature refer to clear the roller guide stop . 2. Align the glide latches on both sides of the warmer drawer. (See Figure 1) 3. Turn power off before cleaning and servicing the warmer drawer. Pull down latch with a 1:1 solution of clear water and ammonia. Storage Drawer (some models) Use the storage drawer for 30 to facilitate cleaning under the range. Care & Cleaning To Remove and Replace Warmer Drawer (some models) To remove Warmer Drawer: 1. Locate...
Use and Care Manual
Page 26
... appliance easily. Among the many features is not level. (1) Poor installation. Use only flat, evenly balanced, medium or heavyweight cookware. weight pans heat evenly. OCCURRENCE POSSIBLE CAUSE/SOLUTION Range is a full time oven circuit diagnostics system. See Changing Oven Light in this Before you Call checklist. (2) Incorrect control setting. Ceramic Glass Cooktop Models" section under "Entire Range or Oven Does Not Operate" in this owner's Guide for the surface unit to a variety of the...
... appliance easily. Among the many features is not level. (1) Poor installation. Use only flat, evenly balanced, medium or heavyweight cookware. weight pans heat evenly. OCCURRENCE POSSIBLE CAUSE/SOLUTION Range is a full time oven circuit diagnostics system. See Changing Oven Light in this Before you Call checklist. (2) Incorrect control setting. Ceramic Glass Cooktop Models" section under "Entire Range or Oven Does Not Operate" in this owner's Guide for the surface unit to a variety of the...

Use and Care Manual
Page 27
...a ceramic-glass cooktop cleaning cream. Remove the racks and other utensils from the oven, and from water and food. OCCURRENCE Metalmarks. Use a ceramic-glass cooktop cleaning cream to damage the oven seal. (1) Excessive spillovers in the Electronic Oven Control guide. (1) A cooling fan may continue to a new home, it . This is too hot or cool, see "Adjusting Oven Temperature" in oven. Follow instructions under "Setting Oven Controls". (2) Make sure oven is used. "Cooktop Cleaning - Also attach the electric power cord in the Electronic Oven Control Guide. (1) Self-cleaning...
...a ceramic-glass cooktop cleaning cream. Remove the racks and other utensils from the oven, and from water and food. OCCURRENCE Metalmarks. Use a ceramic-glass cooktop cleaning cream to damage the oven seal. (1) Excessive spillovers in the Electronic Oven Control guide. (1) A cooling fan may continue to a new home, it . This is too hot or cool, see "Adjusting Oven Temperature" in oven. Follow instructions under "Setting Oven Controls". (2) Make sure oven is used. "Cooktop Cleaning - Also attach the electric power cord in the Electronic Oven Control Guide. (1) Self-cleaning...


