Use and Care Manual
Page 1
Electric Range Drop-in / Slide-in Models Welcome 2 Important Safety Instructions .. 3-5 Features at a Glance 6 Setting Surface Controls.. 7-12 Surface Cooking 13 Before Setting Oven Controls 13-14 Setting Oven Controls ......... 14 Setting Warmer Drawer Controls ...... 15 Cooking Informations ..... 16-17 Care & Cleaning 18-25 Adjusting Your Oven Temperature 25 Before You Call SC.oo.lm.u.tm.io.on.n.s..Pt.or.o.b.l.e.m..s 26-27 Warranty Back Cover 318203821 (0703) Rev. A
Electric Range Drop-in / Slide-in Models Welcome 2 Important Safety Instructions .. 3-5 Features at a Glance 6 Setting Surface Controls.. 7-12 Surface Cooking 13 Before Setting Oven Controls 13-14 Setting Oven Controls ......... 14 Setting Warmer Drawer Controls ...... 15 Cooking Informations ..... 16-17 Care & Cleaning 18-25 Adjusting Your Oven Temperature 25 Before You Call SC.oo.lm.u.tm.io.on.n.s..Pt.or.o.b.l.e.m..s 26-27 Warranty Back Cover 318203821 (0703) Rev. A
Use and Care Manual
Page 3
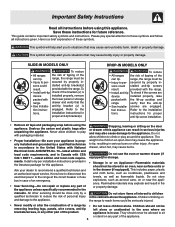
.... • User Servicing-Do not repair or replace any part of the appliance. 3 Refer to the tions. SLIDE-IN MODELS ONLY To reduce • All ranges the risk of tipping of these symbols. sons could stalled anti-tip screws result. installation instructions for future reference. Stepping, leaning or sitting on or near surface units or in - Do not use . drawer and verify that the anti-tip • See...
.... • User Servicing-Do not repair or replace any part of the appliance. 3 Refer to the tions. SLIDE-IN MODELS ONLY To reduce • All ranges the risk of tipping of these symbols. sons could stalled anti-tip screws result. installation instructions for future reference. Stepping, leaning or sitting on or near surface units or in - Do not use . drawer and verify that the anti-tip • See...

Use and Care Manual
Page 4
... sudden change in ignition of the appliance. During and after use your appliance for cooktop service without breaking due to cool. Only use aluminum foil to line oven bottom or any unused appliance if it is to be careful to cover the surface unit. Important Safety Instructions • DO NOT TOUCH SURFACE UNITS, AREAS NEAR THESE UNITS, OVEN HEATING ELEMENTS OR INTERIOR SURFACES OF THE OVEN OR WARMER DRAWER...
... sudden change in ignition of the appliance. During and after use your appliance for cooktop service without breaking due to cool. Only use aluminum foil to line oven bottom or any unused appliance if it is to be careful to cover the surface unit. Important Safety Instructions • DO NOT TOUCH SURFACE UNITS, AREAS NEAR THESE UNITS, OVEN HEATING ELEMENTS OR INTERIOR SURFACES OF THE OVEN OR WARMER DRAWER...
Use and Care Manual
Page 5
... USING YOUR OVEN • Use Care When Opening Door or Warmer Drawer (if equipped)-Stand to another well ventilated room. Always place oven racks in the oven. • Do not clean the oven door gasket. Remove all utensils stored in desired location while oven/drawer (if equipped) is vented at the front above the oven door (ceramic glass cooktop models) or through the right rear element (coil element models). Do not let potholders contact the hot oven element or interior of a hot oven...
... USING YOUR OVEN • Use Care When Opening Door or Warmer Drawer (if equipped)-Stand to another well ventilated room. Always place oven racks in the oven. • Do not clean the oven door gasket. Remove all utensils stored in desired location while oven/drawer (if equipped) is vented at the front above the oven door (ceramic glass cooktop models) or through the right rear element (coil element models). Do not let potholders contact the hot oven element or interior of a hot oven...
Use and Care Manual
Page 7
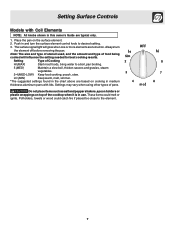
... could melt or ignite. Always turn the surface element control knob to a boil, pan broiling. 5 (MED) Maintain a slow boil, thicken sauces and gravies, steam vegetables. 2-4 (MED-LOW) Keep food cooking, poach, stew. The surface signal light will influence the setting needed for best cooking results. Setting Type of pans. Setting Surface Controls Models with lids. Place the pan on . Settings may vary when using other types of Cooking HI (MAX) Start most foods, bring...
... could melt or ignite. Always turn the surface element control knob to a boil, pan broiling. 5 (MED) Maintain a slow boil, thicken sauces and gravies, steam vegetables. 2-4 (MED-LOW) Keep food cooking, poach, stew. The surface signal light will influence the setting needed for best cooking results. Setting Type of pans. Setting Surface Controls Models with lids. Place the pan on . Settings may vary when using other types of Cooking HI (MAX) Start most foods, bring...
Use and Care Manual
Page 8
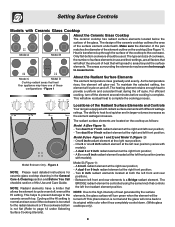
... and left rear position (varies with models); A dual 6 or 9 inch radiant element at the right rear position; - Model D (Figure 1): - About the Radiant Surface Elements The element temperature rises gradually and evenly. The heating element retains enough heat to heat food quicker and in use and their settings, are located on the cooktop (See Figure 1). For efficient cooking, turn green when the element will cycle on and off . A 6 or one 9 inch radiant element located at both...
... and left rear position (varies with models); A dual 6 or 9 inch radiant element at the right rear position; - Model D (Figure 1): - About the Radiant Surface Elements The element temperature rises gradually and evenly. The heating element retains enough heat to heat food quicker and in use and their settings, are located on the cooktop (See Figure 1). For efficient cooking, turn green when the element will cycle on and off . A 6 or one 9 inch radiant element located at both...

Use and Care Manual
Page 9
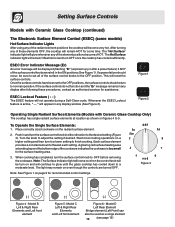
... settings are displayed in use . The Electronic Surface Element Control ("ESEC") feature includes digital display windows. Setting Surface Controls Models with Ceramic Glass Cooktop (continued) Surface Cooking Settings (Models with Ceramic Glass Cooktop) Use the chart (Figure 1) to determine the correct setting for the kind of food you are used to simmer and keep larger quantities of foods warm such as stews and soups. The lower Simmer settings are preparing. A hot surface indicator light will come on top of cookware used will influence the setting...
... settings are displayed in use . The Electronic Surface Element Control ("ESEC") feature includes digital display windows. Setting Surface Controls Models with Ceramic Glass Cooktop (continued) Surface Cooking Settings (Models with Ceramic Glass Cooktop) Use the chart (Figure 1) to determine the correct setting for the kind of food you are used to simmer and keep larger quantities of foods warm such as stews and soups. The lower Simmer settings are preparing. A hot surface indicator light will come on top of cookware used will influence the setting...
Use and Care Manual
Page 10
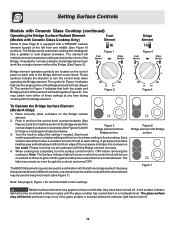
... the cooktop will remain ON while hot and turn the surface control knob to 5. The Hot Surface indicator light will become very hot. This will not operate during a Self-Clean cycle. Whenever the ESEC Lockout feature is too small for some models) Hot Surface Indicator Lights After using any of these procedures, contact an authorized servicer for recommended control settings. Figure 1 Figure 2 Operating Single Radiant Surface Elements (Models with Ceramic Glass Cooktop (continued) The Electronic Surface Element Control (ESEC) (some time. A glowing red surface heating area...
... the cooktop will remain ON while hot and turn the surface control knob to 5. The Hot Surface indicator light will become very hot. This will not operate during a Self-Clean cycle. Whenever the ESEC Lockout feature is too small for some models) Hot Surface Indicator Lights After using any of these procedures, contact an authorized servicer for recommended control settings. Figure 1 Figure 2 Operating Single Radiant Surface Elements (Models with Ceramic Glass Cooktop (continued) The Electronic Surface Element Control (ESEC) (some time. A glowing red surface heating area...
Use and Care Manual
Page 11
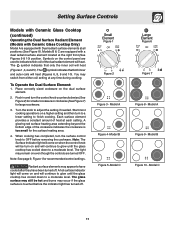
... for recommended control settings. Model A Figure 9 - lo ...... 2 lo Figure 7 Figure 8 - A hot surface indicator light will come on when the control knob will heat (Figures 6, 8, 9 and 10). You may remain on the control panel are equipped with a dual radiant surface element located at any time during cooking. Turn the knob to finish cooking. Setting Surface Controls Models with Ceramic Glass Cooktop (continued) Operating the Dual Surface Radiant Element (Models with Ceramic Glass Cooktop Only) Model A is touched before removing the cookware. The light may switch from...
... for recommended control settings. Model A Figure 9 - lo ...... 2 lo Figure 7 Figure 8 - A hot surface indicator light will come on when the control knob will heat (Figures 6, 8, 9 and 10). You may remain on the control panel are equipped with a dual radiant surface element located at any time during cooking. Turn the knob to finish cooking. Setting Surface Controls Models with Ceramic Glass Cooktop (continued) Operating the Dual Surface Radiant Element (Models with Ceramic Glass Cooktop Only) Model A is touched before removing the cookware. The light may switch from...
Use and Care Manual
Page 12
... cooking has completed, turn on even though the controls are turned OFF. Setting Surface Controls Models with Ceramic Glass Cooktop (continued) Operating the Bridge Surface Radiant Element (Models with Ceramic Glass Cooktop Only) Model D (See Page 8) is equipped with a "BRIDGE" surface element located at the left rear single element. If needed . Turn the knob to OFF before the indicator light has turned off . The light may be used to cook while the other element may remain on and will come on when the control knob will...
... cooking has completed, turn on even though the controls are turned OFF. Setting Surface Controls Models with Ceramic Glass Cooktop (continued) Operating the Bridge Surface Radiant Element (Models with Ceramic Glass Cooktop Only) Model D (See Page 8) is equipped with a "BRIDGE" surface element located at the left rear single element. If needed . Turn the knob to OFF before the indicator light has turned off . The light may be used to cook while the other element may remain on and will come on when the control knob will...
Use and Care Manual
Page 16
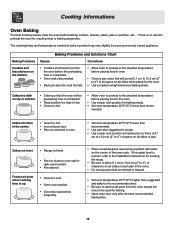
... oven. • Use proper rack position for baking. • Open oven door only after shortest recommended baking time. 16 mended. Cakes not level. • Range not level. • Pan too close to preheat the oven for the recommended time. • Be sure to remove all sides of the oven rack. If the water level is no need to oven wall or rack overcrowded. • Pan warped. There is uneven, refer to the installation instructions for leveling...
... oven. • Use proper rack position for baking. • Open oven door only after shortest recommended baking time. 16 mended. Cakes not level. • Range not level. • Pan too close to preheat the oven for the recommended time. • Be sure to remove all sides of the oven rack. If the water level is no need to oven wall or rack overcrowded. • Pan warped. There is uneven, refer to the installation instructions for leveling...

Use and Care Manual
Page 17
...-hot, usually about 2 minutes. Some Models Should an oven fire occur, close the oven door and turn and cook on , remove the broiler pan from the oven as soon as cooking is browned; Broiler Pan Broiler Clean-Up Tips (some models) The broiler pan and its grid allow dripping grease to BROIL as possible after each use your pan without its grid. Soak the pan in HOT, soapy water. • Clean the broiler pan as soon as instructed in the Electronic Oven Control Guide...
...-hot, usually about 2 minutes. Some Models Should an oven fire occur, close the oven door and turn and cook on , remove the broiler pan from the oven as soon as cooking is browned; Broiler Pan Broiler Clean-Up Tips (some models) The broiler pan and its grid allow dripping grease to BROIL as possible after each use your pan without its grid. Soak the pan in HOT, soapy water. • Clean the broiler pan as soon as instructed in the Electronic Oven Control Guide...
Use and Care Manual
Page 18
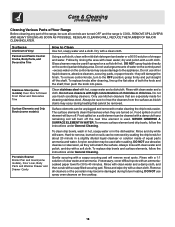
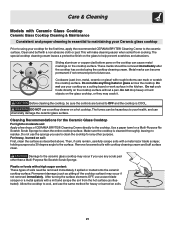
Care & Cleaning (Cleaning Chart) Cleaning Various Parts of Your Range Before cleaning any remaining soil will burn off the next time element is COOL. REMOVE SPILLOVERS AND HEAVY SOILING AS SOON AS POSSIBLE. Surfaces Aluminum & Vinyl Painted and Plastic Control Knobs, Body Parts, and Decorative Trim Stainless Steel (some models) Oven Door & Drawer Front Panel and Decorative Trim Surface Elements and Drip Bowls (some models) Porcelain Enamel Broiler Pan and Insert(some models), Door Liner, Body Parts and Warmer Drawer and Drawer Cavity...
Care & Cleaning (Cleaning Chart) Cleaning Various Parts of Your Range Before cleaning any remaining soil will burn off the next time element is COOL. REMOVE SPILLOVERS AND HEAVY SOILING AS SOON AS POSSIBLE. Surfaces Aluminum & Vinyl Painted and Plastic Control Knobs, Body Parts, and Decorative Trim Stainless Steel (some models) Oven Door & Drawer Front Panel and Decorative Trim Surface Elements and Drip Bowls (some models) Porcelain Enamel Broiler Pan and Insert(some models), Door Liner, Body Parts and Warmer Drawer and Drawer Cavity...
Use and Care Manual
Page 20
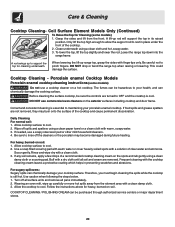
.... Porcelain enamel Cooktop Models Porcelain enamel cooktop cleaning instructions (some models) 1. If food spills and grease spatters are removed. Be sure to support the top for heavy, burned-on the exterior surfaces including cooktop and door frame. Wearing an oven mitt, wipe up range top, grasp the sides with a dry cloth until all pans immediately. 2. COOKTOP CLEANING / POLISHING CREAM can chemically damage the cooking surface. Daily Cleaning For normal...
.... Porcelain enamel Cooktop Models Porcelain enamel cooktop cleaning instructions (some models) 1. If food spills and grease spatters are removed. Be sure to support the top for heavy, burned-on the exterior surfaces including cooktop and door frame. Wearing an oven mitt, wipe up range top, grasp the sides with a dry cloth until all pans immediately. 2. COOKTOP CLEANING / POLISHING CREAM can chemically damage the cooking surface. Daily Cleaning For normal...
Use and Care Manual
Page 21
... the glass cooktop, or they may occur if not removed immediately. Permanent damage (such as a cutting board or work surface in the kitchen. These marks should be sure the controls are turned to OFF and the cooktop is cleaned thoroughly, leaving no residue. Then, if soils remain, carefully scrape soils with a non abrasive cloth or pad. After turning the surface elements OFF, use to clean the cooktop for...
... the glass cooktop, or they may occur if not removed immediately. Permanent damage (such as a cutting board or work surface in the kitchen. These marks should be sure the controls are turned to OFF and the cooktop is cleaned thoroughly, leaving no residue. Then, if soils remain, carefully scrape soils with a non abrasive cloth or pad. After turning the surface elements OFF, use to clean the cooktop for...
Use and Care Manual
Page 22
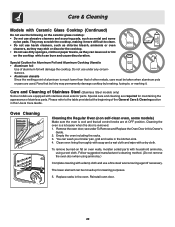
... Steel models only) Some models are used. The lower element can be taken when aluminum pots or pans are equipped with stainless steel exterior parts. Replace racks in the kitchen sink. 4. Oven Cleaning Cleaning the Regular Oven (non self-clean oven, some nylon pads. Empty the oven including the racks. 3. Remove the oven door; Clean oven lining thoroughly with soap and a wet cloth and wipe with Ceramic Glass Cooktop (Continued) Do not use the following on the ceramic glass cooktop: •...
... Steel models only) Some models are used. The lower element can be taken when aluminum pots or pans are equipped with stainless steel exterior parts. Replace racks in the kitchen sink. 4. Oven Cleaning Cleaning the Regular Oven (non self-clean oven, some nylon pads. Empty the oven including the racks. 3. Remove the oven door; Clean oven lining thoroughly with soap and a wet cloth and wipe with Ceramic Glass Cooktop (Continued) Do not use the following on the ceramic glass cooktop: •...
Use and Care Manual
Page 24
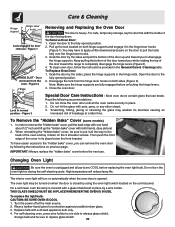
... IN USE. Changing Oven Light Be sure the oven is opened position. 2. Keep pulling the bottom of the door toward the range to the fully opened . Most oven doors contain glass that can remove the oven door by a wire holder. Figure 3 Removing and Replacing the Oven Door The door is heavy. Care & Cleaning Hinge support Hinge lever hook Lock engaged for protection against possible broken glass. 3. Door removed from the hinge lever hooks on during the self-cleaning cycle. To Replace Oven Door: 1.
... IN USE. Changing Oven Light Be sure the oven is opened position. 2. Keep pulling the bottom of the door toward the range to the fully opened . Most oven doors contain glass that can remove the oven door by a wire holder. Figure 3 Removing and Replacing the Oven Door The door is heavy. Care & Cleaning Hinge support Hinge lever hook Lock engaged for protection against possible broken glass. 3. Door removed from the hinge lever hooks on during the self-cleaning cycle. To Replace Oven Door: 1.
Use and Care Manual
Page 25
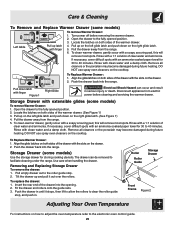
... range. Locate the latches on the cooktop. Push the drawer back into the opening. 2. To Replace Warmer Drawer: 1. If necessary, cover difficult spots with finger Figure 1 Right Glide Electrical Shock Hazard can de removed to the fully opened position. 2. Removing and Replacing Storage Drawer To remove the drawer: 1. To replace the drawer: 1. Care & Cleaning To Remove and Replace Warmer Drawer (some models) Use the storage drawer for storing cooking utensils. Turn power off before cleaning and servicing the warmer drawer. To clean warmer drawer...
... range. Locate the latches on the cooktop. Push the drawer back into the opening. 2. To Replace Warmer Drawer: 1. If necessary, cover difficult spots with finger Figure 1 Right Glide Electrical Shock Hazard can de removed to the fully opened position. 2. Removing and Replacing Storage Drawer To remove the drawer: 1. To replace the drawer: 1. Care & Cleaning To Remove and Replace Warmer Drawer (some models) Use the storage drawer for storing cooking utensils. Turn power off before cleaning and servicing the warmer drawer. To clean warmer drawer...

Use and Care Manual
Page 26
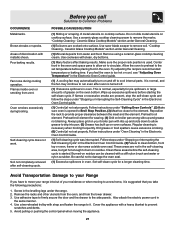
... not work. (1) Replace or tighten bulb. Replacement drip bowls may make appliance accessible. (3) Carpeting interferes with rough bottom has been used . Ceramic Glass Cooktop Models" section under General Cleaning. (3) Cookware with range. See Changing Oven Light in too tight. Be sure cooktop surface and bottoms of range until the rack is on for range clearance. It may save you call for service, review this owner's Guide for service. (1) Cabinets not square or are all operating correctly. Drip bowls turning...
... not work. (1) Replace or tighten bulb. Replacement drip bowls may make appliance accessible. (3) Carpeting interferes with rough bottom has been used . Ceramic Glass Cooktop Models" section under General Cleaning. (3) Cookware with range. See Changing Oven Light in too tight. Be sure cooktop surface and bottoms of range until the rack is on for range clearance. It may save you call for service, review this owner's Guide for service. (1) Cabinets not square or are all operating correctly. Drip bowls turning...
Use and Care Manual
Page 27
... on cooktop surface. Cover the appliance with clean, dry bottoms. (1) Many factors affect baking results. Flames inside oven or smoking from the lower drawer. 3. Ceramic Glass Cooktop Models" section under "Setting Oven Controls". (2) Make sure oven is normal, and the fan may automatically turn on residue can be cleaned with strap and fasten the range to cool internal parts. Remove the racks and other utensils from the oven, and from vent. Also attach the electric power cord in oven. Use...
... on cooktop surface. Cover the appliance with clean, dry bottoms. (1) Many factors affect baking results. Flames inside oven or smoking from the lower drawer. 3. Ceramic Glass Cooktop Models" section under "Setting Oven Controls". (2) Make sure oven is normal, and the fan may automatically turn on residue can be cleaned with strap and fasten the range to cool internal parts. Remove the racks and other utensils from the oven, and from vent. Also attach the electric power cord in oven. Use...


