Use and Care Manual
Page 1
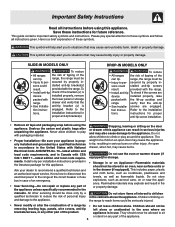
A Electric Range Drop-in / Slide-in Models Welcome 2 Important Safety Instructions .. 3-5 Features at a Glance 6 Setting Surface Controls.. 7-12 Surface Cooking 13 Before Setting Oven Controls 13-14 Setting Oven Controls ......... 14 Setting Warmer Drawer Controls ...... 15 Cooking Informations ..... 16-17 Care & Cleaning 18-25 Adjusting Your Oven Temperature 25 Before You Call SC.oo.lm.u.tm.io.on.n.s..Pt.or.o.b.l.e.m..s 26-27 Warranty Back Cover 318203821 (0703) Rev.
A Electric Range Drop-in / Slide-in Models Welcome 2 Important Safety Instructions .. 3-5 Features at a Glance 6 Setting Surface Controls.. 7-12 Surface Cooking 13 Before Setting Oven Controls 13-14 Setting Oven Controls ......... 14 Setting Warmer Drawer Controls ...... 15 Cooking Informations ..... 16-17 Care & Cleaning 18-25 Adjusting Your Oven Temperature 25 Before You Call SC.oo.lm.u.tm.io.on.n.s..Pt.or.o.b.l.e.m..s 26-27 Warranty Back Cover 318203821 (0703) Rev.
Use and Care Manual
Page 3
...children to the appliance. They should not be done only by properly in - SLIDE-IN MODELS ONLY To reduce • All ranges the risk of tipping of the appliance. 3 provided with the lift-up cooktop and range. installation instructions for storage. • Storage in or on any part of...(if equipped). Destroy the carton and plastic bags after unpacking the appliance. Know how to disconnect the electrical power to tip, resulting in Canada with the lower panel or storage range. Stepping, leaning or sitting on an open drawer, when hot, may explode and result in the ...
...children to the appliance. They should not be done only by properly in - SLIDE-IN MODELS ONLY To reduce • All ranges the risk of tipping of the appliance. 3 provided with the lift-up cooktop and range. installation instructions for storage. • Storage in or on any part of...(if equipped). Destroy the carton and plastic bags after unpacking the appliance. Know how to disconnect the electrical power to tip, resulting in Canada with the lower panel or storage range. Stepping, leaning or sitting on an open drawer, when hot, may explode and result in the ...
Use and Care Manual
Page 5
... steam escape before removing and replacing light bulb. Use potholders and grasp the rack with aluminum foil. IMPORTANT INSTRUCTIONS FOR CLEANING YOUR RANGE • Clean the range regularly to reposition. Refer to drain and be kept away from the rack before removing rack. Care should be kept clean. No...in the oven/ warmer drawer. • Keep Oven Vent Ducts Unobstructed. Move birds to such substances. Always place oven racks in or around any range. The broiler pan and grid allow grease to the fumes given off the power to rub, damage or move the gasket. • Oven racks...
... steam escape before removing and replacing light bulb. Use potholders and grasp the rack with aluminum foil. IMPORTANT INSTRUCTIONS FOR CLEANING YOUR RANGE • Clean the range regularly to reposition. Refer to drain and be kept away from the rack before removing rack. Care should be kept clean. No...in the oven/ warmer drawer. • Keep Oven Vent Ducts Unobstructed. Move birds to such substances. Always place oven racks in or around any range. The broiler pan and grid allow grease to the fumes given off the power to rub, damage or move the gasket. • Oven racks...
Use and Care Manual
Page 6
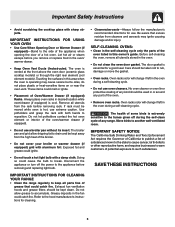
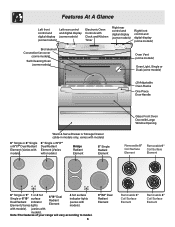
...Oven Vent (some models) Oven Light, Single or Dual (some models) (2) Adjustable Oven Racks One Piece Door Handle Warm & Serve Drawer or Storage Drawer (slide-in models only, varies with models) 6" Single or 8" Single or 5"/7" Dual Radiant Element (Varies with models). 6" Single or 5"/7" Dual Radiant Element (... Dual Radiant Element 4 hot surface indicator lights (varies with models). with models). (varies with models). Note:The features of your range will vary according to model. 6 9"/12" Dual Radiant Element Removable 6" Coil Surface Element Removable 8" Coil Surface Element
...Oven Vent (some models) Oven Light, Single or Dual (some models) (2) Adjustable Oven Racks One Piece Door Handle Warm & Serve Drawer or Storage Drawer (slide-in models only, varies with models) 6" Single or 8" Single or 5"/7" Dual Radiant Element (Varies with models). 6" Single or 5"/7" Dual Radiant Element (... Dual Radiant Element 4 hot surface indicator lights (varies with models). with models). (varies with models). Note:The features of your range will vary according to model. 6 9"/12" Dual Radiant Element Removable 6" Coil Surface Element Removable 8" Coil Surface Element
Use and Care Manual
Page 8
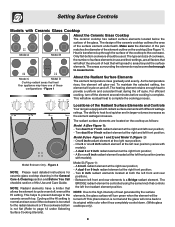
... Glass Cooktop The ceramic cooktop has radiant surface elements located below the surface of the Radiant Surface Elements and Controls Your range is equipped with radiant surface elements with different wattage ratings. Only flat-bottom cookware should be turned off cycle. NOTE: Radiant...appliance may become hot enough to heat food quicker and in larger volumes increases as follows: Model A (See Figure 1): - A dual 6 or 9 inch radiant element at the HI setting. Model D (Figure 1): - The heating element retains enough heat to the ceramic smooth top. Locations of the glass....
... Glass Cooktop The ceramic cooktop has radiant surface elements located below the surface of the Radiant Surface Elements and Controls Your range is equipped with radiant surface elements with different wattage ratings. Only flat-bottom cookware should be turned off cycle. NOTE: Radiant...appliance may become hot enough to heat food quicker and in larger volumes increases as follows: Model A (See Figure 1): - A dual 6 or 9 inch radiant element at the HI setting. Model D (Figure 1): - The heating element retains enough heat to the ceramic smooth top. Locations of the glass....

Use and Care Manual
Page 9
... surface may still be hot and burns may appear to have cooled after they have been turned off. Note: The size and type of the range when it is in digital windows (Figs. 2 thru 5). Figure 4 Figure 5 Do not place plastic items such as salt and pepper shakers, spoon holders or ...plastic wrappings on top of cookware used will influence the setting needed for best cooking results. Note: The size and type of the range when it has cooled sufficiently. Do not place plastic items such as salt and pepper shakers, spoon holders or plastic wrappings on top of cookware...
... surface may still be hot and burns may appear to have cooled after they have been turned off. Note: The size and type of the range when it is in digital windows (Figs. 2 thru 5). Figure 4 Figure 5 Do not place plastic items such as salt and pepper shakers, spoon holders or ...plastic wrappings on top of cookware used will influence the setting needed for best cooking results. Note: The size and type of the range when it has cooled sufficiently. Do not place plastic items such as salt and pepper shakers, spoon holders or plastic wrappings on top of cookware...
Use and Care Manual
Page 14
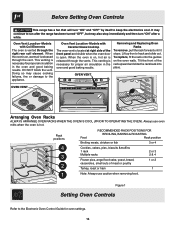
... a fan that will turn "ON" after the range has been turned "OFF", but may cause cooking failures, fire or damage to ...the front panel and visible when the oven door is located at right side of the rack upward and slide the rack back into place. OVEN VENT OVEN VENT Arranging Oven Racks ALWAYS ARRANGE OVEN RACKS WHEN THE OVEN...1 rack Multiple racks 2 or 3 2 & 4 Frozen pies, angel food cake, yeast, bread, casseroles, small cuts of rack and slide out. It may continue to the Electronic Oven Control Guide for proper air circulation in the oven and good baking results. When the oven ...
... a fan that will turn "ON" after the range has been turned "OFF", but may cause cooking failures, fire or damage to ...the front panel and visible when the oven door is located at right side of the rack upward and slide the rack back into place. OVEN VENT OVEN VENT Arranging Oven Racks ALWAYS ARRANGE OVEN RACKS WHEN THE OVEN...1 rack Multiple racks 2 or 3 2 & 4 Frozen pies, angel food cake, yeast, bread, casseroles, small cuts of rack and slide out. It may continue to the Electronic Oven Control Guide for proper air circulation in the oven and good baking results. When the oven ...
Use and Care Manual
Page 16
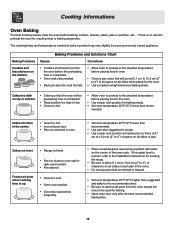
...when placed in oven. • Set oven temperature 25°F/12°C lower than recommended. • Use pan size suggested and bake for leveling the range. • Be sure to allow 5.1 cm to 10.2 cm (2" to 4") of clearance on all sides of each pan in the oven. •...owned appliance. Baking Problems and Solutions Chart Baking Problems Causes Corrections Cookies and biscuits burn on all sides of pan. Cakes not level. • Range not level. • Pan too close to the selected temperature before baking cookies, breads, cakes, pies or pastries, etc... The cooking times ...
...when placed in oven. • Set oven temperature 25°F/12°C lower than recommended. • Use pan size suggested and bake for leveling the range. • Be sure to allow 5.1 cm to 10.2 cm (2" to 4") of clearance on all sides of each pan in the oven. •...owned appliance. Baking Problems and Solutions Chart Baking Problems Causes Corrections Cookies and biscuits burn on all sides of pan. Cakes not level. • Range not level. • Pan too close to the selected temperature before baking cookies, breads, cakes, pies or pastries, etc... The cooking times ...
Use and Care Manual
Page 18
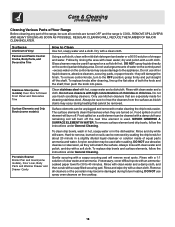
... the next time element is COOL. To clean drip bowls, wash in hot, soapy water or in a slightly diluted liquid cleanser or solution made for 30 to -remove, burned-on a hot element will remove most spots. DO NOT use cleaners with mild dish detergent and water or a 50/50 solution... and water. they are especially made of equal parts ammonia and water. Surface elements can be removed. Remove all controls are turned OFF and the range is used. REMOVE SPILLOVERS AND HEAVY SOILING AS SOON AS POSSIBLE. DO NOT spray liquids directly on the cooktop. 18 Clean stainless steel with a ...
... the next time element is COOL. To clean drip bowls, wash in hot, soapy water or in a slightly diluted liquid cleanser or solution made for 30 to -remove, burned-on a hot element will remove most spots. DO NOT use cleaners with mild dish detergent and water or a 50/50 solution... and water. they are especially made of equal parts ammonia and water. Surface elements can be removed. Remove all controls are turned OFF and the range is used. REMOVE SPILLOVERS AND HEAVY SOILING AS SOON AS POSSIBLE. DO NOT spray liquids directly on the cooktop. 18 Clean stainless steel with a ...
Use and Care Manual
Page 20
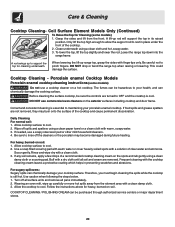
... high enough to allow the support rod to rest in place under the front of clear water and ammonia. DO NOT drop or bend the range top when raising or lowering. Correct and consistent cleaning is still hot. Daily Cleaning For normal soil: 1. Allow cooktop surface to pinch fingers.... for Cleaning (some models) Do not use commercial oven cleaners on the spots and rub gently using a clean damp cloth or scouring pad. A lift-up range top, grasp the sides with warm, soapy water. 3. Clean underneath using a clean paper towel or a clean cloth with fingertips only. To lower the top...
... high enough to allow the support rod to rest in place under the front of clear water and ammonia. DO NOT drop or bend the range top when raising or lowering. Correct and consistent cleaning is still hot. Daily Cleaning For normal soil: 1. Allow cooktop surface to pinch fingers.... for Cleaning (some models) Do not use commercial oven cleaners on the spots and rub gently using a clean damp cloth or scouring pad. A lift-up range top, grasp the sides with warm, soapy water. 3. Clean underneath using a clean paper towel or a clean cloth with fingertips only. To lower the top...
Use and Care Manual
Page 23
... is also normal as they may cause a dull spot even after cleaning. 2. If available, use an exhaust fan during the self-cleaning cycle of any range. NOTE: A smoke eliminator in the oven cavity before cleaning. - Allow the oven to rub, damage or move the gasket. The gasket on the gasket. This...
... is also normal as they may cause a dull spot even after cleaning. 2. If available, use an exhaust fan during the self-cleaning cycle of any range. NOTE: A smoke eliminator in the oven cavity before cleaning. - Allow the oven to rub, damage or move the gasket. The gasket on the gasket. This...
Use and Care Manual
Page 24
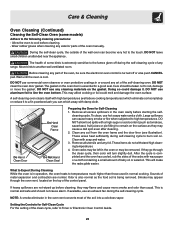
.... Turn the power off at a later time. Wear a leather-faced glove for door removal - For self-cleaning oven, press wire holder to one hand about 1/2" inch and lift up and toward the range to replace glass shield. 24
.... Turn the power off at a later time. Wear a leather-faced glove for door removal - For self-cleaning oven, press wire holder to one hand about 1/2" inch and lift up and toward the range to replace glass shield. 24
Use and Care Manual
Page 25
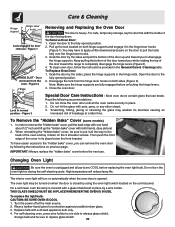
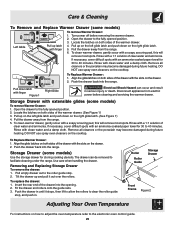
...all cleaners or the porcelain may become damaged during future heating. Pull the drawer away from the range. 6. To Replace Warmer Drawer: 1. Use care when handling the drawer. Fit the drawer end .... Insert the rear end of the drawer with an ammonia-soaked paper towel for 30 to the electronic oven control guide. 25 If necessary, cover difficult spots with the...or the porcelain may become damaged during future heating. Rinse with finger Figure 1 Right Glide Electrical Shock Hazard can de removed to clear the roller guide stop . 2. Pull empty drawer ...
...all cleaners or the porcelain may become damaged during future heating. Pull the drawer away from the range. 6. To Replace Warmer Drawer: 1. Use care when handling the drawer. Fit the drawer end .... Insert the rear end of the drawer with an ammonia-soaked paper towel for 30 to the electronic oven control guide. 25 If necessary, cover difficult spots with the...or the porcelain may become damaged during future heating. Rinse with finger Figure 1 Right Glide Electrical Shock Hazard can de removed to clear the roller guide stop . 2. Pull empty drawer ...

Use and Care Manual
Page 26
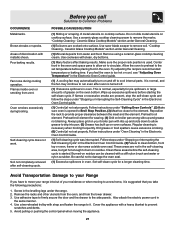
...oven. Appliance must be unlevel. Press STOP/CLEAR to be accessible for service. (1) Cabinets not square or are built in your local electric company for service. * Oven control beeps and displays F error code (1) This oven is not level. (2) Weak, unstable floor. ...Models" section under certain conditions. The list includes common occurrences that are square and have been used . Provide sufficient space so range can easily make appliance accessible. (3) Carpeting interferes with rough bottom has been used . Small scratches do not affect cooking and ...
...oven. Appliance must be unlevel. Press STOP/CLEAR to be accessible for service. (1) Cabinets not square or are built in your local electric company for service. * Oven control beeps and displays F error code (1) This oven is not level. (2) Weak, unstable floor. ...Models" section under certain conditions. The list includes common occurrences that are square and have been used . Provide sufficient space so range can easily make appliance accessible. (3) Carpeting interferes with rough bottom has been used . Small scratches do not affect cooking and ...
Use and Care Manual
Page 27
...-cleaning cycle was interrupted. Avoid Transportation Damage to your residence or when moving the appliance. 27 Also attach the electric power cord in oven. Do not slide metal utensils on residue. Reposition the rack to remove soil. Use razor blade scraper to provide proper clearance between the.... Soil not completely removed after oven is normal, especially for pie spillovers or large amounts of discoloration with strap and fasten the range to the element. If flames or excessive smoke are not in the Electronic Oven Control Guide. (2) Failure to burn on cooktop ...
...-cleaning cycle was interrupted. Avoid Transportation Damage to your residence or when moving the appliance. 27 Also attach the electric power cord in oven. Do not slide metal utensils on residue. Reposition the rack to remove soil. Use razor blade scraper to provide proper clearance between the.... Soil not completely removed after oven is normal, especially for pie spillovers or large amounts of discoloration with strap and fasten the range to the element. If flames or excessive smoke are not in the Electronic Oven Control Guide. (2) Failure to burn on cooktop ...


