Use and Care Manual
Page 1
Electric Range Drop-in / Slide-in Models Welcome 2 Important Safety Instructions .. 3-5 Features at a Glance 6 Setting Surface Controls.. 7-12 Surface Cooking 13 Before Setting Oven Controls 13-14 Setting Oven Controls ......... 14 Setting Warmer Drawer Controls ...... 15 Cooking Informations ..... 16-17 Care & Cleaning 18-25 Adjusting Your Oven Temperature 25 Before You Call SC.oo.lm.u.tm.io.on.n.s..Pt.or.o.b.l.e.m..s 26-27 Warranty Back Cover 318203821 (0703) Rev. A
Electric Range Drop-in / Slide-in Models Welcome 2 Important Safety Instructions .. 3-5 Features at a Glance 6 Setting Surface Controls.. 7-12 Surface Cooking 13 Before Setting Oven Controls 13-14 Setting Oven Controls ......... 14 Setting Warmer Drawer Controls ...... 15 Cooking Informations ..... 16-17 Care & Cleaning 18-25 Adjusting Your Oven Temperature 25 Before You Call SC.oo.lm.u.tm.io.on.n.s..Pt.or.o.b.l.e.m..s 26-27 Warranty Back Cover 318203821 (0703) Rev. A
Use and Care Manual
Page 3
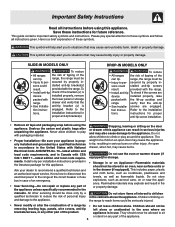
This guide contains important safety symbols and instructions. Here is a brief explanation of the can tip. SLIDE-IN MODELS ONLY To reduce • All ranges the risk of tipping of these symbols and follow all instructions given. anti-tip bracket (s) is in - verify that the ... servicing should never be allowed to play around the appliance. secured by a qualified technician in accordance in the United States with National Electrical Code ANSI/NFPA No. 70-latest edition and local code requirements, and in Canada with packaging material. • Proper Installation-Be...
This guide contains important safety symbols and instructions. Here is a brief explanation of the can tip. SLIDE-IN MODELS ONLY To reduce • All ranges the risk of tipping of these symbols and follow all instructions given. anti-tip bracket (s) is in - verify that the ... servicing should never be allowed to play around the appliance. secured by a qualified technician in accordance in the United States with National Electrical Code ANSI/NFPA No. 70-latest edition and local code requirements, and in Canada with packaging material. • Proper Installation-Be...
Use and Care Manual
Page 6
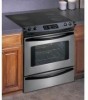
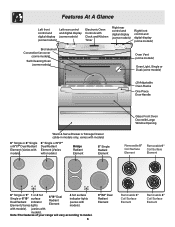
...Oven Vent (some models) Oven Light, Single or Dual (some models) (2) Adjustable Oven Racks One Piece Door Handle Warm & Serve Drawer or Storage Drawer (slide-in models only, varies with models) 6" Single or 8" Single or 5"/7" Dual Radiant Element (Varies with models). 6" Single or 5"/7" Dual Radiant Element (... Dual Radiant Element 4 hot surface indicator lights (varies with models). with models). (varies with models). Note:The features of your range will vary according to model. 6 9"/12" Dual Radiant Element Removable 6" Coil Surface Element Removable 8" Coil Surface Element
...Oven Vent (some models) Oven Light, Single or Dual (some models) (2) Adjustable Oven Racks One Piece Door Handle Warm & Serve Drawer or Storage Drawer (slide-in models only, varies with models) 6" Single or 8" Single or 5"/7" Dual Radiant Element (Varies with models). 6" Single or 5"/7" Dual Radiant Element (... Dual Radiant Element 4 hot surface indicator lights (varies with models). with models). (varies with models). Note:The features of your range will vary according to model. 6 9"/12" Dual Radiant Element Removable 6" Coil Surface Element Removable 8" Coil Surface Element
Use and Care Manual
Page 14
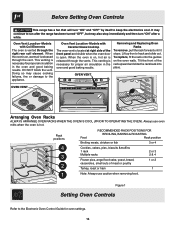
... a fan that will turn "ON" after the range has been turned "OFF", but may cause cooking failures, fire or damage to the appliance. This venting is open. Doing so may ...Note: Always use oven mitts when the oven is released through the right rear coil element. Lift up front of the rack upward and slide the rack back into place. It may continue to the Electronic Oven Control Guide for proper air circulation in the oven and good baking .... Oven Vent Location -Models with Ceramic Glass Cooktop The oven vent is vented through the vent. Tilt the front of rack and slide out.
... a fan that will turn "ON" after the range has been turned "OFF", but may cause cooking failures, fire or damage to the appliance. This venting is open. Doing so may ...Note: Always use oven mitts when the oven is released through the right rear coil element. Lift up front of the rack upward and slide the rack back into place. It may continue to the Electronic Oven Control Guide for proper air circulation in the oven and good baking .... Oven Vent Location -Models with Ceramic Glass Cooktop The oven vent is vented through the vent. Tilt the front of rack and slide out.
Use and Care Manual
Page 27
...out of metal utensils on residue can be cleaned with strap and fasten the range to a new home, it . These areas are cooked onto surface. Be careful not to cool internal parts. Also attach the electric power cord in the Electronic Oven Control guide. (1) Control(s) not set ... food. Always place grid on cooktop surface. Use a ceramic-glass cooktop cleaning cream to Common Problems POSSIBLE CAUSE/SOLUTION (1) Sliding or scraping of your Range If you call Solutions to remove the marks. It is started. Regular cleaning is used. Avoid Transportation Damage to your residence...
...out of metal utensils on residue can be cleaned with strap and fasten the range to a new home, it . These areas are cooked onto surface. Be careful not to cool internal parts. Also attach the electric power cord in the Electronic Oven Control guide. (1) Control(s) not set ... food. Always place grid on cooktop surface. Use a ceramic-glass cooktop cleaning cream to Common Problems POSSIBLE CAUSE/SOLUTION (1) Sliding or scraping of your Range If you call Solutions to remove the marks. It is started. Regular cleaning is used. Avoid Transportation Damage to your residence...


