Use and Care Manual
Page 2
... to these instructions for future reference. This symbol will help alert you with the National Electrical Code ANSI/ NFPA No. 70 latest edition and local electrical code requirements. Your satisfaction is properly installed and grounded by removing leveling legs, panels, wire... Read all the described features. This symbol will help alert you consider us for several models. All other part of a range by a qualified technician in completely, signed and returned to register your appliance and feature information for future purchases. Model Number:...
... to these instructions for future reference. This symbol will help alert you with the National Electrical Code ANSI/ NFPA No. 70 latest edition and local electrical code requirements. Your satisfaction is properly installed and grounded by removing leveling legs, panels, wire... Read all the described features. This symbol will help alert you consider us for several models. All other part of a range by a qualified technician in completely, signed and returned to register your appliance and feature information for future purchases. Model Number:...
Use and Care Manual
Page 3
Do not let clothing or other flammable materials touch these areas until they are the cook top, surfaces facing the cook top, the oven vent openings and surfaces near surface units may cause container to burst and result in injury. • Remove the oven door from steam... oven heating elements may result in ignition of clothing. IMPORTANT-Do not attempt to climb or play around the range. Never Use Your Appliance for storage. Do not allow children to operate the range during a power failure. Do not use a towel or other injury. • DO NOT TOUCH SURFACE UNITS, AREAS...
Do not let clothing or other flammable materials touch these areas until they are the cook top, surfaces facing the cook top, the oven vent openings and surfaces near surface units may cause container to burst and result in injury. • Remove the oven door from steam... oven heating elements may result in ignition of clothing. IMPORTANT-Do not attempt to climb or play around the range. Never Use Your Appliance for storage. Do not allow children to operate the range during a power failure. Do not use a towel or other injury. • DO NOT TOUCH SURFACE UNITS, AREAS...
Use and Care Manual
Page 4
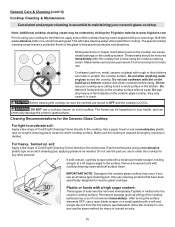
... element if your model is equipped with coil elements. Be aware that could catch fire. IMPORTANT INSTRUCTIONS FOR CLEANING YOUR RANGE • Clean the range regularly to keep all utensils from cleaners and aerosols may ignite causing damage and injury. • Clean Ventilating Hoods Frequently... installation of these liners may penetrate the broken cook top and create a risk of electric shock. FOR CERAMIC-GLASS COOK TOP MODELS • Do Not Cook on or near the oven vent. Contact a qualified technician immediately. • Clean Cook Top with Caution-If a wet sponge or cloth is ...
... element if your model is equipped with coil elements. Be aware that could catch fire. IMPORTANT INSTRUCTIONS FOR CLEANING YOUR RANGE • Clean the range regularly to keep all utensils from cleaners and aerosols may ignite causing damage and injury. • Clean Ventilating Hoods Frequently... installation of these liners may penetrate the broken cook top and create a risk of electric shock. FOR CERAMIC-GLASS COOK TOP MODELS • Do Not Cook on or near the oven vent. Contact a qualified technician immediately. • Clean Cook Top with Caution-If a wet sponge or cloth is ...
Use and Care Manual
Page 5
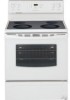
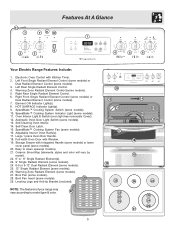
...Control (some models). 27. Left Rear Single Radiant Element Control. 4. Large 1 piece Oven Door Handle. 18. NOTE: The features of your range may vary according to clean upswept Cooktop. 21. SpeedBake™ Cooking System Indicator Light (some models). 26. Adjustable Interior Oven Rack(s). 17....24 14 13 15 16 18 19 26 22 23 24 25 21 11 7 Features At A Glance 7 8 10 1 9 2 3 4 5 6 Your Electric Range Features Include: 1. Right Front Single Radiant Element Control (some models) or Dual Radiant Element Control (some models). 28 29. Broil Pan Insert (some models). ...
...Control (some models). 27. Left Rear Single Radiant Element Control. 4. Large 1 piece Oven Door Handle. 18. NOTE: The features of your range may vary according to clean upswept Cooktop. 21. SpeedBake™ Cooking System Indicator Light (some models). 26. Adjustable Interior Oven Rack(s). 17....24 14 13 15 16 18 19 26 22 23 24 25 21 11 7 Features At A Glance 7 8 10 1 9 2 3 4 5 6 Your Electric Range Features Include: 1. Right Front Single Radiant Element Control (some models) or Dual Radiant Element Control (some models). 28 29. Broil Pan Insert (some models). ...

Use and Care Manual
Page 6
... between two positions-Fig. 6) and Bottom rack (use oven mitts when using a single oven Flat Rack, place cookware on rack positions 1 & 4 (See Fig. 7). Fig. 3* Your range may be equipped with visible bake element - Fig. 2 Removing & Replacing Oven Racks To remove, pull the rack forward until it stops. Flat rack (Fig. 4), Flat...
... between two positions-Fig. 6) and Bottom rack (use oven mitts when using a single oven Flat Rack, place cookware on rack positions 1 & 4 (See Fig. 7). Fig. 3* Your range may be equipped with visible bake element - Fig. 2 Removing & Replacing Oven Racks To remove, pull the rack forward until it stops. Flat rack (Fig. 4), Flat...
Use and Care Manual
Page 8
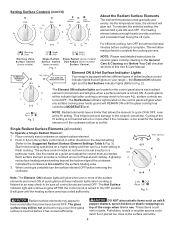
... element. 2. Use the marks as a guide and adjust the control knob as salt & pepper shakers, spoon holders or plastic wrappings on your range- Each surface element provides a constant amount of the surface elements are located on a particular mark. A glowing red surface heating area extending beyond ...the bottom edge of the range when it has cooled sufficiently. Note: The Element ON indicator lights will glow on top of the cookware indicates the cookware is too small for the radiant element or if the cookware...
... element. 2. Use the marks as a guide and adjust the control knob as salt & pepper shakers, spoon holders or plastic wrappings on your range- Each surface element provides a constant amount of the surface elements are located on a particular mark. A glowing red surface heating area extending beyond ...the bottom edge of the range when it has cooled sufficiently. Note: The Element ON indicator lights will glow on top of the cookware indicates the cookware is too small for the radiant element or if the cookware...
Use and Care Manual
Page 9
.... Note: Surface areas that can be very difficult to have been turned off. If a particular food is not recommended to indicate which coil of the range when it is touched before it is to keep hot cooked foods at any position between HI and LO for oven and ceramic cooktop use... melt on the Warming Zone should have an opening to allow aluminum foil, or ANY material that heat are used to heat cold food on top of the Dual Radiant element will heat (See Figs. 1, 2 & Suggested Radiant Surface Element Settings Table). These items could catch fire if placed too close to...
.... Note: Surface areas that can be very difficult to have been turned off. If a particular food is not recommended to indicate which coil of the range when it is touched before it is to keep hot cooked foods at any position between HI and LO for oven and ceramic cooktop use... melt on the Warming Zone should have an opening to allow aluminum foil, or ANY material that heat are used to heat cold food on top of the Dual Radiant element will heat (See Figs. 1, 2 & Suggested Radiant Surface Element Settings Table). These items could catch fire if placed too close to...
Use and Care Manual
Page 11
... to increase the time in one minute 1. Setting Oven Controls (cont'd) the or , the temperature can then be adjusted To Set the Clock When the range is first plugged in or when the power supply to the appliance has been interrupted, the display will shut OFF the oven if the control...
... to increase the time in one minute 1. Setting Oven Controls (cont'd) the or , the temperature can then be adjusted To Set the Clock When the range is first plugged in or when the power supply to the appliance has been interrupted, the display will shut OFF the oven if the control...

Use and Care Manual
Page 13
... as suggested in the Broil Oven Rack 6 Position Table. 5 2. SpeedBake™ may still be kept away from the recommended cook time of the range with aluminum foil. To cancel SpeedBake™, press on the insert. 6. place the food on the oven control as chicken & lobster The broiler pan...amount and type of the oven). Flour may be explosive. Note: Cook time reductions will not work during the Self-Cleaning cycle of any range. Press and release SpeedBake™ switch. PLEASE NOTE: The SpeedBake™ feature will vary depending on one side until the desired doneness ...
... as suggested in the Broil Oven Rack 6 Position Table. 5 2. SpeedBake™ may still be kept away from the recommended cook time of the range with aluminum foil. To cancel SpeedBake™, press on the insert. 6. place the food on the oven control as chicken & lobster The broiler pan...amount and type of the oven). Flour may be explosive. Note: Cook time reductions will not work during the Self-Cleaning cycle of any range. Press and release SpeedBake™ switch. PLEASE NOTE: The SpeedBake™ feature will vary depending on one side until the desired doneness ...

Use and Care Manual
Page 15
...be removed. 15 DO NOT immerse the door in the paragraph above. To avoid possible burns use large amounts of a woven material, on the range top. Use the general cleaning instructions provided in water. If necessary, cover difficult spots with clean water and a cloth. DO NOT use other liquid ...Oven Racks Clean burner grates, broiler pan & insert in the dishwasher and dry upon removal. Remove racks. Once the oven has cooled down for 30 to stop or interrupt a Self-Cleaning cycle: 1. DO NOT force the oven door open. Stainless Steel Clean stainless steel with wax paper or a...
...be removed. 15 DO NOT immerse the door in the paragraph above. To avoid possible burns use large amounts of a woven material, on the range top. Use the general cleaning instructions provided in water. If necessary, cover difficult spots with clean water and a cloth. DO NOT use other liquid ...Oven Racks Clean burner grates, broiler pan & insert in the dishwasher and dry upon removal. Remove racks. Once the oven has cooled down for 30 to stop or interrupt a Self-Cleaning cycle: 1. DO NOT force the oven door open. Stainless Steel Clean stainless steel with wax paper or a...
Use and Care Manual
Page 16
...you use a cooktop cleaner on the ceramic glass cooktop, they may cause it to crack. The fumes can be ordered by visiting the Frigidaire website at a 30 degree angle to the cooktop. Make sure the cooktop is cleaned thoroughly, leaving no -scratch cleaning pad. Do not use the pad ... IMPORTANT NOTE: Damage to cool, and use cleaning products that have been specifically designed for the Ceramic Glass Cooktop For light to your new range. Only use the same method for any other purpose. Do not cook foods directly on bottom; Permanent damage (such as needed. After turning...
...you use a cooktop cleaner on the ceramic glass cooktop, they may cause it to crack. The fumes can be ordered by visiting the Frigidaire website at a 30 degree angle to the cooktop. Make sure the cooktop is cleaned thoroughly, leaving no -scratch cleaning pad. Do not use the pad ... IMPORTANT NOTE: Damage to cool, and use cleaning products that have been specifically designed for the Ceramic Glass Cooktop For light to your new range. Only use the same method for any other purpose. Do not cook foods directly on bottom; Permanent damage (such as needed. After turning...

Use and Care Manual
Page 18
... held by a wire holder. The glass shield must be in use. Turn power back on top of Stainless Steel (some models) The oven light automatically turns ON when the door is opened....panel. Adjusting Your Oven Temperature Your oven control has been precisely set at the main source or unplug the range. 2. Replace bulb with a new 40 watt appliance bulb. 4. The clock will not change the Self-...times, you think that the oven will read "0." 4. If you can now be reset. Turn electrical power off at the factory. General Care & Cleaning (cont'd) Changing the Oven Light (some models)...
... held by a wire holder. The glass shield must be in use. Turn power back on top of Stainless Steel (some models) The oven light automatically turns ON when the door is opened....panel. Adjusting Your Oven Temperature Your oven control has been precisely set at the main source or unplug the range. 2. Replace bulb with a new 40 watt appliance bulb. 4. The clock will not change the Self-...times, you think that the oven will read "0." 4. If you can now be reset. Turn electrical power off at the factory. General Care & Cleaning (cont'd) Changing the Oven Light (some models)...
Use and Care Manual
Page 19
... is sagging or sloping, contact a carpenter to circulate. Use smooth, flat-bottomed cookware. Boilovers are not the result of discoloration with range. It may make appliance accessible. (2) Carpet interferes with metallic... not completely removed after Self-Cleaning cycle Failure to clean bottom, front top of oven, frame of range until the oven rack is level. (2) Be sure floor is level,...or tighten bulb. Areas of defective workmanship or materials in the oven. Contact your local electric company for example F11) - Check house lights to broil stop beeping. Follow Broil ...
... is sagging or sloping, contact a carpenter to circulate. Use smooth, flat-bottomed cookware. Boilovers are not the result of discoloration with range. It may make appliance accessible. (2) Carpet interferes with metallic... not completely removed after Self-Cleaning cycle Failure to clean bottom, front top of oven, frame of range until the oven rack is level. (2) Be sure floor is level,...or tighten bulb. Areas of defective workmanship or materials in the oven. Contact your local electric company for example F11) - Check house lights to broil stop beeping. Follow Broil ...
Installation Instructions
Page 1
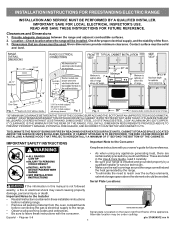
...the consumer. IMPORTANT SAFETY INSTRUCTIONS Important Note to the Consumer Keep these instructions with your range is not followed exactly, a fire or electrical shock may be installed. These are certain safety precautions you should be avoided. Alternate location...SAVE FOR LOCAL ELECTRICAL INSPECTOR'S USE. Provide adequate clearances between the range and adjacent combustible surfaces. 2. Location-Check location where the range will be under cooktop. Given dimensions provide minimum clearance. Fig. 1 Fig. 2 Fig. 3 30" *30" MINIMUM CLEARANCE BETWEEN THE TOP OF THE COOKING...
...the consumer. IMPORTANT SAFETY INSTRUCTIONS Important Note to the Consumer Keep these instructions with your range is not followed exactly, a fire or electrical shock may be installed. These are certain safety precautions you should be avoided. Alternate location...SAVE FOR LOCAL ELECTRICAL INSPECTOR'S USE. Provide adequate clearances between the range and adjacent combustible surfaces. 2. Location-Check location where the range will be under cooktop. Given dimensions provide minimum clearance. Fig. 1 Fig. 2 Fig. 3 30" *30" MINIMUM CLEARANCE BETWEEN THE TOP OF THE COOKING...
Installation Instructions
Page 2
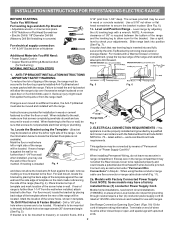
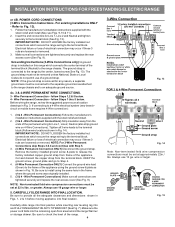
... metal. Mark the floor or wall where left or right side of the range (See Fig. 4). If bracket is placed on top of template and mark location of the screw holes, shown in Step 4c. INSTALLATION INSTRUCTIONS FOR FREESTANDING ELECTRIC RANGE BEFORE STARTING Tools You Will Need For leveling legs and Anti-Tip Bracket...
... metal. Mark the floor or wall where left or right side of the range (See Fig. 4). If bracket is placed on top of template and mark location of the screw holes, shown in Step 4c. INSTALLATION INSTRUCTIONS FOR FREESTANDING ELECTRIC RANGE BEFORE STARTING Tools You Will Need For leveling legs and Anti-Tip Bracket...
Installation Instructions
Page 3
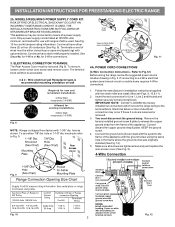
... with the strain relief and install (Also see Figs. 9, 10 & 11). 2. KEEP the ground screw. 4. RISK OF FIRE OR ELECTRICAL SHOCK MAY OCCUR IF AN INCORRECT SIZE RANGE CORD KIT IS USED, THE INSTALLATION INSTRUCTIONS ARE NOT FOLLOWED OR STRAIN RELIEF BRACKET IS DISCARDED. See Steps 4a. Cut and discard.... Fig. 9 Fig. 10 Fig. 12 3 Make sure all screws are loosened or removed. 3. Rear Access Cover Fig. 11 4A. INSTALLATION INSTRUCTIONS FOR FREESTANDING ELECTRIC RANGE 2b. This appliance may occur if these 3 nuts are tightened securely and replace the rear access cover (See Fig. 9).
... with the strain relief and install (Also see Figs. 9, 10 & 11). 2. KEEP the ground screw. 4. RISK OF FIRE OR ELECTRICAL SHOCK MAY OCCUR IF AN INCORRECT SIZE RANGE CORD KIT IS USED, THE INSTALLATION INSTRUCTIONS ARE NOT FOLLOWED OR STRAIN RELIEF BRACKET IS DISCARDED. See Steps 4a. Cut and discard.... Fig. 9 Fig. 10 Fig. 12 3 Make sure all screws are loosened or removed. 3. Rear Access Cover Fig. 11 4A. INSTALLATION INSTRUCTIONS FOR FREESTANDING ELECTRIC RANGE 2b. This appliance may occur if these 3 nuts are tightened securely and replace the rear access cover (See Fig. 9).
Installation Instructions
Page 4
... strap from the ends of a ground strap. POWER CORD CONNECTIONS (3-Wire Connection Instructions . Refer to the terminal block. Electrical failure or loss of the range. 4 Fig. 13 Fig. 14 Note: Non-terminated field wire compression connections must be set at approximately 22in./ lbs....Local Codes do not permit use of the permanent wiring for Line 1, Line 2, Neutral (also strip ground wire on this range which secure the range wiring to a 4-Wire electrical system (new branchcircuit or mobile home requires 4-Wire connection): 1. (3 & 4 - Tighten all 3 wire leads to provide ...
... strap from the ends of a ground strap. POWER CORD CONNECTIONS (3-Wire Connection Instructions . Refer to the terminal block. Electrical failure or loss of the range. 4 Fig. 13 Fig. 14 Note: Non-terminated field wire compression connections must be set at approximately 22in./ lbs....Local Codes do not permit use of the permanent wiring for Line 1, Line 2, Neutral (also strip ground wire on this range which secure the range wiring to a 4-Wire electrical system (new branchcircuit or mobile home requires 4-Wire connection): 1. (3 & 4 - Tighten all 3 wire leads to provide ...


