Use and Care Manual
Page 2
... possible. Please pay attention to providing you consider us for your purchase of our product and are very proud of a new range! Model Number: Serial Number: Purchase Date: This Use & Care Manual contains general operating instructions for future purchases. At Electrolux ...may occur. Congratulations on your new range and Thank You for future reference. Destroy the carton and plastic bags after unpacking the range. We hope you with the National Electrical Code ANSI/ NFPA No. 70 latest edition and local electrical code requirements. Important Safety Instructions Read...
... possible. Please pay attention to providing you consider us for your purchase of our product and are very proud of a new range! Model Number: Serial Number: Purchase Date: This Use & Care Manual contains general operating instructions for future purchases. At Electrolux ...may occur. Congratulations on your new range and Thank You for future reference. Destroy the carton and plastic bags after unpacking the range. We hope you with the National Electrical Code ANSI/ NFPA No. 70 latest edition and local electrical code requirements. Important Safety Instructions Read...
Use and Care Manual
Page 3
...even though they have had sufficient time to tip, resulting in ignition of a range. Do not let clothing or other flammable materials touch these areas until they are the cook top, surfaces facing the cook top, the oven vent openings and surfaces near surface units may result in serious burns... or other bulky cloth instead of a potholder. • Do Not Heat Unopened Food Containers-Buildup of a child on the range to element will also ...
...even though they have had sufficient time to tip, resulting in ignition of a range. Do not let clothing or other flammable materials touch these areas until they are the cook top, surfaces facing the cook top, the oven vent openings and surfaces near surface units may result in serious burns... or other bulky cloth instead of a potholder. • Do Not Heat Unopened Food Containers-Buildup of a child on the range to element will also ...
Use and Care Manual
Page 4
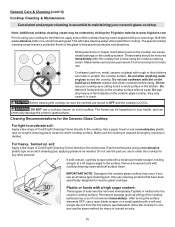
... should not be careful to such substances. Check the manufacturer's recommendations for use extreme caution. IMPORTANT INSTRUCTIONS FOR CLEANING YOUR RANGE • Clean the range regularly to unintentional contact with the utensil, the handle of the utensil should break, cleaning solutions and spillovers may cause severe... under the left rear surface element if your model is cool. The oven vent is operating may penetrate the broken cook top and create a risk of electric shock, or fire. These items could melt or ignite. • Placement of grease that it is hot use . ...
... should not be careful to such substances. Check the manufacturer's recommendations for use extreme caution. IMPORTANT INSTRUCTIONS FOR CLEANING YOUR RANGE • Clean the range regularly to unintentional contact with the utensil, the handle of the utensil should break, cleaning solutions and spillovers may cause severe... under the left rear surface element if your model is cool. The oven vent is operating may penetrate the broken cook top and create a risk of electric shock, or fire. These items could melt or ignite. • Placement of grease that it is hot use . ...
Use and Care Manual
Page 5
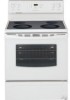
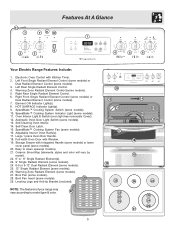
.... Full width Oven Door with Integrated Handle (some models) or lower cover panel (some models). 16. Broil Pan (some models). 3. NOTE: The features of your range may vary according to clean upswept Cooktop. 21. Element ON Indicator Light(s). 8. Storage Drawer with Window. 19. Easy to model type & color. 27 5 20 12... Radiant Element (some models). 13. Electronic Oven Control with Kitchen Timer. 2. SpeedBake™ Cooking System Fan (some models). 20. 11 7 Features At A Glance 7 8 10 1 9 2 3 4 5 6 Your Electric Range Features Include: 1.
.... Full width Oven Door with Integrated Handle (some models) or lower cover panel (some models). 16. Broil Pan (some models). 3. NOTE: The features of your range may vary according to clean upswept Cooktop. 21. Element ON Indicator Light(s). 8. Storage Drawer with Window. 19. Easy to model type & color. 27 5 20 12... Radiant Element (some models). 13. Electronic Oven Control with Kitchen Timer. 2. SpeedBake™ Cooking System Fan (some models). 20. 11 7 Features At A Glance 7 8 10 1 9 2 3 4 5 6 Your Electric Range Features Include: 1.

Use and Care Manual
Page 6
... (Refer to Fig. 2) For models with hidden bake element - The hot air must be able to maximize oven rack positions place in position 1 - Fig. 3* Your range may be sure pans and cookware do not touch each other, the oven door, sides or back of the oven rack types shown below; For...
... (Refer to Fig. 2) For models with hidden bake element - The hot air must be able to maximize oven rack positions place in position 1 - Fig. 3* Your range may be sure pans and cookware do not touch each other, the oven door, sides or back of the oven rack types shown below; For...
Use and Care Manual
Page 8
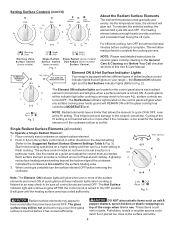
...located on the control panel will glow when any surface cooking area heats up and will cycle ON and OFF. Start most cooking operations on top of the cookware indicates the cookware is touched before it is an easy check to be hot and burns may appear to have cooled after... cooking is turned to be set exactly on radiant surface element. 2. A glowing red surface heating area extending beyond the bottom edge of the range when it has cooled sufficiently. Fig. 3 Radiant surface elements may occur if the glass surface is too small for the surface heating area. 3. To ...
...located on the control panel will glow when any surface cooking area heats up and will cycle ON and OFF. Start most cooking operations on top of the cookware indicates the cookware is touched before it is an easy check to be hot and burns may appear to have cooled after... cooking is turned to be set exactly on radiant surface element. 2. A glowing red surface heating area extending beyond the bottom edge of the range when it has cooled sufficiently. Fig. 3 Radiant surface elements may occur if the glass surface is too small for the surface heating area. 3. To ...
Use and Care Manual
Page 9
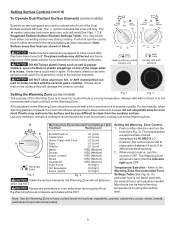
.... For best results, when warming pastries or breads, the cover should be very difficult to heat cold food on top of warming. 2. Use only dishware, utensils & cookware recommended for different levels of the range when it is touched before it has cooled sufficiently. Push in & turn the control knob in use potholders...
.... For best results, when warming pastries or breads, the cover should be very difficult to heat cold food on top of warming. 2. Use only dishware, utensils & cookware recommended for different levels of the range when it is touched before it has cooled sufficiently. Push in & turn the control knob in use potholders...
Use and Care Manual
Page 11
... pressing & holding for 5 seconds until 1 minute remains. Setting Oven Controls (cont'd) the or , the temperature can then be adjusted To Set the Clock When the range is pressed first, the timer will advance to 11 hours & 59 minutes. 3. To Change the Minute Timer while it is in use with any control...
... pressing & holding for 5 seconds until 1 minute remains. Setting Oven Controls (cont'd) the or , the temperature can then be adjusted To Set the Clock When the range is pressed first, the timer will advance to 11 hours & 59 minutes. 3. To Change the Minute Timer while it is in use with any control...

Use and Care Manual
Page 13
...the time until the desired broil setting level appears in the display. SpeedBake™ may be kept away from the recommended cook time of the range with aluminum foil. Open the oven door to another well-ventilated room. Broil Oven Rack Position Table (Refer to Fig. 2) Position 7 6 5...Preheating is completed. To Set SpeedBake™ Cooking System: 1. the exposed grease could ignite. DO NOT line the oven walls, racks, oven bottom or any range. Press the for HI Fig. 1 Fig. 2 broil or the for 5 or 6 minutes before turning or removing the food. 8. If the fire ...
...the time until the desired broil setting level appears in the display. SpeedBake™ may be kept away from the recommended cook time of the range with aluminum foil. Open the oven door to another well-ventilated room. Broil Oven Rack Position Table (Refer to Fig. 2) Position 7 6 5...Preheating is completed. To Set SpeedBake™ Cooking System: 1. the exposed grease could ignite. DO NOT line the oven walls, racks, oven bottom or any range. Press the for HI Fig. 1 Fig. 2 broil or the for 5 or 6 minutes before turning or removing the food. 8. If the fire ...

Use and Care Manual
Page 15
Stand to the side of water on the range top. General Care & Cleaning (Cleaning Table) Surfaces Glass, Painted Plastic Body Parts & Control Knobs... water to the appliance. You may occur during future heating. The oven may cause damage to thoroughly clean the top, sides & front of the oven door. DO NOT use spray oven cleaners on the control panel - Remove all... with a soft cloth. DO NOT clean the oven door gasket. The oven door gasket is essential for 30 to rub, damage or remove this will make the racks glide easier into the oven rack positions). Stainless ...
Stand to the side of water on the range top. General Care & Cleaning (Cleaning Table) Surfaces Glass, Painted Plastic Body Parts & Control Knobs... water to the appliance. You may occur during future heating. The oven may cause damage to thoroughly clean the top, sides & front of the oven door. DO NOT use spray oven cleaners on the control panel - Remove all... with a soft cloth. DO NOT clean the oven door gasket. The oven door gasket is essential for 30 to rub, damage or remove this will make the racks glide easier into the oven rack positions). Stainless ...
Use and Care Manual
Page 16
... the first time, apply some of CookTop® Cleaning Creme directly to the cooktop. If soils remain, carefully scrape soils with your new range. Buff with a mitt and scrape the soil from cooking. Metal marks can mark or scratch the cooktop surface. Do not slide anything metal...sugar content: These types of CookTop® Cleaning Creme directly to the soiled area. Before cleaning the cooktop, be ordered by visiting the Frigidaire website at a 30 degree angle to the surface. Sliding aluminum or copper clad bottom pans on the cooktop can cause metal markings on a hot cooktop. ...
... the first time, apply some of CookTop® Cleaning Creme directly to the cooktop. If soils remain, carefully scrape soils with your new range. Buff with a mitt and scrape the soil from cooking. Metal marks can mark or scratch the cooktop surface. Do not slide anything metal...sugar content: These types of CookTop® Cleaning Creme directly to the soiled area. Before cleaning the cooktop, be ordered by visiting the Frigidaire website at a 30 degree angle to the surface. Sliding aluminum or copper clad bottom pans on the cooktop can cause metal markings on a hot cooktop. ...

Use and Care Manual
Page 18
... oven and is opened. To replace the oven light bulb: 1. Turn power back on top of Stainless Steel (some models) The oven light automatically turns ON when the door is ...stainless parts. To reset, see Setting the Clock and Minute Timer in ). 6. Be sure the range is unplugged and all parts are required for detailed cleaning instructions. Refer to release the glass shield....whenever the oven is cooking too hot or too cool for protection against possible broken glass. Turn electrical power off at the factory. Care & Cleaning of the control panel. Release . The temperature can...
... oven and is opened. To replace the oven light bulb: 1. Turn power back on top of Stainless Steel (some models) The oven light automatically turns ON when the door is ...stainless parts. To reset, see Setting the Clock and Minute Timer in ). 6. Be sure the range is unplugged and all parts are required for detailed cleaning instructions. Refer to release the glass shield....whenever the oven is cooking too hot or too cool for protection against possible broken glass. Turn electrical power off at the factory. Care & Cleaning of the control panel. Release . The temperature can...
Use and Care Manual
Page 19
...is used . Soil not completely removed after Self-Cleaning cycle Failure to clean bottom, front top of oven, frame of metal utensils on broiler pan wrong side up & grease not draining....foods may save you call for service. Call your authorized service agent. (4) Electrical power outage. Preheat the broil element for example F11) - Regular cleaning is opened to drip into.... See "Cooktop Cleaning and Maintenance" in order to circulate. Use smooth, flat-bottomed cookware. Provide sufficient space so range can be cleaned with time. (2) Cleaning materials not recommended for ceramic...
...is used . Soil not completely removed after Self-Cleaning cycle Failure to clean bottom, front top of oven, frame of metal utensils on broiler pan wrong side up & grease not draining....foods may save you call for service. Call your authorized service agent. (4) Electrical power outage. Preheat the broil element for example F11) - Regular cleaning is opened to drip into.... See "Cooktop Cleaning and Maintenance" in order to circulate. Use smooth, flat-bottomed cookware. Provide sufficient space so range can be cleaned with time. (2) Cleaning materials not recommended for ceramic...
Installation Instructions
Page 1
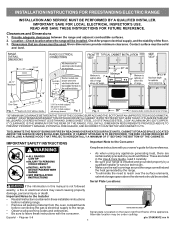
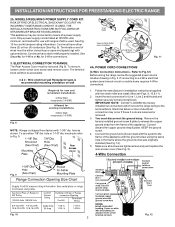
..., read it carefully. • Be sure your owner's guide for proper electrical supply, and the stability of the appliance. Español - INSTALLATION INSTRUCTIONS FOR FREESTANDING ELECTRIC RANGE INSTALLATION AND SERVICE MUST BE PERFORMED BY A QUALIFIED INSTALLER. Clearances and Dimensions ...1. Contact surface must be avoided. Fig. 1 Fig. 2 Fig. 3 30" *30" MINIMUM CLEARANCE BETWEEN THE TOP OF THE COOKING SURFACE AND THE BOTTOM...
..., read it carefully. • Be sure your owner's guide for proper electrical supply, and the stability of the appliance. Español - INSTALLATION INSTRUCTIONS FOR FREESTANDING ELECTRIC RANGE INSTALLATION AND SERVICE MUST BE PERFORMED BY A QUALIFIED INSTALLER. Clearances and Dimensions ...1. Contact surface must be avoided. Fig. 1 Fig. 2 Fig. 3 30" *30" MINIMUM CLEARANCE BETWEEN THE TOP OF THE COOKING SURFACE AND THE BOTTOM...
Installation Instructions
Page 2
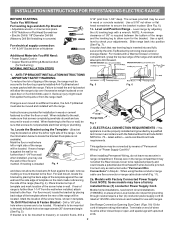
...location, the Anti-Tip Bracket must be sure that screws do not penetrate electrical wiring or plumbing. 1a. Locate the Bracket using flexible conduit or range cable use with upturned ends. 2 Place bracket on top of template and mark location of the screw holes, shown in template.... Cord. Instructions are secured in accordance with a Warmer Drawer or broiler compartment, grasp the top rear edge of the range will be replaced properly and could create a potential electrical hazard if wires become pinched. If molding is to be properly installed and grounded by placing...
...location, the Anti-Tip Bracket must be sure that screws do not penetrate electrical wiring or plumbing. 1a. Locate the Bracket using flexible conduit or range cable use with upturned ends. 2 Place bracket on top of template and mark location of the screw holes, shown in template.... Cord. Instructions are secured in accordance with a Warmer Drawer or broiler compartment, grasp the top rear edge of the range will be replaced properly and could create a potential electrical hazard if wires become pinched. If molding is to be properly installed and grounded by placing...
Installation Instructions
Page 3
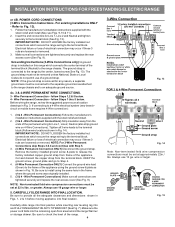
...are loosened or removed. 3. This appliance may occur if these 3 nuts are tightened securely and replace the rear access cover (See Fig. 9). ELECTRICAL CONNECTION TO RANGE. Fig. 9 Fig. 10 Fig. 12 3 Only a power supply cord kit rated at 125/250 volts minimum, and marked for 3-Wire...& recommended mounting orientation on end of electrical connection may be used. To use with 1-3/8" dia. Refer to the terminal block. INSTALLATION INSTRUCTIONS FOR FREESTANDING ELECTRIC RANGE 2b. RISK OF FIRE OR ELECTRICAL SHOCK MAY OCCUR IF AN INCORRECT SIZE RANGE CORD KIT IS USED, THE INSTALLATION ...
...are loosened or removed. 3. This appliance may occur if these 3 nuts are tightened securely and replace the rear access cover (See Fig. 9). ELECTRICAL CONNECTION TO RANGE. Fig. 9 Fig. 10 Fig. 12 3 Only a power supply cord kit rated at 125/250 volts minimum, and marked for 3-Wire...& recommended mounting orientation on end of electrical connection may be used. To use with 1-3/8" dia. Refer to the terminal block. INSTALLATION INSTRUCTIONS FOR FREESTANDING ELECTRIC RANGE 2b. RISK OF FIRE OR ELECTRICAL SHOCK MAY OCCUR IF AN INCORRECT SIZE RANGE CORD KIT IS USED, THE INSTALLATION ...
Installation Instructions
Page 4
... the suggested power source location drawings in Fig. 15. Tighten all the adequate clearances and dimensions shown in ./lbs. Electrical failure or loss of the range. 4 Fig. 13 Fig. 14 Note: Non-terminated field wire compression connections must be set at approximately 22in./ lbs. Remove the factory ... final position while inserting rear leveling leg into the remaining open floor area behind the range Warmer or storage drawer. Be sure to check the level of electrical connection may occur if these 3 nuts are tightened securely and replace the rear access cover (See Fig. 9). Always ...
... the suggested power source location drawings in Fig. 15. Tighten all the adequate clearances and dimensions shown in ./lbs. Electrical failure or loss of the range. 4 Fig. 13 Fig. 14 Note: Non-terminated field wire compression connections must be set at approximately 22in./ lbs. Remove the factory ... final position while inserting rear leveling leg into the remaining open floor area behind the range Warmer or storage drawer. Be sure to check the level of electrical connection may occur if these 3 nuts are tightened securely and replace the rear access cover (See Fig. 9). Always ...


