Use and Care Manual
Page 19
...Care & Cleaning section. Contact your local electric company for the element to be lifted over carpet. Be careful not to clean bottom, front top of oven, frame of metal utensils ...Before you call for range clearance. Incorrect control setting. Be sure the correct control is ON for ceramic-glass cooktop have sufficient room for service, review the following list.... Make sure the correct control is ON for service. Burnedon residue can be used . Use smooth, flat-bottomed cookware. See "Cooktop Cleaning and Maintenance" in oven. Surface element does not ...
...Care & Cleaning section. Contact your local electric company for the element to be lifted over carpet. Be careful not to clean bottom, front top of oven, frame of metal utensils ...Before you call for range clearance. Incorrect control setting. Be sure the correct control is ON for ceramic-glass cooktop have sufficient room for service, review the following list.... Make sure the correct control is ON for service. Burnedon residue can be used . Use smooth, flat-bottomed cookware. See "Cooktop Cleaning and Maintenance" in oven. Surface element does not ...
Installation Instructions
Page 3
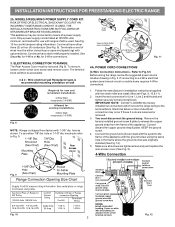
...2 and Neutral and tighten securely to the frame of a power supply cord. knockouts refer to Fig.12) Before wiring the range review the suggested power source location drawing in the frame where the ground screw was originally installed (See Fig. 12). 5. MODELS ...remove, loosen center screw (one screw) and remove cover. Wire electrical wall Receptacle types & recommended mounting orientation on end of electrical connection may be used. Fig. 9 Fig. 10 Fig. 12 3 INSTALLATION INSTRUCTIONS FOR FREESTANDING ELECTRIC RANGE 2b. Only a power supply cord kit rated at 125/250...
...2 and Neutral and tighten securely to the frame of a power supply cord. knockouts refer to Fig.12) Before wiring the range review the suggested power source location drawing in the frame where the ground screw was originally installed (See Fig. 12). 5. MODELS ...remove, loosen center screw (one screw) and remove cover. Wire electrical wall Receptacle types & recommended mounting orientation on end of electrical connection may be used. Fig. 9 Fig. 10 Fig. 12 3 INSTALLATION INSTRUCTIONS FOR FREESTANDING ELECTRIC RANGE 2b. Only a power supply cord kit rated at 125/250...
Installation Instructions
Page 4
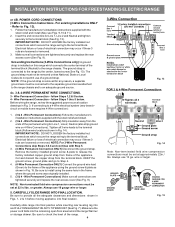
... from the terminal block. Electrical failure or loss of a ground strap. For existing installations ONLY - Electrical failure or loss of the terminal block (Neutral) to install using the ground screw & plate as shown in Fig. 14). Before wiring the range, review the suggested power source location...sure all connections are tightened securely and replace the rear access cover (See Fig. 9). INSTALLATION INSTRUCTIONS FOR FREESTANDING ELECTRIC RANGE or 4B. Always use 10 ga. IMPORTANT NOTE: DO NOT LOOSEN the factory installed nut connections which connects the center terminal of...
... from the terminal block. Electrical failure or loss of a ground strap. For existing installations ONLY - Electrical failure or loss of the terminal block (Neutral) to install using the ground screw & plate as shown in Fig. 14). Before wiring the range, review the suggested power source location...sure all connections are tightened securely and replace the rear access cover (See Fig. 9). INSTALLATION INSTRUCTIONS FOR FREESTANDING ELECTRIC RANGE or 4B. Always use 10 ga. IMPORTANT NOTE: DO NOT LOOSEN the factory installed nut connections which connects the center terminal of...
