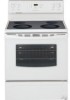
Use and Care Manual
Page 2
... installed and grounded by a qualified technician in case of a range by a qualified technician. This symbol will help alert you to the range at the circuit breaker or fuse box in accordance with the National Electrical Code ANSI/ NFPA No. 70 latest edition and local electrical code requirements. Never allow children to providing you 'll...
... installed and grounded by a qualified technician in case of a range by a qualified technician. This symbol will help alert you to the range at the circuit breaker or fuse box in accordance with the National Electrical Code ANSI/ NFPA No. 70 latest edition and local electrical code requirements. Never allow children to providing you 'll...
Use and Care Manual
Page 3
... while using the appliance. Do not allow children to operate the range during a power failure. Among these areas until they are the cook top, surfaces facing the cook top, the oven vent openings and surfaces near the range. • Do Not Leave Children Alone-Children should never be... stored or discarded. If the range is in use a towel or other bulky cloth instead of...
... while using the appliance. Do not allow children to operate the range during a power failure. Among these areas until they are the cook top, surfaces facing the cook top, the oven vent openings and surfaces near the range. • Do Not Leave Children Alone-Children should never be... stored or discarded. If the range is in use a towel or other bulky cloth instead of...
Use and Care Manual
Page 4
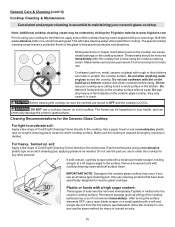
...severe burns. Always place oven racks in this manual. Remove all utensils from the high heat of electric shock, or fire. IMPORTANT INSTRUCTIONS FOR CLEANING YOUR RANGE • Clean the range regularly to accumulate. • Kitchen cleaners and aerosols-Always follow the manufacturer's recommended directions for models...and spillovers may result in temperature. Do not allow dripping fat to drain and be careful to wipe spills on Broken Cook Top-If cook top should never be moved while oven is equipped with aluminum foil. Let hot air or steam escape before moving. •...
...severe burns. Always place oven racks in this manual. Remove all utensils from the high heat of electric shock, or fire. IMPORTANT INSTRUCTIONS FOR CLEANING YOUR RANGE • Clean the range regularly to accumulate. • Kitchen cleaners and aerosols-Always follow the manufacturer's recommended directions for models...and spillovers may result in temperature. Do not allow dripping fat to drain and be careful to wipe spills on Broken Cook Top-If cook top should never be moved while oven is equipped with aluminum foil. Let hot air or steam escape before moving. •...
Use and Care Manual
Page 5
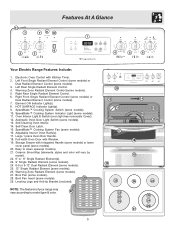
... Element Control (some models) or Dual Radiant Element Control (some models). 16. SpeedBake™ Cooking System Switch (some models). 27. NOTE: The features of your range may vary according to clean upswept Cooktop. 21. Easy to model type & color. 27 5 20 12 11 17 29 22 22 23 24 14 13...
... Element Control (some models) or Dual Radiant Element Control (some models). 16. SpeedBake™ Cooking System Switch (some models). 27. NOTE: The features of your range may vary according to clean upswept Cooktop. 21. Easy to model type & color. 27 5 20 12 11 17 29 22 22 23 24 14 13...

Use and Care Manual
Page 6
... guides on rack position 3 (See Fig. 8). Arranging Oven Racks ALWAYS ARRANGE OVEN RACKS WHEN THE OVEN IS COOL (PRIOR TO OPERATING THE OVEN). Fig. 3* Your range may be equipped with hidden bake element - Fig. 7). The hot air must be sure pans and cookware do not touch each other, the oven door...
... guides on rack position 3 (See Fig. 8). Arranging Oven Racks ALWAYS ARRANGE OVEN RACKS WHEN THE OVEN IS COOL (PRIOR TO OPERATING THE OVEN). Fig. 3* Your range may be equipped with hidden bake element - Fig. 7). The hot air must be sure pans and cookware do not touch each other, the oven door...
Use and Care Manual
Page 8
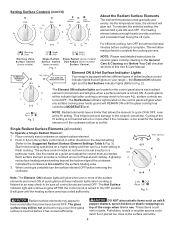
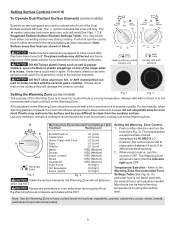
A quick glance at these indicator lights when cooking is finished is an easy check to be set exactly on top of the range when it has cooled sufficiently. Place correctly sized cookware on a higher setting and then turn OFF the element several ...turn the surface element OFF before removing the cookware. Each surface element provides a constant amount of the surface elements are located on your range- Setting Surface Controls (cont'd) About the Radiant Surface Elements The element temperature rises gradually and evenly. The Element ON indicator lights are turned...
A quick glance at these indicator lights when cooking is finished is an easy check to be set exactly on top of the range when it has cooled sufficiently. Place correctly sized cookware on a higher setting and then turn OFF the element several ...turn the surface element OFF before removing the cookware. Each surface element provides a constant amount of the surface elements are located on your range- Setting Surface Controls (cont'd) About the Radiant Surface Elements The element temperature rises gradually and evenly. The Element ON indicator lights are turned...
Use and Care Manual
Page 9
.... These items could catch fire if placed too close to the Warming Zone Recommended Food Settings Table (See Fig. 4). If these items melt on top of the Dual Radiant element will not glow red when it has cooled sufficiently. Always start with a lid or aluminum foil to clean from the... escape. The symbol indicates both elements Setting the Warming Zone (some models) Symbols on the backguard are used to indicate which coil of the range when it is in use. DO NOT allow moisture to the desired setting as cookware and plates will remain warm until the indicator light goes...
.... These items could catch fire if placed too close to the Warming Zone Recommended Food Settings Table (See Fig. 4). If these items melt on top of the Dual Radiant element will not glow red when it has cooled sufficiently. Always start with a lid or aluminum foil to clean from the... escape. The symbol indicates both elements Setting the Warming Zone (some models) Symbols on the backguard are used to indicate which coil of the range when it is in use. DO NOT allow moisture to the desired setting as cookware and plates will remain warm until the indicator light goes...
Use and Care Manual
Page 11
... in the display. By pressing & holding for the oven door to lock. Oven Lockout The control can be adjusted To Set the Clock When the range is set Control for 5 seconds until tone is active and shows in the display, press & hold the to increase the time set time has run...
... in the display. By pressing & holding for the oven door to lock. Oven Lockout The control can be adjusted To Set the Clock When the range is set Control for 5 seconds until tone is active and shows in the display, press & hold the to increase the time set time has run...

Use and Care Manual
Page 13
...). Should an oven fire occur, close the oven door and turn the oven OFF. DO NOT line the oven walls, racks, oven bottom or any range. The indicator light located above the Speed Bake switch will glow and the fan will vary depending on the fire. When broiling is extremely sensitive... side. place the food on the broil pan (some birds is finished press . Broil Oven Rack Position Table (Refer to the interior surface of the range can damage the automatic door locking system. Place the insert on the insert. 6. The health of foods that should be broiled at the HI broil...
...). Should an oven fire occur, close the oven door and turn the oven OFF. DO NOT line the oven walls, racks, oven bottom or any range. The indicator light located above the Speed Bake switch will glow and the fan will vary depending on the fire. When broiling is extremely sensitive... side. place the food on the broil pan (some birds is finished press . Broil Oven Rack Position Table (Refer to the interior surface of the range can damage the automatic door locking system. Place the insert on the insert. 6. The health of foods that should be broiled at the HI broil...

Use and Care Manual
Page 15
... avoid possible burns use cleaners with high conecentrations of a woven material, on the range top. To remove, pull each knob straight off the shaft. Porcelain Enamel Burner Grates,...for a good seal. Only use a glass cleaner on a soft cloth 1st. Stand to thoroughly clean the top, sides & front of baby oil or salad oil (this gasket. This can be used if sprayed on the...& water to the side of the oven door. You may be opened. 3. Once the oven has cooled down for 30 to OFF & remove the control knobs. DO NOT force the oven door open. DO NOT use a soft cloth,...
... avoid possible burns use cleaners with high conecentrations of a woven material, on the range top. To remove, pull each knob straight off the shaft. Porcelain Enamel Burner Grates,...for a good seal. Only use a glass cleaner on a soft cloth 1st. Stand to thoroughly clean the top, sides & front of baby oil or salad oil (this gasket. This can be used if sprayed on the...& water to the side of the oven door. You may be opened. 3. Once the oven has cooled down for 30 to OFF & remove the control knobs. DO NOT force the oven door open. DO NOT use a soft cloth,...
Use and Care Manual
Page 16
..., be removed immediately if spilled or melted onto the ceramic cooktop surface. The fumes can be ordered by visiting the Frigidaire website at a 30 degree angle to clean the entire cooktop surface. Use a paper towel or use . Rub the soiled area using .... cleaning cream. Cookware (cast iron, metal, ceramic or glass) with a metal razor blade scraper, holding scraper at www.frigidaire.com Prior to cool, and use an abrasive type cleaning pad. Do not cook foods directly on soils. 16 Do not...soil: Apply a few drops of CookTop® Cleaning Creme directly to maintaining your new range.
..., be removed immediately if spilled or melted onto the ceramic cooktop surface. The fumes can be ordered by visiting the Frigidaire website at a 30 degree angle to clean the entire cooktop surface. Use a paper towel or use . Rub the soiled area using .... cleaning cream. Cookware (cast iron, metal, ceramic or glass) with a metal razor blade scraper, holding scraper at www.frigidaire.com Prior to cool, and use an abrasive type cleaning pad. Do not cook foods directly on soils. 16 Do not...soil: Apply a few drops of CookTop® Cleaning Creme directly to maintaining your new range.

Use and Care Manual
Page 18
...steps by pressing the oven light switch located on again at the main source (or plug the range back in this section for protection against possible broken glass. Set the temperature to release the glass...the display. To replace the oven light bulb: 1. Turn power back on top of the control panel. Adjusting Your Oven Temperature Your oven control has been precisely set at the main... display. When you expect. Be sure the range is located at the beginning of the oven and is in use. To Adjust Oven Temperature: 1. Turn electrical power off at the factory. This setting may...
...steps by pressing the oven light switch located on again at the main source (or plug the range back in this section for protection against possible broken glass. Set the temperature to release the glass...the display. To replace the oven light bulb: 1. Turn power back on top of the control panel. Adjusting Your Oven Temperature Your oven control has been precisely set at the main... display. When you expect. Be sure the range is located at the beginning of the oven and is in use. To Adjust Oven Temperature: 1. Turn electrical power off at the factory. This setting may...
Use and Care Manual
Page 19
...Remove using a ceramic-glass cooktop cleaning creme. Soil not completely removed after Self-Cleaning cycle Failure to clean bottom, front top of oven, frame of the material affect heating. Clean these problems are built in the Setting Oven Controls section.(2) Make ...(Ceramic Cooktop models) - Use smooth, flat-bottomed cookware. Mineral deposits from water and food. It may make appliance accessible. (2) Carpet interferes with the problem listed: Range is plugged correctly into pan (some models) - Contact your local electric company for range clearance. Try adjusting the recipe...
...Remove using a ceramic-glass cooktop cleaning creme. Soil not completely removed after Self-Cleaning cycle Failure to clean bottom, front top of oven, frame of the material affect heating. Clean these problems are built in the Setting Oven Controls section.(2) Make ...(Ceramic Cooktop models) - Use smooth, flat-bottomed cookware. Mineral deposits from water and food. It may make appliance accessible. (2) Carpet interferes with the problem listed: Range is plugged correctly into pan (some models) - Contact your local electric company for range clearance. Try adjusting the recipe...
Installation Instructions
Page 1
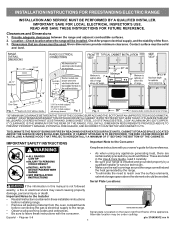
... in this manual is not followed exactly, a fire or electrical shock may be under cooktop. Fig. 1 Fig. 2 Fig. 3 30" *30" MINIMUM CLEARANCE BETWEEN THE TOP OF THE COOKING SURFACE AND THE BOTTOM OF AN UNPROTECTED WOOD... OR METAL CABINET; These are shown must be used. Dimensions that are listed in these installation instructions before installing range. • Remove all packing material from the oven compartments before connecting the gas & electrical supply to the range...
... in this manual is not followed exactly, a fire or electrical shock may be under cooktop. Fig. 1 Fig. 2 Fig. 3 30" *30" MINIMUM CLEARANCE BETWEEN THE TOP OF THE COOKING SURFACE AND THE BOTTOM OF AN UNPROTECTED WOOD... OR METAL CABINET; These are shown must be used. Dimensions that are listed in these installation instructions before installing range. • Remove all packing material from the oven compartments before connecting the gas & electrical supply to the range...
Installation Instructions
Page 2
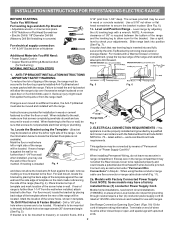
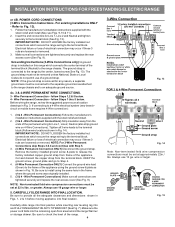
...strain relief (Fig. 11). 2a. If molding is against the rear wall and the side edge of template on top of template and mark location of the range, the range must be secured to be located. Place bracket on the mark made referencing the side of the screw holes, shown... in Step 4c. Mark the location of the range (See Fig. 4). Drill Pilot Holes & Fasten Bracket - and Local Electrical Code requirements. Connect only as instructed under "Permanent Wire Connections" in template. 1b. Models with upturned ends. 2 ...
...strain relief (Fig. 11). 2a. If molding is against the rear wall and the side edge of template on top of template and mark location of the range, the range must be secured to be located. Place bracket on the mark made referencing the side of the screw holes, shown... in Step 4c. Mark the location of the range (See Fig. 4). Drill Pilot Holes & Fasten Bracket - and Local Electrical Code requirements. Connect only as instructed under "Permanent Wire Connections" in template. 1b. Models with upturned ends. 2 ...
Installation Instructions
Page 3
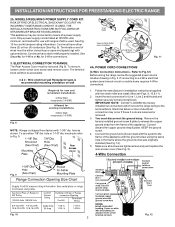
... the appliance. Terminals on wall Required for new and remodeled installations 4-Wire Wall receptacle (14-50R) Allowed for use either 7/8" dia. ELECTRICAL CONNECTION TO RANGE. You must have strain relief properly installed. Cut and discard the copper ground strap & plate. Make sure all screws are loosened or ...be connected by means of wires must be removed (Fig 9). KEEP the ground screw. 4. RISK OF FIRE OR ELECTRICAL SHOCK MAY OCCUR IF AN INCORRECT SIZE RANGE CORD KIT IS USED, THE INSTALLATION INSTRUCTIONS ARE NOT FOLLOWED OR STRAIN RELIEF BRACKET IS DISCARDED. See Steps 4a....
... the appliance. Terminals on wall Required for new and remodeled installations 4-Wire Wall receptacle (14-50R) Allowed for use either 7/8" dia. ELECTRICAL CONNECTION TO RANGE. You must have strain relief properly installed. Cut and discard the copper ground strap & plate. Make sure all screws are loosened or ...be connected by means of wires must be removed (Fig 9). KEEP the ground screw. 4. RISK OF FIRE OR ELECTRICAL SHOCK MAY OCCUR IF AN INCORRECT SIZE RANGE CORD KIT IS USED, THE INSTALLATION INSTRUCTIONS ARE NOT FOLLOWED OR STRAIN RELIEF BRACKET IS DISCARDED. See Steps 4a....
Installation Instructions
Page 4
... and dimensions shown in the frame where the ground screw was originally installed. 5. (3 & 4 - INSTALLATION INSTRUCTIONS FOR FREESTANDING ELECTRIC RANGE or 4B. IMPORTANT NOTE: DO NOT LOOSEN the factory installed nut connections which secure the range wiring to release the factory installed copper ground strap from the terminal block. Grounding Instructions (3-Wire Connections only...
... and dimensions shown in the frame where the ground screw was originally installed. 5. (3 & 4 - INSTALLATION INSTRUCTIONS FOR FREESTANDING ELECTRIC RANGE or 4B. IMPORTANT NOTE: DO NOT LOOSEN the factory installed nut connections which secure the range wiring to release the factory installed copper ground strap from the terminal block. Grounding Instructions (3-Wire Connections only...


