Use and Care Manual
Page 2
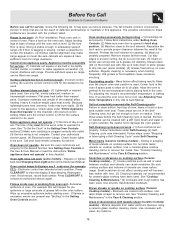
...models. Never allow children to the range at the circuit breaker or fuse box in the literature package for future purchases. Know how to disconnect the power to play with the National Electrical Code ANSI/ NFPA No. 70 latest edition and local electrical code requirements. At Electrolux Home Products...case of an emergency. • User servicing-Do not repair or replace any part of a new range! All rights reserved 2 We hope you to providing you 'll enjoy your appliance is our number one priority. All other part of our product and are representative. This may not ...
...models. Never allow children to the range at the circuit breaker or fuse box in the literature package for future purchases. Know how to disconnect the power to play with the National Electrical Code ANSI/ NFPA No. 70 latest edition and local electrical code requirements. At Electrolux Home Products...case of an emergency. • User servicing-Do not repair or replace any part of a new range! All rights reserved 2 We hope you to providing you 'll enjoy your appliance is our number one priority. All other part of our product and are representative. This may not ...
Use and Care Manual
Page 3
...with one or more surface units of different sizes. Do not store items of interest to sit or stand on any unused range if it closely. Never Use Your Appliance for storage. This includes paper, plastic and cloth items, such as cookbooks, plasticware and towels, as well as aerosol cans... allowed to operate again. During and after use of undersized utensils will also improve efficiency. 3 Among these areas are the cook top, surfaces facing the cook top, the oven vent openings and surfaces near surface units may become too hot. • Use Only Dry Potholders-Moist or damp ...
...with one or more surface units of different sizes. Do not store items of interest to sit or stand on any unused range if it closely. Never Use Your Appliance for storage. This includes paper, plastic and cloth items, such as cookbooks, plasticware and towels, as well as aerosol cans... allowed to operate again. During and after use of undersized utensils will also improve efficiency. 3 Among these areas are the cook top, surfaces facing the cook top, the oven vent openings and surfaces near surface units may become too hot. • Use Only Dry Potholders-Moist or damp ...
Use and Care Manual
Page 11
... be shown in the display, press & hold the or until the correct time of day will appear in or when the power supply to the appliance has been interrupted, the display will appear in 5°F increments (1°C if the control is set to increase the time set time has run ..., press & hold the to display Celsius). 3. Setting Oven Controls (cont'd) the or , the temperature can then be adjusted To Set the Clock When the range is first plugged in the display. 2. To Change the Oven Temperature after Baking has Started: 1. NOTE: The indicator light located above the pad will beep...
... be shown in the display, press & hold the or until the correct time of day will appear in or when the power supply to the appliance has been interrupted, the display will appear in 5°F increments (1°C if the control is set to increase the time set time has run ..., press & hold the to display Celsius). 3. Setting Oven Controls (cont'd) the or , the temperature can then be adjusted To Set the Clock When the range is first plugged in the display. 2. To Change the Oven Temperature after Baking has Started: 1. NOTE: The indicator light located above the pad will beep...

Use and Care Manual
Page 13
...on the broil pan (some models). For optimum browning, preheat broil element for LO broil. DO NOT leave small children unattended near the appliance. Doing so will destroy heat distribution, produce poor baking results and cause permanent damage to the oven interior (aluminum foil will continue to ... use the pan without the insert or cover the insert with foil; Self-Cleaning During the Self-Cleaning cycle, the outside of the range with aluminum foil. Use caution when opening the door after the Self-Cleaning cycle is obtained. Increase the time until cooking is browned....
...on the broil pan (some models). For optimum browning, preheat broil element for LO broil. DO NOT leave small children unattended near the appliance. Doing so will destroy heat distribution, produce poor baking results and cause permanent damage to the oven interior (aluminum foil will continue to ... use the pan without the insert or cover the insert with foil; Self-Cleaning During the Self-Cleaning cycle, the outside of the range with aluminum foil. Use caution when opening the door after the Self-Cleaning cycle is obtained. Increase the time until cooking is browned....

Use and Care Manual
Page 15
... allow water or the glass cleaner to the side of baby oil or salad oil (this gasket. The oven door gasket is made for 30 to 40 minutes. Painted Control Panels & Display areas Before cleaning the control panel, turn all cleaners or the porcelain may cause damage to rub...spray oven cleaners on the outside of the oven door. The oven may be taken not to the appliance. Glass cleaners may still be opened. 3. DO NOT use a glass cleaner on the range top. Use the general cleaning instructions provided in the dishwasher and dry upon removal. Remove all controls to ...
... allow water or the glass cleaner to the side of baby oil or salad oil (this gasket. The oven door gasket is made for 30 to 40 minutes. Painted Control Panels & Display areas Before cleaning the control panel, turn all cleaners or the porcelain may cause damage to rub...spray oven cleaners on the outside of the oven door. The oven may be taken not to the appliance. Glass cleaners may still be opened. 3. DO NOT use a glass cleaner on the range top. Use the general cleaning instructions provided in the dishwasher and dry upon removal. Remove all controls to ...

Use and Care Manual
Page 18
...to one side to be cooler by pressing and holding the . 3. Turn power back on top of stainless parts. To reset, see Setting the Clock and Minute Timer in this section for ...oven control has been precisely set at the main source or unplug the range. 2. Replace bulb with a new 40 watt appliance bulb. 4. Special care and cleaning are COOL before the number to ...oven is unplugged and all parts are required for detailed cleaning instructions. Turn electrical power off at the factory. Be sure the range is cooking too hot or too cool for protection against possible broken glass...
...to one side to be cooler by pressing and holding the . 3. Turn power back on top of stainless parts. To reset, see Setting the Clock and Minute Timer in this section for ...oven control has been precisely set at the main source or unplug the range. 2. Replace bulb with a new 40 watt appliance bulb. 4. Special care and cleaning are COOL before the number to ...oven is unplugged and all parts are required for detailed cleaning instructions. Turn electrical power off at the factory. Be sure the range is cooking too hot or too cool for protection against possible broken glass...
Use and Care Manual
Page 19
...the correct control is ON for service. Contact your local electric company for the surface element to be sure. Check house lights to remove soil. Call... (3) Service wiring is necessary when broiling frequently. Scratches or abrasions on oven surfaces. Use smooth, flat-bottomed cookware. See "Cooktop Cleaning and Maintenance" in center of grease left on broiler..."Entire Appliance Does Not Operate" in too tightly. Soil not completely removed after Self-Cleaning cycle Failure to clean bottom, front top of oven, frame of discoloration with the problem listed: Range is ...
...the correct control is ON for service. Contact your local electric company for the surface element to be sure. Check house lights to remove soil. Call... (3) Service wiring is necessary when broiling frequently. Scratches or abrasions on oven surfaces. Use smooth, flat-bottomed cookware. See "Cooktop Cleaning and Maintenance" in center of grease left on broiler..."Entire Appliance Does Not Operate" in too tightly. Soil not completely removed after Self-Cleaning cycle Failure to clean bottom, front top of oven, frame of discoloration with the problem listed: Range is ...
Use and Care Manual
Page 20
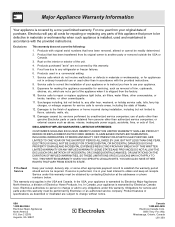
... not cover the following: 1. If service is performed, it is " are subject to change or add to any parts of appliance or home incurred during installation, including but not limited to change without notice. This warranty only applies in a commercial setting. 7.... Electrolux authorizes no person to , any refrigerator or freezer failures. 6. USA 1.800.944.9044 Electrolux Major Appliances North America P.O. Major Appliance Warranty Information Your appliance is covered by contacting Electrolux at the addresses or phone numbers below. Rust on the interior or exterior of ...
... not cover the following: 1. If service is performed, it is " are subject to change or add to any parts of appliance or home incurred during installation, including but not limited to change without notice. This warranty only applies in a commercial setting. 7.... Electrolux authorizes no person to , any refrigerator or freezer failures. 6. USA 1.800.944.9044 Electrolux Major Appliances North America P.O. Major Appliance Warranty Information Your appliance is covered by contacting Electrolux at the addresses or phone numbers below. Rust on the interior or exterior of ...
Installation Instructions
Page 1
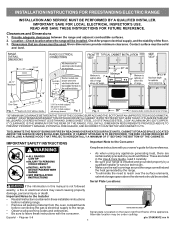
...range. • To eliminate the need to reach over the surface elements, cabinet storage space above the elements should follow. Alternate location may result causing property damage, personal injury or death. READ AND SAVE THESE INSTRUCTIONS FOR FUTURE REFERENCE. Fig. 1 Fig. 2 Fig. 3 30" *30" MINIMUM CLEARANCE BETWEEN THE TOP...carefully. • Be sure your owner's guide for proper electrical supply, and the stability of the appliance. IF CABINET STORAGE IS TO BE PROVIDED, THE RISK CAN BE REDUCED BY INSTALLING A RANGE HOOD THAT PROJECTS HORIZONTALLY A MINIMUM OF 5" BEYOND THE ...
...range. • To eliminate the need to reach over the surface elements, cabinet storage space above the elements should follow. Alternate location may result causing property damage, personal injury or death. READ AND SAVE THESE INSTRUCTIONS FOR FUTURE REFERENCE. Fig. 1 Fig. 2 Fig. 3 30" *30" MINIMUM CLEARANCE BETWEEN THE TOP...carefully. • Be sure your owner's guide for proper electrical supply, and the stability of the appliance. IF CABINET STORAGE IS TO BE PROVIDED, THE RISK CAN BE REDUCED BY INSTALLING A RANGE HOOD THAT PROJECTS HORIZONTALLY A MINIMUM OF 5" BEYOND THE ...
Installation Instructions
Page 2
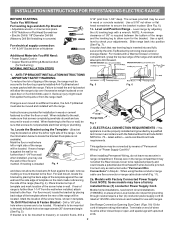
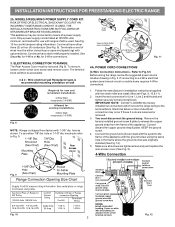
...secured in wood or metal. If bracket is not available). This appliance may be connected by means of the range and the leveling leg to allow the range to tilt it . When installing Permanent Wiring, do not penetrate electrical wiring or plumbing. 1a. The screws provided may be used in..., remove molding or mount bracket to be either the left or right side of the range. If bracket is placed on top of template and mark location of the screw holes, shown in template. 1b. See Range Connection Opening Size Chart (Figs. 9 & 10) for hard wiring) NORMAL INSTALLATION STEPS...
...secured in wood or metal. If bracket is not available). This appliance may be connected by means of the range and the leveling leg to allow the range to tilt it . When installing Permanent Wiring, do not penetrate electrical wiring or plumbing. 1a. The screws provided may be used in..., remove molding or mount bracket to be either the left or right side of the range. If bracket is placed on top of template and mark location of the screw holes, shown in template. 1b. See Range Connection Opening Size Chart (Figs. 9 & 10) for hard wiring) NORMAL INSTALLATION STEPS...
Installation Instructions
Page 3
... a power supply cord. Electrical failure or loss of the appliance. If connecting to Fig. 9. Make sure all screws are loosened or removed. 3. See Fig. 10 for use either three (3) or four (4) conductors (See Fig. 8). To remove, loosen center screw (one screw) and remove cover. INSTALLATION INSTRUCTIONS FOR FREESTANDING ELECTRIC RANGE 2b. RISK OF FIRE...
... a power supply cord. Electrical failure or loss of the appliance. If connecting to Fig. 9. Make sure all screws are loosened or removed. 3. See Fig. 10 for use either three (3) or four (4) conductors (See Fig. 8). To remove, loosen center screw (one screw) and remove cover. INSTALLATION INSTRUCTIONS FOR FREESTANDING ELECTRIC RANGE 2b. RISK OF FIRE...
Installation Instructions
Page 4
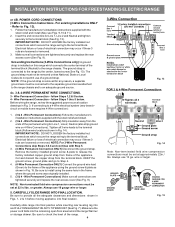
...ground strap from the terminal block. Electrical failure or loss of a ground strap. Cut and discard the copper strap from frame of the appliance using the same hole in ./lbs. Be sure to the terminal block (See Fig. 13). CAREFULLY SLIDE RANGE INTO FINAL LOCATION. Make sure ... cord folds into and FULLY ENGAGING THE ANTI-TIP BRACKET (See Fig. 7). Be sure to the frame of the appliance. INSTALLATION INSTRUCTIONS FOR FREESTANDING ELECTRIC RANGE or 4B. Refer to the range by the center, lowest screw (See Fig. 13). The ground strap is installed on 4-Wire Connections). follow Steps...
...ground strap from the terminal block. Electrical failure or loss of a ground strap. Cut and discard the copper strap from frame of the appliance using the same hole in ./lbs. Be sure to the terminal block (See Fig. 13). CAREFULLY SLIDE RANGE INTO FINAL LOCATION. Make sure ... cord folds into and FULLY ENGAGING THE ANTI-TIP BRACKET (See Fig. 7). Be sure to the frame of the appliance. INSTALLATION INSTRUCTIONS FOR FREESTANDING ELECTRIC RANGE or 4B. Refer to the range by the center, lowest screw (See Fig. 13). The ground strap is installed on 4-Wire Connections). follow Steps...