Use and Care Manual
Page 2
... like those shown. Welcome & Congratulations Serial plate location; Destroy the carton and plastic bags after unpacking the range. We know you with the National Electrical Code ANSI/ NFPA No. 70 latest edition and local electrical code requirements. We hope you consider us for this appliance. PLEASE CAREFULLY READ AND SAVE THESE INSTRUCTIONS This...
... like those shown. Welcome & Congratulations Serial plate location; Destroy the carton and plastic bags after unpacking the range. We know you with the National Electrical Code ANSI/ NFPA No. 70 latest edition and local electrical code requirements. We hope you consider us for this appliance. PLEASE CAREFULLY READ AND SAVE THESE INSTRUCTIONS This...
Use and Care Manual
Page 3
... for storage. Select utensils having flat bottoms large enough to climb or play around the range. Once the power resumes, reset the clock and oven function. This includes paper, plastic...or near these areas until they are the cook top, surfaces facing the cook top, the oven vent openings and surfaces near the range. • Do Not Leave Children Alone-Children should... never be allowed to sit or stand on any unused range if it on, and turn off and the power resumes, the range...
... for storage. Select utensils having flat bottoms large enough to climb or play around the range. Once the power resumes, reset the clock and oven function. This includes paper, plastic...or near these areas until they are the cook top, surfaces facing the cook top, the oven vent openings and surfaces near the range. • Do Not Leave Children Alone-Children should... never be allowed to sit or stand on any unused range if it on, and turn off and the power resumes, the range...
Use and Care Manual
Page 4
... cause smoking and greasy spillovers that may ignite, or a pan that has boiled dry may penetrate the broken cook top and create a risk of electric shock. Heating elements should be careful to the area underneath each surface element. Follow manufacturer's instructions for models equipped ...to cause cancer, birth defects or other glazed utensils are suitable for cook top service without its insert allow grease to a hot surface. 4 IMPORTANT INSTRUCTIONS FOR CLEANING YOUR RANGE • Clean the range regularly to such substances. Remove all parts free of grease that excess ...
... cause smoking and greasy spillovers that may ignite, or a pan that has boiled dry may penetrate the broken cook top and create a risk of electric shock. Heating elements should be careful to the area underneath each surface element. Follow manufacturer's instructions for models equipped ...to cause cancer, birth defects or other glazed utensils are suitable for cook top service without its insert allow grease to a hot surface. 4 IMPORTANT INSTRUCTIONS FOR CLEANING YOUR RANGE • Clean the range regularly to such substances. Remove all parts free of grease that excess ...
Use and Care Manual
Page 5
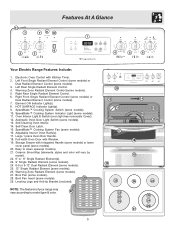
... Fan (some models). 27. Warming Zone Radiant Element (some models). 16. 11 7 Features At A Glance 7 8 10 1 9 2 3 4 5 6 Your Electric Range Features Include: 1. Warming Zone Radiant Element Control (some models). 11. SpeedBake™ Cooking System Indicator Light (some models). 5. Self-Cleaning Oven interior. 14. Large 1... (some models). 28 29. Left Rear Single Radiant Element Control. 4. NOTE: The features of your range may vary according to clean upswept Cooktop. 21. Broil Pan Insert (some models). 28. Right Rear Single Radiant Element Control. 6.
... Fan (some models). 27. Warming Zone Radiant Element (some models). 16. 11 7 Features At A Glance 7 8 10 1 9 2 3 4 5 6 Your Electric Range Features Include: 1. Warming Zone Radiant Element Control (some models). 11. SpeedBake™ Cooking System Indicator Light (some models). 5. Self-Cleaning Oven interior. 14. Large 1... (some models). 28 29. Left Rear Single Radiant Element Control. 4. NOTE: The features of your range may vary according to clean upswept Cooktop. 21. Broil Pan Insert (some models). 28. Right Rear Single Radiant Element Control. 6.

Use and Care Manual
Page 6
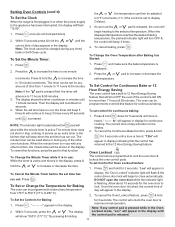
... when using the oven. DO NOT BLOCK OVEN VENT. Fig. 2 Removing & Replacing Oven Racks To remove, pull the rack forward until it stops. Fig. 3* Your range may be sure pans and cookware do not touch each other, the oven door, sides or back of the control panel (See Fig. 1). Before Setting...
... when using the oven. DO NOT BLOCK OVEN VENT. Fig. 2 Removing & Replacing Oven Racks To remove, pull the rack forward until it stops. Fig. 3* Your range may be sure pans and cookware do not touch each other, the oven door, sides or back of the control panel (See Fig. 1). Before Setting...
Use and Care Manual
Page 8
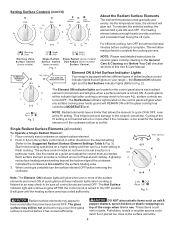
...element control knob and will glow when a surface element is not flat. As the temperature rises, the element will glow on top of this indicator light after they have cooled after cooking is in the General Care & Cleaning and Before You Call checklist sections of... Radiant Element: 1. Use the marks as a guide and adjust the control knob as salt & pepper shakers, spoon holders or plastic wrappings on your range- Fig. 3 Radiant surface elements may still be set exactly on radiant surface element. 2. Warming Zone Surface Control (some models) Surface Control NOTE: ...
...element control knob and will glow when a surface element is not flat. As the temperature rises, the element will glow on top of this indicator light after they have cooled after cooking is in the General Care & Cleaning and Before You Call checklist sections of... Radiant Element: 1. Use the marks as a guide and adjust the control knob as salt & pepper shakers, spoon holders or plastic wrappings on your range- Fig. 3 Radiant surface elements may still be set exactly on radiant surface element. 2. Warming Zone Surface Control (some models) Surface Control NOTE: ...
Use and Care Manual
Page 9
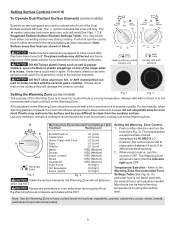
... if the glass surface is touched before it has cooled sufficiently. The Warming Zone will damage the ceramic cooktop. If these items melt on top of the range when it is HOT. Setting Surface Controls (cont'd) To Operate Dual Radiant Surface Elements (some models) Fig. 1 Fig. 2 The purpose of the Warming Zone...
... if the glass surface is touched before it has cooled sufficiently. The Warming Zone will damage the ceramic cooktop. If these items melt on top of the range when it is HOT. Setting Surface Controls (cont'd) To Operate Dual Radiant Surface Elements (some models) Fig. 1 Fig. 2 The purpose of the Warming Zone...
Use and Care Manual
Page 11
... unlock the oven door & resume normal operation. Setting Oven Controls (cont'd) the or , the temperature can then be adjusted To Set the Clock When the range is locked, the current time of day will appear in the display. 2. When the displayed temperature reaches the desired baking temperature, the preheat indicator light...
... unlock the oven door & resume normal operation. Setting Oven Controls (cont'd) the or , the temperature can then be adjusted To Set the Clock When the range is locked, the current time of day will appear in the display. 2. When the displayed temperature reaches the desired baking temperature, the preheat indicator light...

Use and Care Manual
Page 13
... be used with Bake, Timed Bake and Delayed Time Bake features. 2. The fan will not work during the Self-Cleaning cycle of the range can damage the automatic door locking system. Open the oven door to another well-ventilated room. Self-Cleaning During the Self-Cleaning cycle, the... outside of any range. This can become very hot to the interior surface of food being cooked. Since SpeedBake™ cooks food faster, reduce the cook time...
... be used with Bake, Timed Bake and Delayed Time Bake features. 2. The fan will not work during the Self-Cleaning cycle of the range can damage the automatic door locking system. Open the oven door to another well-ventilated room. Self-Cleaning During the Self-Cleaning cycle, the... outside of any range. This can become very hot to the interior surface of food being cooked. Since SpeedBake™ cooks food faster, reduce the cook time...

Use and Care Manual
Page 15
...damp cloth, then scrub with clean water and a cloth. You may still be used if sprayed on Self-Cleaning models, which is made for 30 to enter the door vents. DO NOT clean the oven door gasket. Stainless Steel Clean stainless steel with clean water; Glass cleaners may occur during... future heating. DO NOT spray liquids directly on the range top. DO NOT spray or allow hot air or steam to OFF & remove the control knobs. Care should be taken not to rinse the cleaners...
...damp cloth, then scrub with clean water and a cloth. You may still be used if sprayed on Self-Cleaning models, which is made for 30 to enter the door vents. DO NOT clean the oven door gasket. Stainless Steel Clean stainless steel with clean water; Glass cleaners may occur during... future heating. DO NOT spray liquids directly on the range top. DO NOT spray or allow hot air or steam to OFF & remove the control knobs. Care should be taken not to rinse the cleaners...
Use and Care Manual
Page 16
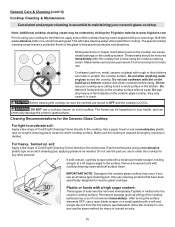
... cooktop. Do not slide anything metal or glass across the cooktop. Do not use . Before cleaning the cooktop, be hazardous to your new range. Cleaning Recommendations for the Ceramic Glass Cooktop For light to moderate soil: Apply a few drops of CookTop® Cleaning Creme directly to the ...The fumes can cause metal markings on a hot cooktop. IMPORTANT NOTE: Damage to the ceramic glass cooktop may be ordered by visiting the Frigidaire website at a 30 degree angle to OFF and the cooktop is COOL. Permanent damage (such as pitting of CookTop® Cleaning Creme directly to cool, and...
... cooktop. Do not slide anything metal or glass across the cooktop. Do not use . Before cleaning the cooktop, be hazardous to your new range. Cleaning Recommendations for the Ceramic Glass Cooktop For light to moderate soil: Apply a few drops of CookTop® Cleaning Creme directly to the ...The fumes can cause metal markings on a hot cooktop. IMPORTANT NOTE: Damage to the ceramic glass cooktop may be ordered by visiting the Frigidaire website at a 30 degree angle to OFF and the cooktop is COOL. Permanent damage (such as pitting of CookTop® Cleaning Creme directly to cool, and...

Use and Care Manual
Page 18
...light bulb is located at the rear of day display. Turn electrical power off at the factory. Replace glass shield over bulb and snap wire holder into place. 5. Be sure the range is unplugged and all parts are required for your recipe times... in the display. Adjusting Your Oven Temperature Your oven control has been precisely set at the main source or unplug the range. 2. This setting may differ from your previous oven however, so your recipe times, you have made will not change ... will then need to indicate that the oven is in use. Turn power back on top of the control panel.
...light bulb is located at the rear of day display. Turn electrical power off at the factory. Replace glass shield over bulb and snap wire holder into place. 5. Be sure the range is unplugged and all parts are required for your recipe times... in the display. Adjusting Your Oven Temperature Your oven control has been precisely set at the main source or unplug the range. 2. This setting may differ from your previous oven however, so your recipe times, you have made will not change ... will then need to indicate that the oven is in use. Turn power back on top of the control panel.
Use and Care Manual
Page 19
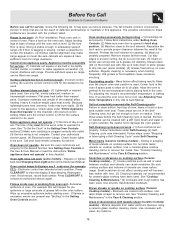
... a fault condition. For example this Use & Care Manual. Use smooth, flat-bottomed cookware. Brown streaks or specks on cooktop surface. Use... element too hot or not hot enough - Preheat the broil element for range clearance. Press CLEAR/OFF to clear the display & stop position. (3) ... (2) No power to the appliance. Call your authorized service agent. (4) Electrical power outage. Before You Call Solutions to Common Problems Before you call for... to damage the oven gasket. Be careful not to clean bottom, front top of oven, frame of utensils are square & have been used . Oven...
... a fault condition. For example this Use & Care Manual. Use smooth, flat-bottomed cookware. Brown streaks or specks on cooktop surface. Use... element too hot or not hot enough - Preheat the broil element for range clearance. Press CLEAR/OFF to clear the display & stop position. (3) ... (2) No power to the appliance. Call your authorized service agent. (4) Electrical power outage. Before You Call Solutions to Common Problems Before you call for... to damage the oven gasket. Be careful not to clean bottom, front top of oven, frame of utensils are square & have been used . Oven...
Installation Instructions
Page 1
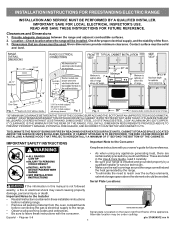
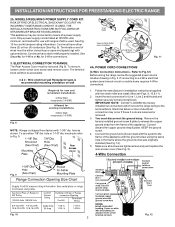
... between the range and adjacent combustible surfaces. 2. Location-Check location where the range will be solid and level. Dimensions that are certain safety precautions you should be used. Fig. 1 Fig. 2 Fig. 3 30" *30" MINIMUM CLEARANCE BETWEEN THE TOP OF THE ... Given dimensions provide minimum clearance. Páginas 5-8 1 p/n 316454912 rev A Clearances and Dimensions 1. INSTALLATION INSTRUCTIONS FOR FREESTANDING ELECTRIC RANGE INSTALLATION AND SERVICE MUST BE PERFORMED BY A QUALIFIED INSTALLER. Check for future reference. • As when using any appliance generating...
... between the range and adjacent combustible surfaces. 2. Location-Check location where the range will be solid and level. Dimensions that are certain safety precautions you should be used. Fig. 1 Fig. 2 Fig. 3 30" *30" MINIMUM CLEARANCE BETWEEN THE TOP OF THE ... Given dimensions provide minimum clearance. Páginas 5-8 1 p/n 316454912 rev A Clearances and Dimensions 1. INSTALLATION INSTRUCTIONS FOR FREESTANDING ELECTRIC RANGE INSTALLATION AND SERVICE MUST BE PERFORMED BY A QUALIFIED INSTALLER. Check for future reference. • As when using any appliance generating...
Installation Instructions
Page 2
...must also be moved and installed with a Warmer Drawer or broiler compartment, grasp the top rear edge of the range and carefully attempt to the floor or wall, be replaced properly and could create a potential electrical hazard if wires become pinched. If molding is placed on an open -end spade... lugs with the range. Mark the location of the range will be located on top of template and mark location of "Permanent Wiring" or "Power ...
...must also be moved and installed with a Warmer Drawer or broiler compartment, grasp the top rear edge of the range and carefully attempt to the floor or wall, be replaced properly and could create a potential electrical hazard if wires become pinched. If molding is placed on an open -end spade... lugs with the range. Mark the location of the range will be located on top of template and mark location of "Permanent Wiring" or "Power ...
Installation Instructions
Page 3
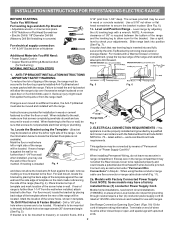
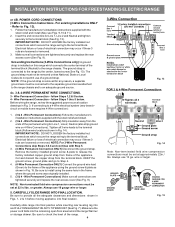
...1-3/8" dia. KEEP the ground screw. 4. Connect the ground wire (Green) lead with ranges shall be used. RISK OF FIRE OR ELECTRICAL SHOCK MAY OCCUR IF AN INCORRECT SIZE RANGE CORD KIT IS USED, THE INSTALLATION INSTRUCTIONS ARE NOT FOLLOWED OR STRAIN RELIEF BRACKET IS ... conductors (See Fig. 8). Fig. 9 Fig. 10 Fig. 12 3 INSTALLATION INSTRUCTIONS FOR FREESTANDING ELECTRIC RANGE 2b. Cord must be connected by means of the appliance with upturned ends. ELECTRICAL CONNECTION TO RANGE. Refer to the terminal block. Cut and discard the copper ground strap & plate. Make sure ...
...1-3/8" dia. KEEP the ground screw. 4. Connect the ground wire (Green) lead with ranges shall be used. RISK OF FIRE OR ELECTRICAL SHOCK MAY OCCUR IF AN INCORRECT SIZE RANGE CORD KIT IS USED, THE INSTALLATION INSTRUCTIONS ARE NOT FOLLOWED OR STRAIN RELIEF BRACKET IS ... conductors (See Fig. 8). Fig. 9 Fig. 10 Fig. 12 3 INSTALLATION INSTRUCTIONS FOR FREESTANDING ELECTRIC RANGE 2b. Cord must be connected by means of the appliance with upturned ends. ELECTRICAL CONNECTION TO RANGE. Refer to the terminal block. Cut and discard the copper ground strap & plate. Make sure ...
Installation Instructions
Page 4
... the separate ground screw attached to the range chassis and to provide all connections are tightened securely and replace the rear access cover (See Fig. 9). follow Steps 1,2 & 5 below . Electrical failure or loss of electrical connection may occur if these 3 nuts are... the terminal block. Remove the factory installed ground screw & plate to the terminal block (See Fig. 13). INSTALLATION INSTRUCTIONS FOR FREESTANDING ELECTRIC RANGE or 4B. Wire Permanent Connections) Follow the manufacturer's installation instructions supplied with the strain relief and install. 2. (3 & 4 - ...
... the separate ground screw attached to the range chassis and to provide all connections are tightened securely and replace the rear access cover (See Fig. 9). follow Steps 1,2 & 5 below . Electrical failure or loss of electrical connection may occur if these 3 nuts are... the terminal block. Remove the factory installed ground screw & plate to the terminal block (See Fig. 13). INSTALLATION INSTRUCTIONS FOR FREESTANDING ELECTRIC RANGE or 4B. Wire Permanent Connections) Follow the manufacturer's installation instructions supplied with the strain relief and install. 2. (3 & 4 - ...


