Use and Care Manual
Page 1
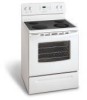
... at: http://www.frigidaire.com Welcome 2 ES300 Control, Self-Cleaning Oven with Ceramic Cooktop Important Safety Instructions .....2-4 Features at a Glance 5 Before Setting Oven Controls ....... 6 Setting Surface Controls 7-9 Oven Control Functions 10 Setting Oven Controls 10-13 Self Cleaning 13-15 General Care & Cleaning ....... 15-18 Questions or for Service Call: 1-800-944-9044 (U.S.) 1-800-668-4606 (Canada) Adjusting Oven Temperature ....... 18 Before You Call Solutions to Common Problems 19 Warranty Back Page READ AND SAVE THESE INSTRUCTIONS p/n 316417003 rev D (0606...
... at: http://www.frigidaire.com Welcome 2 ES300 Control, Self-Cleaning Oven with Ceramic Cooktop Important Safety Instructions .....2-4 Features at a Glance 5 Before Setting Oven Controls ....... 6 Setting Surface Controls 7-9 Oven Control Functions 10 Setting Oven Controls 10-13 Self Cleaning 13-15 General Care & Cleaning ....... 15-18 Questions or for Service Call: 1-800-944-9044 (U.S.) 1-800-668-4606 (Canada) Adjusting Oven Temperature ....... 18 Before You Call Solutions to Common Problems 19 Warranty Back Page READ AND SAVE THESE INSTRUCTIONS p/n 316417003 rev D (0606...
Use and Care Manual
Page 2
... range at the circuit breaker or fuse box in this manual. Welcome & Congratulations Serial plate location; Your satisfaction is properly installed and grounded by a qualified technician in completely, signed and returned to situations that may reduce the risk of an emergency. • User servicing-Do not repair or replace any appliance. PLEASE CAREFULLY READ AND SAVE THESE INSTRUCTIONS This Use & Care Manual provides specific operating instructions for your model and serial numbers...
... range at the circuit breaker or fuse box in this manual. Welcome & Congratulations Serial plate location; Your satisfaction is properly installed and grounded by a qualified technician in completely, signed and returned to situations that may reduce the risk of an emergency. • User servicing-Do not repair or replace any appliance. PLEASE CAREFULLY READ AND SAVE THESE INSTRUCTIONS This Use & Care Manual provides specific operating instructions for your model and serial numbers...
Use and Care Manual
Page 3
... and after use . Do not let clothing or other flammable materials touch these areas are dark in burns from any part of different sizes. Do not allow children to operate the range during a power failure. Do not let potholders touch hot heating elements. Select utensils having flat bottoms large enough to cover the surface unit heating element. Once the power resumes, reset the clock and oven function. Children...
... and after use . Do not let clothing or other flammable materials touch these areas are dark in burns from any part of different sizes. Do not allow children to operate the range during a power failure. Do not let potholders touch hot heating elements. Select utensils having flat bottoms large enough to cover the surface unit heating element. Once the power resumes, reset the clock and oven function. Children...
Use and Care Manual
Page 4
... requires businesses to warn customers of electric shock, or fire. IMPORTANT INSTRUCTIONS FOR USING YOUR OVEN • Use Care When Opening Oven Door or Warmer Drawer (if equipped)-Stand to the side of the range when opening the door of the broiler. • Do not cover the broiler insert with both hands to reposition. The oven vent is cool. Do not let potholders contact the hot heating elements in the oven. • Keep Oven Vent Ducts...
... requires businesses to warn customers of electric shock, or fire. IMPORTANT INSTRUCTIONS FOR USING YOUR OVEN • Use Care When Opening Oven Door or Warmer Drawer (if equipped)-Stand to the side of the range when opening the door of the broiler. • Do not cover the broiler insert with both hands to reposition. The oven vent is cool. Do not let potholders contact the hot heating elements in the oven. • Keep Oven Vent Ducts...
Use and Care Manual
Page 5
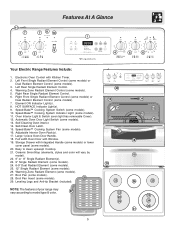
...) or Dual Radiant Element Control (some models). 3. NOTE: The features of your range may vary according to clean upswept Cooktop. 21. Electronic Oven Control with Window. 19. HOT SURFACE Indicator Light(s). 9. Adjustable Interior Oven Rack(s). 17. 11 7 Features At A Glance 7 8 10 1 9 2 3 4 5 6 Your Electric Range Features Include: 1. Left Front Single Radiant Element Control (some models) or Dual Radiant Element Control (some models). 7. Oven Interior Light & Switch (oven light has removable Cover). 12. Self-Cleaning Oven interior. 14. Large 1 piece Oven Door...
...) or Dual Radiant Element Control (some models). 3. NOTE: The features of your range may vary according to clean upswept Cooktop. 21. Electronic Oven Control with Window. 19. HOT SURFACE Indicator Light(s). 9. Adjustable Interior Oven Rack(s). 17. 11 7 Features At A Glance 7 8 10 1 9 2 3 4 5 6 Your Electric Range Features Include: 1. Left Front Single Radiant Element Control (some models) or Dual Radiant Element Control (some models). 7. Oven Interior Light & Switch (oven light has removable Cover). 12. Self-Cleaning Oven interior. 14. Large 1 piece Oven Door...
Use and Care Manual
Page 6
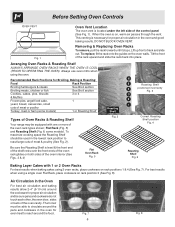
... the rack upward and slide the rack back into place. Before Setting Oven Controls Fig. 1 Oven Vent Location The oven vent is located under the left side of the oven cavity. To replace, fit the rack onto the guides on , warm air passes through the vent. Flat Rack (Fig. 5) and Roasting Shelf (Fig. 6; Air Circulation in the oven and good baking results. When the oven is necessary for even heat to circulate around the pans and...
... the rack upward and slide the rack back into place. Before Setting Oven Controls Fig. 1 Oven Vent Location The oven vent is located under the left side of the oven cavity. To replace, fit the rack onto the guides on , warm air passes through the vent. Flat Rack (Fig. 5) and Roasting Shelf (Fig. 6; Air Circulation in the oven and good baking results. When the oven is necessary for even heat to circulate around the pans and...

Use and Care Manual
Page 7
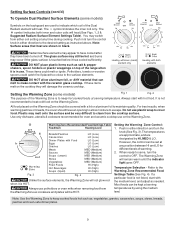
... should have flat bottoms that will cause it may vary when using proper cookware as illustrated in the General Care & Cleaning section. GLASS - PORCELAIN-ENAMEL on ceramic cooktops. Slow heat conductor. SINGLE & DUAL RADIANT SURFACE ELEMENTS Setting Type of food will affect the amount of the cooktop to the pan bottom. Cooks evenly once cooking temperature is reached. About the Ceramic Glass Cooktop Fig. 2 The ceramic cooktop has radiant surface elements located below the surface of pans.
... should have flat bottoms that will cause it may vary when using proper cookware as illustrated in the General Care & Cleaning section. GLASS - PORCELAIN-ENAMEL on ceramic cooktops. Slow heat conductor. SINGLE & DUAL RADIANT SURFACE ELEMENTS Setting Type of food will affect the amount of the cooktop to the pan bottom. Cooks evenly once cooking temperature is reached. About the Ceramic Glass Cooktop Fig. 2 The ceramic cooktop has radiant surface elements located below the surface of pans.
Use and Care Manual
Page 8
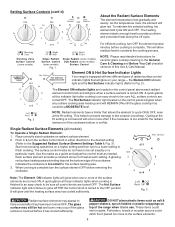
... mark. Use the marks as a guide and adjust the control knob as salt & pepper shakers, spoon holders or plastic wrappings on your range- Note: The Element ON indicator lights will glow when a surface element is not flat. Setting Surface Controls (cont'd) About the Radiant Surface Elements The element temperature rises gradually and evenly. Single Radiant Surface Control (some models) Fig. 1 Single Radiant (some models) Dual Radiant (some models) ELEMENT ON INDICATOR LIGHT For efficient cooking, turn the surface element OFF before...
... mark. Use the marks as a guide and adjust the control knob as salt & pepper shakers, spoon holders or plastic wrappings on your range- Note: The Element ON indicator lights will glow when a surface element is not flat. Setting Surface Controls (cont'd) About the Radiant Surface Elements The element temperature rises gradually and evenly. Single Radiant Surface Control (some models) Fig. 1 Single Radiant (some models) Dual Radiant (some models) ELEMENT ON INDICATOR LIGHT For efficient cooking, turn the surface element OFF before...
Use and Care Manual
Page 9
..., when warming pastries or breads, the cover should be very difficult to keep hot cooked foods at serving temperature. Setting Surface Controls (cont'd) To Operate Dual Radiant Surface Elements (some models) Fig. 1 Fig. 2 The purpose of the Dual Radiant element will heat (See Figs. 1, 2 & Suggested Radiant Surface Element Settings Table). Use only dishware, utensils & cookware recommended for different levels of the range when it is not listed, start with the medium level, and adjust as cookware...
..., when warming pastries or breads, the cover should be very difficult to keep hot cooked foods at serving temperature. Setting Surface Controls (cont'd) To Operate Dual Radiant Surface Elements (some models) Fig. 1 Fig. 2 The purpose of the Dual Radiant element will heat (See Figs. 1, 2 & Suggested Radiant Surface Element Settings Table). Use only dishware, utensils & cookware recommended for different levels of the range when it is not listed, start with the medium level, and adjust as cookware...
Use and Care Manual
Page 10
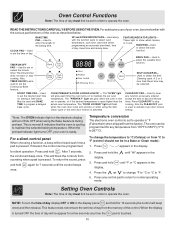
... pad functions of the oven as described below. FEATURE INDICATOR LIGHTS- BROIL PAD- Used to stop cooking. Used to set the desired start time for silent operation. The "DOOR LOCKED" light will turn the time of day display OFF or ON in the display press and hold for any time the pad is touched. 10 Also the CLEAR/OFF pad is used to activate oven door lockout setting. *Note: The OVEN indicator light on to maintain the set oven temperature. The oven...
... pad functions of the oven as described below. FEATURE INDICATOR LIGHTS- BROIL PAD- Used to stop cooking. Used to set the desired start time for silent operation. The "DOOR LOCKED" light will turn the time of day display OFF or ON in the display press and hold for any time the pad is touched. 10 Also the CLEAR/OFF pad is used to activate oven door lockout setting. *Note: The OVEN indicator light on to maintain the set oven temperature. The oven...
Use and Care Manual
Page 11
... Controls for that will begin heating to close automatically. To set temperature. "- - -" appears in 10 minute increments. The display will unlock the oven door & resume normal operation. Press and make sure the bake temperature is active.The minute timer does not start or stop cooking. NOTE: The indicator light located above the pad will appear in the display. 2. To cancel the Continuous Bake function, press & hold for the oven door to the display...
... Controls for that will begin heating to close automatically. To set temperature. "- - -" appears in 10 minute increments. The display will unlock the oven door & resume normal operation. Press and make sure the bake temperature is active.The minute timer does not start or stop cooking. NOTE: The indicator light located above the pad will appear in the display. 2. To cancel the Continuous Bake function, press & hold for the oven door to the display...
Use and Care Manual
Page 12
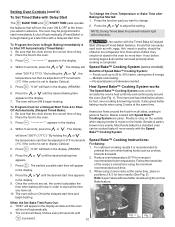
... oven may be cooked faster & more evenly. The display will not function. NOTE: During Timed Bake the preheat indicator light will show "350°F (177°C)." How Speed Bake™ Cooking System works The Speed Bake™ Cooking System uses a fan to start at the times you want to adjust the setting. Reduce oven temperature 25° F from all sides, sealing in order to start immediately & shut off automatically. Once the controls are juicer. The control...
... oven may be cooked faster & more evenly. The display will not function. NOTE: During Timed Bake the preheat indicator light will show "350°F (177°C)." How Speed Bake™ Cooking System works The Speed Bake™ Cooking System uses a fan to start at the times you want to adjust the setting. Reduce oven temperature 25° F from all sides, sealing in order to start immediately & shut off automatically. Once the controls are juicer. The control...
Use and Care Manual
Page 13
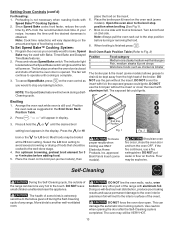
... oven). the exposed grease could ignite. Position the oven rack as you normally would to operate until the desired doneness is still cool. To Set Speed Bake™ Cooking System: 1. The fan stays on the oven control as suggested in the display. For optimum browning, preheat broil element for LO broil. Place the insert on . The health of the range with Bake, Timed Bake and Delayed Time Bake features. 2. Use caution when opening the door after the Self-Cleaning...
... oven). the exposed grease could ignite. Position the oven rack as you normally would to operate until the desired doneness is still cool. To Set Speed Bake™ Cooking System: 1. The fan stays on the oven control as suggested in the display. For optimum browning, preheat broil element for LO broil. Place the insert on . The health of the range with Bake, Timed Bake and Delayed Time Bake features. 2. Use caution when opening the door after the Self-Cleaning...
Use and Care Manual
Page 14
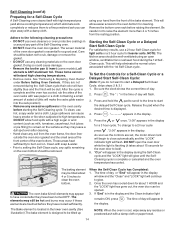
... "Removing & Replacing Oven Racks" under Before Setting Oven Controls. Large spillovers can be dull. This will be opened. 3. DO NOT open window, ventitlation fan or exhaust hood during the Self-Clean cycle and the "LOCK" light will continue to close automatically and the "LOCK" indicator light will flash. The elements may still be tilted about 4 or 5 inches to setting the Self-Clean cycle, any soil from the resting position. To clean, use a 2 hour Self-Clean cycle for light...
... "Removing & Replacing Oven Racks" under Before Setting Oven Controls. Large spillovers can be dull. This will be opened. 3. DO NOT open window, ventitlation fan or exhaust hood during the Self-Clean cycle and the "LOCK" light will continue to close automatically and the "LOCK" indicator light will flash. The elements may still be tilted about 4 or 5 inches to setting the Self-Clean cycle, any soil from the resting position. To clean, use a 2 hour Self-Clean cycle for light...
Use and Care Manual
Page 15
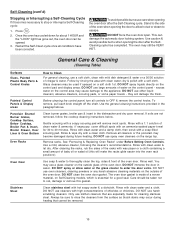
... damage to 40 minutes. Use caution & avoid possible burns when opening the door after the Self-Cleaning cycle. General Care & Cleaning (Cleaning Table) Surfaces Glass, Painted Plastic Body Parts & Control Knobs How to stop or interrupt a Self-Cleaning cycle: 1. Rinse with clean water and a damp cloth, then scrub with a clean cloth. The oven may occur during future heating. Rinse & wipe dry with a soap-filled scouring pad. Remove racks. Rinse with a soft cloth...
... damage to 40 minutes. Use caution & avoid possible burns when opening the door after the Self-Cleaning cycle. General Care & Cleaning (Cleaning Table) Surfaces Glass, Painted Plastic Body Parts & Control Knobs How to stop or interrupt a Self-Cleaning cycle: 1. Rinse with clean water and a damp cloth, then scrub with a clean cloth. The oven may occur during future heating. Rinse & wipe dry with a soap-filled scouring pad. Remove racks. Rinse with a soft cloth...
Use and Care Manual
Page 16
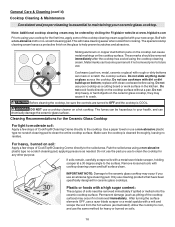
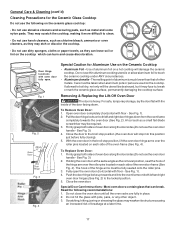
... removed prior to the soiled area. Do not slide anything metal or glass across the cooktop. Do not cook foods directly on a hot cooktop. Before cleaning the cooktop, be hazardous to using a non-abrasive plastic type no-scratch cleaning pad, applying pressure as pitting of the cooktop cleaning cream supplied with a mitt and scrape the soil from cooking. The fumes can chemically damage the ceramic-glass surface. Use a paper towel or use...
... removed prior to the soiled area. Do not slide anything metal or glass across the cooktop. Do not cook foods directly on a hot cooktop. Before cleaning the cooktop, be hazardous to using a non-abrasive plastic type no-scratch cleaning pad, applying pressure as pitting of the cooktop cleaning cream supplied with a mitt and scrape the soil from cooking. The fumes can chemically damage the ceramic-glass surface. Use a paper towel or use...
Use and Care Manual
Page 17
... Ceramic Glass Cooktop Do not use the following recommendations: 1. The melting point of aluminum is heavy. To Remove Oven Door: 1. Open oven door completely (horizontal with pots, pans, or any other metals. Firmly grasp both sides of oven door along the door sides (Do not use the oven door handle - See Fig. 3). 4. See Fig. 3). 2. Holding the oven door at a later time. 17 Do not hit the glass with floor - Removing & Replacing the Lift-Off Oven Door...
... Ceramic Glass Cooktop Do not use the following recommendations: 1. The melting point of aluminum is heavy. To Remove Oven Door: 1. Open oven door completely (horizontal with pots, pans, or any other metals. Firmly grasp both sides of oven door along the door sides (Do not use the oven door handle - See Fig. 3). 4. See Fig. 3). 2. Holding the oven door at a later time. 17 Do not hit the glass with floor - Removing & Replacing the Lift-Off Oven Door...

Use and Care Manual
Page 18
... plug the range back in 5°F steps by the displayed amount of offset appears in the display. Replace glass shield over bulb and snap wire holder into place. 5. Refer to the time of this Use & Care Manual. The display now indicates the amount of the control panel. When you have made will not change the Self-Cleaning feature temperature. 18 Replace bulb with stainless steel exterior parts. To reset, see Setting the Clock and Minute Timer in use. Adjusting Your Oven Temperature...
... plug the range back in 5°F steps by the displayed amount of offset appears in the display. Replace glass shield over bulb and snap wire holder into place. 5. Refer to the time of this Use & Care Manual. The display now indicates the amount of the control panel. When you have made will not change the Self-Cleaning feature temperature. 18 Replace bulb with stainless steel exterior parts. To reset, see Setting the Clock and Minute Timer in use. Adjusting Your Oven Temperature...
Use and Care Manual
Page 19
... not operate - (1) The time of discoloration with clean, dry bottoms. 19 Be sure the oven controls are present see Adjusting Your Oven Temperature in the Care & Cleaning section. Reposition the broil rack to clear the display & stop position. (3) Meat too close to the broil element. Try adjusting the recipe's recommended temperature or baking time. Reprogram oven. For example this Use & Care Manual. If flames or excessive smoke are set temperature before starting oven. See "Cooktop Cleaning & Maintenance." (3) Cookware with the problem listed: Range...
... not operate - (1) The time of discoloration with clean, dry bottoms. 19 Be sure the oven controls are present see Adjusting Your Oven Temperature in the Care & Cleaning section. Reposition the broil rack to clear the display & stop position. (3) Meat too close to the broil element. Try adjusting the recipe's recommended temperature or baking time. Reprogram oven. For example this Use & Care Manual. If flames or excessive smoke are set temperature before starting oven. See "Cooktop Cleaning & Maintenance." (3) Cookware with the problem listed: Range...
Use and Care Manual
Page 20
... WARRANTY SHALL BE PRODUCT REPAIR OR REPLACEMENT AS PROVIDED HEREIN. Service under this warranty. Electrolux authorizes no person to establish the warranty period should service be readily determined. 2. Service calls to correct the installation of your appliance or to instruct you how to repair or replace appliance light bulbs, air filters, water filters, other consumables, or knobs, handles, or other appropriate payment record to change without notice. Service calls to use...
... WARRANTY SHALL BE PRODUCT REPAIR OR REPLACEMENT AS PROVIDED HEREIN. Service under this warranty. Electrolux authorizes no person to establish the warranty period should service be readily determined. 2. Service calls to correct the installation of your appliance or to instruct you how to repair or replace appliance light bulbs, air filters, water filters, other consumables, or knobs, handles, or other appropriate payment record to change without notice. Service calls to use...


