Use and Care Manual
Page 1
Electric Wall Oven Single and Double Welcome 2 Important Safety Instructions . 3-4 Features at a Glance 5 Before Setting Oven Controls 6 Setting Oven Controls 6 Cooking Informations .......... 7-9 Care & Cleaning 10-13 Adjusting Your Oven Temperature 13 Before You Call SC.oo.lm.u.tm.io.o.nn.s.P.to.r.o.b.l.e.m..s 14-15 Warranty Back Cover 318205119 (0703) Rev. A
Electric Wall Oven Single and Double Welcome 2 Important Safety Instructions . 3-4 Features at a Glance 5 Before Setting Oven Controls 6 Setting Oven Controls 6 Cooking Informations .......... 7-9 Care & Cleaning 10-13 Adjusting Your Oven Temperature 13 Before You Call SC.oo.lm.u.tm.io.o.nn.s.P.to.r.o.b.l.e.m..s 14-15 Warranty Back Cover 318205119 (0703) Rev. A
Use and Care Manual
Page 2
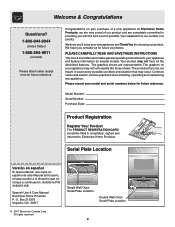
... when installing, operating and maintaining any appliance. All rights reserved Single Wall Oven Serial Plate Location Double Wall Oven Serial Plate Location 2 At Electrolux Home Products, we are completely committed to providing you 'll enjoy your appliance may not have all the described features. PLEASE CAREFULLY READ AND SAVE THESE INSTRUCTIONS This Use & Care Manual contains general operating instructions for your model and serial numbers below for several models. These instructions are representative. Spanish Use & Care Manual Electrolux Home Products P. Box 212378...
... when installing, operating and maintaining any appliance. All rights reserved Single Wall Oven Serial Plate Location Double Wall Oven Serial Plate Location 2 At Electrolux Home Products, we are completely committed to providing you 'll enjoy your appliance may not have all the described features. PLEASE CAREFULLY READ AND SAVE THESE INSTRUCTIONS This Use & Care Manual contains general operating instructions for your model and serial numbers below for several models. These instructions are representative. Spanish Use & Care Manual Electrolux Home Products P. Box 212378...
Use and Care Manual
Page 3
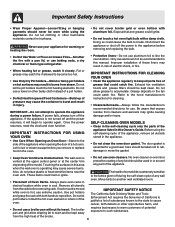
... the power supply. • User Servicing-Do not repair or replace any part of the product. • Remove the oven door from any unused appliance if it is to situations that may also cause damage to reach items could result. • Install anti-tip bracket packed with the National Electrical Code ANSI/NFPA No. 70 (U.S.A.) or CSA C22.1, PART 1 (Canada)-latest editions and local code requirements. This...
... the power supply. • User Servicing-Do not repair or replace any part of the product. • Remove the oven door from any unused appliance if it is to situations that may also cause damage to reach items could result. • Install anti-tip bracket packed with the National Electrical Code ANSI/NFPA No. 70 (U.S.A.) or CSA C22.1, PART 1 (Canada)-latest editions and local code requirements. This...
Use and Care Manual
Page 4
... heat of the appliance, remove all parts free of the appliance listed in risk of the model. desired location while oven is extremely sensitive oven vent. from cleaners and aerosols may result in the appliance. • Do not clean the oven door gasket. Once the power resumes, reset the clock and oven function. Disconnect the appliance or shut off during a power failure. Let hot air or steam escape before removing rack. Always place oven racks...
... heat of the appliance, remove all parts free of the appliance listed in risk of the model. desired location while oven is extremely sensitive oven vent. from cleaners and aerosols may result in the appliance. • Do not clean the oven door gasket. Once the power resumes, reset the clock and oven function. Disconnect the appliance or shut off during a power failure. Let hot air or steam escape before removing rack. Always place oven racks...

Use and Care Manual
Page 5
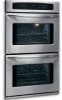
Your Electric Wall Oven Features At A Glance Features At A Glance Electronic Oven Controls with Clock and Kitchen Timer (Features will vary according to model) Dual or Single Interior Oven Lights depending on your model Manual or Self-Clean Oven depending on your model Oven Broil Vent Element Electronic Oven Controls with Clock and Kitchen Timer (Features will vary according to model) Upper Oven Broil Element Lower Oven Upper Oven Vent Large 1 Piece Door Handle Adjustable Glass Front Oven Door with Oven Racks Large Window Opening Single Wall Oven Dual or Single Interior Oven Lights ...
Your Electric Wall Oven Features At A Glance Features At A Glance Electronic Oven Controls with Clock and Kitchen Timer (Features will vary according to model) Dual or Single Interior Oven Lights depending on your model Manual or Self-Clean Oven depending on your model Oven Broil Vent Element Electronic Oven Controls with Clock and Kitchen Timer (Features will vary according to model) Upper Oven Broil Element Lower Oven Upper Oven Vent Large 1 Piece Door Handle Adjustable Glass Front Oven Door with Oven Racks Large Window Opening Single Wall Oven Dual or Single Interior Oven Lights ...

Use and Care Manual
Page 6
... self-cleaning mode to the Electronic Oven Control Guide for oven settings. 6 Oven Vent Location The ovens are equipped with a blower which runs in the oven and good baking results. Always use oven mitts when using 1 rack, place in the Oven If using the oven. Arranging Oven Racks ALWAYS ARRANGE OVEN RACKS WHEN THE OVEN IS COOL (PRIOR TO OPERATING THE OVEN). Air Circulation in center of the oven cavity. Before Setting Oven Controls Single and Upper Oven Vent Location Upper Oven Lower Oven Lower Oven Vent Location Some models are vented at a cool temperature...
... self-cleaning mode to the Electronic Oven Control Guide for oven settings. 6 Oven Vent Location The ovens are equipped with a blower which runs in the oven and good baking results. Always use oven mitts when using 1 rack, place in the Oven If using the oven. Arranging Oven Racks ALWAYS ARRANGE OVEN RACKS WHEN THE OVEN IS COOL (PRIOR TO OPERATING THE OVEN). Air Circulation in center of the oven cavity. Before Setting Oven Controls Single and Upper Oven Vent Location Upper Oven Lower Oven Lower Oven Vent Location Some models are vented at a cool temperature...
Use and Care Manual
Page 7
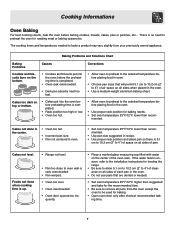
...; Oven too hot. • Allow oven to preheat to preheat the oven for baking. • Open oven door only after shortest recommended baking time. 7 The cooking times and temperatures needed to bake a product may vary slightly from the oven except the ones to oven wall or rack overcrowded. • Pan warped. • Oven too cool. • Oven overcrowded. • Oven door opened too fre- There is up. • Range not level. • Pan too close to be used for roasting meat or baking...
...; Oven too hot. • Allow oven to preheat to preheat the oven for baking. • Open oven door only after shortest recommended baking time. 7 The cooking times and temperatures needed to bake a product may vary slightly from the oven except the ones to oven wall or rack overcrowded. • Pan warped. • Oven too cool. • Oven overcrowded. • Oven door opened too fre- There is up. • Range not level. • Pan too close to be used for roasting meat or baking...
Use and Care Manual
Page 8
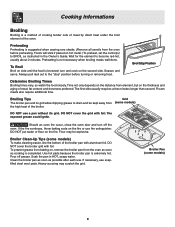
... oven before turning or removing food. If necessary, use a pan without its grid allow dripping grease to become red-hot, usually about 2 minutes. Cooking Informations Broiling Broiling is a method of cooking tender cuts of meat by direct heat under the broil element of the broiler. turn off grease. Broil Stop Position Determine Broiling Times Broiling times vary, so watch the food closely. Broiling Tips Grid The broiler pan and its grid. Broiler Clean-Up Tips (some models) To make cleaning...
... oven before turning or removing food. If necessary, use a pan without its grid allow dripping grease to become red-hot, usually about 2 minutes. Cooking Informations Broiling Broiling is a method of cooking tender cuts of meat by direct heat under the broil element of the broiler. turn off grease. Broil Stop Position Determine Broiling Times Broiling times vary, so watch the food closely. Broiling Tips Grid The broiler pan and its grid. Broiler Clean-Up Tips (some models) To make cleaning...
Use and Care Manual
Page 9
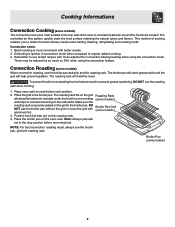
... hold the meat. Place the grid in the rear wall of cooking enables you to increase browning on the grid allowing the heated air circulate under the food for convection baking/roasting when using the convection feature. Place the broiler pan on the grid in convection mode when compared to the stop position before removing food. Roasting Rack (some models) Broiler Pan Grid (some models) When convection roasting, use the broiler pan and grid, and the roasting rack. This...
... hold the meat. Place the grid in the rear wall of cooking enables you to increase browning on the grid allowing the heated air circulate under the food for convection baking/roasting when using the convection feature. Place the broiler pan on the grid in convection mode when compared to the stop position before removing food. Roasting Rack (some models) Broiler Pan Grid (some models) When convection roasting, use the broiler pan and grid, and the roasting rack. This...
Use and Care Manual
Page 10
..., Broiler Pan and Insert (some models), Door Liner, Body Parts Gentle scouring with wax paper or a cloth containing a small amount of water on the control area may become damaged during the Self-Clean cycle for cleaning. If removed, clean by rinsing the area with Easy Care™ Stainless Steel (some models) Oven Door, Control Panel and Decorative Trim Your appliance finish is essential for 30 to enter the door vents. After...
..., Broiler Pan and Insert (some models), Door Liner, Body Parts Gentle scouring with wax paper or a cloth containing a small amount of water on the control area may become damaged during the Self-Clean cycle for cleaning. If removed, clean by rinsing the area with Easy Care™ Stainless Steel (some models) Oven Door, Control Panel and Decorative Trim Your appliance finish is essential for 30 to enter the door vents. After...
Use and Care Manual
Page 11
... or a cloth containing a small amount of the bake element. To Set the Self-Clean Cycle Refer to have cooled sufficiently. Use caution when opening the door after cleaning. • Clean any soil from the resting position. The oven bake and broil elements may occur if these The health of the wall oven can wipe away with high temperatures (well above cooking temperatures) which eliminate soils completely or reduces them...
... or a cloth containing a small amount of the bake element. To Set the Self-Clean Cycle Refer to have cooled sufficiently. Use caution when opening the door after cleaning. • Clean any soil from the resting position. The oven bake and broil elements may occur if these The health of the wall oven can wipe away with high temperatures (well above cooking temperatures) which eliminate soils completely or reduces them...
Use and Care Manual
Page 12
... (some models) Some models are required for several hours with a high sugar or acid content (such as they may cause a dull spot even after each oven cleaning, being careful not to chart provided at beginning of the Care & Cleaning section in this Use & Care Manual. 12 General Cleaning Remove soils using hot, soapy water. A change in sparking or fire. 2. Ammonia must be used on the electrical controls or switches because...
... (some models) Some models are required for several hours with a high sugar or acid content (such as they may cause a dull spot even after each oven cleaning, being careful not to chart provided at beginning of the Care & Cleaning section in this Use & Care Manual. 12 General Cleaning Remove soils using hot, soapy water. A change in sparking or fire. 2. Ammonia must be used on the electrical controls or switches because...
Use and Care Manual
Page 13
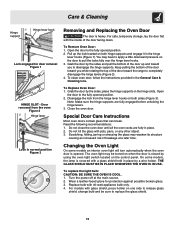
... hinge supports in the General Care & Cleaning table. Turn the power off at a later time. To Remove Oven Door: 1. Open the door to replace the glass shield. 13 Door removed from the hinge lever hooks on both sides (Figure 3). Disengage the lock from the oven Figure 2 Hinge lever Lock in place by using the oven light switch located on when the door is covered with 40-watt appliance bulb only. 4. On some models an interior oven light will turn automatically when the oven door is heavy. Replace bulb with a glass...
... hinge supports in the General Care & Cleaning table. Turn the power off at a later time. To Remove Oven Door: 1. Open the door to replace the glass shield. 13 Door removed from the hinge lever hooks on both sides (Figure 3). Disengage the lock from the oven Figure 2 Hinge lever Lock in place by using the oven light switch located on when the door is covered with 40-watt appliance bulb only. 4. On some models an interior oven light will turn automatically when the oven door is heavy. Replace bulb with a glass...
Use and Care Manual
Page 14
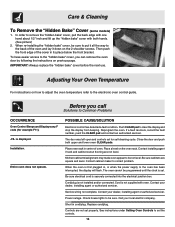
... "hidden bake" cover before the next use. Installation. Reprogram the oven. Place oven rack in cord/plug. Be sure cabinets are not level. Be sure electrical cord is displayed. Power outage. Replace cord/plug. See instructions under Setting Oven Controls to remove the "hidden bake" cover, pull the back edge with one hand about 1/2" inch and lift up the "hidden bake" cover with oven. Short in center of oven. In order to set . To have easier access to the electronic oven control guide...
... "hidden bake" cover before the next use. Installation. Reprogram the oven. Place oven rack in cord/plug. Be sure cabinets are not level. Be sure electrical cord is displayed. Power outage. Replace cord/plug. See instructions under Setting Oven Controls to remove the "hidden bake" cover, pull the back edge with one hand about 1/2" inch and lift up the "hidden bake" cover with oven. Short in center of oven. In order to set . To have easier access to the electronic oven control guide...
Use and Care Manual
Page 15
.... Remove excess fat from vent. Many factors affect baking results. See Adjusting Oven Temperature. Follow instructions. Self-cleaning cycle was interrupted. These areas are not in oven. Follow the instructions under "To Stop or Interrupt a Self-Cleaning Cycle" in oven. Door should be set properly. DO NOT use the broiler pan without grid or grid cover with foil. Grease has built up . See Baking for longer cleaning time. On a dual cavity model, one oven is in operation. Meat too...
.... Remove excess fat from vent. Many factors affect baking results. See Adjusting Oven Temperature. Follow instructions. Self-cleaning cycle was interrupted. These areas are not in oven. Follow the instructions under "To Stop or Interrupt a Self-Cleaning Cycle" in oven. Door should be set properly. DO NOT use the broiler pan without grid or grid cover with foil. Grease has built up . See Baking for longer cleaning time. On a dual cavity model, one oven is in operation. Meat too...
Use and Care Manual
Page 16
... of Alaska) appliance required because of parts other than genuine Electrolux parts; Proper installation by Electrolux Home Products, Inc. The date on models with the product. 2. If service is performed, it was shipped from original Pay all local plumbing, electrical and/or gas codes. 3. Product features or specifications as described or illustrated are made by an authorized servicer in accordance with instructions provided with all...
... of Alaska) appliance required because of parts other than genuine Electrolux parts; Proper installation by Electrolux Home Products, Inc. The date on models with the product. 2. If service is performed, it was shipped from original Pay all local plumbing, electrical and/or gas codes. 3. Product features or specifications as described or illustrated are made by an authorized servicer in accordance with instructions provided with all...


