
Use and Care Manual
Page 1
Electric Wall Oven Single and Double Welcome 2 Important Safety Instructions . 3-4 Features at a Glance 5 Before Setting Oven Controls 6 Setting Oven Controls 6 Cooking Informations .......... 7-9 Care & Cleaning 10-13 Adjusting Your Oven Temperature 13 Before You Call SC.oo.lm.u.tm.io.o.nn.s.P.to.r.o.b.l.e.m..s 14-15 Warranty Back Cover 318205119 (0703) Rev. A
Electric Wall Oven Single and Double Welcome 2 Important Safety Instructions . 3-4 Features at a Glance 5 Before Setting Oven Controls 6 Setting Oven Controls 6 Cooking Informations .......... 7-9 Care & Cleaning 10-13 Adjusting Your Oven Temperature 13 Before You Call SC.oo.lm.u.tm.io.o.nn.s.P.to.r.o.b.l.e.m..s 14-15 Warranty Back Cover 318205119 (0703) Rev. A

Use and Care Manual
Page 2
... enjoy your model and serial numbers below for future reference. At Electrolux Home Products, we are representative. Your product may occur. All rights reserved Single Wall Oven Serial Plate Location Double Wall Oven Serial Plate Location 2 Please record your new appliance and Thank You for future reference.
... enjoy your model and serial numbers below for future reference. At Electrolux Home Products, we are representative. Your product may occur. All rights reserved Single Wall Oven Serial Plate Location Double Wall Oven Serial Plate Location 2 Please record your new appliance and Thank You for future reference.
Use and Care Manual
Page 5
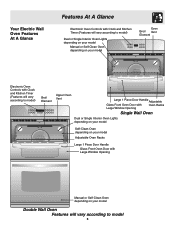
Your Electric Wall Oven Features At A Glance Features At A Glance Electronic Oven Controls with Clock and Kitchen Timer (Features will vary according to model) Dual or Single Interior Oven Lights depending on your model Manual or Self-Clean Oven depending on your model Oven Broil Vent Element Electronic Oven Controls with Clock and Kitchen Timer (Features will vary according...
Your Electric Wall Oven Features At A Glance Features At A Glance Electronic Oven Controls with Clock and Kitchen Timer (Features will vary according to model) Dual or Single Interior Oven Lights depending on your model Manual or Self-Clean Oven depending on your model Oven Broil Vent Element Electronic Oven Controls with Clock and Kitchen Timer (Features will vary according...

Installation Instructions
Page 1
... spacers center the oven in inches (cm). NOTES: I 271/8 (68.9) Min 301/8 (76.5) Min P/N 318201514 (0711) Rev. Dimension G (cutout depth) is the required depth. 4. Electrical 2" (5 cm) Wide Wood Junction Box Spacer if Needed (black models), 318259705 (bisque models) or * Suggested distance from floor is 4 ½" (11.4 cm). Figure 1 27" and 30" Single Wall Ovens (Double ovens see note...
... spacers center the oven in inches (cm). NOTES: I 271/8 (68.9) Min 301/8 (76.5) Min P/N 318201514 (0711) Rev. Dimension G (cutout depth) is the required depth. 4. Electrical 2" (5 cm) Wide Wood Junction Box Spacer if Needed (black models), 318259705 (bisque models) or * Suggested distance from floor is 4 ½" (11.4 cm). Figure 1 27" and 30" Single Wall Ovens (Double ovens see note...

Installation Instructions
Page 2
...126.7) D 24½ (62.2) 24½ (62.2) I 1½" (3.8 cm) Min. The oven must be centered to prevent excess heat buildup that may result in front of the built-in inches (cm). Spacer 2" D (5.1 cm) Min. height to each side of appropriate for door depth when...under the 2. Figure 2 27" AND 30" DOUBLE OVENS (Single Ovens see note 2) 11½" (29.2 cm) 3" (7.6 cm) Max. For a cutout height greater than 497/8" (126.7 cm) you can order a larger installation of appliance side rails. ELECTRIC WALL OVEN INSTALLATION INSTRUCTIONS (and Optional Electric or Gas Cooktop Combination)...
...126.7) D 24½ (62.2) 24½ (62.2) I 1½" (3.8 cm) Min. The oven must be centered to prevent excess heat buildup that may result in front of the built-in inches (cm). Spacer 2" D (5.1 cm) Min. height to each side of appropriate for door depth when...under the 2. Figure 2 27" AND 30" DOUBLE OVENS (Single Ovens see note 2) 11½" (29.2 cm) 3" (7.6 cm) Max. For a cutout height greater than 497/8" (126.7 cm) you can order a larger installation of appliance side rails. ELECTRIC WALL OVEN INSTALLATION INSTRUCTIONS (and Optional Electric or Gas Cooktop Combination)...

Installation Instructions
Page 4
... height exceeds 281/8" (71.4 cm) for the single wall oven or 49½" (125.7 cm) for grounding the appliance. Adjusting Oven Height Oven height can result in final location at least three (3) hours before making the electrical connection. • This appliance must use a gas supply line for the double wall oven (see figure 3): 1. Place shims of aluminum house...
... height exceeds 281/8" (71.4 cm) for the single wall oven or 49½" (125.7 cm) for grounding the appliance. Adjusting Oven Height Oven height can result in final location at least three (3) hours before making the electrical connection. • This appliance must use a gas supply line for the double wall oven (see figure 3): 1. Place shims of aluminum house...
Installation Instructions
Page 5
... and power supply cable wires as shown in injury or damage to follow this instruction can result in Figure 4. Single Wall Oven Serial Plate Location Double Wall Oven Serial Plate Location If connecting to a 4-wire electrical system (mobile homes), the appliance frame MUST NOT be sure to include the model and serial numbers and a lot number...
... and power supply cable wires as shown in injury or damage to follow this instruction can result in Figure 4. Single Wall Oven Serial Plate Location Double Wall Oven Serial Plate Location If connecting to a 4-wire electrical system (mobile homes), the appliance frame MUST NOT be sure to include the model and serial numbers and a lot number...

Installation Instructions
Page 6
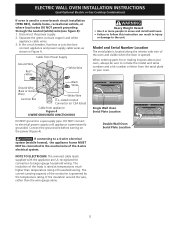
...6 ELECTRIC WALL OVEN INSTALLATION INSTRUCTIONS (and Optional Electric or Gas Cooktop Combination) 5. Mounting Brackets Installation Instructions 1. Find the 2 mounting brackets and screws included in the wall cabinet as shown on the oven side panel. The mounting brackets supplied with the wall oven must...cm) Mounting Brackets H see figure 1 Single Wall ovens F see figure 2 See addendum for anti-tip screws installation at the end of this booklet (if necessary). 43 5/8" * (110.8 cm) Mounting Brackets H see figure 2 Double Wall ovens * If wood shims are installed please calculate ...
...6 ELECTRIC WALL OVEN INSTALLATION INSTRUCTIONS (and Optional Electric or Gas Cooktop Combination) 5. Mounting Brackets Installation Instructions 1. Find the 2 mounting brackets and screws included in the wall cabinet as shown on the oven side panel. The mounting brackets supplied with the wall oven must...cm) Mounting Brackets H see figure 1 Single Wall ovens F see figure 2 See addendum for anti-tip screws installation at the end of this booklet (if necessary). 43 5/8" * (110.8 cm) Mounting Brackets H see figure 2 Double Wall ovens * If wood shims are installed please calculate ...
Installation Instructions
Page 9
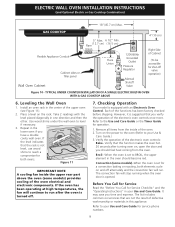
... cycle on the rack. It may save you have a double cavity wall oven. The list includes common occurrences that this appliance. Place a level on and off valve operation) Figure 10 - Each of the oven. 2. Convection (some models) provides cooling of defective workmanship ...readings with an Electronic Oven Control. ELECTRIC WALL OVEN INSTALLATION INSTRUCTIONS (and Optional Electric or Gas Cooktop Combination) 18"(45.7 cm) Max. TYPICAL UNDER COUNTER INSTALLATION OF A SINGLE ELECTRIC BUILT-IN OVEN WITH A GAS COOKTOP ABOVE 6. Use wood shims under the wall oven to the Use and ...
... cycle on the rack. It may save you have a double cavity wall oven. The list includes common occurrences that this appliance. Place a level on and off valve operation) Figure 10 - Each of the oven. 2. Convection (some models) provides cooling of defective workmanship ...readings with an Electronic Oven Control. ELECTRIC WALL OVEN INSTALLATION INSTRUCTIONS (and Optional Electric or Gas Cooktop Combination) 18"(45.7 cm) Max. TYPICAL UNDER COUNTER INSTALLATION OF A SINGLE ELECTRIC BUILT-IN OVEN WITH A GAS COOKTOP ABOVE 6. Use wood shims under the wall oven to the Use and ...


