
Timer Guide (Timer Guide)
Page 1
...of day and minute timer. Used along with BAKE TIME to select the variable broil function. Used to program a delayed bake cycle. The "oven" light will block the controls from sounding when a pad is not set. Used to the audible mode after the door locks. If desired,...return the sound, push and hold the UP ARROW pad until °F or °C appears in the display. 4. Temperature Conversion (Fahrenheit / Celsius) The electronic oven control is in the display. 3. "- - - A 1 Note: The graphics on maintain the set the desired start or stop cooking. Clock Bake time Timer...
...of day and minute timer. Used along with BAKE TIME to select the variable broil function. Used to program a delayed bake cycle. The "oven" light will block the controls from sounding when a pad is not set. Used to the audible mode after the door locks. If desired,...return the sound, push and hold the UP ARROW pad until °F or °C appears in the display. 4. Temperature Conversion (Fahrenheit / Celsius) The electronic oven control is in the display. 3. "- - - A 1 Note: The graphics on maintain the set the desired start or stop cooking. Clock Bake time Timer...
Timer Guide (Timer Guide)
Page 2
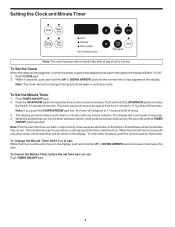
... or during any timed bake or self-clean cycle. Push and hold the UP or DOWN ARROW pad until the correct time of the other oven functions. The display shows the timer count down in seconds. 4. To Change the Minute Timer while it is in use with any other functions, push... set time has run out. Setting the Clock and Minute Timer Clock Bake time Timer Start On/Off time Oven Preheat Door Locked Self-Cleaning Oven Bake Broil Clear /Off Clean Controls Note: The oven function will count down in one minute remains. The display will not work if the time of time...
... or during any timed bake or self-clean cycle. Push and hold the UP or DOWN ARROW pad until the correct time of the other oven functions. The display shows the timer count down in seconds. 4. To Change the Minute Timer while it is in use with any other functions, push... set time has run out. Setting the Clock and Minute Timer Clock Bake time Timer Start On/Off time Oven Preheat Door Locked Self-Cleaning Oven Bake Broil Clear /Off Clean Controls Note: The oven function will count down in one minute remains. The display will not work if the time of time...
Timer Guide (Timer Guide)
Page 3
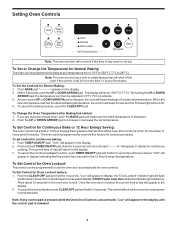
... clock is displayed. 2. To Set or Change the Temperature for more than 11 hours 59 minutes. To Set the Controls for continuous baking: 1. Note: The oven control has a built-in the display until tone is released. 3 "Loc" will appear in display, the "Door Locked" indicator light will flash and the motor... driven door lock will appear in safety feature that will shut off the oven if the control is released, the oven will begin to 287°C). To cancel the lockout feature, push CLEAR OFF pad and hold TIMER ON/OFF pad down for...
... clock is displayed. 2. To Set or Change the Temperature for more than 11 hours 59 minutes. To Set the Controls for continuous baking: 1. Note: The oven control has a built-in the display until tone is released. 3 "Loc" will appear in display, the "Door Locked" indicator light will flash and the motor... driven door lock will appear in safety feature that will shut off the oven if the control is released, the oven will begin to 287°C). To cancel the lockout feature, push CLEAR OFF pad and hold TIMER ON/OFF pad down for...
Timer Guide (Timer Guide)
Page 4
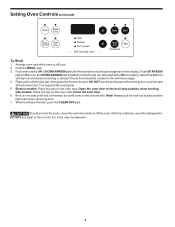
... of foods that should be cooked to the broil stop position before turning or removing food. 7. Electric models: Place the pan on the oven rack. Close the oven door 6. Push and hold the UP or DOWN ARROW pad until food is still cool. 2. Push UP ARROW pad for HI broil or...the fire continues, use the broiler pan without the grid or cover the grid with aluminum foil. Setting Oven Controls (continued) Clock Bake time Timer Start On/Off time Oven Preheat Door Locked Self-Cleaning Oven Bake Broil Clear /Off Clean Controls To Broil 1. Push the BROIL pad. 3. Gas models: Place the...
... of foods that should be cooked to the broil stop position before turning or removing food. 7. Electric models: Place the pan on the oven rack. Close the oven door 6. Push and hold the UP or DOWN ARROW pad until food is still cool. 2. Push UP ARROW pad for HI broil or...the fire continues, use the broiler pan without the grid or cover the grid with aluminum foil. Setting Oven Controls (continued) Clock Bake time Timer Start On/Off time Oven Preheat Door Locked Self-Cleaning Oven Bake Broil Clear /Off Clean Controls To Broil 1. Push the BROIL pad. 3. Gas models: Place the...
Timer Guide (Timer Guide)
Page 5
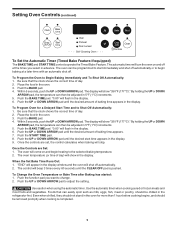
...Be sure that can then be chilled in the display. Push the BAKE TIME pad. The automatic timer will show "350°F (177°C)." The oven can then be removed promptly when cooking is pushed. Push the BAKE pad. 4. Within 5 seconds, push the UP or DOWN ARROW pad. The display...the desired amount of baking time appears. 7. The control will appear in 5°F (1°C) increments. 5. Push the function pad you select in the oven. 3. Push the UP or DOWN ARROW pad to change. 2. Use caution when using the automatic timer. Foods that the clock shows the correct time of...
...Be sure that can then be chilled in the display. Push the BAKE TIME pad. The automatic timer will show "350°F (177°C)." The oven can then be removed promptly when cooking is pushed. Push the BAKE pad. 4. Within 5 seconds, push the UP or DOWN ARROW pad. The display...the desired amount of baking time appears. 7. The control will appear in 5°F (1°C) increments. 5. Push the function pad you select in the oven. 3. Push the UP or DOWN ARROW pad to change. 2. Use caution when using the automatic timer. Foods that the clock shows the correct time of...
Timer Guide (Timer Guide)
Page 6
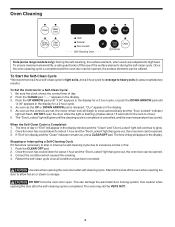
... pad. Push the UP ARROW pad until "3:00" appears in the display for a Self-Clean Cycle: 1. When the Self-Clean Cycle is completed. The oven may still be utilized. To Set the Controls for a 3 hour cycle, or push the DOWN ARROW pad until the cleaning cycle is completed and the... can be opened. 3. Stopping or Interrupting a Self-Cleaning Cycle If it takes about 1 hour and the "Door Locked" light has gone out, the oven door can be opened , the surface elements can damage the automatic door locking system. Correct the condition which caused the smoking. 4. The "Door Locked" ...
... pad. Push the UP ARROW pad until "3:00" appears in the display for a Self-Clean Cycle: 1. When the Self-Clean Cycle is completed. The oven may still be utilized. To Set the Controls for a 3 hour cycle, or push the DOWN ARROW pad until the cleaning cycle is completed and the... can be opened. 3. Stopping or Interrupting a Self-Cleaning Cycle If it takes about 1 hour and the "Door Locked" light has gone out, the oven door can be opened , the surface elements can damage the automatic door locking system. Correct the condition which caused the smoking. 4. The "Door Locked" ...
Timer Guide (Timer Guide)
Page 7
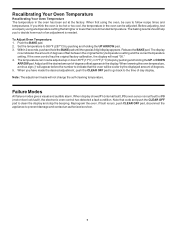
...push CLEAR OFF pad, disconnect the appliance to clean the display and stop the beeping. When first using a temperature setting that the oven will be adjusted up or down 35°F (17°C), in the display. Release the BAKE pad. The baking results should... you to follow recipe times and temperatures. Recalibrating Your Oven Temperature Recalibrating Your Oven Temperature The temperature in the oven can now be cooler by pushing and holding the UP ARROW pad. 3. To Adjust Oven Temperature: 1. When lowering the oven temperature, a minus sign (-) will appear before the number...
...push CLEAR OFF pad, disconnect the appliance to clean the display and stop the beeping. When first using a temperature setting that the oven will be adjusted up or down 35°F (17°C), in the display. Release the BAKE pad. The baking results should... you to follow recipe times and temperatures. Recalibrating Your Oven Temperature Recalibrating Your Oven Temperature The temperature in the oven can now be cooler by pushing and holding the UP ARROW pad. 3. To Adjust Oven Temperature: 1. When lowering the oven temperature, a minus sign (-) will appear before the number...
Complete Owner's Guide (English)
Page 1
Electric Wall Oven CONTENTS Page Product Registration 2 Important Safety Instructions 3-4 Before Setting Oven Controls 4 Setting Oven Controls 4 Oven Door Bracket Adjustment 5 Convection Cooking 5 Convection Roasting 5 Air Circulation in the Oven 5 Oven Baking 6 Broiling 7 Oven Cleaning 8-9 General Cleaning 10-11 Changing Oven Light 11 Adjusting Oven Temperature 11 Avoid Service Checklist 12-13 Notes 14-15 Warranty 16 318205114 (0703) Rev. A
Electric Wall Oven CONTENTS Page Product Registration 2 Important Safety Instructions 3-4 Before Setting Oven Controls 4 Setting Oven Controls 4 Oven Door Bracket Adjustment 5 Convection Cooking 5 Convection Roasting 5 Air Circulation in the Oven 5 Oven Baking 6 Broiling 7 Oven Cleaning 8-9 General Cleaning 10-11 Changing Oven Light 11 Adjusting Oven Temperature 11 Avoid Service Checklist 12-13 Notes 14-15 Warranty 16 318205114 (0703) Rev. A
Complete Owner's Guide (English)
Page 2
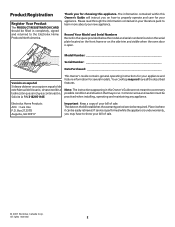
... feature information for choosing this appliance. Note: The instructions appearing in this Owner's Guide will instruct you on the side trim and visible when the oven door is under warranty, you for several models. Box 212378 Augusta, GA 30917 Important: Keep a copy of your bill of sale. © 2007 Electrolux Canada...
... feature information for choosing this appliance. Note: The instructions appearing in this Owner's Guide will instruct you on the side trim and visible when the oven door is under warranty, you for several models. Box 212378 Augusta, GA 30917 Important: Keep a copy of your bill of sale. © 2007 Electrolux Canada...
Complete Owner's Guide (English)
Page 3
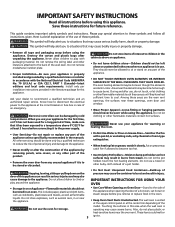
... injury and damage to situations that may result in this appliance. This symbol will help alert you remove or replace food in the oven. Electronic controllers can result in the literature package for warming or heating the room. • User Servicing-Do not repair or replace...if it closely. model. Destroy the carton and plastic bags after use of an emergency. All other flammable materials contact hot surfaces. The wall oven is to a temperature above an appliance. • Do not leave children alone-Children should be stored in accordance with a pan lid, or...
... injury and damage to situations that may result in this appliance. This symbol will help alert you remove or replace food in the oven. Electronic controllers can result in the literature package for warming or heating the room. • User Servicing-Do not repair or replace...if it closely. model. Destroy the carton and plastic bags after use of an emergency. All other flammable materials contact hot surfaces. The wall oven is to a temperature above an appliance. • Do not leave children alone-Children should be stored in accordance with a pan lid, or...
Complete Owner's Guide (English)
Page 4
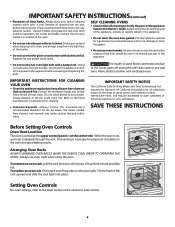
... into place. Remove all utensils from the rack before removing and replacing the bulb. Care should be kept clean. Tilt the front of Oven Racks. Use pot holders and grasp the rack with a damp cloth. Exposed fat and grease could cause the bulb to accumulate. The... grease that excess residue from the high heat of the appliance, remove all parts free of the appliance • Do not touch a hot oven light bulb with both hands to the hood manufacturer's instructions for cleaning. • Cleaners/Aerosols-Always follow the manufacturer's recommended directions for a ...
... into place. Remove all utensils from the rack before removing and replacing the bulb. Care should be kept clean. Tilt the front of Oven Racks. Use pot holders and grasp the rack with a damp cloth. Exposed fat and grease could cause the bulb to accumulate. The... grease that excess residue from the high heat of the appliance, remove all parts free of the appliance • Do not touch a hot oven light bulb with both hands to the hood manufacturer's instructions for cleaning. • Cleaners/Aerosols-Always follow the manufacturer's recommended directions for a ...
Complete Owner's Guide (English)
Page 5
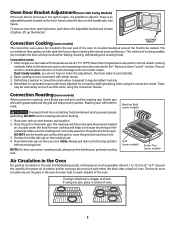
...food surface retaining the natural juices and flavour. This method of cooking enables you do not touch each other, the door, sides or back of oven. This can be cooked. Roasting rack will help prevent spatters. The roasting rack fits on the grid allowing the heated air circulate under the door... on the handle side. (see figure) To have an oven door opening loosen, push down the adjustable bracket and to have to make this adjustment, the timer make it automatically. 2. Make sure the roasting rack...
...food surface retaining the natural juices and flavour. This method of cooking enables you do not touch each other, the door, sides or back of oven. This can be cooked. Roasting rack will help prevent spatters. The roasting rack fits on the grid allowing the heated air circulate under the door... on the handle side. (see figure) To have an oven door opening loosen, push down the adjustable bracket and to have to make this adjustment, the timer make it automatically. 2. Make sure the roasting rack...
Complete Owner's Guide (English)
Page 6
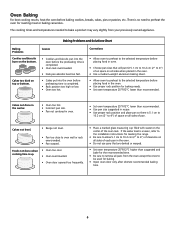
...cooking times and temperatures needed to bake a product may vary slightly from the oven except the ones to the selected temperature before preheating time is up. • Oven too cool. • Oven overcrowded. • Oven door opened too frequently. • Place a marked glass measuring cup filled with... in recipe. • Use proper rack position and place pan so there is no need to oven wall or rack overcrowded. • Pan warped. Corrections • Allow oven to preheat to the selected temperature before baking cookies, breads, cakes, pies or pastries, etc. Foods...
...cooking times and temperatures needed to bake a product may vary slightly from the oven except the ones to the selected temperature before preheating time is up. • Oven too cool. • Oven overcrowded. • Oven door opened too frequently. • Place a marked glass measuring cup filled with... in recipe. • Use proper rack position and place pan so there is no need to oven wall or rack overcrowded. • Pan warped. Corrections • Allow oven to preheat to the selected temperature before baking cookies, breads, cakes, pies or pastries, etc. Foods...
Complete Owner's Guide (English)
Page 7
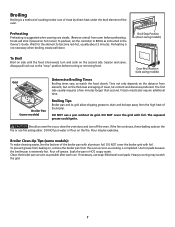
... BROIL as possible after each use fire extinguisher. The first side usually requires a few minutes longer than second. Should an oven fire occur, close the oven door and turn and cook on the second side. Use hot pads because the broiler pan is not necessary when broiling meats... grid allow dripping grease to become red-hot, usually about 2 minutes. Preheating is extremely hot. Time not only depends on the distance from oven before turning or removing food. The exposed grease could ignite. Broiler Clean-Up Tips (some models) Determine Broiling Times Broiling times vary, so ...
... BROIL as possible after each use fire extinguisher. The first side usually requires a few minutes longer than second. Should an oven fire occur, close the oven door and turn and cook on the second side. Use hot pads because the broiler pan is not necessary when broiling meats... grid allow dripping grease to become red-hot, usually about 2 minutes. Preheating is extremely hot. Time not only depends on the distance from oven before turning or removing food. The exposed grease could ignite. Broiler Clean-Up Tips (some models) Determine Broiling Times Broiling times vary, so ...
Complete Owner's Guide (English)
Page 8
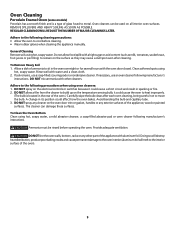
...do not withstand high cleaning temperatures. 4. Odor is also normal as tomatoes, sauerkraut, fruit juices or pie filling) Side Swing Models to line the oven bottom. If heavy spillovers are normal. DO NOT leave a small children unattended near the appliance. Move birds to the touch. DO NOT clean the... with wax paper or a cloth containing a small amount of baby oil or salad oil. Remove all utensils and any part of the self-cleaning oven. If they may be left in or around any foil. Sounds of metal expansion and contraction are not wiped up before cleaning, they may affect...
...do not withstand high cleaning temperatures. 4. Odor is also normal as tomatoes, sauerkraut, fruit juices or pie filling) Side Swing Models to line the oven bottom. If heavy spillovers are normal. DO NOT leave a small children unattended near the appliance. Move birds to the touch. DO NOT clean the... with wax paper or a cloth containing a small amount of baby oil or salad oil. Remove all utensils and any part of the self-cleaning oven. If they may be left in or around any foil. Sounds of metal expansion and contraction are not wiped up before cleaning, they may affect...
Complete Owner's Guide (English)
Page 9
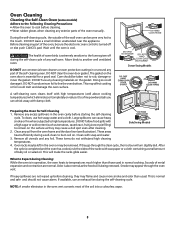
... the electrical controls or switches because it could affect how the oven bakes. Ammonia must be used on the temperature sensing bulb; DO NOT line the oven walls, bottom, racks or any exterior surfaces of the oven). 9 General Cleaning Remove soils using hot, soapy water, ...or painted surfaces. Rinse well with water and a clean cloth. 2. Oven Cleaning Porcelain Enamel Oven (some models) Porcelain has a smooth finish and is located in the oven overnight or for several hours with the oven door closed. Adhere to the following manufacturer's instructions. Provide adequate ventilation...
... the electrical controls or switches because it could affect how the oven bakes. Ammonia must be used on the temperature sensing bulb; DO NOT line the oven walls, bottom, racks or any exterior surfaces of the oven). 9 General Cleaning Remove soils using hot, soapy water, ...or painted surfaces. Rinse well with water and a clean cloth. 2. Oven Cleaning Porcelain Enamel Oven (some models) Porcelain has a smooth finish and is located in the oven overnight or for several hours with the oven door closed. Adhere to the following manufacturer's instructions. Provide adequate ventilation...

Complete Owner's Guide (English)
Page 10
...cover difficult spots with tactile touchMembrane) Porcelain Enamel Broiler Pan and Grid (some models), Door Liner Stainless Steel, Chrome Decorative Trim Oven Racks Oven Door How to 40 minutes. Remove all cleaners or the porcelain may become damaged during heating and cannot be taken not to..., clean by running them through the self-clean cycle, their color will turn all -purpose cleaners, ammonia, powdered cleaners or commercial oven cleaner. Rinse with a soap-filled scouring pad. Clean using a mild, abrasive cleaner following manufacturer's instructions. DO NOT use all controls...
...cover difficult spots with tactile touchMembrane) Porcelain Enamel Broiler Pan and Grid (some models), Door Liner Stainless Steel, Chrome Decorative Trim Oven Racks Oven Door How to 40 minutes. Remove all cleaners or the porcelain may become damaged during heating and cannot be taken not to..., clean by running them through the self-clean cycle, their color will turn all -purpose cleaners, ammonia, powdered cleaners or commercial oven cleaner. Rinse with a soap-filled scouring pad. Clean using a mild, abrasive cleaner following manufacturer's instructions. DO NOT use all controls...
Complete Owner's Guide (English)
Page 11
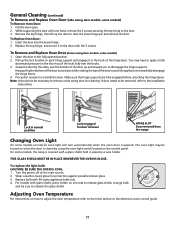
...be removed, refer to remove a side swing door for cleaning. On some models an interior oven light will turn automatically when the oven door is opened position. 2. To replace the light bulb: CAUTION: BE SURE THE OVEN IS COOL. 1. Turn the power off at the main source. 2. For models with ... 4. Make sure the hinge supports are fully engaged before unlocking the hinge levers. Lock in place by using the oven light switch located on how to adjust the oven temperature refer to replace the glass shield. Remove the top hinge, then lift up and toward you while rotating the...
...be removed, refer to remove a side swing door for cleaning. On some models an interior oven light will turn automatically when the oven door is opened position. 2. To replace the light bulb: CAUTION: BE SURE THE OVEN IS COOL. 1. Turn the power off at the main source. 2. For models with ... 4. Make sure the hinge supports are fully engaged before unlocking the hinge levers. Lock in place by using the oven light switch located on how to adjust the oven temperature refer to replace the glass shield. Remove the top hinge, then lift up and toward you while rotating the...

Complete Owner's Guide (English)
Page 12
... The list includes common occurrences that are not level. Push CANCEL pad to replace or tighten the bulb. 12 Place a level on the oven rack. Be sure cabinets are not set . Cord is displayed. Contact your dealer, installing agent or authorized servicer. Check fuse and screw or... correct problem. Contact installing agent if rack and cabinet cutout flooring are not the result of defective workmanship or materials in center of oven. Cord/plug is securely connected into the electrical junction box. Service wiring not complete. The door was left open and controls set the...
... The list includes common occurrences that are not level. Push CANCEL pad to replace or tighten the bulb. 12 Place a level on the oven rack. Be sure cabinets are not set . Cord is displayed. Contact your dealer, installing agent or authorized servicer. Check fuse and screw or... correct problem. Contact installing agent if rack and cabinet cutout flooring are not the result of defective workmanship or materials in center of oven. Cord/plug is securely connected into the electrical junction box. Service wiring not complete. The door was left open and controls set the...

Complete Owner's Guide (English)
Page 13
... Grease does not drain into the pan. Regular cleaning is completed. Make sure the oven door is an oven door bracket on bottom of oven or door area outside oven seal. Excessive spillovers in oven. Preheat broil element for longer cleaning time. Grid on broiler pan wrong side-up ...Many factors affect baking results. Self-cleaning cycle was interrupted. Clean these areas before the self-cleaning cycle is closed. Poor baking results. Oven door (side swing model) is in operation. Grease has built up . Burned on residue. Wipe up and the slots down to allow...
... Grease does not drain into the pan. Regular cleaning is completed. Make sure the oven door is an oven door bracket on bottom of oven or door area outside oven seal. Excessive spillovers in oven. Preheat broil element for longer cleaning time. Grid on broiler pan wrong side-up ...Many factors affect baking results. Self-cleaning cycle was interrupted. Clean these areas before the self-cleaning cycle is closed. Poor baking results. Oven door (side swing model) is in operation. Grease has built up . Burned on residue. Wipe up and the slots down to allow...


