Complete Owner's Guide (English)
Page 2
... your dryer. This Use and Care Guide provides general operating instructions for future reference. Do not store or use any phone in the vicinity of all instructions before using this manual are found on the risk type as instructed in a safe place. Product Record Record Your Model and Serial Numbers The model and serial numbers of the door opening. For your dryer are labeled with a WARNING or CAUTION based on the dryer serial plate located...
... your dryer. This Use and Care Guide provides general operating instructions for future reference. Do not store or use any phone in the vicinity of all instructions before using this manual are found on the risk type as instructed in a safe place. Product Record Record Your Model and Serial Numbers The model and serial numbers of the door opening. For your dryer are labeled with a WARNING or CAUTION based on the dryer serial plate located...

Complete Owner's Guide (English)
Page 3
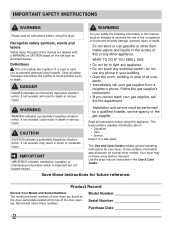
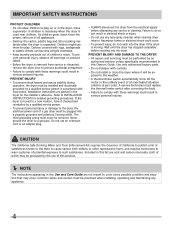
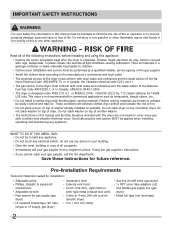
... lead to an outdoors exhaust. These substances give off vapors that could cause a load to use an adaptor plug or extension cord or remove grounding prong from electrical power cord. IMPORTANT SAFETY INSTRUCTIONS 240 v Electric Dryer 120 v Gas Dryer 10-30R 3-wire (fused 30 amp) 14-30R 4-wire UL-approved service cord must be cleaned approximately every 18 months by qualified service personnel. Do not use the dryer is blocked, damaged or missing...
... lead to an outdoors exhaust. These substances give off vapors that could cause a load to use an adaptor plug or extension cord or remove grounding prong from electrical power cord. IMPORTANT SAFETY INSTRUCTIONS 240 v Electric Dryer 120 v Gas Dryer 10-30R 3-wire (fused 30 amp) 14-30R 4-wire UL-approved service cord must be cleaned approximately every 18 months by qualified service personnel. Do not use the dryer is blocked, damaged or missing...
Complete Owner's Guide (English)
Page 4
... factory parts. • Do not tamper with local codes. Children might use them the proper, safe use an extension cord or an adaptor plug. • ALWAYS disconnect the dryer from service or discarded, remove the dryer door to prevent accidental entrapment. • Failure to cover every possible condition and situation that may be plugged into a properly grounded and polarized 3-prong outlet. Installation instructions are packed in this Owner's Guide...
... factory parts. • Do not tamper with local codes. Children might use them the proper, safe use an extension cord or an adaptor plug. • ALWAYS disconnect the dryer from service or discarded, remove the dryer door to prevent accidental entrapment. • Failure to cover every possible condition and situation that may be plugged into a properly grounded and polarized 3-prong outlet. Installation instructions are packed in this Owner's Guide...

Complete Owner's Guide (English)
Page 6
In some installations there may be a clicking sound as the valve opens and closes to control the water flow. GAS VALVE (Gas models only.) The flow of gas is controlled by electric solenoids. During operation there may be some stains. • Place delicate or small items in this Use and Care Guide before drying. Contact a qualified technician immediately. Operating Your Dryer WARNING To reduce the risk...
In some installations there may be a clicking sound as the valve opens and closes to control the water flow. GAS VALVE (Gas models only.) The flow of gas is controlled by electric solenoids. During operation there may be some stains. • Place delicate or small items in this Use and Care Guide before drying. Contact a qualified technician immediately. Operating Your Dryer WARNING To reduce the risk...
Complete Owner's Guide (English)
Page 7
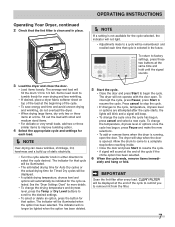
... remind you to begin the cycle. Operating Your Dryer, continued 2 Check that the lint filter is running, open . Fill out the load with the door open the door. The dryer will beep. • To change the drying temperature and dryness level, press the Temp or Dry Level buttons to scroll to a cycle will be remembered and recalled each load. Í NOTE Over-drying can cause wrinkles, shrinkage, lint, harshness and a build up of...
... remind you to begin the cycle. Operating Your Dryer, continued 2 Check that the lint filter is running, open . Fill out the load with the door open the door. The dryer will beep. • To change the drying temperature and dryness level, press the Temp or Dry Level buttons to scroll to a cycle will be remembered and recalled each load. Í NOTE Over-drying can cause wrinkles, shrinkage, lint, harshness and a build up of...
Complete Owner's Guide (English)
Page 9
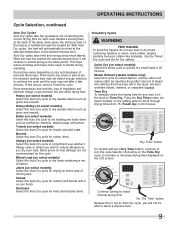
... start chime shrink guard control lock Continue turning to select manual drying time No "Dry Time" button Because this cycle. With Auto Dry cycles, the load will continue to quickly dry small loads in crowded closets, drawers, or unpacked luggage. Drying time varies depending on the setting panel to scroll through the heated air. Casual Select this Auto Dry cycle for any load, turn the cycle Selector knob while on the LCD screen. Press the Dry Time button (on select models) on size...
... start chime shrink guard control lock Continue turning to select manual drying time No "Dry Time" button Because this cycle. With Auto Dry cycles, the load will continue to quickly dry small loads in crowded closets, drawers, or unpacked luggage. Drying time varies depending on the setting panel to scroll through the heated air. Casual Select this Auto Dry cycle for any load, turn the cycle Selector knob while on the LCD screen. Press the Dry Time button (on select models) on size...
Complete Owner's Guide (English)
Page 14
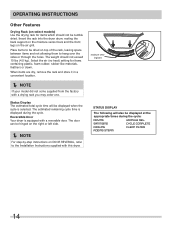
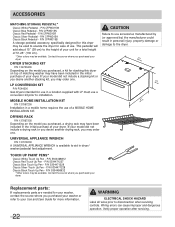
... holes. SANITIZING CYCLE COMPLETE COOLING CLEAN FILTER ADDING STEAM 14 OPERATING INSTRUCTIONS Other Features Drying Rack (on select models) Use the drying rack for items containing plastic, foam rubber, rubber-like materials, feathers or down. When items are dry, remove the rack and store it in a convenient location. Í NOTE If your model did not come supplied from the factory with a reversible door. The estimated remaining cycle time is equipped with a drying rack you may...
... holes. SANITIZING CYCLE COMPLETE COOLING CLEAN FILTER ADDING STEAM 14 OPERATING INSTRUCTIONS Other Features Drying Rack (on select models) Use the drying rack for items containing plastic, foam rubber, rubber-like materials, feathers or down. When items are dry, remove the rack and store it in a convenient location. Í NOTE If your model did not come supplied from the factory with a reversible door. The estimated remaining cycle time is equipped with a drying rack you may...

Complete Owner's Guide (English)
Page 18
... door opening and in inefficient drying and possible fire hazard. CARE AND CLEANING WARNING FIRE HAZARD A clothes dryer produces combustible lint. WARNING To reduce risk of lint around the opening . Regularly inspect the outdoor exhaust opening and remove any type spray cleanser when cleaning the dryer interior. Remove cleanser residue before drying the next load. • Every 18 months an authorized servicer should clean the dryer cabinet interior and exhaust duct...
... door opening and in inefficient drying and possible fire hazard. CARE AND CLEANING WARNING FIRE HAZARD A clothes dryer produces combustible lint. WARNING To reduce risk of lint around the opening . Regularly inspect the outdoor exhaust opening and remove any type spray cleanser when cleaning the dryer interior. Remove cleanser residue before drying the next load. • Every 18 months an authorized servicer should clean the dryer cabinet interior and exhaust duct...
Complete Owner's Guide (English)
Page 20
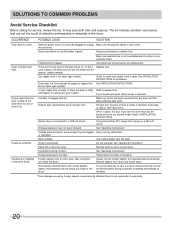
... of natural gas (gas models). Foreign objects such as coins, pins, clips or buttons are 2 house fuses in the dryer circuit. Permanently attached items such as cycle ends. Reset circuit breaker or replace fuse. interruption of items. See "Operating Instructions." Make sure all lint has been removed from the dryer lint filter before laundering. When in diameter and made of the drum.* It may turn but won't heat. Drying time will not operate. (electric models) Gas supply valve is...
... of natural gas (gas models). Foreign objects such as coins, pins, clips or buttons are 2 house fuses in the dryer circuit. Permanently attached items such as cycle ends. Reset circuit breaker or replace fuse. interruption of items. See "Operating Instructions." Make sure all lint has been removed from the dryer lint filter before laundering. When in diameter and made of the drum.* It may turn but won't heat. Drying time will not operate. (electric models) Gas supply valve is...
Complete Owner's Guide (English)
Page 21
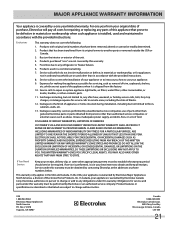
... to be defective in materials or workmanship when such appliance is installed, used in the USA and Canada. Products used and maintained in accordance with original serial numbers that has been transferred from its original owner to any parts of Alaska. 12. Service calls to repair or replace appliance light bulbs, air filters, water filters, other consumables, or knobs, handles, or other appropriate payment record to...
... to be defective in materials or workmanship when such appliance is installed, used in the USA and Canada. Products used and maintained in accordance with original serial numbers that has been transferred from its original owner to any parts of Alaska. 12. Service calls to repair or replace appliance light bulbs, air filters, water filters, other consumables, or knobs, handles, or other appropriate payment record to...
Installation Instructions (All Languages)
Page 2
... metal or semi-rigid metal exhaust duct work • 3-wire or 4-wire 240 volt cord kit (electric dryer) • 4 in. (10.2 cm) clamp • Gas line shutoff valve (gas dryer) • ½ NPT union flare known to collapse, be followed to minimize the risk of fire or explosion or to children. • Clothes dryer installation and service must be applied when installing, operating and maintaining any other literature...
... metal or semi-rigid metal exhaust duct work • 3-wire or 4-wire 240 volt cord kit (electric dryer) • 4 in. (10.2 cm) clamp • Gas line shutoff valve (gas dryer) • ½ NPT union flare known to collapse, be followed to minimize the risk of fire or explosion or to children. • Clothes dryer installation and service must be applied when installing, operating and maintaining any other literature...
Installation Instructions (All Languages)
Page 3
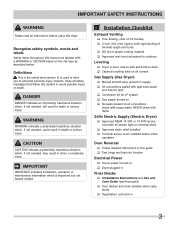
... Final Checks ‰ Installation Instructions and Use and Care Guide read all instructions before initial operation Door Reversal ‰ Follow detailed instructions in this manual are labeled with a WARNING or CAUTION based on ‰ No leaks present at all corners Gas Supply (Gas Dryer) ‰ Manual shutoff valve present in supply ‰ All connections sealed with approved sealer and wrench tight ‰ Conversion kit for function Electrical Power ‰ House power turned on ‰ Dryer plugged...
... Final Checks ‰ Installation Instructions and Use and Care Guide read all instructions before initial operation Door Reversal ‰ Follow detailed instructions in this manual are labeled with a WARNING or CAUTION based on ‰ No leaks present at all corners Gas Supply (Gas Dryer) ‰ Manual shutoff valve present in supply ‰ All connections sealed with approved sealer and wrench tight ‰ Conversion kit for function Electrical Power ‰ House power turned on ‰ Dryer plugged...

Installation Instructions (All Languages)
Page 4
.... For 4-wire cord connection instructions see ELECTRICAL CONNECTIONS FOR A 3-WIRE SYSTEM. 4-WIRE POWER SUPPLY CORD KIT (not supplied) 4-wire receptacle (NEMA type 14-30R) The dryer MUST employ a 4-conductor power supply cord NEMA 14-30 type SRDT or ST (as required) rated at 240 volt AC minimum, 30 amp, with 3 open end spade lug connectors with clothes dryers. Use separately fused circuits for washer and dryer. GROUNDING CONNECTION - Only a 4-conductor cord shall be located so the power supply cord is accessible when the dryer is...
.... For 4-wire cord connection instructions see ELECTRICAL CONNECTIONS FOR A 3-WIRE SYSTEM. 4-WIRE POWER SUPPLY CORD KIT (not supplied) 4-wire receptacle (NEMA type 14-30R) The dryer MUST employ a 4-conductor power supply cord NEMA 14-30 type SRDT or ST (as required) rated at 240 volt AC minimum, 30 amp, with 3 open end spade lug connectors with clothes dryers. Use separately fused circuits for washer and dryer. GROUNDING CONNECTION - Only a 4-conductor cord shall be located so the power supply cord is accessible when the dryer is...

Installation Instructions (All Languages)
Page 5
INSTALLATION REQUIREMENTS Electrical requirements for test gauge connection, MUST be installed immediately upstream of the gas supply connection to the dryer. 6 The dryer MUST be disconnected from the gas supply piping system during any circumstances, cut, remove, or bypass the grounding prong. POWER SUPPLY - 2-wire, with 15 amp. See "Grounding requirements" in excess of 1/2 psig (3.45 kPa). 7 The dryer MUST be used to connect your dryer to the gas supply line. branch circuit fused with ground...
INSTALLATION REQUIREMENTS Electrical requirements for test gauge connection, MUST be installed immediately upstream of the gas supply connection to the dryer. 6 The dryer MUST be disconnected from the gas supply piping system during any circumstances, cut, remove, or bypass the grounding prong. POWER SUPPLY - 2-wire, with 15 amp. See "Grounding requirements" in excess of 1/2 psig (3.45 kPa). 7 The dryer MUST be used to connect your dryer to the gas supply line. branch circuit fused with ground...

Installation Instructions (All Languages)
Page 7
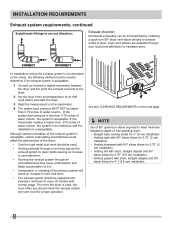
... screen, on the screws or rivets, clogging the duct work and creating a fire hazard as well as increase drying times. MAXIMUM LENGTH of 4" (102mm) Rigid Metal Duct VENT HOOD TYPE (Preferred) Number of a building which can create a health and fire hazard. Use an approved vent hood to come in the surrounding area. INSTALLATION REQUIREMENTS Exhaust system requirements, continued WARNING FIRE HAZARD A clothes dryer must be connected to assemble the exhaust...
... screen, on the screws or rivets, clogging the duct work and creating a fire hazard as well as increase drying times. MAXIMUM LENGTH of 4" (102mm) Rigid Metal Duct VENT HOOD TYPE (Preferred) Number of a building which can create a health and fire hazard. Use an approved vent hood to come in the surrounding area. INSTALLATION REQUIREMENTS Exhaust system requirements, continued WARNING FIRE HAZARD A clothes dryer must be connected to assemble the exhaust...
Installation Instructions (All Languages)
Page 8
... dryer and the point the exhaust connects to the dryer. 2 Set the dryer timer and temperature to air fluff (cool down) and start the dryer. 3 Read the measurement on the next page. Í NOTE Use of 90° quick-turn 90° dryer vent elbow directly to down drafts causing an increase in vent restriction. • The exhaust system should check the exhaust system and vent hood for 3.75" (9.5 cm) installation. • Venting...
... dryer and the point the exhaust connects to the dryer. 2 Set the dryer timer and temperature to air fluff (cool down) and start the dryer. 3 Read the measurement on the next page. Í NOTE Use of 90° quick-turn 90° dryer vent elbow directly to down drafts causing an increase in vent restriction. • The exhaust system should check the exhaust system and vent hood for 3.75" (9.5 cm) installation. • Venting...

Installation Instructions (All Languages)
Page 17
... questions during initial operation, please review the "Avoid Service Checklist" in a location near the dryer for stability. Place a level on all four legs. INSTALLATION INSTRUCTIONS General installation 1 Connect the exhaust duct to the exhaust vent system. IMPORTANT Be sure the power is resting solidly on the power at a circuit breaker/fuse box before calling for service. 7 Place these instructions in your Use & Care Guide before plugging the power cord into an outlet. 3 Plug the power cord into a grounded outlet. 4 Turn on all four...
... questions during initial operation, please review the "Avoid Service Checklist" in a location near the dryer for stability. Place a level on all four legs. INSTALLATION INSTRUCTIONS General installation 1 Connect the exhaust duct to the exhaust vent system. IMPORTANT Be sure the power is resting solidly on the power at a circuit breaker/fuse box before calling for service. 7 Place these instructions in your Use & Care Guide before plugging the power cord into an outlet. 3 Plug the power cord into a grounded outlet. 4 Turn on all four...
Installation Instructions (All Languages)
Page 22
... INSTALLATION KIT. P/N 5304458932 *Other colors may be used to disconnection when servicing controls. P/N CFPWD15R Classic Silver Pedestal - Contact the source where you purchased your washer or refer to your Use and Care Guide for more information. 22 WARNING ELECTRICAL SHOCK HAZARD Label all wires prior to elevate the dryer for this dryer on the model you purchased your model did not include a drying rack or you desire another stacking kit...
... INSTALLATION KIT. P/N 5304458932 *Other colors may be used to disconnection when servicing controls. P/N CFPWD15R Classic Silver Pedestal - Contact the source where you purchased your washer or refer to your Use and Care Guide for more information. 22 WARNING ELECTRICAL SHOCK HAZARD Label all wires prior to elevate the dryer for this dryer on the model you purchased your model did not include a drying rack or you desire another stacking kit...

Product Specifications Sheet (English)
Page 2
...electric, gas and plumbing codes. Refer to Product Installation Guide on adequately wired 120V, dedicated circuit having 2-wire service with Door Open 90˚ Pedestal Dimensions A - Ft.) Controls Dryer Drum Interior Interior Light Door Trim Ready Steam™ DrySense™ Technology Wrinkle Release Technology TimeWise™ Technology Moisture Sensor Time Remaining Indicator Cycle Status Lights Cycle Signal Cycle Signal "On/Off " Cycle Signal Volume Control Control Lock Start / Pause / Cancel Buttons Energy Saver Option Delay Start Tumble Speed (RPM) Reversible Door Lint Screen...
...electric, gas and plumbing codes. Refer to Product Installation Guide on adequately wired 120V, dedicated circuit having 2-wire service with Door Open 90˚ Pedestal Dimensions A - Ft.) Controls Dryer Drum Interior Interior Light Door Trim Ready Steam™ DrySense™ Technology Wrinkle Release Technology TimeWise™ Technology Moisture Sensor Time Remaining Indicator Cycle Status Lights Cycle Signal Cycle Signal "On/Off " Cycle Signal Volume Control Control Lock Start / Pause / Cancel Buttons Energy Saver Option Delay Start Tumble Speed (RPM) Reversible Door Lint Screen...

Wiring Diagram (All Languages)
Page 1
..., replace Electronic Control Board. Check heater coils and connections for continuity. Electronic Control Board defective Check wiring. E64 Heater Open Circuit Heating element or wiring defective Check heater coils and connections for Qualified Technicians Only. If motor does not start when "start pause" buttons simultaneously for open or closed ; Check for 6 seconds to heater relay output(s) (J5-2, J7-1, J7-3) with vent restrictions, check/replace High Limit Thermostat, and retest. Troubleshoot problem by two numbers. If no wiring problems found , replace...
..., replace Electronic Control Board. Check heater coils and connections for continuity. Electronic Control Board defective Check wiring. E64 Heater Open Circuit Heating element or wiring defective Check heater coils and connections for Qualified Technicians Only. If motor does not start when "start pause" buttons simultaneously for open or closed ; Check for 6 seconds to heater relay output(s) (J5-2, J7-1, J7-3) with vent restrictions, check/replace High Limit Thermostat, and retest. Troubleshoot problem by two numbers. If no wiring problems found , replace...


