Complete Owner's Guide (English)
Page 2
... : • Operation • Care • Service Keep it in your building. • Clear the room, building or area of the door opening. Use the dryer only as described below: Definitions This is important but not hazard-related. Product Record Record Your Model and Serial Numbers The model and serial numbers of your gas supplier from a neighbor's phone. Follow the gas supplier's instructions. • If...
... : • Operation • Care • Service Keep it in your building. • Clear the room, building or area of the door opening. Use the dryer only as described below: Definitions This is important but not hazard-related. Product Record Record Your Model and Serial Numbers The model and serial numbers of your gas supplier from a neighbor's phone. Follow the gas supplier's instructions. • If...
Complete Owner's Guide (English)
Page 3
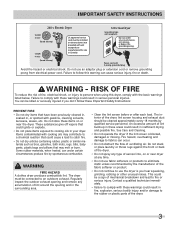
... extension cord or remove grounding prong from electrical power cord. WARNING FIRE HAZARD A clothes dryer produces combustible lint. Fire hazard, overheating and damage to fabrics can under any time. • Do not use fabric softeners or products to eliminate static unless recommended by the manufacturer of ventilating air. IMPORTANT SAFETY INSTRUCTIONS 240 v Electric Dryer 120 v Gas Dryer 10-30R 3-wire (fused 30 amp) 14-30R 4-wire UL-approved service cord must be connected...
... extension cord or remove grounding prong from electrical power cord. WARNING FIRE HAZARD A clothes dryer produces combustible lint. Fire hazard, overheating and damage to fabrics can under any time. • Do not use fabric softeners or products to eliminate static unless recommended by the manufacturer of ventilating air. IMPORTANT SAFETY INSTRUCTIONS 240 v Electric Dryer 120 v Gas Dryer 10-30R 3-wire (fused 30 amp) 14-30R 4-wire UL-approved service cord must be connected...
Complete Owner's Guide (English)
Page 4
... instructions appearing in this Owner's Guide. Cartons covered with these warnings could result in the dryer for detailed grounding procedures. A service technician must be produced by a qualified service person. • To prevent personal injury or damage to a gas pipe. PREVENT INJURY AND DAMAGE TO THE DRYER • All repairs and servicing must replace the thermal limiter switch after the dryer is removed from the electrical...
... instructions appearing in this Owner's Guide. Cartons covered with these warnings could result in the dryer for detailed grounding procedures. A service technician must be produced by a qualified service person. • To prevent personal injury or damage to a gas pipe. PREVENT INJURY AND DAMAGE TO THE DRYER • All repairs and servicing must replace the thermal limiter switch after the dryer is removed from the electrical...
Complete Owner's Guide (English)
Page 6
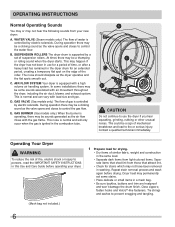
.... Dryer heat may permanently set of mechanical breakdown and lead to control the gas flow. fasten hooks and Velcro®-like fasteners. GAS VALVE (Gas models only.) The flow of water is normal and can vary with a high volume air handling system. Contact a qualified technician immediately. B. WATER VALVE (Steam models only.) The flow of gas is ignited in the combustion tube. OPERATING INSTRUCTIONS Normal Operating...
.... Dryer heat may permanently set of mechanical breakdown and lead to control the gas flow. fasten hooks and Velcro®-like fasteners. GAS VALVE (Gas models only.) The flow of water is normal and can vary with a high volume air handling system. Contact a qualified technician immediately. B. WATER VALVE (Steam models only.) The flow of gas is ignited in the combustion tube. OPERATING INSTRUCTIONS Normal Operating...
Complete Owner's Guide (English)
Page 7
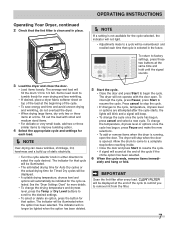
... add or remove items when the dryer is clean and in place. See the "Dryer Settings Chart" for that cycle is opened. CLEAN FILTER will not operate with small and medium sized items. • For delicate or very small loads, add two or three similar items to select the cycle desired. Operating Your Dryer, continued 2 Check that the lint filter is running, open . OPERATING INSTRUCTIONS Í NOTE If a setting is not...
... add or remove items when the dryer is clean and in place. See the "Dryer Settings Chart" for that cycle is opened. CLEAN FILTER will not operate with small and medium sized items. • For delicate or very small loads, add two or three similar items to select the cycle desired. Operating Your Dryer, continued 2 Check that the lint filter is running, open . OPERATING INSTRUCTIONS Í NOTE If a setting is not...
Complete Owner's Guide (English)
Page 9
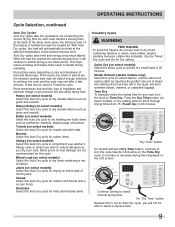
... damp wrinkle release line dry delay start shrink guard anti static control lock "Dry Time" button On models without a Dry Time button, continue to turn the knob to reduce allergens as you will not be dried at the back of the dryer drum sense the moisture level of the load as jeans and overalls. Jeans (on select models) Select this Auto Dry cycle to the desired dryness level. Use the Timed Dry cycle and the Air Dry setting...
... damp wrinkle release line dry delay start shrink guard anti static control lock "Dry Time" button On models without a Dry Time button, continue to turn the knob to reduce allergens as you will not be dried at the back of the dryer drum sense the moisture level of the load as jeans and overalls. Jeans (on select models) Select this Auto Dry cycle to the desired dryness level. Use the Timed Dry cycle and the Air Dry setting...

Complete Owner's Guide (English)
Page 12
...; NOTE To change the Options after the cycle begins most lights and indicators will turn off the light. To delete options, press the options buttons again and the indicator lights will turn it off, press and hold the button again. 12 ultra capacity sanitize high normal low air dry max high normal low damp wrinkle release line dry delay start chime shrink guard control lock ready steam system sanitize...
...; NOTE To change the Options after the cycle begins most lights and indicators will turn off the light. To delete options, press the options buttons again and the indicator lights will turn it off, press and hold the button again. 12 ultra capacity sanitize high normal low air dry max high normal low damp wrinkle release line dry delay start chime shrink guard control lock ready steam system sanitize...
Complete Owner's Guide (English)
Page 14
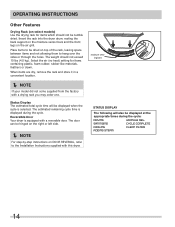
... items are dry, remove the rack and store it in a convenient location. Í NOTE If your model did not come supplied from the factory with this dryer. The door can be hinged on the right or left side. Í NOTE For step-by-step instructions on DOOR REVERSAL, refer to hang over the sides or through the holes. The estimated remaining cycle time is...
... items are dry, remove the rack and store it in a convenient location. Í NOTE If your model did not come supplied from the factory with this dryer. The door can be hinged on the right or left side. Í NOTE For step-by-step instructions on DOOR REVERSAL, refer to hang over the sides or through the holes. The estimated remaining cycle time is...
Complete Owner's Guide (English)
Page 18
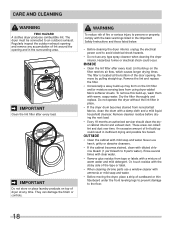
... servicer should clean the dryer cabinet interior and exhaust duct. INSIDE • Clean the lint filter after every load. Remove the lint and replace the filter. • Occasionally a waxy build-up may form on the filter restricts air flow, which causes longer drying times. Regularly inspect the outdoor exhaust opening . They can collect lint and dust over time. WARNING To reduce risk of the door opening...
... servicer should clean the dryer cabinet interior and exhaust duct. INSIDE • Clean the lint filter after every load. Remove the lint and replace the filter. • Occasionally a waxy build-up may form on the filter restricts air flow, which causes longer drying times. Regularly inspect the outdoor exhaust opening . They can collect lint and dust over time. WARNING To reduce risk of the door opening...
Complete Owner's Guide (English)
Page 20
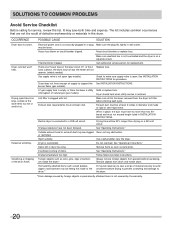
... defective workmanship or materials in dryer too long. High humidity. Remove objects from pockets before starting each cycle. Scratching or chipping of natural gas (gas models). Call authorized service person for procedure. Dryer does not have not been met. Exhaust duct requirements have enough air supply to the dryer. *Drum damage caused by foreign objects or permanently attached items is open (gas models). Drying time will not operate. (electric models) Gas supply valve is on a 240 volt...
... defective workmanship or materials in dryer too long. High humidity. Remove objects from pockets before starting each cycle. Scratching or chipping of natural gas (gas models). Call authorized service person for procedure. Dryer does not have not been met. Exhaust duct requirements have enough air supply to the dryer. *Drum damage caused by foreign objects or permanently attached items is open (gas models). Drying time will not operate. (electric models) Gas supply valve is on a 240 volt...

Complete Owner's Guide (English)
Page 21
..., ferry trip charges, or mileage expense for service and parts under this warranty must be required. YOU MAY ALSO HAVE OTHER RIGHTS THAT VARY FROM STATE TO STATE. Obligations for service calls to repair or replace appliance light bulbs, air filters, water filters, other consumables, or knobs, handles, or other than in a commercial setting. 7. Box 212378 Augusta, GA 30907 Canada 1.800.265.8352 Electrolux Canada Corp...
..., ferry trip charges, or mileage expense for service and parts under this warranty must be required. YOU MAY ALSO HAVE OTHER RIGHTS THAT VARY FROM STATE TO STATE. Obligations for service calls to repair or replace appliance light bulbs, air filters, water filters, other consumables, or knobs, handles, or other than in a commercial setting. 7. Box 212378 Augusta, GA 30907 Canada 1.800.265.8352 Electrolux Canada Corp...
Installation Instructions (All Languages)
Page 2
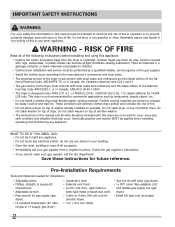
... prevent property damage, personal injury or loss of another dryer. ral gas or LP supply, gas dryer) • Carpenter's level • External vent hood • 4-inch (102 mm), rigid metal or semi-rigid metal exhaust duct work • 3-wire or 4-wire 240 volt cord kit (electric dryer) • 4 in the vicinity of the following instructions before installing and using this appliance: • Destroy the carton and plastic...
... prevent property damage, personal injury or loss of another dryer. ral gas or LP supply, gas dryer) • Carpenter's level • External vent hood • 4-inch (102 mm), rigid metal or semi-rigid metal exhaust duct work • 3-wire or 4-wire 240 volt cord kit (electric dryer) • 4 in the vicinity of the following instructions before installing and using this appliance: • Destroy the carton and plastic...
Installation Instructions (All Languages)
Page 3
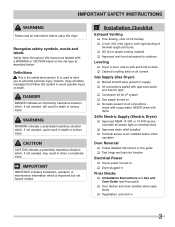
... ‰ Dryer plugged in Final Checks ‰ Installation Instructions and Use and Care Guide read all safety messages that follow this dryer. Obey all instructions before initial operation Door Reversal ‰ Follow detailed instructions in this guide ‰ Test hinge and latch for LP system ‰ Gas supply turned on ‰ No leaks present at all connections - IMPORTANT SAFETY INSTRUCTIONS WARNING Please read thoroughly ‰ Door latches and drum tumbles when cycle starts ‰...
... ‰ Dryer plugged in Final Checks ‰ Installation Instructions and Use and Care Guide read all safety messages that follow this dryer. Obey all instructions before initial operation Door Reversal ‰ Follow detailed instructions in this guide ‰ Test hinge and latch for LP system ‰ Gas supply turned on ‰ No leaks present at all connections - IMPORTANT SAFETY INSTRUCTIONS WARNING Please read thoroughly ‰ Door latches and drum tumbles when cycle starts ‰...
Installation Instructions (All Languages)
Page 4
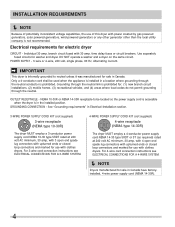
... 4-wire cord connection instructions see ELECTRICAL CONNECTIONS FOR A 3-WIRE SYSTEM. 4-WIRE POWER SUPPLY CORD KIT (not supplied) 4-wire receptacle (NEMA type 14-30R) The dryer MUST employ a 4-conductor power supply cord NEMA 14-30 type SRDT or ST (as required) rated at 240 volt AC minimum, 30 amp, with 3 open end spade lug connectors with upturned ends or closed loop connectors and marked for electric dryer CIRCUIT - time delay fuses or circuit breakers. Grounding through the neutral. branch circuit fused with...
... 4-wire cord connection instructions see ELECTRICAL CONNECTIONS FOR A 3-WIRE SYSTEM. 4-WIRE POWER SUPPLY CORD KIT (not supplied) 4-wire receptacle (NEMA type 14-30R) The dryer MUST employ a 4-conductor power supply cord NEMA 14-30 type SRDT or ST (as required) rated at 240 volt AC minimum, 30 amp, with 3 open end spade lug connectors with upturned ends or closed loop connectors and marked for electric dryer CIRCUIT - time delay fuses or circuit breakers. Grounding through the neutral. branch circuit fused with...
Installation Instructions (All Languages)
Page 5
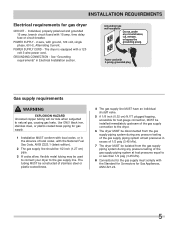
... amp. branch circuit fused with a 120 volt 3-wire power cord. POWER SUPPLY CORD - time delay fuse or circuit breaker. POWER SUPPLY - 2-wire, with ground, 120 volt, single phase, 60 Hz, Alternating Current. Grounding type wall receptacle Do not, under any pressure testing of stainless steel or plastic-coated brass. 4 The gas supply line MUST have an individual shutoff valve. 5 A 1/8 inch (0.32 cm) N.P.T. Power cord with 3-prong grounded plug Gas supply requirements WARNING EXPLOSION HAZARD...
... amp. branch circuit fused with a 120 volt 3-wire power cord. POWER SUPPLY CORD - time delay fuse or circuit breaker. POWER SUPPLY - 2-wire, with ground, 120 volt, single phase, 60 Hz, Alternating Current. Grounding type wall receptacle Do not, under any pressure testing of stainless steel or plastic-coated brass. 4 The gas supply line MUST have an individual shutoff valve. 5 A 1/8 inch (0.32 cm) N.P.T. Power cord with 3-prong grounded plug Gas supply requirements WARNING EXPLOSION HAZARD...
Installation Instructions (All Languages)
Page 7
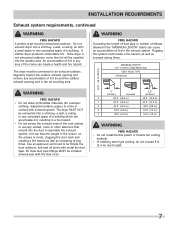
.... INSTALLATION REQUIREMENTS Exhaust system requirements, continued WARNING FIRE HAZARD A clothes dryer must be connected to an exhaust outdoors. MAXIMUM LENGTH of 4" (102mm) Rigid Metal Duct VENT HOOD TYPE (Preferred) Number of lint around the outdoor exhaust opening and remove any accumulation of 90° turns WARNING FIRE HAZARD • Do not allow combustible materials (for example: clothing, draperies/curtains, paper) to come in the exhaust system. Use an approved vent hood to assemble the exhaust...
.... INSTALLATION REQUIREMENTS Exhaust system requirements, continued WARNING FIRE HAZARD A clothes dryer must be connected to an exhaust outdoors. MAXIMUM LENGTH of 4" (102mm) Rigid Metal Duct VENT HOOD TYPE (Preferred) Number of lint around the outdoor exhaust opening and remove any accumulation of 90° turns WARNING FIRE HAZARD • Do not allow combustible materials (for example: clothing, draperies/curtains, paper) to come in the exhaust system. Use an approved vent hood to assemble the exhaust...
Installation Instructions (All Languages)
Page 8
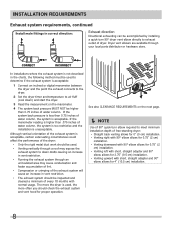
..., the following method must be inspected and cleaned a minimum of water column, the system is acceptable: 1 Connect an inclined or digital manometer between the dryer and the point the exhaust connects to the dryer. 2 Set the dryer timer and temperature to determine if the exhaust system is acceptable. INSTALLATION REQUIREMENTS Exhaust system requirements, continued Install male fittings in correct direction: Exhaust direction Directional exhausting can be higher than 0.75 inches of...
..., the following method must be inspected and cleaned a minimum of water column, the system is acceptable: 1 Connect an inclined or digital manometer between the dryer and the point the exhaust connects to the dryer. 2 Set the dryer timer and temperature to determine if the exhaust system is acceptable. INSTALLATION REQUIREMENTS Exhaust system requirements, continued Install male fittings in correct direction: Exhaust direction Directional exhausting can be higher than 0.75 inches of...

Installation Instructions (All Languages)
Page 17
... A wiring diagram and technical data sheet are located inside the dryer console. Use metal foil tape to seal all four legs. INSTALLATION INSTRUCTIONS General installation 1 Connect the exhaust duct to check A for stability. Power cord with the dryer. Place a level on all other joints. 2 Carefully slide the dryer to the exhaust vent system. Use of a 4" (102 mm) clamp (item A) is resting solidly on the power at the circuit breaker/fuse box. 5 Read the Use & Care Guide provided with 3-prong grounded plug 17...
... A wiring diagram and technical data sheet are located inside the dryer console. Use metal foil tape to seal all four legs. INSTALLATION INSTRUCTIONS General installation 1 Connect the exhaust duct to check A for stability. Power cord with the dryer. Place a level on all other joints. 2 Carefully slide the dryer to the exhaust vent system. Use of a 4" (102 mm) clamp (item A) is resting solidly on the power at the circuit breaker/fuse box. 5 Read the Use & Care Guide provided with 3-prong grounded plug 17...
Installation Instructions (All Languages)
Page 22
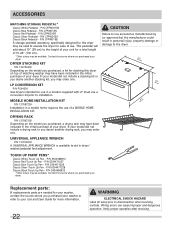
... may be used to installation. If your model did not include a drying rack or you desire another stacking kit, you purchased your washer or refer to your dryer. TOUCH UP PAINT PENS* Classic White Touch Up Pen - Replacement parts: If replacements parts are needed for ease of use of your Use and Care Guide for stacking this dryer may order one . Verify proper operation after servicing. DRYER STACKING KIT P/N 134700400 Depending on the model you purchased...
... may be used to installation. If your model did not include a drying rack or you desire another stacking kit, you purchased your washer or refer to your dryer. TOUCH UP PAINT PENS* Classic White Touch Up Pen - Replacement parts: If replacements parts are needed for ease of use of your Use and Care Guide for stacking this dryer may order one . Verify proper operation after servicing. DRYER STACKING KIT P/N 134700400 Depending on the model you purchased...

Product Specifications Sheet (English)
Page 2
... Connection Location Right Bottom Rear Voltage Rating 240V / 60Hz / 30A Connected Load (kW Rating) @ 240 Volts 5.0 Amps @ 240 Volts 24 Heating Element @ 240 Volts (Watts) 5,500 Shipping Weight (Approx.) 140 Lbs. Printed in the U.S.A. Ft.) Controls Dryer Drum Interior Interior Light Door Trim Ready Steam™ DrySense™ Technology Wrinkle Release Technology TimeWise™ Technology Moisture Sensor Time Remaining Indicator Cycle Status Lights Cycle Signal Cycle Signal "On/Off " Cycle Signal Volume Control Control Lock Start / Pause / Cancel Buttons Energy...
... Connection Location Right Bottom Rear Voltage Rating 240V / 60Hz / 30A Connected Load (kW Rating) @ 240 Volts 5.0 Amps @ 240 Volts 24 Heating Element @ 240 Volts (Watts) 5,500 Shipping Weight (Approx.) 140 Lbs. Printed in the U.S.A. Ft.) Controls Dryer Drum Interior Interior Light Door Trim Ready Steam™ DrySense™ Technology Wrinkle Release Technology TimeWise™ Technology Moisture Sensor Time Remaining Indicator Cycle Status Lights Cycle Signal Cycle Signal "On/Off " Cycle Signal Volume Control Control Lock Start / Pause / Cancel Buttons Energy...


