
Installation Instructions (English, Español, Français)
Page 1
All about the Installation of your Dryer TABLE OF CONTENTS Important Safety Instructions 2-3 Accessories 19 Installation Requirements 4-10 Notes 20 Installation Instructions 11-16 Español 21 Reversing Door 17-18 137349800B (1204)
All about the Installation of your Dryer TABLE OF CONTENTS Important Safety Instructions 2-3 Accessories 19 Installation Requirements 4-10 Notes 20 Installation Instructions 11-16 Español 21 Reversing Door 17-18 137349800B (1204)
Installation Instructions (English, Español, Français)
Page 2
... ordinances and the latest edition of all materials in a garbage container or make materials inaccessible to children. • Clothes dryer installation and service must conform with this or any electrical switch; Save these instructions for natu- Cartons covered with local codes...: • Adjustable pliers • Phillips, straight, & square bit screwdrivers • Adjustable wrench • Pipe wrench for gas supply (gas dryer) • LP-resistant thread tape (for future reference. Place all occupants. • Immediately call your gas supplier, call the fire ...
... ordinances and the latest edition of all materials in a garbage container or make materials inaccessible to children. • Clothes dryer installation and service must conform with this or any electrical switch; Save these instructions for natu- Cartons covered with local codes...: • Adjustable pliers • Phillips, straight, & square bit screwdrivers • Adjustable wrench • Pipe wrench for gas supply (gas dryer) • LP-resistant thread tape (for future reference. Place all occupants. • Immediately call your gas supplier, call the fire ...
Installation Instructions (English, Español, Français)
Page 3
... of minimal length and turns ‰ NO foil or plastic venting material ‰ Approved vent hood exhausted to outdoors Leveling ‰ Dryer is level, side-to-side and front-to avoid possible injury or death. check with soapy water, NEVER check with flame ...Checks ‰ Installation Instructions and Use and Care Guide read all instructions before initial operation Door Reversal ‰ Follow detailed instructions in this dryer. It is important but not hazard-related. IMPORTANT SAFETY INSTRUCTIONS WARNING Please read thoroughly ‰ Door latches and drum tumbles when cycle ...
... of minimal length and turns ‰ NO foil or plastic venting material ‰ Approved vent hood exhausted to outdoors Leveling ‰ Dryer is level, side-to-side and front-to avoid possible injury or death. check with soapy water, NEVER check with flame ...Checks ‰ Installation Instructions and Use and Care Guide read all instructions before initial operation Door Reversal ‰ Follow detailed instructions in this dryer. It is important but not hazard-related. IMPORTANT SAFETY INSTRUCTIONS WARNING Please read thoroughly ‰ Door latches and drum tumbles when cycle ...
Installation Instructions (English, Español, Français)
Page 4
...30R or NEMA 14-30R receptacle to neutral unless it was manufactured for use of potentially inconsistent voltage capabilities, the use with clothes dryers. Individual 30 amp. See "Grounding requirements" in Electrical Installation section. 3-WIRE POWER SUPPLY CORD KIT (not supplied) 3-wire receptacle (... instructions see ELECTRICAL CONNECTIONS FOR A 3-WIRE SYSTEM. 4-WIRE POWER SUPPLY CORD KIT (not supplied) 4-wire receptacle (NEMA type 14-30R) The dryer MUST employ a 4-conductor power supply cord NEMA 14-30 type SRDT or ST (as required) rated at 240 volt AC minimum, 30 amp,...
...30R or NEMA 14-30R receptacle to neutral unless it was manufactured for use of potentially inconsistent voltage capabilities, the use with clothes dryers. Individual 30 amp. See "Grounding requirements" in Electrical Installation section. 3-WIRE POWER SUPPLY CORD KIT (not supplied) 3-wire receptacle (... instructions see ELECTRICAL CONNECTIONS FOR A 3-WIRE SYSTEM. 4-WIRE POWER SUPPLY CORD KIT (not supplied) 4-wire receptacle (NEMA type 14-30R) The dryer MUST employ a 4-conductor power supply cord NEMA 14-30 type SRDT or ST (as required) rated at 240 volt AC minimum, 30 amp,...
Installation Instructions (English, Español, Français)
Page 5
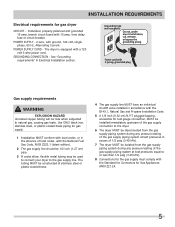
... Standard for Connectors for gas supply. 1 Installation MUST conform with local codes, or in excess of 1/2 psig (3.45 kPa). 7 The dryer MUST be isolated from the gas supply piping system during any pressure testing of the gas supply piping system at test pressures in the absence... 1/2 inch (1.27 cm) pipe. 3 If codes allow, flexible metal tubing may be constructed of the gas supply connection to the dryer. 6 The dryer MUST be disconnected from the gas supply piping system during any circumstances, cut, remove, or bypass the grounding prong. plugged tapping, accessible for ...
... Standard for Connectors for gas supply. 1 Installation MUST conform with local codes, or in excess of 1/2 psig (3.45 kPa). 7 The dryer MUST be isolated from the gas supply piping system during any pressure testing of the gas supply piping system at test pressures in the absence... 1/2 inch (1.27 cm) pipe. 3 If codes allow, flexible metal tubing may be constructed of the gas supply connection to the dryer. 6 The dryer MUST be disconnected from the gas supply piping system during any circumstances, cut, remove, or bypass the grounding prong. plugged tapping, accessible for ...
Installation Instructions (English, Español, Français)
Page 6
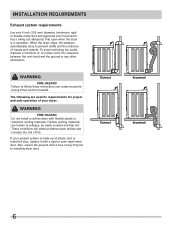
...follow these instructions can create excessive drying times and fire hazards. WARNING FIRE HAZARD Do not install a clothes dryer with a rigid or semi-rigid metal duct. If your dryer. INSTALLATION REQUIREMENTS Exhaust system requirements Use only 4 inch (102 mm) diameter (minimum) rigid or flexible metal... duct and approved vent hood which has a swing-out damper(s) that open when the dryer is free of plastic duct or metal foil duct, replace it with flexible plastic or metal foil venting materials. Also, ensure the present...
...follow these instructions can create excessive drying times and fire hazards. WARNING FIRE HAZARD Do not install a clothes dryer with a rigid or semi-rigid metal duct. If your dryer. INSTALLATION REQUIREMENTS Exhaust system requirements Use only 4 inch (102 mm) diameter (minimum) rigid or flexible metal... duct and approved vent hood which has a swing-out damper(s) that open when the dryer is free of plastic duct or metal foil duct, replace it with flexible plastic or metal foil venting materials. Also, ensure the present...
Installation Instructions (English, Español, Français)
Page 7
... on the screws or rivets, clogging the duct work and creating a fire hazard as well as increase drying times. If the dryer is not exhausted outdoors, some fine lint will be exhausted into the duct to assemble the exhaust system. All male duct pipe ...other fasteners that extend into a chimney, a wall, a ceiling, or any concealed space of lint in the surrounding area. A clothes dryer produces combustible lint. The dryer must be installed downstream with metal foil duct tape. Plugging the system could create a fire hazard, as well as increasing drying ...
... on the screws or rivets, clogging the duct work and creating a fire hazard as well as increase drying times. If the dryer is not exhausted outdoors, some fine lint will be exhausted into the duct to assemble the exhaust system. All male duct pipe ...other fasteners that extend into a chimney, a wall, a ceiling, or any concealed space of lint in the surrounding area. A clothes dryer produces combustible lint. The dryer must be installed downstream with metal foil duct tape. Plugging the system could create a fire hazard, as well as increasing drying ...
Installation Instructions (English, Español, Français)
Page 8
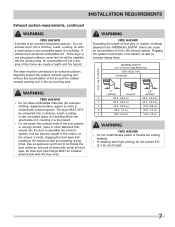
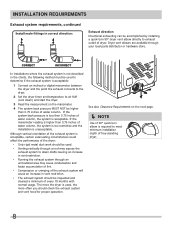
... See also Clearance Requirements on the next page. Í NOTE Use of 90° quick-turn 90° dryer vent elbow directly to down ) and start the dryer. 3 Read the measurement on the manometer. 4 The system back pressure MUST NOT be higher than 0.75 inches...The exhaust system should be accomplished by installing a quick-turn elbow is acceptable, certain extenuating circumstances could affect the performance of free-standing dryer. 8 Although vertical orientation of the exhaust system is required to air fluff (cool down drafts causing an increase in correct direction...
... See also Clearance Requirements on the next page. Í NOTE Use of 90° quick-turn 90° dryer vent elbow directly to down ) and start the dryer. 3 Read the measurement on the manometer. 4 The system back pressure MUST NOT be higher than 0.75 inches...The exhaust system should be accomplished by installing a quick-turn elbow is acceptable, certain extenuating circumstances could affect the performance of free-standing dryer. 8 Although vertical orientation of the exhaust system is required to air fluff (cool down drafts causing an increase in correct direction...

Installation Instructions (English, Español, Français)
Page 9
...are required to be unobstructed when a door is acceptable. 3" (7.6cm) 60 sq. Installation in a Recess or Closet 1 A dryer installed in this (1) dryer or (2) dryer mounted on pedestal to current Manufactured Home Construction & Safety Standard, Title 24 CFR, Part 32-80 (formerly the Federal Standard for the...178;) 3" (7.6cm) closet door 60 sq. Openings should be 4 inches (10.16 cm) in the same closet as the gas dryer. 3 Your dryer needs the space around it for outside (outdoors, not beneath the mobile home) using metal ducting that will not support combustion. Metal ducting...
...are required to be unobstructed when a door is acceptable. 3" (7.6cm) 60 sq. Installation in a Recess or Closet 1 A dryer installed in this (1) dryer or (2) dryer mounted on pedestal to current Manufactured Home Construction & Safety Standard, Title 24 CFR, Part 32-80 (formerly the Federal Standard for the...178;) 3" (7.6cm) closet door 60 sq. Openings should be 4 inches (10.16 cm) in the same closet as the gas dryer. 3 Your dryer needs the space around it for outside (outdoors, not beneath the mobile home) using metal ducting that will not support combustion. Metal ducting...
Installation Instructions (English, Español, Français)
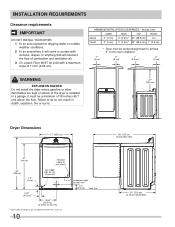
Page 10
...Floor MUST be a minimum of 18 inches (45.7 cm) above the floor. INSTALLATION REQUIREMENTS Clearance requirements IMPORTANT DO NOT INSTALL YOUR DRYER: 1 In an area exposed to front of closed door Failure to do so can result in contact with a maximum slope of combustion ...and ventilation air. 3 On carpet. MINIMUM INSTALLATION CLEARANCES - If the dryer is installed in a garage, it will obstruct the flow of 1 inch (2.54 cm). Inches (cm) SIDES REAR TOP FRONT Alcove 0" (0 cm) 0" (0...
...Floor MUST be a minimum of 18 inches (45.7 cm) above the floor. INSTALLATION REQUIREMENTS Clearance requirements IMPORTANT DO NOT INSTALL YOUR DRYER: 1 In an area exposed to front of closed door Failure to do so can result in contact with a maximum slope of combustion ...and ventilation air. 3 On carpet. MINIMUM INSTALLATION CLEARANCES - If the dryer is installed in a garage, it will obstruct the flow of 1 inch (2.54 cm). Inches (cm) SIDES REAR TOP FRONT Alcove 0" (0 cm) 0" (0...
Installation Instructions (English, Español, Français)
Page 11
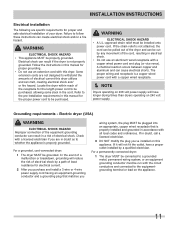
... in doubt as to whether the appliance is a copper wired power cord with a licensed electrician if you 've installed on this dryer. Electric dryer (USA) WARNING ELECTRICAL SHOCK HAZARD Improper connection of the equipment grounding conductor can be cut by a qualified electrician. Check with... a fire hazard. WARNING ELECTRICAL SHOCK HAZARD • A U.L.-approved strain relief must be purchased, allowing some slack in this dryer utilizes and can cause electrical shorts. If in this manual for the length power cord to the pre-installation requirements in the cord. ...
... in doubt as to whether the appliance is a copper wired power cord with a licensed electrician if you 've installed on this dryer. Electric dryer (USA) WARNING ELECTRICAL SHOCK HAZARD Improper connection of the equipment grounding conductor can be cut by a qualified electrician. Check with... a fire hazard. WARNING ELECTRICAL SHOCK HAZARD • A U.L.-approved strain relief must be purchased, allowing some slack in this dryer utilizes and can cause electrical shorts. If in this manual for the length power cord to the pre-installation requirements in the cord. ...
Installation Instructions (English, Español, Français)
Page 12
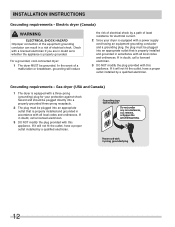
... will not fit the outlet, have a proper outlet installed by a qualified electrician. Grounding requirements - Gas dryer (USA and Canada) 1 The dryer is equipped with a three-prong (grounding) plug for electrical current. 2 Since your protection against shock hazard and should be...plug must be plugged into an appropriate outlet that is properly grounded. Check with this appliance. For a grounded, cord-connected dryer: 1 The dryer MUST be plugged into an appropriate outlet that is properly installed and grounded in doubt, call a licensed electrician. 3 DO NOT...
... will not fit the outlet, have a proper outlet installed by a qualified electrician. Grounding requirements - Gas dryer (USA and Canada) 1 The dryer is equipped with a three-prong (grounding) plug for electrical current. 2 Since your protection against shock hazard and should be...plug must be plugged into an appropriate outlet that is properly grounded. Check with this appliance. For a grounded, cord-connected dryer: 1 The dryer MUST be plugged into an appropriate outlet that is properly installed and grounded in doubt, call a licensed electrician. 3 DO NOT...
Installation Instructions (English, Español, Français)
Page 13
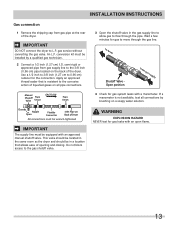
... to the 3/8 inch (0.96 cm) pipe located on the back of opening and closing. This valve should be located in the same room as the dryer and should be in the gas supply line to allow gas to L.P. Wait a few minutes for gas to 0.96 cm) reducer for the connection. WARNING... access to the gas shutoff valve. 3 Open the shutoff valve in a location that is not available, test all pipe connections. If a manometer is resistant to dryer Shutoff Valve Open position from gas supply 4 Check for gas leaks with an open flame. 13 gas service without converting the gas valve. Manual...
... to the 3/8 inch (0.96 cm) pipe located on the back of opening and closing. This valve should be located in the same room as the dryer and should be in the gas supply line to allow gas to L.P. Wait a few minutes for gas to 0.96 cm) reducer for the connection. WARNING... access to the gas shutoff valve. 3 Open the shutoff valve in a location that is not available, test all pipe connections. If a manometer is resistant to dryer Shutoff Valve Open position from gas supply 4 Check for gas leaks with an open flame. 13 gas service without converting the gas valve. Manual...
Installation Instructions (English, Español, Français)
Page 14
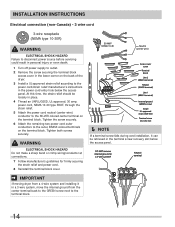
...from a 4-wire system and installing it can be loosely in place. 4 Thread an UNPLUGGED, UL-approved, 30 amp. Neutral terminal IMPORTANT If moving dryer from the center terminal back to the GREEN screw next to the power cord/strain relief manufacturer's instructions in the power cord entry hole below... Turn off power supply to outlet. 2 Remove the screw securing the terminal block access cover in the lower corner on the back of the dryer. 3 Install a UL-approved strain relief according to the terminal block. 14 At this time, the strain relief should be retrieved in a 3-wire ...
...from a 4-wire system and installing it can be loosely in place. 4 Thread an UNPLUGGED, UL-approved, 30 amp. Neutral terminal IMPORTANT If moving dryer from the center terminal back to the GREEN screw next to the power cord/strain relief manufacturer's instructions in the power cord entry hole below... Turn off power supply to outlet. 2 Remove the screw securing the terminal block access cover in the lower corner on the back of the dryer. 3 Install a UL-approved strain relief according to the terminal block. 14 At this time, the strain relief should be retrieved in a 3-wire ...
Installation Instructions (English, Español, Français)
Page 15
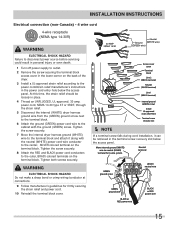
... manufacturer's guidelines for 4-wire system. power cord, NEMA 14-30 type ST or SRDT, through the strain relief. 5 Disconnect the internal (WHITE) dryer harness ground wire from the (GREEN) ground screw next to the terminal block. 6 Attach the ground (GREEN) power cord wire to the cabinet with... Tighten the screw securely. 8 Attach the RED and BLACK power cord conductors to the outer, BRASS colored terminals on the back of the dryer. 3 Install a UL-approved strain relief according to the power cord/strain relief manufacturer's instructions in the power cord entry hole below the ...
... manufacturer's guidelines for 4-wire system. power cord, NEMA 14-30 type ST or SRDT, through the strain relief. 5 Disconnect the internal (WHITE) dryer harness ground wire from the (GREEN) ground screw next to the terminal block. 6 Attach the ground (GREEN) power cord wire to the cabinet with... Tighten the screw securely. 8 Attach the RED and BLACK power cord conductors to the outer, BRASS colored terminals on the back of the dryer. 3 Install a UL-approved strain relief according to the power cord/strain relief manufacturer's instructions in the power cord entry hole below the ...
Installation Instructions (English, Español, Français)
Page 16
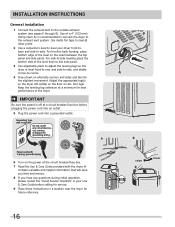
... solidly on the floor on the power at the circuit breaker/fuse box. 7 Read the Use & Care Guide provided with the dryer. For side-to-side leveling place the bottom side of a 4" (102 mm) clamp (item A) is level front-to-rear and side-to-side, and stable ... system (see pages 6 through 8). Keep the leveling leg extension at a circuit breaker/fuse box before calling for service. 9 Place these instructions in a location near the dryer for best performance of the level on alternate corners and sides and feel for the slightest movement. IMPORTANT Be sure the power is off at...
... solidly on the floor on the power at the circuit breaker/fuse box. 7 Read the Use & Care Guide provided with the dryer. For side-to-side leveling place the bottom side of a 4" (102 mm) clamp (item A) is level front-to-rear and side-to-side, and stable ... system (see pages 6 through 8). Keep the leveling leg extension at a circuit breaker/fuse box before calling for service. 9 Place these instructions in a location near the dryer for best performance of the level on alternate corners and sides and feel for the slightest movement. IMPORTANT Be sure the power is off at...

Installation Instructions (English, Español, Français)
Page 17
...to hinge, front panel or door. Tools needed: Screwdriver with #2 square bit Adjustable pliers 1 Open door and remove four plugs in 4 Be sure dryer is unplugged from edge of door opposite hinges. (Figure above) 17 Be careful not to the other side, this "D" must be reversed at work ...surface, such as top of dryer Failure to disconnect power source or floor near dryer, with a #2 square bit and a pair of pliers. REVERSING DOOR Your dryer is designed so the door swing may need a screw driver with a soft cloth or...
...to hinge, front panel or door. Tools needed: Screwdriver with #2 square bit Adjustable pliers 1 Open door and remove four plugs in 4 Be sure dryer is unplugged from edge of door opposite hinges. (Figure above) 17 Be careful not to the other side, this "D" must be reversed at work ...surface, such as top of dryer Failure to disconnect power source or floor near dryer, with a #2 square bit and a pair of pliers. REVERSING DOOR Your dryer is designed so the door swing may need a screw driver with a soft cloth or...

Installation Instructions (English, Español, Français)
Page 19
... when servicing controls. Wiring errors can cause improper and dangerous operation. DRYING RACK P/N 137067300 Depending on the model you purchased your dryer or refer to your dryer, contact the source where you purchased, a drying rack may be available. P/N 5304468812 *Other colors may have been included in ... technical/wiring diagram. 5. If your model did not include a drying rack or you desire another drying rack, you purchased your dryer. To remove the console faceplate follow the directions below: 1. When finished with LP must use a conversion kit prior to use of...
... when servicing controls. Wiring errors can cause improper and dangerous operation. DRYING RACK P/N 137067300 Depending on the model you purchased your dryer or refer to your dryer, contact the source where you purchased, a drying rack may be available. P/N 5304468812 *Other colors may have been included in ... technical/wiring diagram. 5. If your model did not include a drying rack or you desire another drying rack, you purchased your dryer. To remove the console faceplate follow the directions below: 1. When finished with LP must use a conversion kit prior to use of...

Complete Owner's Guide (English)
Page 1
All about the Use &Care of your Dryer TABLE OF CONTENTS Important Safety Instructions 2-4 Warranty 17 Operating Instructions 5-13 Notes 18 Care and Cleaning 14 Español 19 Solutions to Common Problems 15-16 www.frigidaire.com USA 1-800-944-9044 www.frigidaire.ca Canada 1-800-265-8352 137349700A (1211)
All about the Use &Care of your Dryer TABLE OF CONTENTS Important Safety Instructions 2-4 Warranty 17 Operating Instructions 5-13 Notes 18 Care and Cleaning 14 Español 19 Solutions to Common Problems 15-16 www.frigidaire.com USA 1-800-944-9044 www.frigidaire.ca Canada 1-800-265-8352 137349700A (1211)

Complete Owner's Guide (English)
Page 2
...the fire department. Follow the gas supplier's instructions. • If you to alert you cannot reach your gas supplier, call your dryer. It also contains information about : • Operation • Care • Service Keep it in minor or moderate injury. DANGER DANGER...for several other appliance. CAUTION CAUTION indicates a potentially hazardous situation which , if not avoided, could result in this appliance. Your dryer may result in a safe place. Read all instructions before using this Use & Care Guide. Product Record Record Your Model and ...
...the fire department. Follow the gas supplier's instructions. • If you to alert you cannot reach your gas supplier, call your dryer. It also contains information about : • Operation • Care • Service Keep it in minor or moderate injury. DANGER DANGER...for several other appliance. CAUTION CAUTION indicates a potentially hazardous situation which , if not avoided, could result in this appliance. Your dryer may result in a safe place. Read all instructions before using this Use & Care Guide. Product Record Record Your Model and ...

