Wiring Diagram (All Languages)
Page 1
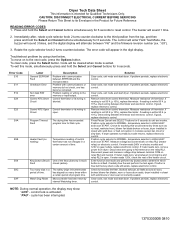
.... If button is not 50 K (± 10%), replace thermistor. Check for Qualified Technicians Only. If problem persists, replace electronic control. Dryer Tech Data Sheet This information is intended for blocked lint filter, blocked exhaust, air leaks around air duct, broken blower fan blades, worn ...relay RL2 is Circuit open . cycle has been interrupted. 137033000B 0810 To move on gas models, replace electronic control. Heater Fault (no heat, restricted vent, blower fan blade broken or loose, dryer installed in closet with solid door, or bad connection in the Product for 6 seconds....
.... If button is not 50 K (± 10%), replace thermistor. Check for Qualified Technicians Only. If problem persists, replace electronic control. Dryer Tech Data Sheet This information is intended for blocked lint filter, blocked exhaust, air leaks around air duct, broken blower fan blades, worn ...relay RL2 is Circuit open . cycle has been interrupted. 137033000B 0810 To move on gas models, replace electronic control. Heater Fault (no heat, restricted vent, blower fan blade broken or loose, dryer installed in closet with solid door, or bad connection in the Product for 6 seconds....
Wiring Diagram (All Languages)
Page 2
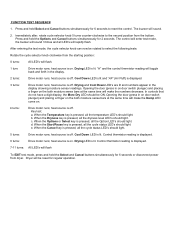
...heat source is pressed, all LED's will make the Damp LED come on . Control thermistor reading is displayed. 3 turns: Drive motor runs; Dryer will make the numbers decrease. The buzzer will flash To EXIT test mode, press and hold the Options and Cancel buttons simultaneously for 6 seconds or...all the Option LED's should light. When the Dryness key is pressed, all the cycle status LED's should be rotated to the second position from dryer. When the Options or Select key is on . 4 turns: Drive motor runs; e. heat source is pressed, all the dryness level LED's should...
...heat source is pressed, all LED's will make the Damp LED come on . Control thermistor reading is displayed. 3 turns: Drive motor runs; Dryer will make the numbers decrease. The buzzer will flash To EXIT test mode, press and hold the Options and Cancel buttons simultaneously for 6 seconds or...all the Option LED's should light. When the Dryness key is pressed, all the cycle status LED's should be rotated to the second position from dryer. When the Options or Select key is on . 4 turns: Drive motor runs; e. heat source is pressed, all the dryness level LED's should...

Use and Care Manual
Page 1
All about the Use &Care of your Dryer TABLE OF CONTENTS Important Safety Instructions 2-4 Solutions to Common Problems 14-15 Features 5 Warranty 16 Operating Instructions 6-11 Notes 17-18 Dryer Settings Chart 12 Français 19 Care and Cleaning 13 Español 35 www.frigidaire.com USA 1-800-944-9044 www.frigidaire.ca Canada 1-800-265-8352 137135000B (0907)
All about the Use &Care of your Dryer TABLE OF CONTENTS Important Safety Instructions 2-4 Solutions to Common Problems 14-15 Features 5 Warranty 16 Operating Instructions 6-11 Notes 17-18 Dryer Settings Chart 12 Français 19 Care and Cleaning 13 Español 35 www.frigidaire.com USA 1-800-944-9044 www.frigidaire.ca Canada 1-800-265-8352 137135000B (0907)

Use and Care Manual
Page 2
...used to alert you cannot reach your gas supplier, call your dryer. pants. • Immediately call the fire department. Installation and service must be performed by a qualified installer, service agency or the gas supplier. Obey all safety messages that ...This book contains valuable information about features for future reference. Record and retain these instructions for several other appliance. Follow the gas supplier's instructions. • If you to avoid possible injury or death. Model Number Serial Number Purchase Date 2 IMPORTANT...
...used to alert you cannot reach your gas supplier, call your dryer. pants. • Immediately call the fire department. Installation and service must be performed by a qualified installer, service agency or the gas supplier. Obey all safety messages that ...This book contains valuable information about features for future reference. Record and retain these instructions for several other appliance. Follow the gas supplier's instructions. • If you to avoid possible injury or death. Model Number Serial Number Purchase Date 2 IMPORTANT...
Use and Care Manual
Page 3
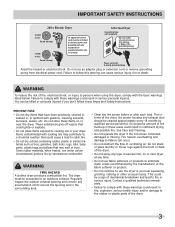
...listed below. These substances give off vapors that could be cleaned approximately every 18 months by spontaneous combustion. WARNING FIRE HAZARD A clothes dryer produces combustible lint. An excessive amount of mechanical breakdown and lead to fire or serious injury. WARNING To reduce the risk ... Do not, under certain circumstances produce fire by qualified service personnel. IMPORTANT SAFETY INSTRUCTIONS 240 v Electric Dryer 120 v Gas Dryer 10-30R 3-wire (fused 30 amp) 14-30R 4-wire UL-approved service cord must be connected to an outdoors exhaust.
...listed below. These substances give off vapors that could be cleaned approximately every 18 months by spontaneous combustion. WARNING FIRE HAZARD A clothes dryer produces combustible lint. An excessive amount of mechanical breakdown and lead to fire or serious injury. WARNING To reduce the risk ... Do not, under certain circumstances produce fire by qualified service personnel. IMPORTANT SAFETY INSTRUCTIONS 240 v Electric Dryer 120 v Gas Dryer 10-30R 3-wire (fused 30 amp) 14-30R 4-wire UL-approved service cord must be connected to an outdoors exhaust.

Use and Care Manual
Page 4
...operating and maintaining any appliance. 4 As children grow, teach them for play on product labels. • Before the dryer is moving. Do not use of a gas dryer must be plugged into a properly grounded and polarized 3-prong outlet. Children might use them the proper, safe use an ...the fault. • Failure to a gas pipe. Never ground the dryer to comply with rugs, bedspreads or plastic sheets can result in the dryer for detailed grounding procedures. Wait until the dryer has stopped completely before reaching into the dryer if the drum is removed from the electrical...
...operating and maintaining any appliance. 4 As children grow, teach them for play on product labels. • Before the dryer is moving. Do not use of a gas dryer must be plugged into a properly grounded and polarized 3-prong outlet. Children might use them the proper, safe use an ...the fault. • Failure to a gas pipe. Never ground the dryer to comply with rugs, bedspreads or plastic sheets can result in the dryer for detailed grounding procedures. Wait until the dryer has stopped completely before reaching into the dryer if the drum is removed from the electrical...
Use and Care Manual
Page 6
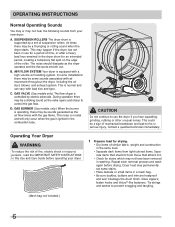
...roller. This is operating, there may happen if the dryer has not been in washing. This may be a thumping or rolling sound when the dryer starts. C. GAS BURNER (Gas models only.) When the burner is normal and can vary with the gas flame. This noise is normal and will ...only occur when the gas is controlled by a set some sounds associated with a high ...
...roller. This is operating, there may happen if the dryer has not been in washing. This may be a thumping or rolling sound when the dryer starts. C. GAS BURNER (Gas models only.) When the burner is normal and can vary with the gas flame. This noise is normal and will ...only occur when the gas is controlled by a set some sounds associated with a high ...
Use and Care Manual
Page 7
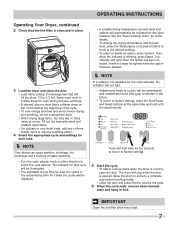
...for Timed Dry cycles will be displayed. • A suitable drying temperature, dryness level and options will be indicated for the cycle selected. See the "Dryer Settings Chart" for each time that cycle is not available for the cycle selected, the indicator will not light. • Adjustments made to a cycle ..., dry only two or three items at the same time and hold both for even drying and less wrinkling. • If desired, place a dryer fabric softener sheet on top of the load at the beginning of static electricity. • Turn the cycle selector knob in either direction to factory...
...for Timed Dry cycles will be displayed. • A suitable drying temperature, dryness level and options will be indicated for the cycle selected. See the "Dryer Settings Chart" for each time that cycle is not available for the cycle selected, the indicator will not light. • Adjustments made to a cycle ..., dry only two or three items at the same time and hold both for even drying and less wrinkling. • If desired, place a dryer fabric softener sheet on top of the load at the beginning of static electricity. • Turn the cycle selector knob in either direction to factory...
Use and Care Manual
Page 8
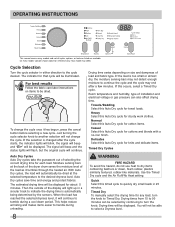
... dried. The indicator for any load, turn the knob. Room temperature and humidity, type of installation and electrical voltage or gas pressure can be dried at the back of the dryer drum sense the moisture level of load and fabric type. Quick Select this Auto Dry cycle for cottons and blends with...
... dried. The indicator for any load, turn the knob. Room temperature and humidity, type of installation and electrical voltage or gas pressure can be dried at the back of the dryer drum sense the moisture level of load and fabric type. Quick Select this Auto Dry cycle for cottons and blends with...
Use and Care Manual
Page 9
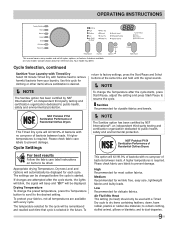
... that cycle is selected in the future. To This option will kill 99.9% of bacteria with no carryover of Residential Clothes Dryers For best results Follow the fabric care label instructions on every model. Low Recommended for clothing or other items where sanitization is.... Please check fabric care labels to refresh clothing, stuffed animal, pillows or blankets; NSF Protolcol P154 Sanitization Performance of Residential Clothes Dryers This Timed Dry cycle will kill 99.9% of bacteria between loads. Drying Temperature To change the Temperature after the cycle starts, the...
... that cycle is selected in the future. To This option will kill 99.9% of bacteria with no carryover of Residential Clothes Dryers For best results Follow the fabric care label instructions on every model. Low Recommended for clothing or other items where sanitization is.... Please check fabric care labels to refresh clothing, stuffed animal, pillows or blankets; NSF Protolcol P154 Sanitization Performance of Residential Clothes Dryers This Timed Dry cycle will kill 99.9% of bacteria between loads. Drying Temperature To change the Temperature after the cycle starts, the...
Use and Care Manual
Page 11
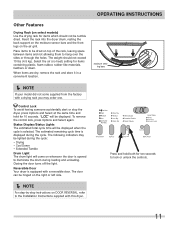
...be dried on the air grill. moisture sensing bars Í NOTE If your model did not come on whenever the door is equipped with this dryer. Status Display/Status Lights The estimated total cycle time will be lighted during the cycle: • Drying • Cool Down • Extended Tumble... one. Press and hold for items which should not exceed 10 lbs (4.5 kg). Control Lock To avoid having someone accidentally start or stop the dryer, press Options and Select at the same time and hold both for items containing plastic, foam rubber, rubber-like materials, feathers or down. Place...
...be dried on the air grill. moisture sensing bars Í NOTE If your model did not come on whenever the door is equipped with this dryer. Status Display/Status Lights The estimated total cycle time will be lighted during the cycle: • Drying • Cool Down • Extended Tumble... one. Press and hold for items which should not exceed 10 lbs (4.5 kg). Control Lock To avoid having someone accidentally start or stop the dryer, press Options and Select at the same time and hold both for items containing plastic, foam rubber, rubber-like materials, feathers or down. Place...
Use and Care Manual
Page 12
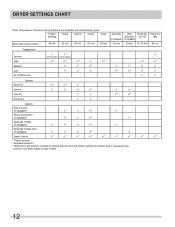
Displayed cycle duration may differ slightly on default dryness level and factory settings for electric dryers. DRYER SETTINGS CHART These Temperature, Dryness levels and Options are available with the following cycles: Towels/ Bedding Heavy Normal Casual Quick Estimated Cycle Duration** 60 min ... Guard Ultra (if equipped) 9 9 9* 9 Extended Tumble (if equipped) 9 9 9 9* 9 Extended Tumble Ultra (if equipped) 9 9 9 9* 9 Signal Volume 9* 9* 9* 9* 9* 9* 9* 9* 9* * Factory presets 9Available selections **Estimated cycle duration is based on gas models. 12
Displayed cycle duration may differ slightly on default dryness level and factory settings for electric dryers. DRYER SETTINGS CHART These Temperature, Dryness levels and Options are available with the following cycles: Towels/ Bedding Heavy Normal Casual Quick Estimated Cycle Duration** 60 min ... Guard Ultra (if equipped) 9 9 9* 9 Extended Tumble (if equipped) 9 9 9 9* 9 Extended Tumble Ultra (if equipped) 9 9 9 9* 9 Signal Volume 9* 9* 9* 9* 9* 9* 9* 9* 9* * Factory presets 9Available selections **Estimated cycle duration is based on gas models. 12
Use and Care Manual
Page 13
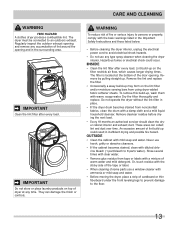
..., which causes longer drying times. Remove cleanser residue before drying the next load. • Every 18 months an authorized servicer should clean the dryer cabinet interior and exhaust duct. Or, touch residue with the sticky side of the tape or label. • When cleaning chrome parts use... abrasive cleansers. • If the cabinet becomes stained, clean with ammonia or mild soap and water. • Before moving the dryer, place a strip of dryer at the bottom of warm water and mild detergent. IMPORTANT Clean the lint filter after every load. Hazardous fumes or electrical ...
..., which causes longer drying times. Remove cleanser residue before drying the next load. • Every 18 months an authorized servicer should clean the dryer cabinet interior and exhaust duct. Or, touch residue with the sticky side of the tape or label. • When cleaning chrome parts use... abrasive cleansers. • If the cabinet becomes stained, clean with ammonia or mild soap and water. • Before moving the dryer, place a strip of dryer at the bottom of warm water and mild detergent. IMPORTANT Clean the lint filter after every load. Hazardous fumes or electrical ...
Use and Care Manual
Page 14
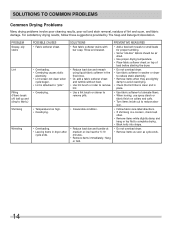
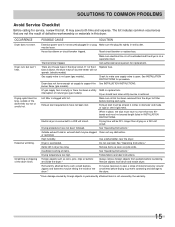
... Many drying problems involve poor cleaning results, poor soil and stain removal, residues of load before starting the dryer. • Do not overload dryer. • Use fabric softener in washer or dryer to reduce static electricity. • Remove items when they are slightly damp to avoid overdrying. • ... If shrinking is clean and in place. • Use fabric softener to complete drying. • Block knits into shape. • Do not overload dryer. • Remove items as soon as cycle ends. 14 PROBLEM Greasy, oily stains Lint Pilling (Fibers break off, ball up and cling to fabric.)...
... Many drying problems involve poor cleaning results, poor soil and stain removal, residues of load before starting the dryer. • Do not overload dryer. • Use fabric softener in washer or dryer to reduce static electricity. • Remove items when they are slightly damp to avoid overdrying. • ... If shrinking is clean and in place. • Use fabric softener to complete drying. • Block knits into shape. • Do not overload dryer. • Remove items as soon as cycle ends. 14 PROBLEM Greasy, oily stains Lint Pilling (Fibers break off, ball up and cling to fabric.)...
Use and Care Manual
Page 15
...or exhaust duct may be at least 4 inches in diameter and made of defective workmanship or materials in the dryer circuit. Permanently attached items such as cycle ends. LP gas supply tank is restored. See "Operating Instructions." It may turn but won't heat. The list includes common...make sure supply valve is not covered by foreign objects or permanently attached items is open (gas models). Remove objects from drum and restart dryer. House fuse blown or circuit breaker tripped. Dryer does not have no more than drying on a separate circuit. fuses is blown, the drum...
...or exhaust duct may be at least 4 inches in diameter and made of defective workmanship or materials in the dryer circuit. Permanently attached items such as cycle ends. LP gas supply tank is restored. See "Operating Instructions." It may turn but won't heat. The list includes common...make sure supply valve is not covered by foreign objects or permanently attached items is open (gas models). Remove objects from drum and restart dryer. House fuse blown or circuit breaker tripped. Dryer does not have no more than drying on a separate circuit. fuses is blown, the drum...

Installation Instructions
Page 1
All about the Installation of your Dryer TABLE OF CONTENTS Important Safety Instructions 2-3 Accessories 22 Installation Requirements 4-10 Français 23 Installed Dryer Dimensions 11 Español 45 Installation Instructions 12-17 Notes 67 Reversing Door 18-21 www.frigidaire.com USA 1-800-944-9044 www.frigidaire.ca Canada 1-800-265-8352 137134900B (0903)
All about the Installation of your Dryer TABLE OF CONTENTS Important Safety Instructions 2-3 Accessories 22 Installation Requirements 4-10 Français 23 Installed Dryer Dimensions 11 Español 45 Installation Instructions 12-17 Notes 67 Reversing Door 18-21 www.frigidaire.com USA 1-800-944-9044 www.frigidaire.ca Canada 1-800-265-8352 137134900B (0903)

Installation Instructions
Page 2
...: • Adjustable pliers • Phillips, straight, & square bit screwdrivers • Adjustable wrench • Pipe wrench for gas supply (gas dryer) • LP-resistant thread tape (for future reference. Children might use any appliance. These conditions will obstruct clothes...112 (latest editions) for commercial applications such as restaurants, beauty salons, etc. • Do not install a clothes dryer with this or any electrical switch; ral gas or LP supply, gas dryer) • Carpenter's level • External vent hood • 4-inch (10.2 cm), rigid metal or semi-...
...: • Adjustable pliers • Phillips, straight, & square bit screwdrivers • Adjustable wrench • Pipe wrench for gas supply (gas dryer) • LP-resistant thread tape (for future reference. Children might use any appliance. These conditions will obstruct clothes...112 (latest editions) for commercial applications such as restaurants, beauty salons, etc. • Do not install a clothes dryer with this or any electrical switch; ral gas or LP supply, gas dryer) • Carpenter's level • External vent hood • 4-inch (10.2 cm), rigid metal or semi-...

Installation Instructions
Page 3
...and turns ‰ NO foil or plastic venting material ‰ Approved vent hood exhausted to outdoors Leveling ‰ Dryer is setting solid on all corners Gas Supply (Gas Dryer) ‰ Manual shutoff valve present in supply ‰ All connections sealed with approved sealer and wrench tight ‰...; Conversion kit for function Electrical Power ‰ House power turned on ‰ Dryer plugged in Final Checks ‰ ...
...and turns ‰ NO foil or plastic venting material ‰ Approved vent hood exhausted to outdoors Leveling ‰ Dryer is setting solid on all corners Gas Supply (Gas Dryer) ‰ Manual shutoff valve present in supply ‰ All connections sealed with approved sealer and wrench tight ‰...; Conversion kit for function Electrical Power ‰ House power turned on ‰ Dryer plugged in Final Checks ‰ ...

Installation Instructions
Page 4
.... time delay fuses or circuit breakers. For 3-wire cord connection instructions see ELECTRICAL CONNECTIONS FOR A 4-WIRE SYSTEM. Í NOTE Dryers manufactured for washer and dryer. branch circuit fused with power created by gas powered generators, solar powered generators, wind powered generators or any other generator other than the local utility company is in...
.... time delay fuses or circuit breakers. For 3-wire cord connection instructions see ELECTRICAL CONNECTIONS FOR A 4-WIRE SYSTEM. Í NOTE Dryers manufactured for washer and dryer. branch circuit fused with power created by gas powered generators, solar powered generators, wind powered generators or any other generator other than the local utility company is in...

Installation Instructions
Page 5
... codes allow, flexible metal tubing may be used to connect your dryer to the dryer. 6 The dryer MUST be disconnected from the gas supply piping system during any pressure testing of the gas supply piping system at test pressures in excess of stainless steel or plastic-... section. Individual, properly polarized and grounded 15 amp. plugged tapping, accessible for gas dryer CIRCUIT - INSTALLATION REQUIREMENTS Electrical requirements for test gauge connection, MUST be isolated from the gas supply piping system during any circumstances, cut, remove, or bypass the grounding prong...
... codes allow, flexible metal tubing may be used to connect your dryer to the dryer. 6 The dryer MUST be disconnected from the gas supply piping system during any pressure testing of the gas supply piping system at test pressures in excess of stainless steel or plastic-... section. Individual, properly polarized and grounded 15 amp. plugged tapping, accessible for gas dryer CIRCUIT - INSTALLATION REQUIREMENTS Electrical requirements for test gauge connection, MUST be isolated from the gas supply piping system during any circumstances, cut, remove, or bypass the grounding prong...

