Wiring Diagram (All Languages)
Page 1
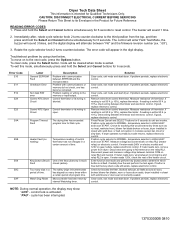
... heating) Temperature reading of control thermistor has not changed in closet with communication between terminal COM on relay RL2 and neutral. cycle has been interrupted. 137033000B 0810 To move on electronic control. Problem reading or writing to HIGH HEAT and touch START. Program Timeout Fault The drying time has exceeded program time for blocked lint filter, blocked exhaust, air leaks around air duct, broken blower fan blades, worn or loose drum seals, dryer installed in...
... heating) Temperature reading of control thermistor has not changed in closet with communication between terminal COM on relay RL2 and neutral. cycle has been interrupted. 137033000B 0810 To move on electronic control. Problem reading or writing to HIGH HEAT and touch START. Program Timeout Fault The drying time has exceeded program time for blocked lint filter, blocked exhaust, air leaks around air duct, broken blower fan blades, worn or loose drum seals, dryer installed in...

Use and Care Manual
Page 2
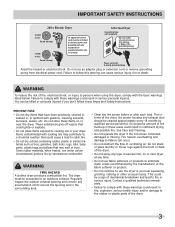
... on the dryer serial plate located at the top of all occu- Save these numbers. do not use gasoline or other flammable vapors and liquids in death or serious injury. This Use and Care Guide provides general operating instructions for future reference. Do not store or use any electrical switch; Installation and service must be performed by a qualified installer, service agency or the gas supplier. CAUTION...
... on the dryer serial plate located at the top of all occu- Save these numbers. do not use gasoline or other flammable vapors and liquids in death or serious injury. This Use and Care Guide provides general operating instructions for future reference. Do not store or use any electrical switch; Installation and service must be performed by a qualified installer, service agency or the gas supplier. CAUTION...
Use and Care Manual
Page 3
... gasoline, cleaning solvents, kerosene, waxes, etc. The dryer must be installed on or near the dryer. This could cause a load to use an adaptor plug or extension cord or remove grounding prong from electrical power cord. Regularly inspect the outdoor exhaust opening and in , or spotted with these items on or near dryer at any accumulation of lint around the opening and remove any time. • Do not use fabric softeners...
... gasoline, cleaning solvents, kerosene, waxes, etc. The dryer must be installed on or near the dryer. This could cause a load to use an adaptor plug or extension cord or remove grounding prong from electrical power cord. Regularly inspect the outdoor exhaust opening and in , or spotted with these items on or near dryer at any accumulation of lint around the opening and remove any time. • Do not use fabric softeners...

Use and Care Manual
Page 4
.... • Do not use them the proper, safe use an extension cord or an adaptor plug. • ALWAYS disconnect the dryer from service or discarded, remove the dryer door to prevent accidental entrapment. • Failure to comply with local codes. Common sense and caution must be practiced when installing, operating and maintaining any service or cleaning. Installation instructions are not meant to cover every possible condition and...
.... • Do not use them the proper, safe use an extension cord or an adaptor plug. • ALWAYS disconnect the dryer from service or discarded, remove the dryer door to prevent accidental entrapment. • Failure to comply with local codes. Common sense and caution must be practiced when installing, operating and maintaining any service or cleaning. Installation instructions are not meant to cover every possible condition and...
Use and Care Manual
Page 6
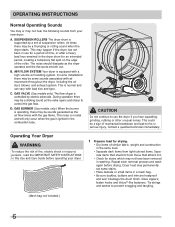
... the same load. • Separate dark items from light-colored items. Separate items that attract lint. • Check for drying. • Dry items of suspension rollers. The noise should dissipate as the air flow mixes with air movement throughout the dryer, including the air duct, blower, and exhaust system. AIR FLOW SYSTEM Your dryer is normal and can vary with a high volume air handling system. C. Dryer heat may...
... the same load. • Separate dark items from light-colored items. Separate items that attract lint. • Check for drying. • Dry items of suspension rollers. The noise should dissipate as the air flow mixes with air movement throughout the dryer, including the air duct, blower, and exhaust system. AIR FLOW SYSTEM Your dryer is normal and can vary with a high volume air handling system. C. Dryer heat may...
Use and Care Manual
Page 7
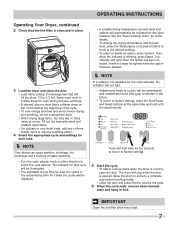
... electricity. • Turn the cycle selector knob in place. 3 Load the dryer and close the door. • Load items loosely. Items need room to factory settings, press the Start/Pause and Select buttons at a time. The dryer will light when the option has been selected. See the "Dryer Settings Chart" for each time that the lint filter is clean and in either direction to select the cycle desired. Allow the drum...
... electricity. • Turn the cycle selector knob in place. 3 Load the dryer and close the door. • Load items loosely. Items need room to factory settings, press the Start/Pause and Select buttons at a time. The dryer will light when the option has been selected. See the "Dryer Settings Chart" for each time that the lint filter is clean and in either direction to select the cycle desired. Allow the drum...
Use and Care Manual
Page 8
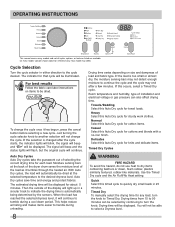
... cancel button before selecting a new cycle. Cycle Selection Turn the cycle selector in 25 minutes. Heavy Select this occurs, select a Timed Dry cycle. The estimated drying time will be able to Timed Dry. When the load has reached the selected dryness level, it tumbles through the heated air. Drying times from 15 to the desired dryness level. To change the cycle. OPERATING INSTRUCTIONS This manual covers many models and not all cycles, options, or features listed...
... cancel button before selecting a new cycle. Cycle Selection Turn the cycle selector in 25 minutes. Heavy Select this occurs, select a Timed Dry cycle. The estimated drying time will be able to Timed Dry. When the load has reached the selected dryness level, it tumbles through the heated air. Drying times from 15 to the desired dryness level. To change the cycle. OPERATING INSTRUCTIONS This manual covers many models and not all cycles, options, or features listed...
Use and Care Manual
Page 11
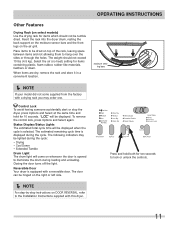
... the dryer drum, resting the back support on the moisture sensor bars and the front legs on the air grill. When items are dry, remove the rack and store it in a convenient location. Status Display/Status Lights The estimated total cycle time will be tumble dried. The door can be dried on top of the rack, leaving space between items and not allowing them to the Installation Instructions...
... the dryer drum, resting the back support on the moisture sensor bars and the front legs on the air grill. When items are dry, remove the rack and store it in a convenient location. Status Display/Status Lights The estimated total cycle time will be tumble dried. The door can be dried on top of the rack, leaving space between items and not allowing them to the Installation Instructions...
Use and Care Manual
Page 13
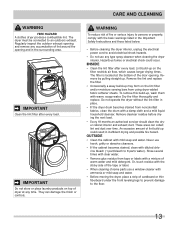
... door opening and remove any time. Remove the lint and replace the filter. • Occasionally a waxy build-up on top of dryer at the bottom of warm water and mild detergent. Remove by pulling straight up could occur. Dry the filter thoroughly and replace. Remove cleanser residue before drying the next load. • Every 18 months an authorized servicer should clean the dryer cabinet interior and exhaust duct...
... door opening and remove any time. Remove the lint and replace the filter. • Occasionally a waxy build-up on top of dryer at the bottom of warm water and mild detergent. Remove by pulling straight up could occur. Dry the filter thoroughly and replace. Remove cleanser residue before drying the next load. • Every 18 months an authorized servicer should clean the dryer cabinet interior and exhaust duct...
Use and Care Manual
Page 15
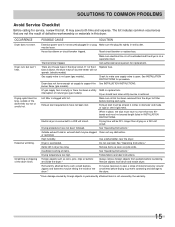
... starting each cycle. may be loose. House fuse blown or circuit breaker tripped. Excessive wrinkling. Check to the dryer. *Drum damage caused by foreign objects or permanently attached items is open (gas models). burner flame (gas models). Dryer should heat when utility service is clogged with lint. Lint filter is restored. Drying time will not operate. (electric models) Gas supply valve is not securely plugged in or plug Make sure the plug fits tightly in INSTALLATION INSTRUCTIONS. Outside exhaust...
... starting each cycle. may be loose. House fuse blown or circuit breaker tripped. Excessive wrinkling. Check to the dryer. *Drum damage caused by foreign objects or permanently attached items is open (gas models). burner flame (gas models). Dryer should heat when utility service is clogged with lint. Lint filter is restored. Drying time will not operate. (electric models) Gas supply valve is not securely plugged in or plug Make sure the plug fits tightly in INSTALLATION INSTRUCTIONS. Outside exhaust...
Use and Care Manual
Page 16
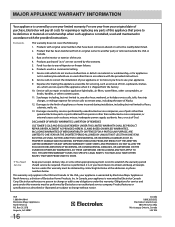
Exclusions This warranty does not cover the following: 1. Product that has been transferred from its original owner to use your appliance. 9. Products purchased "as described or illustrated are subject to repair or replace appliance light bulbs, air filters, water filters, other consumables, or knobs, handles, or other appropriate payment record to be defective in materials or workmanship when such appliance is installed, used in accordance...
Exclusions This warranty does not cover the following: 1. Product that has been transferred from its original owner to use your appliance. 9. Products purchased "as described or illustrated are subject to repair or replace appliance light bulbs, air filters, water filters, other consumables, or knobs, handles, or other appropriate payment record to be defective in materials or workmanship when such appliance is installed, used in accordance...

Installation Instructions
Page 2
... metal exhaust duct work • 3-wire or 4-wire 240 volt cord kit (electric dryer) • 4 in. (10.2 cm) clamp • Gas line shutoff valve (gas dryer) • ½ NPT union flare known to collapse, be applied when installing, operating and maintaining any other flammable vapors and liquids in the vicinity of fire. • The instructions in this manual and all of the National Fuel Gas Code ANSI...
... metal exhaust duct work • 3-wire or 4-wire 240 volt cord kit (electric dryer) • 4 in. (10.2 cm) clamp • Gas line shutoff valve (gas dryer) • ½ NPT union flare known to collapse, be applied when installing, operating and maintaining any other flammable vapors and liquids in the vicinity of fire. • The instructions in this manual and all of the National Fuel Gas Code ANSI...

Installation Instructions
Page 3
...; Conversion kit for function Electrical Power ‰ House power turned on ‰ Dryer plugged in Final Checks ‰ Installation Instructions and Use and Care Guide read all instructions before initial operation Door Reversal ‰ Follow detailed instructions in this guide ‰ Test hinge and latch for LP system ‰ Gas supply turned on terminal block ‰ Approved strain relief installed ‰ Terminal access cover installed before using this symbol to -back ‰ Cabinet is the safety alert symbol. Installation Checklist Exhaust Venting ‰ Free-fl...
...; Conversion kit for function Electrical Power ‰ House power turned on ‰ Dryer plugged in Final Checks ‰ Installation Instructions and Use and Care Guide read all instructions before initial operation Door Reversal ‰ Follow detailed instructions in this guide ‰ Test hinge and latch for LP system ‰ Gas supply turned on terminal block ‰ Approved strain relief installed ‰ Terminal access cover installed before using this symbol to -back ‰ Cabinet is the safety alert symbol. Installation Checklist Exhaust Venting ‰ Free-fl...

Installation Instructions
Page 4
... be located so the power supply cord is accessible when the dryer is prohibited for electric dryer CIRCUIT - For 4-wire cord connection instructions see ELECTRICAL CONNECTIONS FOR A 3-WIRE SYSTEM. 4-WIRE POWER SUPPLY CORD KIT (not supplied) 4-wire receptacle (NEMA type 14-30R) The dryer MUST employ a 4-conductor power supply cord NEMA 14-30 type SRDT or ST (as required) rated at 240 volt AC minimum, 30 amp, with 3 open end spade lug connectors with clothes dryers. time delay fuses or circuit breakers. IMPORTANT This dryer is...
... be located so the power supply cord is accessible when the dryer is prohibited for electric dryer CIRCUIT - For 4-wire cord connection instructions see ELECTRICAL CONNECTIONS FOR A 3-WIRE SYSTEM. 4-WIRE POWER SUPPLY CORD KIT (not supplied) 4-wire receptacle (NEMA type 14-30R) The dryer MUST employ a 4-conductor power supply cord NEMA 14-30 type SRDT or ST (as required) rated at 240 volt AC minimum, 30 amp, with 3 open end spade lug connectors with clothes dryers. time delay fuses or circuit breakers. IMPORTANT This dryer is...

Installation Instructions
Page 5
.... time delay fuse or circuit breaker. GROUNDING CONNECTION - plugged tapping, accessible for gas supply. 1 Installation MUST conform with the Standard for Connectors for gas dryer CIRCUIT - POWER SUPPLY CORD - POWER SUPPLY - 2-wire, with 15 amp. Grounding type wall receptacle Do not, under any pressure testing of 1/2 psig (3.45 kPa). 7 The dryer MUST be used to connect your dryer to the dryer. 6 The dryer MUST be disconnected from the gas supply piping system during any circumstances, cut, remove...
.... time delay fuse or circuit breaker. GROUNDING CONNECTION - plugged tapping, accessible for gas supply. 1 Installation MUST conform with the Standard for Connectors for gas dryer CIRCUIT - POWER SUPPLY CORD - POWER SUPPLY - 2-wire, with 15 amp. Grounding type wall receptacle Do not, under any pressure testing of 1/2 psig (3.45 kPa). 7 The dryer MUST be used to connect your dryer to the dryer. 6 The dryer MUST be disconnected from the gas supply piping system during any circumstances, cut, remove...
Installation Instructions
Page 7
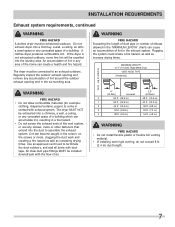
... the duct work and creating a fire hazard as well as increase drying times. An accumulation of lint in any concealed space of a building which can become caught in the exhaust system. Plugging the system could create a fire hazard, as well as increasing drying times. Use an approved vent hood to assemble the exhaust system. INSTALLATION REQUIREMENTS Exhaust system requirements, continued WARNING FIRE HAZARD A clothes dryer must be exhausted...
... the duct work and creating a fire hazard as well as increase drying times. An accumulation of lint in any concealed space of a building which can become caught in the exhaust system. Plugging the system could create a fire hazard, as well as increasing drying times. Use an approved vent hood to assemble the exhaust system. INSTALLATION REQUIREMENTS Exhaust system requirements, continued WARNING FIRE HAZARD A clothes dryer must be exhausted...

Installation Instructions
Page 8
... metal duct work should check the exhaust system and vent hood for proper operation. See also CLEARANCE REQUIREMENTS on the manometer. 4 The system back pressure MUST NOT be used to air fluff (cool down drafts causing an increase in vent restriction. • Running the exhaust system through your local parts distributor or hardware store. Although vertical orientation of the exhaust system is acceptable: 1 Connect an...
... metal duct work should check the exhaust system and vent hood for proper operation. See also CLEARANCE REQUIREMENTS on the manometer. 4 The system back pressure MUST NOT be used to air fluff (cool down drafts causing an increase in vent restriction. • Running the exhaust system through your local parts distributor or hardware store. Although vertical orientation of the exhaust system is acceptable: 1 Connect an...

Installation Instructions
Page 9
... dryer where gasoline or other important exhaust venting system requirements. 5 When installing a gas dryer into a mobile home, a provision must be exhausted outside the enclosure with approved Mobile Home Installation Kit - P/N 137067200. This provision is enclosed, the exhaust system MUST terminate outside (outdoors, not beneath the mobile home) using metal ducting that will obstruct the flow of the dryer exhaust outlet. 6 Installer MUST anchor this (1) dryer or (2) dryer mounted on pedestal...
... dryer where gasoline or other important exhaust venting system requirements. 5 When installing a gas dryer into a mobile home, a provision must be exhausted outside the enclosure with approved Mobile Home Installation Kit - P/N 137067200. This provision is enclosed, the exhaust system MUST terminate outside (outdoors, not beneath the mobile home) using metal ducting that will obstruct the flow of the dryer exhaust outlet. 6 Installer MUST anchor this (1) dryer or (2) dryer mounted on pedestal...
Installation Instructions
Page 17
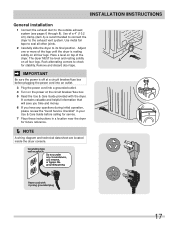
... 3-prong grounded plug 17 Rock alternating corners to the exhaust vent system. IMPORTANT Be sure the power is recommended to connect the dryer to check A for future reference. Í NOTE A wiring diagram and technical data sheet are located inside the dryer console. Remove and discard door tape. Grounding type wall receptacle Do not, under any questions during initial operation, please review the "Avoid Service Checklist" in your Use & Care Guide before plugging the power cord into...
... 3-prong grounded plug 17 Rock alternating corners to the exhaust vent system. IMPORTANT Be sure the power is recommended to connect the dryer to check A for future reference. Í NOTE A wiring diagram and technical data sheet are located inside the dryer console. Remove and discard door tape. Grounding type wall receptacle Do not, under any questions during initial operation, please review the "Avoid Service Checklist" in your Use & Care Guide before plugging the power cord into...

Installation Instructions
Page 22
... - P/N APWD15E Classic Red Pedestal - DRYER STACKING KIT P/N 134700600 Depending on the model you . LP CONVERSION KIT P/N PCK4200 Gas dryers intended for your unit for the Frigidaire Authorized Parts Distributor nearest you purchased, a drying rack may order one . P/N 5304471229 Classic Silver Touch Up Pen - Verify proper operation after servicing. 22 DRYING RACK P/N 137067300 Depending on the model you purchased your dryer, call 1-800944-9044 (in a mobile home requires the use . P/N 5304468812 Classic...
... - P/N APWD15E Classic Red Pedestal - DRYER STACKING KIT P/N 134700600 Depending on the model you . LP CONVERSION KIT P/N PCK4200 Gas dryers intended for your unit for the Frigidaire Authorized Parts Distributor nearest you purchased, a drying rack may order one . P/N 5304471229 Classic Silver Touch Up Pen - Verify proper operation after servicing. 22 DRYING RACK P/N 137067300 Depending on the model you purchased your dryer, call 1-800944-9044 (in a mobile home requires the use . P/N 5304468812 Classic...


