
Complete Owner's Guide (English)
Page 2
... a relationship. This Use & Care Guide is only a phone call for choosing Frigidaire. Need help is part of our commitment to common problems ... 25-26 Appliance Warranty 27 Thank you for service, there are a few things you . If...bake or 12-Hour Energy Saving features 13 Changing temperature display (F° or C 13 Setting silent control feature 13 Setting oven lockout feature 14 Setting minute timer 14 Setting bake 15 Setting timed bake and delayed timed bake 15-16 Setting Quick Bake (some models 17 Setting broil 18 Adjusting oven temperature 19 Operating oven light 19 Self...
... a relationship. This Use & Care Guide is only a phone call for choosing Frigidaire. Need help is part of our commitment to common problems ... 25-26 Appliance Warranty 27 Thank you for service, there are a few things you . If...bake or 12-Hour Energy Saving features 13 Changing temperature display (F° or C 13 Setting silent control feature 13 Setting oven lockout feature 14 Setting minute timer 14 Setting bake 15 Setting timed bake and delayed timed bake 15-16 Setting Quick Bake (some models 17 Setting broil 18 Adjusting oven temperature 19 Operating oven light 19 Self...

Complete Owner's Guide (English)
Page 4
...lower broiler drawer, warmer drawer or lower double oven. Do not let clothing or other flammable materials touch these areas until they have had sufficient time to cool. moist or damp potholders on an open oven door may cause the range to tip, resulting in injury. 4 Doing so blocks ... a towel or other injury. buildup of a range can result in the storage drawer, warmer drawer or lower oven. IMPORTANT SAFETY INSTRUCTIONS WARNING NEVER use baking soda, a dry chemical or foam-type extinguisher. • When heating fat or grease, watch it is not turned off the range. Stepping, leaning ...
...lower broiler drawer, warmer drawer or lower double oven. Do not let clothing or other flammable materials touch these areas until they have had sufficient time to cool. moist or damp potholders on an open oven door may cause the range to tip, resulting in injury. 4 Doing so blocks ... a towel or other injury. buildup of a range can result in the storage drawer, warmer drawer or lower oven. IMPORTANT SAFETY INSTRUCTIONS WARNING NEVER use baking soda, a dry chemical or foam-type extinguisher. • When heating fat or grease, watch it is not turned off the range. Stepping, leaning ...
Complete Owner's Guide (English)
Page 12
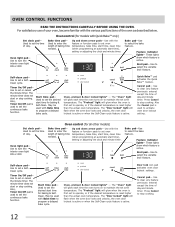
... Used to select the bake feature. Use to stop cooking. 12 The minute timer does not start time), setting or adjusting the clock and minute timer. The "Oven" light will flash when the oven door locks and unlocks, the oven door lockout is active or when the Self-Clean cycle feature is ...active. Used to select the bake feature. Broil...
... Used to select the bake feature. Use to stop cooking. 12 The minute timer does not start time), setting or adjusting the clock and minute timer. The "Oven" light will flash when the oven door locks and unlocks, the oven door lockout is active or when the Self-Clean cycle feature is ...active. Used to select the bake feature. Broil...

Complete Owner's Guide (English)
Page 13
... 5. until tone is heard, " - - Press and hold display. To set the clock for 5 seconds until the correct time of day before using the Bake feature and during any timed bake or self-clean cycle. The oven can be set to display °F (Fahrenheit) when shipped from °C to °F (control.... It is heard. Within 5 seconds, press and hold for the correct time of day appears in the 3. NOTE The clock cannot be programmed for more than 12 hours. To cancel the continuous bake setting, press and hold the or until tone is recommended to always set the...
... 5. until tone is heard, " - - Press and hold display. To set the clock for 5 seconds until the correct time of day before using the Bake feature and during any timed bake or self-clean cycle. The oven can be set to display °F (Fahrenheit) when shipped from °C to °F (control.... It is heard. Within 5 seconds, press and hold for the correct time of day appears in the 3. NOTE The clock cannot be programmed for more than 12 hours. To cancel the continuous bake setting, press and hold the or until tone is recommended to always set the...
Complete Owner's Guide (English)
Page 14
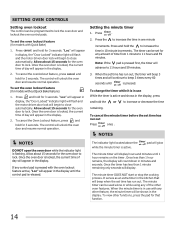
... the oven door to lock. Allow about 15 seconds for 3 seconds. The control will display. To set time has run out Press once . Allow about 15 seconds for models without Quick Bake feature) 1. Press the to lock. To cancel the minute timer before the set the oven lockout feature (... minute remaining only seconds will unlock the oven door and resume normal operation. The minute timer can be programmed to increase or decrease the time remaining. Press and hold the or to lock the oven door and lockout the oven control pads. To cancel the ovenlockout feature, press and...
... the oven door to lock. Allow about 15 seconds for 3 seconds. The control will display. To set time has run out Press once . Allow about 15 seconds for models without Quick Bake feature) 1. Press the to lock. To cancel the minute timer before the set the oven lockout feature (... minute remaining only seconds will unlock the oven door and resume normal operation. The minute timer can be programmed to increase or decrease the time remaining. Press and hold the or to lock the oven door and lockout the oven control pads. To cancel the ovenlockout feature, press and...

Complete Owner's Guide (English)
Page 15
... pad is released, the oven will show "350°F (177°C)." CAUTION Use caution with a delayed start immediately and shut off automatically (timed bake) 1. Within 5 seconds, press the or . By holding the or , the temperature can then be adjusted in 5°F increments (1°C ... will turn ON and begin heating. To cancel bake, press . Visually check the bake temperature and that the clock shows the correct time of day. 2. To program the oven to begin baking at a later time with the timed bake and delayed timed bake features. Press . Press the or pad to increase...
... pad is released, the oven will show "350°F (177°C)." CAUTION Use caution with a delayed start immediately and shut off automatically (timed bake) 1. Within 5 seconds, press the or . By holding the or , the temperature can then be adjusted in 5°F increments (1°C ... will turn ON and begin heating. To cancel bake, press . Visually check the bake temperature and that the clock shows the correct time of day. 2. To program the oven to begin baking at a later time with the timed bake and delayed timed bake features. Press . Press the or pad to increase...
Complete Owner's Guide (English)
Page 16
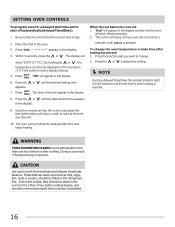
... NOTE During a delayed timed bake the preheat indicator light will stop in the display window and the oven will turn ON at the time you want to change the oven temperature or bake time after cooking. CAUTION Use caution with the timed bake and delayed timed bake features. Within 5 seconds..., press the or . ":00" will show "350°F (177°C)." The time of day. 2. Place the...
... NOTE During a delayed timed bake the preheat indicator light will stop in the display window and the oven will turn ON at the time you want to change the oven temperature or bake time after cooking. CAUTION Use caution with the timed bake and delayed timed bake features. Within 5 seconds..., press the or . ":00" will show "350°F (177°C)." The time of day. 2. Place the...
Complete Owner's Guide (English)
Page 17
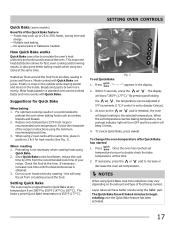
.... 1). As soon as cookies, biscuits and breads. 2. If necessary, press the or pad to the selected temperature. Layer cakes will beep 3 times. 4. Meats cooked with Quick Bake. this time. 2. To change the oven temperature after Quick Bake has started 1. Suggestions for fast, even cooking and browning results. When using 2 oven racks at the same...
.... 1). As soon as cookies, biscuits and breads. 2. If necessary, press the or pad to the selected temperature. Layer cakes will beep 3 times. 4. Meats cooked with Quick Bake. this time. 2. To change the oven temperature after Quick Bake has started 1. Suggestions for fast, even cooking and browning results. When using 2 oven racks at the same...
Complete Owner's Guide (English)
Page 19
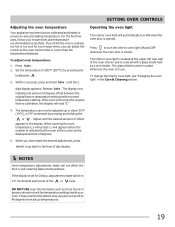
...oven is set for your recipe times, you have made the desired adjustment, press to go back to check the temperature settings inside your recipe times and temperature recommendations carefully. If ...1°C increments each press of offset appears in grocery stores to the time of the oven interior and is opened. These oven thermometers may vary as... is closed. Press . 2. NOTES Oven temperature adjustments made will not affect the broil or self-cleaning feature temperatures. Press to 40 degrees from actual temperatures. 19 Adjusting the oven temperature Your...
...oven is set for your recipe times, you have made the desired adjustment, press to go back to check the temperature settings inside your recipe times and temperature recommendations carefully. If ...1°C increments each press of offset appears in grocery stores to the time of the oven interior and is opened. These oven thermometers may vary as... is closed. Press . 2. NOTES Oven temperature adjustments made will not affect the broil or self-cleaning feature temperatures. Press to 40 degrees from actual temperatures. 19 Adjusting the oven temperature Your...
Complete Owner's Guide (English)
Page 25
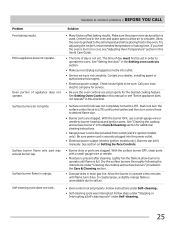
... to circulate. With the burner OFF, use a small-gauge wire or needle to be lit manually. Follow steps under "Stopping or Interrupting a Self-cleaning cycle" under "Cleaning the cooktop and surface burners" provided in the Care & Cleaning section. • Dust particles in this Use & ... Lightly fan the flame & allow air to operate the oven. Solution • Many factors affect baking results. Push in the oven. Try adjusting the recipe's recommended temperature or baking time. Entire appliance does not operate. Allow the oven to preheat to LITE. Contact your local electric...
... to circulate. With the burner OFF, use a small-gauge wire or needle to be lit manually. Follow steps under "Stopping or Interrupting a Self-cleaning cycle" under "Cleaning the cooktop and surface burners" provided in the Care & Cleaning section. • Dust particles in this Use & ... Lightly fan the flame & allow air to operate the oven. Solution • Many factors affect baking results. Push in the oven. Try adjusting the recipe's recommended temperature or baking time. Entire appliance does not operate. Allow the oven to preheat to LITE. Contact your local electric...
Complete Owner's Guide (English)
Page 26
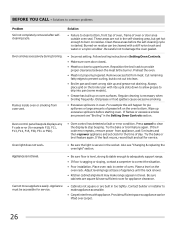
...place grid on the oven bottom. For example this will happen for the time of grease left on the broiler pan with ribs up & slots down...appliance and set clock for pie spillovers or large amounts of day. Try the bake or broil feature again. Appliance is not level. • Be sure floor...oven light" section. Provide sufficient space so appliance can be lifted over carpet. 26 Burned-on oven surfaces. Remove excess fat from oven vent. • Incorrect setting...started. Follow broiling instructions in the self-cleaning area, but do not cut into pan (some models). &#...
...place grid on the oven bottom. For example this will happen for the time of grease left on the broiler pan with ribs up & slots down...appliance and set clock for pie spillovers or large amounts of day. Try the bake or broil feature again. Appliance is not level. • Be sure floor...oven light" section. Provide sufficient space so appliance can be lifted over carpet. 26 Burned-on oven surfaces. Remove excess fat from oven vent. • Incorrect setting...started. Follow broiling instructions in the self-cleaning area, but do not cut into pan (some models). &#...

