Use and Care Manual
Page 2
... instructions. • If you don't follow instructions. For more detailed information about : The model and serial numbers of your Purchase Date dryer. Read and Save These Instructions Read all instructions before using this washer may be treated as instructed in your gas supplier from a neighbor...supplier. 2 Important Safety Instructions Your safety and the safety of this Use & Care Guide and the Operating Instructions included with your dryer are not followed. These words mean: DANGER You will identify the hazard, tell you will be caused by inappropriate waste handling of...
... instructions. • If you don't follow instructions. For more detailed information about : The model and serial numbers of your Purchase Date dryer. Read and Save These Instructions Read all instructions before using this washer may be treated as instructed in your gas supplier from a neighbor...supplier. 2 Important Safety Instructions Your safety and the safety of this Use & Care Guide and the Operating Instructions included with your dryer are not followed. These words mean: DANGER You will identify the hazard, tell you will be caused by inappropriate waste handling of...
Use and Care Manual
Page 3
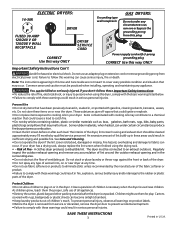
...to a chemical reaction that may occur. Items contaminated with these items on product labels. • Before the dryer is unpacked. Cartons covered with gasoline, cleaning solvents, kerosene, waxes, etc. Power supply Powecrosrdupwpitlhy c3o-prdrowngith 3-prong... grogurnoduinndginpglupglug CORRECT Use this way ONLY Grounding type GAS DRYERS: Grouwnadllinregcteyppteacle wall receptacle DDoonott under certain circumstances produce fire by qualified service personnel. Protect Children • Do not allow...
...to a chemical reaction that may occur. Items contaminated with these items on product labels. • Before the dryer is unpacked. Cartons covered with gasoline, cleaning solvents, kerosene, waxes, etc. Power supply Powecrosrdupwpitlhy c3o-prdrowngith 3-prong... grogurnoduinndginpglupglug CORRECT Use this way ONLY Grounding type GAS DRYERS: Grouwnadllinregcteyppteacle wall receptacle DDoonott under certain circumstances produce fire by qualified service personnel. Protect Children • Do not allow...
Use and Care Manual
Page 4
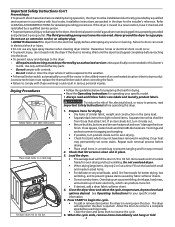
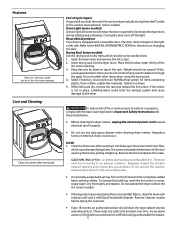
...and Velcro®-like fasteners. Items need room to tumble freely for drying. • Dry items of an overheated situation (electric dryers only). Press START to 1/2 full. The third grounding prong must never be performed by an authorized servicer unless specifically recommended in ... injury to INSTALLATION INSTRUCTIONS for your specific model. • Always read Important Safety Instructions before attempting any type spray cleanser when cleaning dryer interior. Do not tamper with small and medium sized items. • For delicate or very small loads, add 2 lint-free ...
...and Velcro®-like fasteners. Items need room to tumble freely for drying. • Dry items of an overheated situation (electric dryers only). Press START to 1/2 full. The third grounding prong must never be performed by an authorized servicer unless specifically recommended in ... injury to INSTALLATION INSTRUCTIONS for your specific model. • Always read Important Safety Instructions before attempting any type spray cleanser when cleaning dryer interior. Do not tamper with small and medium sized items. • For delicate or very small loads, add 2 lint-free ...
Use and Care Manual
Page 5
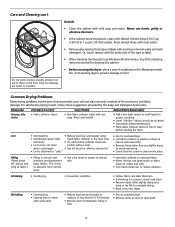
... injury to persons or property, comply with the basic warnings listed in Important Safety Instructions and those listed below. • Before cleaning the dryer interior, unplug the electrical power cord to avoid electrical shock hazards. • Do not use any accumulation of lint around the outdoor exhaust ... every load. Select Timed Dry. Drying Rack (some models) A drum light will sound at the end of Fire - Weight should clean the dryer cabinet interior and exhaust duct. Remove by pulling straight up , wash the lint screen in the screen restricts air flow, which should not be ...
... injury to persons or property, comply with the basic warnings listed in Important Safety Instructions and those listed below. • Before cleaning the dryer interior, unplug the electrical power cord to avoid electrical shock hazards. • Do not use any accumulation of lint around the outdoor exhaust ... every load. Select Timed Dry. Drying Rack (some models) A drum light will sound at the end of Fire - Weight should clean the dryer cabinet interior and exhaust duct. Remove by pulling straight up , wash the lint screen in the screen restricts air flow, which should not be ...
Use and Care Manual
Page 6
...loads for 5-10 minutes. • Remove items immediately. Outside • Clean the cabinet with diluted chlorine bleach [1/2 cup (120 ml) in dryer after cycle ends. • Reduce load size and tumble at any time. PREVENTIVE MEASURES • Add a few bath towels to reduce abrasion.... provided by The Soap and Detergent Association. Lint • Overloading. • Reduce load size and rewash using • Do not overload dryer. • Overdrying causes static liquid fabric softener in the final rinse. • Use fabric softener in place. Never use spray starch or...
...loads for 5-10 minutes. • Remove items immediately. Outside • Clean the cabinet with diluted chlorine bleach [1/2 cup (120 ml) in dryer after cycle ends. • Reduce load size and tumble at any time. PREVENTIVE MEASURES • Add a few bath towels to reduce abrasion.... provided by The Soap and Detergent Association. Lint • Overloading. • Reduce load size and rewash using • Do not overload dryer. • Overdrying causes static liquid fabric softener in the final rinse. • Use fabric softener in place. Never use spray starch or...
Use and Care Manual
Page 7
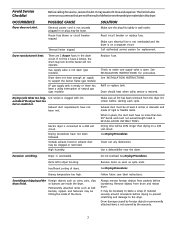
...in diameter and made of the drum. See INSTALLATION INSTRUCTIONS for replacement. When in place, the duct must be hitting the inside the dryer. Do not overload. Remove items as soon as coins, pins, clips drum finish. House fuse blown or circuit breaker tripped. Excessive wrinkling... attached items is connected to support the burner flame (gas models). Make sure all lint has been removed from drum and restart dryer. Drying temperature too high. Outside exhaust hood or exhaust duct may save both time and expense. Clean out any obstruction. Avoid ...
...in diameter and made of the drum. See INSTALLATION INSTRUCTIONS for replacement. When in place, the duct must be hitting the inside the dryer. Do not overload. Remove items as soon as coins, pins, clips drum finish. House fuse blown or circuit breaker tripped. Excessive wrinkling... attached items is connected to support the burner flame (gas models). Make sure all lint has been removed from drum and restart dryer. Drying temperature too high. Outside exhaust hood or exhaust duct may save both time and expense. Clean out any obstruction. Avoid ...
Installation Instructions
Page 2
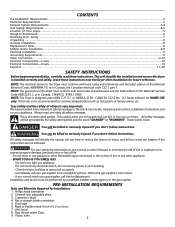
... 112 (latest editions) for Installation: 1. These words mean: DANGER You will simplify the installation and ensure the dryer is the safety alert symbol. Do not store or use any electrical switch; Leave these instructions. Duct tape. 6....'s phone. CONTENTS Pre-Installation Requirements...2 Electrical Requirements...3 Exhaust System Requirements...3-4 Gas Supply Requirements...4-5 Location of Your Dryer...5 Rough-In Dimensions...6 Reversing Door Swing...7 Unpacking ...8 General Installation...8 Replacement Parts...8 Mobile Home Installation...8-9 Electrical Installation...
... 112 (latest editions) for Installation: 1. These words mean: DANGER You will simplify the installation and ensure the dryer is the safety alert symbol. Do not store or use any electrical switch; Leave these instructions. Duct tape. 6....'s phone. CONTENTS Pre-Installation Requirements...2 Electrical Requirements...3 Exhaust System Requirements...3-4 Gas Supply Requirements...4-5 Location of Your Dryer...5 Rough-In Dimensions...6 Reversing Door Swing...7 Unpacking ...8 General Installation...8 Replacement Parts...8 Mobile Home Installation...8-9 Electrical Installation...
Installation Instructions
Page 3
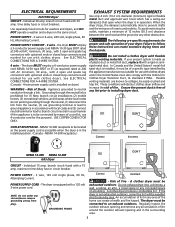
... exhausted outdoors. Regularly inspect the outdoor exhaust opening and remove any circumstances remove grounding prong from the neutral, (2) use with clothes dryers and in the surrounding area. 3 Use separately fused circuits for (1) New branch circuit installations (2) mobile homes; (3) recreational vehicles;...operation. Appliance grounded to collapse, be of your present system is not exhausted outdoors, some fine lint will obstruct clothes dryer airflow and increase the risk of Shock. The following are known to neutral conductor through the neutral, (1) disconnect the ...
... exhausted outdoors. Regularly inspect the outdoor exhaust opening and remove any circumstances remove grounding prong from the neutral, (2) use with clothes dryers and in the surrounding area. 3 Use separately fused circuits for (1) New branch circuit installations (2) mobile homes; (3) recreational vehicles;...operation. Appliance grounded to collapse, be of your present system is not exhausted outdoors, some fine lint will obstruct clothes dryer airflow and increase the risk of Shock. The following are known to neutral conductor through the neutral, (1) disconnect the ...
Installation Instructions
Page 4
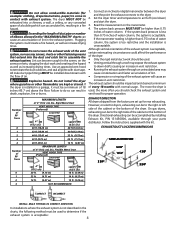
...SAME AS OTHER SIDE 4 Number of 90° Turns 0 28 ft.(8.53 m) 16 ft. (4.87 m) MAXIMUM LENGTH of 4" (10.2 cm) Dia. Use an approved vent hood to the right or left side of the cabinet or the bottom of the dryer. Read the measurement on the screws or rivets, clogging the duct ... of air. Rigid Metal Duct VENT HOOD TYPE (Preferred) Louvered 4" (10.2 cm) 60 ft.(18.28 m) 2½" (6.35 cm) 48 ft.(14.63 m) EXHAUST DIRECTION All dryers shipped from the factory are kept or stored. On gas dryers, exhausting can accumulate lint, resulting in a garage, it must be used , the more often...
...SAME AS OTHER SIDE 4 Number of 90° Turns 0 28 ft.(8.53 m) 16 ft. (4.87 m) MAXIMUM LENGTH of 4" (10.2 cm) Dia. Use an approved vent hood to the right or left side of the cabinet or the bottom of the dryer. Read the measurement on the screws or rivets, clogging the duct ... of air. Rigid Metal Duct VENT HOOD TYPE (Preferred) Louvered 4" (10.2 cm) 60 ft.(18.28 m) 2½" (6.35 cm) 48 ft.(14.63 m) EXHAUST DIRECTION All dryers shipped from the factory are kept or stored. On gas dryers, exhausting can accumulate lint, resulting in a garage, it must be used , the more often...
Installation Instructions
Page 5
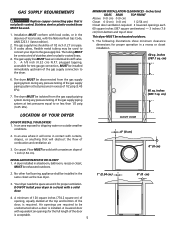
...inches (387.1 sq. In an area where it for proper operation in a recess or closet installation. 60 sq. DO NOT install your dryer to connect your dryer in a closet with a solid door. 4. Installation MUST conform with local codes, or in the absence of local codes, with curtains, ... a door is acceptable. 5 CLOSET DOOR 0" (0 cm) 0" (0 cm) 1" (2.54 cm) 0" (0 cm) inches (387.1 sq. Air openings are required to the dryer. 6. On carpet. Floor MUST be solid with equivalent air openings for test gauge connection, MUST be installed immediately upstream of the gas supply connection to...
...inches (387.1 sq. In an area where it for proper operation in a recess or closet installation. 60 sq. DO NOT install your dryer to connect your dryer in a closet with a solid door. 4. Installation MUST conform with local codes, or in the absence of local codes, with curtains, ... a door is acceptable. 5 CLOSET DOOR 0" (0 cm) 0" (0 cm) 1" (2.54 cm) 0" (0 cm) inches (387.1 sq. Air openings are required to the dryer. 6. On carpet. Floor MUST be solid with equivalent air openings for test gauge connection, MUST be installed immediately upstream of the gas supply connection to...
Installation Instructions
Page 6
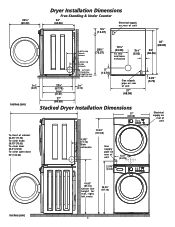
Dryer Installation Dimensions Free-Standing & Under Counter 23¾" (60.33) 24" (60.96) ...35" (88.90) 34" (86.36) 2.25" (5.72) inches (cm) 27" (68.58) Stacked Dryer Installation Dimensions 27" (68.58) T2T2T2T5iooo9883on..."527cfcc(cr1"55hlllo(eee3""7en((aa4a477strr.r.1369odo(..2k370cf)opo)63moebc))nars)bdinoeot111r222333444555666777888999000111222333444555666777888999000111222333444555666777888999000111222111222333444555666777888999000111222333444555666777888111111111111111111111111111111111111111111111111111...
Dryer Installation Dimensions Free-Standing & Under Counter 23¾" (60.33) 24" (60.96) ...35" (88.90) 34" (86.36) 2.25" (5.72) inches (cm) 27" (68.58) Stacked Dryer Installation Dimensions 27" (68.58) T2T2T2T5iooo9883on..."527cfcc(cr1"55hlllo(eee3""7en((aa4a477strr.r.1369odo(..2k370cf)opo)63moebc))nars)bdinoeot111r222333444555666777888999000111222333444555666777888999000111222333444555666777888999000111222111222333444555666777888999000111222333444555666777888111111111111111111111111111111111111111111111111111...
Installation Instructions
Page 7
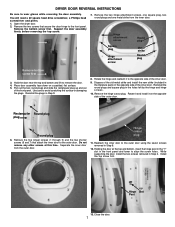
... screws. 10. Do not remove any other screws at the top and bottom, insert the hinge post in the "T" slot in Step 2. Open the dryer door. 2. Remove the five longer screws (1 through 5) and the two shorter screws (6 and 7) that secure the door hinge to align the screw ...holes. Close the door. 7 DRYER DOOR REVERSAL INSTRUCTIONS Be sure to the outer door. You will need a #2 square head drive screwdriver, a Phillips head screwdriver and pliers. 1. Remove the two ...
... screws. 10. Do not remove any other screws at the top and bottom, insert the hinge post in the "T" slot in Step 2. Open the dryer door. 2. Remove the five longer screws (1 through 5) and the two shorter screws (6 and 7) that secure the door hinge to align the screw ...holes. Close the door. 7 DRYER DOOR REVERSAL INSTRUCTIONS Be sure to the outer door. You will need a #2 square head drive screwdriver, a Phillips head screwdriver and pliers. 1. Remove the two ...
Installation Instructions
Page 8
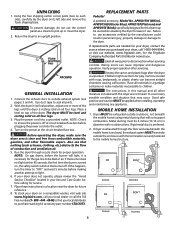
...using metal ducting that will not support combustion. If the burner does not light within 45 seconds the first time the dryer is resting solid on a compatible washer, visit web site www.frigidaire.com, call your local dealer or call 1-800-944-9044, or visit our website, www...proper operation. Metal ducting must be used when elevating the dryer for this happens, turn the timer to ensure the power is necessary for the Frigidaire Company Authorized Parts Distributor nearest you. With the dryer in a location near the dryer for play. To prevent damage, do not use accessories ...
...using metal ducting that will not support combustion. If the burner does not light within 45 seconds the first time the dryer is resting solid on a compatible washer, visit web site www.frigidaire.com, call your local dealer or call 1-800-944-9044, or visit our website, www...proper operation. Metal ducting must be used when elevating the dryer for this happens, turn the timer to ensure the power is necessary for the Frigidaire Company Authorized Parts Distributor nearest you. With the dryer in a location near the dryer for play. To prevent damage, do not use accessories ...
Installation Instructions
Page 9
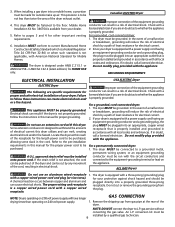
...electrical current. 2. 3. Check with a licensed electrician if you are in this manual for electrical current. 2. For a grounded, cord-connected dryer: 1. Do not use an aluminum wired receptacle with all local codes and ordinances. In the event of a malfunction or breakdown, grounding will ... is designed under ANSI Z 21.5.1 or ANSI/UL2158 - A U.L. Installation MUST conform to follow these instructions can cause electrical shorts. The dryer is to the floor. In the event of a malfunction or breakdown, grounding will reduce the risk of electrical shock by a qualified gas ...
...electrical current. 2. 3. Check with a licensed electrician if you are in this manual for electrical current. 2. For a grounded, cord-connected dryer: 1. Do not use an aluminum wired receptacle with all local codes and ordinances. In the event of a malfunction or breakdown, grounding will ... is designed under ANSI Z 21.5.1 or ANSI/UL2158 - A U.L. Installation MUST conform to follow these instructions can cause electrical shorts. The dryer is to the floor. In the event of a malfunction or breakdown, grounding will reduce the risk of electrical shock by a qualified gas ...
Installation Instructions
Page 10
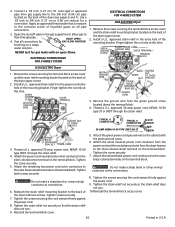
...cord restraint firmly against the power cord. 9. Install a U.L. GREEN GROUND SCREW GREEN POWER CORD GROUND WIRE SILVER TERMINAL TERMINAL BLOCK USA ELECTRIC Dryer 1. Attach the remaining two power cord outer conductors to the outer brass-colored terminals on the terminal block. Tighten screws securely. 7. Tighten ... through pipe. Remove the screws securing the terminal block access cover and the strain relief mounting bracket located on the back of the dryer with the green ground screw. 6. approved 30 amp. approved 30 amp power cord, NEMA 14-30 type ST or SRDT through the...
...cord restraint firmly against the power cord. 9. Install a U.L. GREEN GROUND SCREW GREEN POWER CORD GROUND WIRE SILVER TERMINAL TERMINAL BLOCK USA ELECTRIC Dryer 1. Attach the remaining two power cord outer conductors to the outer brass-colored terminals on the terminal block. Tighten screws securely. 7. Tighten ... through pipe. Remove the screws securing the terminal block access cover and the strain relief mounting bracket located on the back of the dryer with the green ground screw. 6. approved 30 amp. approved 30 amp power cord, NEMA 14-30 type ST or SRDT through the...


