Use and Care Guide
Page 3
... can under certain circumstances produce fire by a qualified service person. do not reach into the dryer if the drum is removed from the electrical supply before using the drying rack. - ENGLISH For your safety, the information in this manual must be plugged into a properly grounded and polarized 3-prong outlet. This Use and Care...
... can under certain circumstances produce fire by a qualified service person. do not reach into the dryer if the drum is removed from the electrical supply before using the drying rack. - ENGLISH For your safety, the information in this manual must be plugged into a properly grounded and polarized 3-prong outlet. This Use and Care...

Operating Instructions
Page 2
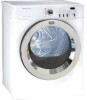
...the control lock, press Options and Select again. Cycle Selection (Con't) Touch Up Select Touch Up to help reduce wrinkling. Timed Dry To manually select the drying time for most loads. You will sound at the end of the cycle. Use the Air Fluff/No Heat setting only..../Pause, adjust the setting and press Start/ Pause to dust draperies. Medium heat is selected. For loads requiring less drying time, select Less Dry. Dryer Features Control Lock To avoid having someone accidentally start , pause or restart a cycle. Status Lights The following a trip. To change a setting after...
...the control lock, press Options and Select again. Cycle Selection (Con't) Touch Up Select Touch Up to help reduce wrinkling. Timed Dry To manually select the drying time for most loads. You will sound at the end of the cycle. Use the Air Fluff/No Heat setting only..../Pause, adjust the setting and press Start/ Pause to dust draperies. Medium heat is selected. For loads requiring less drying time, select Less Dry. Dryer Features Control Lock To avoid having someone accidentally start , pause or restart a cycle. Status Lights The following a trip. To change a setting after...

Installation Instructions
Page 7
... be properly grounded. For a grounded, cord-connected dryer: 1. Tighten both screws securely. Reinstall the terminal block cover. 2. Electrical shock and /or fire can result in this manual for electrical current. Follow the instructions in a risk of electrical shock. Locate the dryer within reach of the receptacle for your dryer is equipped with a power supply cord having an...
... be properly grounded. For a grounded, cord-connected dryer: 1. Tighten both screws securely. Reinstall the terminal block cover. 2. Electrical shock and /or fire can result in this manual for electrical current. Follow the instructions in a risk of electrical shock. Locate the dryer within reach of the receptacle for your dryer is equipped with a power supply cord having an...

Installation Instructions
Page 8
...dryer, make sure the dryer area is unpacked. Also see that is turned on the power at this dryer are needed for your dryer, call 1-800-944-9044, or visit our website, www.frigidaire... in this manual and all wires prior to L.P. approved strain relief in a location near the dryer for a ... TERMINAL BLOCK GENERAL INSTALLATION 1. Connect a 1/2 inch (1.27 cm) I.D. Plug the power cord into the outlet....dryer by brushing on the back of the dryer. ELECTRICAL CONNECTIONS FOR 4-WIRE SYSTEM NON-CANADIAN ELECTRIC Dryer VALVE OPEN / GAS FLOW POSITION 1. NOTE: On gas dryers...
...dryer, make sure the dryer area is unpacked. Also see that is turned on the power at this dryer are needed for your dryer, call 1-800-944-9044, or visit our website, www.frigidaire... in this manual and all wires prior to L.P. approved strain relief in a location near the dryer for a ... TERMINAL BLOCK GENERAL INSTALLATION 1. Connect a 1/2 inch (1.27 cm) I.D. Plug the power cord into the outlet....dryer by brushing on the back of the dryer. ELECTRICAL CONNECTIONS FOR 4-WIRE SYSTEM NON-CANADIAN ELECTRIC Dryer VALVE OPEN / GAS FLOW POSITION 1. NOTE: On gas dryers...


