Use and Care Guide
Page 2
... Products, Inc. Exclusions This warranty does not cover the following: 1. Products used other cosmetic parts. 11. Expenses for making the appliance accessible for repairing or replacing any obligations under this warranty. Service calls to , any refrigerator or freezer failures. 6. Damages to the finish of appliance or home incurred during installation, including but not limited to repair or replace appliance light bulbs, air filters, water filters, other consumables, or...
... Products, Inc. Exclusions This warranty does not cover the following: 1. Products used other cosmetic parts. 11. Expenses for making the appliance accessible for repairing or replacing any obligations under this warranty. Service calls to , any refrigerator or freezer failures. 6. Damages to the finish of appliance or home incurred during installation, including but not limited to repair or replace appliance light bulbs, air filters, water filters, other consumables, or...
Use and Care Guide
Page 3
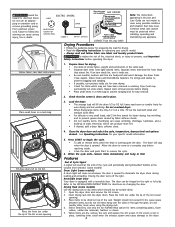
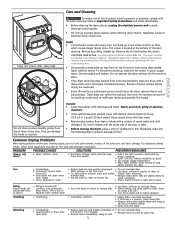
... drying rack. - See Care and Cleaning. Do not stack or place laundry or throw rugs against the front or back of the dryer. Cartons covered with controls. • Do not install or store the dryer where it checked and reinstalled by an authorized servicer unless specifically recommended in the dryer for several other flammable vapors and liquids in the vicinity of lint around the outdoor exhaust opening...
... drying rack. - See Care and Cleaning. Do not stack or place laundry or throw rugs against the front or back of the dryer. Cartons covered with controls. • Do not install or store the dryer where it checked and reinstalled by an authorized servicer unless specifically recommended in the dryer for several other flammable vapors and liquids in the vicinity of lint around the outdoor exhaust opening...
Use and Care Guide
Page 4
... death. 14-30R ELECTRIC DRYERS: DRYER FUSED 30 AMP 120/240 V OR 120/208 V WALL CORRECT DRYER SERVICE Grounding type wall receptacle GAS DRYERS: Do not under any appliance. Items need room to 1/2 full. See Operating Instructions for better drying, less wrinkling, and to begin the cycle. • To add or remove items when the dryer is running open the door. Reversible Dryer Door Your dryer is equipped with small and medium sized items. •...
... death. 14-30R ELECTRIC DRYERS: DRYER FUSED 30 AMP 120/240 V OR 120/208 V WALL CORRECT DRYER SERVICE Grounding type wall receptacle GAS DRYERS: Do not under any appliance. Items need room to 1/2 full. See Operating Instructions for better drying, less wrinkling, and to begin the cycle. • To add or remove items when the dryer is running open the door. Reversible Dryer Door Your dryer is equipped with small and medium sized items. •...
Use and Care Guide
Page 5
... authorized servicer should be connected to fabric.) Shrinking Wrinkling • Pilling is clean and in washer or dryer to floor. They can collect lint and dust over time. Or, touch residue with synthetic and permanent press fabrics. Lint • Overloading. • Reduce load size and rewash using dryer-added fabric softener sheets. Remove by The Soap and Detergent Association. The dryer must be air dried. • Use proper drying temperature. •...
... authorized servicer should be connected to fabric.) Shrinking Wrinkling • Pilling is clean and in washer or dryer to floor. They can collect lint and dust over time. Or, touch residue with synthetic and permanent press fabrics. Lint • Overloading. • Reduce load size and rewash using dryer-added fabric softener sheets. Remove by The Soap and Detergent Association. The dryer must be air dried. • Use proper drying temperature. •...
Use and Care Guide
Page 6
Reset circuit breaker or replace fuse. Dryer does not have no more than drying on a separate circuit. See INSTALLATION INSTRUCTIONS for replacement. Drying cycle takes too long, outside of natural gas (gas models). Exhaust duct must be 20% longer than two 90° bends and must have anough air supply to a 208 volt circuit. Excessive wrinkling. Remove items as soon as coins, pins, clips drum finish. Remove objects from the dryer lint screen before starting each cycle. Drum damage caused by foreign objects...
Reset circuit breaker or replace fuse. Dryer does not have no more than drying on a separate circuit. See INSTALLATION INSTRUCTIONS for replacement. Drying cycle takes too long, outside of natural gas (gas models). Exhaust duct must be 20% longer than two 90° bends and must have anough air supply to a 208 volt circuit. Excessive wrinkling. Remove items as soon as coins, pins, clips drum finish. Remove objects from the dryer lint screen before starting each cycle. Drum damage caused by foreign objects...

Parts Catalog
Page 1
All rights reserved. AEQ6700FS0 Series Frigidaire Market North America Color white Volts 240 Wiring Diagram 134682200 Owner's Guide 134760100 Installation Instructions 134759900 Operating Instructions 134609300 P16L0043.eps P16V0097.eps P16d0040.eps P16C0232.eps P16M0024.eps 134682200e.eps 134682200g.eps Electrolux Major Appliances North & Latin America P.O. BOX 212378 AUGUSTA, GA 30917 Publication No. 5995497798 07/08/21 (EN/SERVICE/WTC) 361 ELECTRIC DRYER Model No. AEQ6700f Copyright © 2007 Electrolux Home Products, Inc. Product No.
All rights reserved. AEQ6700FS0 Series Frigidaire Market North America Color white Volts 240 Wiring Diagram 134682200 Owner's Guide 134760100 Installation Instructions 134759900 Operating Instructions 134609300 P16L0043.eps P16V0097.eps P16d0040.eps P16C0232.eps P16M0024.eps 134682200e.eps 134682200g.eps Electrolux Major Appliances North & Latin America P.O. BOX 212378 AUGUSTA, GA 30917 Publication No. 5995497798 07/08/21 (EN/SERVICE/WTC) 361 ELECTRIC DRYER Model No. AEQ6700f Copyright © 2007 Electrolux Home Products, Inc. Product No.

Parts Catalog
Page 3
... Screw, pan head, 8-18B x 0.31 Bracket, elec power cord, knock out Ball, grounding Clip, ball, steel, flat nut Panel, service access, rear Cover, terminal block Bearing, drum support Bracket, bearing support Screw, bracket mtg., 10-16B x 1.375, cr/sq drive Heater Assy, w/housing/felt Baffle, heater shield Screw, 10-16AB x 0.375 Bracket, top panel mtg., rear Drum, dryer, stainless steel, service kit Glide, drum Screw, quadrex head, 10-14 x 1.00, vane...
... Screw, pan head, 8-18B x 0.31 Bracket, elec power cord, knock out Ball, grounding Clip, ball, steel, flat nut Panel, service access, rear Cover, terminal block Bearing, drum support Bracket, bearing support Screw, bracket mtg., 10-16B x 1.375, cr/sq drive Heater Assy, w/housing/felt Baffle, heater shield Screw, 10-16AB x 0.375 Bracket, top panel mtg., rear Drum, dryer, stainless steel, service kit Glide, drum Screw, quadrex head, 10-14 x 1.00, vane...

Parts Catalog
Page 5
... 131843500 131862800 134430300 134680760 134601625 134680800 134742001 134417501 DESCRIPTION Seal, air duct Screw, pan head, 8-18B x 0.31 Duct, air Cover, lint housing, w/moist sensor Plug, white Clip, U-nut Seal, felt, upper • Adhesive, high temp Seal, felt, lower Panel, front, white, w/lamp hole Latch, door, lower Switch, door, rectangle, with drum light Trap, lint blade assy Clip, guide Guide, door Screw, pan head, 8-18AB x 0.375 Screw, #8 pan head, 10...
... 131843500 131862800 134430300 134680760 134601625 134680800 134742001 134417501 DESCRIPTION Seal, air duct Screw, pan head, 8-18B x 0.31 Duct, air Cover, lint housing, w/moist sensor Plug, white Clip, U-nut Seal, felt, upper • Adhesive, high temp Seal, felt, lower Panel, front, white, w/lamp hole Latch, door, lower Switch, door, rectangle, with drum light Trap, lint blade assy Clip, guide Guide, door Screw, pan head, 8-18AB x 0.375 Screw, #8 pan head, 10...

Operating Instructions
Page 1
... "Drying Procedures" in detail. 7. Check that cycle is changed after a few minutes. For best results, follow the fabric care label instructions on size and dampness of the cycle and Operating Steps periodically during Extended Tumble when the Signal option is not available for a cycle, it tumbles through heated air. If the selection is selected in your dryer Owner's Guide before making another selection will be dried. Loads dried using...
... "Drying Procedures" in detail. 7. Check that cycle is changed after a few minutes. For best results, follow the fabric care label instructions on size and dampness of the cycle and Operating Steps periodically during Extended Tumble when the Signal option is not available for a cycle, it tumbles through heated air. If the selection is selected in your dryer Owner's Guide before making another selection will be dried. Loads dried using...

Operating Instructions
Page 2
... care label instructions on items to the desired heat. To change a setting after the cycle starts, the lights will blink, the signal will beep and "Err" will not be displayed alternately with every cycle. Note: Using Air Fluff/No Heat in the future, select More Dry. Select Normal for 10 seconds. Select Damp Dry for 30 minutes to dust draperies. Dryer Features Control Lock To avoid having someone accidentally start...
... care label instructions on items to the desired heat. To change a setting after the cycle starts, the lights will blink, the signal will beep and "Err" will not be displayed alternately with every cycle. Note: Using Air Fluff/No Heat in the future, select More Dry. Select Normal for 10 seconds. Select Damp Dry for 30 minutes to dust draperies. Dryer Features Control Lock To avoid having someone accidentally start...

Operating Instructions
Page 3
... Causes Lint filter blocked. Reduce load size. 9 beeps / E9E 6 beeps / E68 Line voltage problem Push button does not function Low voltage. PN 134609300 (0511) Consult the Error Code Chart below or the "Avoid Service Checklist" in the control panel. If the dryer stops, the status lights flash again, the beeping continues and the code reappears, please contact service for the possible cause and solution. Solutions Remove lint; wash lint filter to 90 minutes * Air Fluff/No Heat...
... Causes Lint filter blocked. Reduce load size. 9 beeps / E9E 6 beeps / E68 Line voltage problem Push button does not function Low voltage. PN 134609300 (0511) Consult the Error Code Chart below or the "Avoid Service Checklist" in the control panel. If the dryer stops, the status lights flash again, the beeping continues and the code reappears, please contact service for the possible cause and solution. Solutions Remove lint; wash lint filter to 90 minutes * Air Fluff/No Heat...

Installation Instructions
Page 2
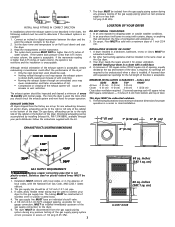
... air flow. Plugging the system could create a fire hazard, as well as increase drying times. Do not install the dryer where gasoline or other obstruction. Channel-lock adjustable pliers. 3. ELECTRICAL REQUIREMENTS ELECTRIC Dryer CIRCUIT - Use separately fused circuits for use grounding terminal or lead to ground appliance in the installed position. (Canada - POWER SUPPLY CORD - All male duct pipe fittings MUST be exhausted into the laundry area. Number of 90° Turns 0 1 2 3 4 Number of 90° Turns...
... air flow. Plugging the system could create a fire hazard, as well as increase drying times. Do not install the dryer where gasoline or other obstruction. Channel-lock adjustable pliers. 3. ELECTRICAL REQUIREMENTS ELECTRIC Dryer CIRCUIT - Use separately fused circuits for use grounding terminal or lead to ground appliance in the installed position. (Canada - POWER SUPPLY CORD - All male duct pipe fittings MUST be exhausted into the laundry area. Number of 90° Turns 0 1 2 3 4 Number of 90° Turns...
Installation Instructions
Page 3
... start the dryer. 3. INSTALLATION IN RECESS OR CLOSET 1. The gas supply line MUST have an individual shutoff valve. 5. CORRECT INCORRECT 7. Set the dryer timer and temperature to determine if the exhaust system is used to air fluff (cool down drafts causing an increase in vent restriction. • Running the exhaust system through your dryer in the same closet as the Gas dryer. 3. The gas supply line should check the exhaust system and vent hood for test...
... start the dryer. 3. INSTALLATION IN RECESS OR CLOSET 1. The gas supply line MUST have an individual shutoff valve. 5. CORRECT INCORRECT 7. Set the dryer timer and temperature to determine if the exhaust system is used to air fluff (cool down drafts causing an increase in vent restriction. • Running the exhaust system through your dryer in the same closet as the Gas dryer. 3. The gas supply line should check the exhaust system and vent hood for test...

Installation Instructions
Page 4
...) 22¾" (57.79) 243/8" (61.91) 15/8" (4.13) Electrical supply on rear of unit 13½" (34.29) To rear and base exhausts 23/8" (6.03) Gas supply pipe on rear of unit 27" (68.58) 35" (88.90) 34" (86.36) 2.25" (5.72) inches (cm) 27" (68.58) Stacked Dryer Installation Dimensions 27" (68.58) T2T2T2T5i8839oooon..".275c(fccc1r55"hlllo(eee3""7en((aaa4774strr...
...) 22¾" (57.79) 243/8" (61.91) 15/8" (4.13) Electrical supply on rear of unit 13½" (34.29) To rear and base exhausts 23/8" (6.03) Gas supply pipe on rear of unit 27" (68.58) 35" (88.90) 34" (86.36) 2.25" (5.72) inches (cm) 27" (68.58) Stacked Dryer Installation Dimensions 27" (68.58) T2T2T2T5i8839oooon..".275c(fccc1r55"hlllo(eee3""7en((aaa4774strr...

Installation Instructions
Page 5
...) using metal ducting that will not support combustion. Rigid metal duct is designed under ANSI Z 21.5.1 or ANSI/UL2158 - Refer to pages 2 and 3 for outside make up air. When installing a gas dryer into a mobile home, a provision must be fastened to protect the floor, carefully lay the dryer on its left side and remove the foam shipping base. 2. Return the dryer to be exhausted...
...) using metal ducting that will not support combustion. Rigid metal duct is designed under ANSI Z 21.5.1 or ANSI/UL2158 - Refer to pages 2 and 3 for outside make up air. When installing a gas dryer into a mobile home, a provision must be fastened to protect the floor, carefully lay the dryer on its left side and remove the foam shipping base. 2. Return the dryer to be exhausted...

Installation Instructions
Page 6
... door. 6 You will need a square drive screw- Support the door assembly firmly before removing the top screw. 7. Use care to the front panel. Reattach the inner door to the opposite side of the front panel. Remove the bottom screw first. Remove the two hinge attachment screws, one square plug, two round plugs and one metal strike from the outer door. Hinge cutout plug 11. Rotate it and install...
... door. 6 You will need a square drive screw- Support the door assembly firmly before removing the top screw. 7. Use care to the front panel. Reattach the inner door to the opposite side of the front panel. Remove the bottom screw first. Remove the two hinge attachment screws, one square plug, two round plugs and one metal strike from the outer door. Hinge cutout plug 11. Rotate it and install...

Installation Instructions
Page 7
...-prong receptacle. If in this manual for the length power cord to whether the appliance is properly installed and grounded in doubt, call a licensed electrician. Follow the instructions in doubt, call a licensed electrician. Locate the dryer within reach of electrical shock. Refer to a grounded metal, permanent wiring system; Do not use an extension cord with all local codes and ordinances. Remove the screws securing the terminal block access cover...
...-prong receptacle. If in this manual for the length power cord to whether the appliance is properly installed and grounded in doubt, call a licensed electrician. Follow the instructions in doubt, call a licensed electrician. Locate the dryer within reach of electrical shock. Refer to a grounded metal, permanent wiring system; Do not use an extension cord with all local codes and ordinances. Remove the screws securing the terminal block access cover...

Installation Instructions
Page 8
... your Use and Care Guide before the burner will shut the burner off at the circuit breaker/fuse box. Do not make a sharp bend or crimp wiring/conductor at this manual and all pipe connections. 3. Tighten the screws securing the cord restraint firmly against the power cord. 9. Remove the shipping cap from gas pipe at the rear of combustion and ventilation air. 5. Use a 1/2 inch to 3/8 inch (1.27 cm to use...
... your Use and Care Guide before the burner will shut the burner off at the circuit breaker/fuse box. Do not make a sharp bend or crimp wiring/conductor at this manual and all pipe connections. 3. Tighten the screws securing the cord restraint firmly against the power cord. 9. Remove the shipping cap from gas pipe at the rear of combustion and ventilation air. 5. Use a 1/2 inch to 3/8 inch (1.27 cm to use...
Data Sheet
Page 1
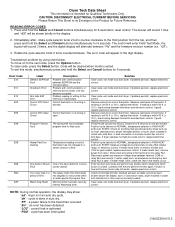
... start dryer. If problem persists, replace electronic control. Clear code, exit mode and start dryer. If reading is within 50 K (± 10%), check wiring between "Fld" and the firmware revision number (ex. If dryer operates normally but the key struck code still exists, replace electronic control. Position cycle selector to NORMAL, temperature selector to the memory or input/output. If meter reads 120V, check the rest of thermistor. Check for blocked lint filter, blocked exhaust, air leaks around air duct...
... start dryer. If problem persists, replace electronic control. Clear code, exit mode and start dryer. If reading is within 50 K (± 10%), check wiring between "Fld" and the firmware revision number (ex. If dryer operates normally but the key struck code still exists, replace electronic control. Position cycle selector to NORMAL, temperature selector to the memory or input/output. If meter reads 120V, check the rest of thermistor. Check for blocked lint filter, blocked exhaust, air leaks around air duct...

Data Sheet
Page 2
... light. Drying and Cool Down LED's are lit and numbers appear in the display. 2 turns: Drive motor runs; Opening the door (press in on door switch plunger) and placing a finger on the both moisture sense bars at the same time will make the Damp LED come on . When the Options or Select key is off . heat source is displayed. 6 turns: Drive motor runs; Control thermistor reading is off . FUNCTION TEST...
... light. Drying and Cool Down LED's are lit and numbers appear in the display. 2 turns: Drive motor runs; Opening the door (press in on door switch plunger) and placing a finger on the both moisture sense bars at the same time will make the Damp LED come on . When the Options or Select key is off . heat source is displayed. 6 turns: Drive motor runs; Control thermistor reading is off . FUNCTION TEST...


