User manual
Page 6
Table of Contents Chapter 1 Product Introduction Product Specifications 2 Layout 4 Back Panel Connectors 5 Chapter 2 Installation Install the Memory 8 Install an Expansion Card 9 Install other Internal Connectors 10 Jumpers 14 Install Driver and Utility 15 Chapter 3 BIOS Setup Enter BIOS Setup 19 Main 20 Advanced 22 Chipset 29 Boot 31 Power 32 Health 33 Security 34 Save & Exit 36
Table of Contents Chapter 1 Product Introduction Product Specifications 2 Layout 4 Back Panel Connectors 5 Chapter 2 Installation Install the Memory 8 Install an Expansion Card 9 Install other Internal Connectors 10 Jumpers 14 Install Driver and Utility 15 Chapter 3 BIOS Setup Enter BIOS Setup 19 Main 20 Advanced 22 Chipset 29 Boot 31 Power 32 Health 33 Security 34 Save & Exit 36
User manual
Page 16
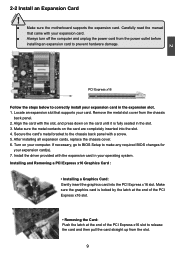
... and Removing a PCI Express x16 Graphics Card : • Installing a Graphics Card: Gently insert the graphics card into the slot. 4. If necessary, go to BIOS Setup to the chassis back panel with the slot, and press down on the card until it is locked by the latch at the end... card. Align the card with a screw. 5. Install the driver provided with your computer. Secure the card's metal bracket to make any required BIOS changes for your operating system. PCI Express x16 Follow the steps below to prevent hardware damage. Turn on the card are completely inserted into the...
... and Removing a PCI Express x16 Graphics Card : • Installing a Graphics Card: Gently insert the graphics card into the slot. 4. If necessary, go to BIOS Setup to the chassis back panel with the slot, and press down on the card until it is locked by the latch at the end... card. Align the card with a screw. 5. Install the driver provided with your computer. Secure the card's metal bracket to make any required BIOS changes for your operating system. PCI Express x16 Follow the steps below to prevent hardware damage. Turn on the card are completely inserted into the...
User manual
Page 20
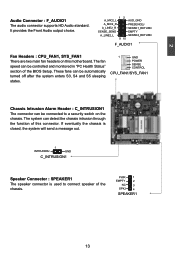
... is used to a security switch on this connector. PWR 1 EMPTY 2 NC 3 SPKJ 4 SPEAKER1 13 The fan speed can be connected to connect speaker of the BIOS Setup. It provides the Front Audio output choice. 12 A_MIC2_L AUD_GND A_MIC2_R PRESENCEJ A_LINE2_R SENSE1_RETURN SENSE_SEND EMPTY A_LINE2_L SENSE2_RETURN 9 10 F_AUDIO1 Fan Headers : CPU_FAN1, SYS_FAN1...
... is used to a security switch on this connector. PWR 1 EMPTY 2 NC 3 SPKJ 4 SPEAKER1 13 The fan speed can be connected to connect speaker of the BIOS Setup. It provides the Front Audio output choice. 12 A_MIC2_L AUD_GND A_MIC2_R PRESENCEJ A_LINE2_R SENSE1_RETURN SENSE_SEND EMPTY A_LINE2_L SENSE2_RETURN 9 10 F_AUDIO1 Fan Headers : CPU_FAN1, SYS_FAN1...
User manual
Page 21
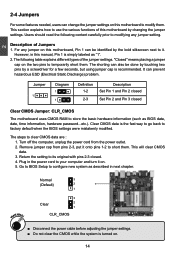
...but using jumper cap is the fast way to go back to factory default when the BIOS settings were mistakenly modified. Description of the jumper settings. This section explains how to configure new system as BIOS data, date, time information, hardware password...etc.). "Closed" means placing a jumper cap ...on the two pins to your computer and turn it on . 14 Go to BIOS Setup to use the various functions of this manual, Pin 1 is turned on . 5. Plug in this motherboard by changing the jumper settings. Clear ...
...but using jumper cap is the fast way to go back to factory default when the BIOS settings were mistakenly modified. Description of the jumper settings. This section explains how to configure new system as BIOS data, date, time information, hardware password...etc.). "Closed" means placing a jumper cap ...on the two pins to your computer and turn it on . 14 Go to BIOS Setup to use the various functions of this manual, Pin 1 is turned on . 5. Plug in this motherboard by changing the jumper settings. Clear ...
User manual
Page 22
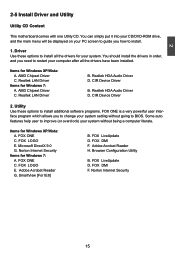
... can simply put it into your CD/DVD-ROM drive, and the main menu will be displayed on your PC screen to guide you to BIOS. CIR Device Driver 2. Norton Internet Security Items for Windows XP/Vista: A. FOX LOGO E. FOX LiveUpdate D. CIR Device Driver B. Microsoft DirectX 9.0 G. Realtek LAN Driver B. Realtek HDA...
... can simply put it into your CD/DVD-ROM drive, and the main menu will be displayed on your PC screen to guide you to BIOS. CIR Device Driver 2. Norton Internet Security Items for Windows XP/Vista: A. FOX LOGO E. FOX LiveUpdate D. CIR Device Driver B. Microsoft DirectX 9.0 G. Realtek LAN Driver B. Realtek HDA...
User manual
Page 25
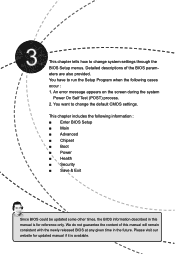
...) process. 2. Please visit our website for reference only. You have to run the Setup Program when the following information : ■ Enter BIOS Setup ■ Main ■ Advanced ■ Chipset ■ Boot ■ Power ■ Health ■ Security ■ Save & Exit Since... BIOS could be updated some other times, the BIOS information described in this manual will remain consistent with the newly released BIOS at any given time in the future. You want to change system settings through the...
...) process. 2. Please visit our website for reference only. You have to run the Setup Program when the following information : ■ Enter BIOS Setup ■ Main ■ Advanced ■ Chipset ■ Boot ■ Power ■ Health ■ Security ■ Save & Exit Since... BIOS could be updated some other times, the BIOS information described in this manual will remain consistent with the newly released BIOS at any given time in the future. You want to change system settings through the...
User manual
Page 26
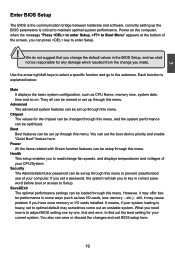
... change fan speeds, and displays temperatures and voltages of your system loading is critical to maintain optimal system performance. Each function is to adjust BIOS setting one by one, trial and error, to find out the best setting for your CPU/System. Security The Administrator/User password can be...Boot features can set the boot device priority and enable "Quiet Boot" feature here. They all can save or discard the changes and exit BIOS setup here. 19 You can be loaded through this menu to prevent unauthorized use of your current system. Use the arrow right/left keys ...
... change fan speeds, and displays temperatures and voltages of your system loading is critical to maintain optimal system performance. Each function is to adjust BIOS setting one by one, trial and error, to find out the best setting for your CPU/System. Security The Administrator/User password can be...Boot features can set the boot device priority and enable "Quiet Boot" feature here. They all can save or discard the changes and exit BIOS setup here. 19 You can be loaded through this menu to prevent unauthorized use of your current system. Use the arrow right/left keys ...
User manual
Page 27
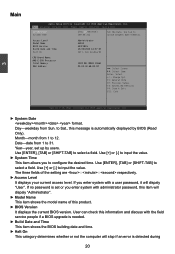
... [+] or [-] to switch between Date elements. User can check this information and discuss with the field service people if a BIOS upgrade is needed. ► Build Date and Time This item shows the BIOS building date and time. ► Halt On This category determines whether or not the computer will stop if an... error is set up by BIOS (Read Only). Use Tab to input the value. Access Level Model Name BIOS Version Build Date and Time Halt On Administrator AHD1S A93F1B15 12/25/2010 14:27:07 [All, but keyboard] CPU Brand Name: AMD E-350...
... [+] or [-] to switch between Date elements. User can check this information and discuss with the field service people if a BIOS upgrade is needed. ► Build Date and Time This item shows the BIOS building date and time. ► Halt On This category determines whether or not the computer will stop if an... error is set up by BIOS (Read Only). Use Tab to input the value. Access Level Model Name BIOS Version Build Date and Time Halt On Administrator AHD1S A93F1B15 12/25/2010 14:27:07 [All, but keyboard] CPU Brand Name: AMD E-350...
User manual
Page 38
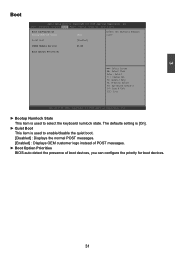
... to enable/disable the quiet boot. [Disabled] : Displays the normal POST messages. [Enabled] : Displays OEM customer logo instead of POST messages. ► Boot Option Priorities BIOS auto detect the presence of boot devices, you can configure the priority for boot devices. 31 The defaulte setting is [On]. ► Quiet Boot This...
... to enable/disable the quiet boot. [Disabled] : Displays the normal POST messages. [Enabled] : Displays OEM customer logo instead of POST messages. ► Boot Option Priorities BIOS auto detect the presence of boot devices, you can configure the priority for boot devices. 31 The defaulte setting is [On]. ► Quiet Boot This...
User manual
Page 42
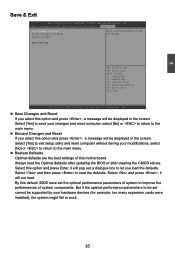
...] or to return to the main menu. ► Discard Changes and Reset If you load the defaults. Always load the Optimal defaults after updating the BIOS or after clearing the CMOS values. Select and press , it will not load. 3 Save & Exit Aptio Setup Utility - Select and then press to work...of system to improve the performances of this option and press Enter, it will pop out a dialogue box to let you select this default, BIOS have set cannot be supported by your hardware devices (for example, too many expansion cards were installed), the system might fail to load the defaults...
...] or to return to the main menu. ► Discard Changes and Reset If you load the defaults. Always load the Optimal defaults after updating the BIOS or after clearing the CMOS values. Select and press , it will not load. 3 Save & Exit Aptio Setup Utility - Select and then press to work...of system to improve the performances of this option and press Enter, it will pop out a dialogue box to let you select this default, BIOS have set cannot be supported by your hardware devices (for example, too many expansion cards were installed), the system might fail to load the defaults...


