
English Manual.
Page 1
A7GMX/A7VMX Series Motherboard User's Manual
A7GMX/A7VMX Series Motherboard User's Manual
English Manual.
Page 2
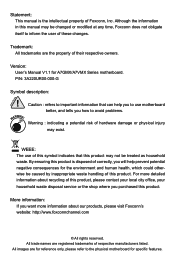
...-000-G Symbol description: ! CAUTION Statement: This manual is disposed of correctly, you want more detailed information about our products, please visit Foxconn's website: http://www.foxconnchannel.com © All rights reserved. Version: User's Manual V1.1 for specific features. For more information about... images are for reference only, please refer to inform the user of this manual may not be changed or modified at any time, Foxconn does not obligate itself to the physical motherboard for A7GMX/A7VMX Series motherboard. Although the information in this product.
...-000-G Symbol description: ! CAUTION Statement: This manual is disposed of correctly, you want more detailed information about our products, please visit Foxconn's website: http://www.foxconnchannel.com © All rights reserved. Version: User's Manual V1.1 for specific features. For more information about... images are for reference only, please refer to inform the user of this manual may not be changed or modified at any time, Foxconn does not obligate itself to the physical motherboard for A7GMX/A7VMX Series motherboard. Although the information in this product.
English Manual.
Page 19
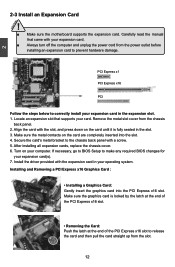
2 CAUTION 2-3 Install an Expansion Card ! ■ Make sure the motherboard supports the expansion card. Secure the card's metal bracket to correctly install your computer. Align the card with the expansion card in your expansion card(s). 7.... Graphics Card : • Installing a Graphics Card: Gently insert the graphics card into the slot. 4. Locate an expansion slot that came with a screw. 5. Carefully read the manual that supports your expansion card. ■ Always turn off the computer and unplug the power cord from the power outlet before installing an expansion card...
2 CAUTION 2-3 Install an Expansion Card ! ■ Make sure the motherboard supports the expansion card. Secure the card's metal bracket to correctly install your computer. Align the card with the expansion card in your expansion card(s). 7.... Graphics Card : • Installing a Graphics Card: Gently insert the graphics card into the slot. 4. Locate an expansion slot that came with a screw. 5. Carefully read the manual that supports your expansion card. ■ Always turn off the computer and unplug the power cord from the power outlet before installing an expansion card...
English Manual.
Page 24
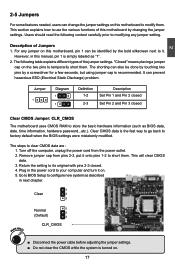
... following content carefully prior to temporarily short them. 2 2-5 Jumpers For some features needed, users can change the jumper settings on this motherboard to your computer and turn it on. 5. It can prevent hazardous ESD (Electrical Static Discharge) problem. This section explains how to... its original with pins 2-3 closed Clear CMOS Jumper: CLR_CMOS The motherboard uses CMOS RAM to it. Return the setting to use the various functions of this manual, pin 1 is turned on. 17 Description of the jumper settings.
... following content carefully prior to temporarily short them. 2 2-5 Jumpers For some features needed, users can change the jumper settings on this motherboard to your computer and turn it on. 5. It can prevent hazardous ESD (Electrical Static Discharge) problem. This section explains how to... its original with pins 2-3 closed Clear CMOS Jumper: CLR_CMOS The motherboard uses CMOS RAM to it. Return the setting to use the various functions of this manual, pin 1 is turned on. 17 Description of the jumper settings.

English Manual.
Page 39
...Timing Configuration Help Item Memory Speed Mode [Auto] Memory Speed Adjust [Auto] DRAM Timing Mode [Auto] Options Auto Limit Manual 3 Move Enter:Select +/-/:Value F10:Save ESC:Exit F1:General Help F9:Optimized Defaults ► Memory Speed Mode This ... contains important information about the module's speed, size, addressing mode and various other parameters, so that the motherboard memory controller (chipset) can configure the timings manually. A chip select or pair of "Memory Speed Adjust". ► Memory Speed Adjust This item will appear...
...Timing Configuration Help Item Memory Speed Mode [Auto] Memory Speed Adjust [Auto] DRAM Timing Mode [Auto] Options Auto Limit Manual 3 Move Enter:Select +/-/:Value F10:Save ESC:Exit F1:General Help F9:Optimized Defaults ► Memory Speed Mode This ... contains important information about the module's speed, size, addressing mode and various other parameters, so that the motherboard memory controller (chipset) can configure the timings manually. A chip select or pair of "Memory Speed Adjust". ► Memory Speed Adjust This item will appear...


