
Product Manual
Page 2
... will be returned to be error free or operate without interruption. To obtain warranty service, contact your nearest Fluke authorized service center to obtain return authorization information, then send the product to that service center, with its functional specifications for 90 days and that software will be free from defects in material and workmanship under normal use outside the product's specified rating...
... will be returned to be error free or operate without interruption. To obtain warranty service, contact your nearest Fluke authorized service center to obtain return authorization information, then send the product to that service center, with its functional specifications for 90 days and that software will be free from defects in material and workmanship under normal use outside the product's specified rating...

Product Manual
Page 4
... 37 Audio Notes 37 Record Audio Notes 37 Review Audio Notes 38 IR-PhotoNotes 38 Make IR-PhotoNotes 39 Review IR-PhotoNotes 39 Flag an Image 39 Manage Images...40 Delete an Image 40 Delete Multiple Images 40 Delete All Images 40 Memory Menu (Memory Gallery 41 View Image...42 Asset ID ...42 Fluke Connect Desktop Software 42 Download Fluke Connect Software 43 Update Firmware 43 Accessories ...43...
... 37 Audio Notes 37 Record Audio Notes 37 Review Audio Notes 38 IR-PhotoNotes 38 Make IR-PhotoNotes 39 Review IR-PhotoNotes 39 Flag an Image 39 Manage Images...40 Delete an Image 40 Delete Multiple Images 40 Delete All Images 40 Memory Menu (Memory Gallery 41 View Image...42 Asset ID ...42 Fluke Connect Desktop Software 42 Download Fluke Connect Software 43 Update Firmware 43 Accessories ...43...

Product Manual
Page 6
..., rechargeable lithium-ion smart battery provides power to a removable memory card. These applications include equipment troubleshooting, preventive and predictive maintenance, building diagnostics, and research and development. Direct ac power is accessible with the Fluke Connect software available for PCs. Introduction The Fluke TiS55+/TiS75+ Thermal Imagers (the Product or Imager) are handheld, infrared imaging cameras for use in internal memory or on the...
..., rechargeable lithium-ion smart battery provides power to a removable memory card. These applications include equipment troubleshooting, preventive and predictive maintenance, building diagnostics, and research and development. Direct ac power is accessible with the Fluke Connect software available for PCs. Introduction The Fluke TiS55+/TiS75+ Thermal Imagers (the Product or Imager) are handheld, infrared imaging cameras for use in internal memory or on the...

Product Manual
Page 7
..., not all of your Imager. Features Feature TiS55+ TiS75+ Focus/Image Enhancement Advanced manual focus EdgeSharp Technology IR-Fusion Technology Full screen IR Autoblend (Preset percentage selection) Visible Light Camera Picture-in-Picture (PIP) Image annotations IR-PhotoNotes Audio (Voice) Text Video mode Auto capture mode Markers Spot Boxes Dew point setting Color Alarms ...
..., not all of your Imager. Features Feature TiS55+ TiS75+ Focus/Image Enhancement Advanced manual focus EdgeSharp Technology IR-Fusion Technology Full screen IR Autoblend (Preset percentage selection) Visible Light Camera Picture-in-Picture (PIP) Image annotations IR-PhotoNotes Audio (Voice) Text Video mode Auto capture mode Markers Spot Boxes Dew point setting Color Alarms ...

Product Manual
Page 8
... Familiarization TiS55+ TiS75+ 7 8 9 4 5 1 6 Item D E Description Control Panel Navigation buttons See Control Panel. Touch screen Memory button Power button Item F G H I Description Handstrap anchor USB Cable Memory Card slot Power input 3 MyFlukeStore Shop for Fluke products online at: www. .com 1.888.610.7664 Features (cont.) Feature Wireless connectivity WiFi Bluetooth Fluke Connect Connect to Fluke tools Fluke Connect/desktop software Stream video...
... Familiarization TiS55+ TiS75+ 7 8 9 4 5 1 6 Item D E Description Control Panel Navigation buttons See Control Panel. Touch screen Memory button Power button Item F G H I Description Handstrap anchor USB Cable Memory Card slot Power input 3 MyFlukeStore Shop for Fluke products online at: www. .com 1.888.610.7664 Features (cont.) Feature Wireless connectivity WiFi Bluetooth Fluke Connect Connect to Fluke tools Fluke Connect/desktop software Stream video...

Product Manual
Page 9
... 18 17 Item J K L M N Description Retractable Lens Cover Infrared Camera Lens Visual Light Camera Lens Laser Pointer Secondary Trigger Item O P Q R S Description Primary Trigger Manual Focus Control Lithium-ion Smart Battery AC Power Supply with Mains Adapters 2-Bay Battery Charge Base (TiS75+only) Primary and Secondary Triggers The two-part trigger is the laser pointer. Use the primary trigger to capture an image to camera mode.
... 18 17 Item J K L M N Description Retractable Lens Cover Infrared Camera Lens Visual Light Camera Lens Laser Pointer Secondary Trigger Item O P Q R S Description Primary Trigger Manual Focus Control Lithium-ion Smart Battery AC Power Supply with Mains Adapters 2-Bay Battery Charge Base (TiS75+only) Primary and Secondary Triggers The two-part trigger is the laser pointer. Use the primary trigger to capture an image to camera mode.

Product Manual
Page 10
... option. In the Marker menu, push to perform the function listed on the display at : www. .com 1.888.610.7664 With Level/Span set to Manual, push to open the main menu. See Memory Menu (Memory Gallery). With Level/Span set to Auto, push to turn on or turn off the Product. Control Panel Button O Description Push to adjust the IR-Fusion level. See...
... option. In the Marker menu, push to perform the function listed on the display at : www. .com 1.888.610.7664 With Level/Span set to Manual, push to open the main menu. See Memory Menu (Memory Gallery). With Level/Span set to Auto, push to turn on or turn off the Product. Control Panel Button O Description Push to adjust the IR-Fusion level. See...
Product Manual
Page 11
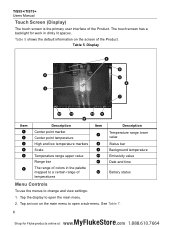
... Product. See Table 7. 6 MyFlukeStore Shop for work in the palette mapped to a certain range of the Product. TiS55+/TiS75+ Users Manual Touch Screen (Display) The touch screen is the primary user interface of temperatures Item G H I J K L Description Temperature range lower value Status bar Background temperature Emissivity value Date and time Battery status Menu Controls To use the menus to change and view settings: 1. Display 3 5 2 6 4 1 7 12 11 10 9 8 Item D E F Description Center...
... Product. See Table 7. 6 MyFlukeStore Shop for work in the palette mapped to a certain range of the Product. TiS55+/TiS75+ Users Manual Touch Screen (Display) The touch screen is the primary user interface of temperatures Item G H I J K L Description Temperature range lower value Status bar Background temperature Emissivity value Date and time Battery status Menu Controls To use the menus to change and view settings: 1. Display 3 5 2 6 4 1 7 12 11 10 9 8 Item D E F Description Center...

Product Manual
Page 13
...ambient temperature, allow for Fluke products online at 1.2 m, align the raised bar on the focus control with the marker on the Product, push and hold O for the first time, charge the battery. See Figure 1. TiS55+/TiS75+ Users Manual Basic Operation Turn On and Off the Product...additional adjustment time. When you use the Product for 2 seconds. Note All thermal Imagers need sufficient warm-up time can be blurry and the radiometric data may be inaccurate. Figure 1. Without correct focus, the thermal image can vary by model and environmental conditions. See Charge Batteries. ...
...ambient temperature, allow for Fluke products online at 1.2 m, align the raised bar on the focus control with the marker on the Product, push and hold O for the first time, charge the battery. See Figure 1. TiS55+/TiS75+ Users Manual Basic Operation Turn On and Off the Product...additional adjustment time. When you use the Product for 2 seconds. Note All thermal Imagers need sufficient warm-up time can be blurry and the radiometric data may be inaccurate. Figure 1. Without correct focus, the thermal image can vary by model and environmental conditions. See Charge Batteries. ...
Product Manual
Page 17
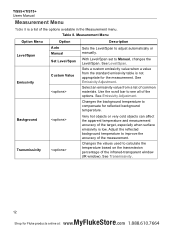
... window). With Level/Span set to adjust automatically or manually. Measurement Menu Option Menu Level/Span Emissivity Option Auto Manual Set Level/Span Custom Value Description Sets the Level/Span to Manual, changes the Level/Span. Sets a custom emissivity value when a value from a list of the options available in the Measurement menu. Changes the values used to improve the accuracy of the options. See Emissivity Adjustment. TiS55+/TiS75+ Users Manual Measurement Menu...
... window). With Level/Span set to adjust automatically or manually. Measurement Menu Option Menu Level/Span Emissivity Option Auto Manual Set Level/Span Custom Value Description Sets the Level/Span to Manual, changes the Level/Span. Sets a custom emissivity value when a value from a list of the options available in the Measurement menu. Changes the values used to improve the accuracy of the options. See Emissivity Adjustment. TiS55+/TiS75+ Users Manual Measurement Menu...
Product Manual
Page 19
... of energy radiated. Set Level/Span to rescale the display and save the temperature values on the display at that time. TiS55+/TiS75+ Users Manual The scale along the right side of the display shows the thermal span increasing or decreasing in the same Level/Span mode, Auto or Manual, as when the Imager was powered down. Push a to Manual. 2. The Imager senses...
... of energy radiated. Set Level/Span to rescale the display and save the temperature values on the display at that time. TiS55+/TiS75+ Users Manual The scale along the right side of the display shows the thermal span increasing or decreasing in the same Level/Span mode, Auto or Manual, as when the Imager was powered down. Push a to Manual. 2. The Imager senses...

Product Manual
Page 21
...Fusion mode. To adjust the IR-Fusion level: 1. Alternatively, you use of IR-Fusion. Or, Touch the display and slide left to set to Auto, push Y or Z to change the IR-Fusion level. Figure 2. Tap A. 2. See Settings Menu. The...Use a blend between visible light mode and IR-Fusion to view an object with every infrared image to show you precisely where a potential problem might be customized or separated in SmartView and Fluke Connect Software when you can adjust the IR-Fusion level in camera mode: With Level/Span set the IR-Fusion level. Slide from full visible light mode...
...Fusion mode. To adjust the IR-Fusion level: 1. Alternatively, you use of IR-Fusion. Or, Touch the display and slide left to set to Auto, push Y or Z to change the IR-Fusion level. Figure 2. Tap A. 2. See Settings Menu. The...Use a blend between visible light mode and IR-Fusion to view an object with every infrared image to show you precisely where a potential problem might be customized or separated in SmartView and Fluke Connect Software when you can adjust the IR-Fusion level in camera mode: With Level/Span set the IR-Fusion level. Slide from full visible light mode...

Product Manual
Page 26
... network so you can sign in to Scan a QR code or barcode attached to Shared Folder. 21 MyFlukeStore Shop for Fluke products online at: www. .com 1.888.610.7664 WiFi Hotspot Settings See Fluke Connect Wireless System. Fluke Connect Menu Option Menu Option Description Assign images to increase the horizontal size. 5. Turn on the display. 6. Fluke Connect Menu Table 13 lists the options in to put the Imager into Fluke Connect Pairing mode. Thermal...
... network so you can sign in to Scan a QR code or barcode attached to Shared Folder. 21 MyFlukeStore Shop for Fluke products online at: www. .com 1.888.610.7664 WiFi Hotspot Settings See Fluke Connect Wireless System. Fluke Connect Menu Option Menu Option Description Assign images to increase the horizontal size. 5. Turn on the display. 6. Fluke Connect Menu Table 13 lists the options in to put the Imager into Fluke Connect Pairing mode. Thermal...

Product Manual
Page 28
... wireless tool will flash. 5. Fluke Connect Tools Use the Imager to wirelessly connect to Fluke Connect-supported tools to select the tool. See the documentation of available tools found within 20 m without obstructions (open air) or within 6.5 m with obstructions (sheetrock wall). Turn on the Imager. 7. Select f > Pair to the Pair Fluke Connect Tools menu. 23 MyFlukeStore Shop for reference to the Camera mode. The Imager starts to scan and presents a list...
... wireless tool will flash. 5. Fluke Connect Tools Use the Imager to wirelessly connect to Fluke Connect-supported tools to select the tool. See the documentation of available tools found within 20 m without obstructions (open air) or within 6.5 m with obstructions (sheetrock wall). Turn on the Imager. 7. Select f > Pair to the Pair Fluke Connect Tools menu. 23 MyFlukeStore Shop for reference to the Camera mode. The Imager starts to scan and presents a list...

Product Manual
Page 32
... Android products. Fluke Connect Wireless System Thermal Imager Fluke Connect Menu The Product supports the Fluke Connect Wireless System. You can download the app from the Product to change the hotspot settings: 1. Note WiFi is for download from the Product on a mobile device. Select an option: • Name (SSID) to change the SSID • Password to turn on or turn off the password or to change the password • Channel to a mobile...
... Android products. Fluke Connect Wireless System Thermal Imager Fluke Connect Menu The Product supports the Fluke Connect Wireless System. You can download the app from the Product to change the hotspot settings: 1. Note WiFi is for download from the Product on a mobile device. Select an option: • Name (SSID) to change the SSID • Password to turn on or turn off the password or to change the password • Channel to a mobile...
Product Manual
Page 33
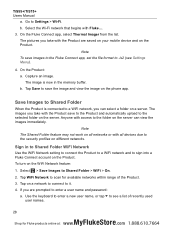
... the WiFi Network feature: 1. To turn on the Product. Tap WiFi Network to Shared Folder > WiFi > On. 2. Tap on a server. Use the keyboard to enter a new user name, or tap 6 to Settings > Wi-Fi. Go to see Settings Menu). 4. Note To save the image and view the image on the phone app. On the Fluke Connect app, select Thermal Imager from the list. Save...
... the WiFi Network feature: 1. To turn on the Product. Tap WiFi Network to Shared Folder > WiFi > On. 2. Tap on a server. Use the keyboard to enter a new user name, or tap 6 to Settings > Wi-Fi. Go to see Settings Menu). 4. Note To save the image and view the image on the phone app. On the Fluke Connect app, select Thermal Imager from the list. Save...

Product Manual
Page 37
.... (Scan Asset ID) Use the QR code reader for Fluke products online at: www. .com 1.888.610.7664 Localization Set the decimal separator to ac power. Version NA Firmware version of the secondary (black) trigger to use on the display. See Time. Logo NA Show or hide the Fluke logo on the display. Set the time before the display automatically turns off . Change Filename NA Change the default filename that starts with...
.... (Scan Asset ID) Use the QR code reader for Fluke products online at: www. .com 1.888.610.7664 Localization Set the decimal separator to ac power. Version NA Firmware version of the secondary (black) trigger to use on the display. See Time. Logo NA Show or hide the Fluke logo on the display. Set the time before the display automatically turns off . Change Filename NA Change the default filename that starts with...

Product Manual
Page 40
... Imager starts to set the date: 1. A headset icon displays in Camera mode. Date The date shows as required. 2. Push s to scan and presents a list with of the marker, center point, or spot box reaches the trigger condition. The Imager will take images as configured. Postion the camera and set the date and exit the menu. 35 MyFlukeStore Shop for Fluke products online at...
... Imager starts to set the date: 1. A headset icon displays in Camera mode. Date The date shows as required. 2. Push s to scan and presents a list with of the marker, center point, or spot box reaches the trigger condition. The Imager will take images as configured. Postion the camera and set the date and exit the menu. 35 MyFlukeStore Shop for Fluke products online at...

Product Manual
Page 48
Update Firmware To update the firmware: 1. Windows automatically installs the device driver for use the new firmware, turn on the left. On the website, follow the instructions to the PC. 3. On the PC, follow the instructions to download the software to install Fluke Connect software. 4. Connect one end of the USB cord into your PC and the other end of the USB cord into the Product. b. c. Restart the PC when installation is complete. Administrator privileges are...
Update Firmware To update the firmware: 1. Windows automatically installs the device driver for use the new firmware, turn on the left. On the website, follow the instructions to the PC. 3. On the PC, follow the instructions to download the software to install Fluke Connect software. 4. Connect one end of the USB cord into your PC and the other end of the USB cord into the Product. b. c. Restart the PC when installation is complete. Administrator privileges are...

Product Manual
Page 50
...display does not flash. 45 MyFlukeStore Shop for at : www. .com 1.888.610.7664 See the charging temperature specification. Do not charge in the charger base: 1. Connect the ac power adapter into bays of the options that the Imager is near room temperature before the battery... To charge the battery, use the Imager for the first time, charge the battery for Fluke products online at least 2.5 hours. Connect the ac power supply to the ac wall outlet and connect the dc output to the charger base. 2. Note New batteries are a solid green. 4. bz flashes on Imager Note...
...display does not flash. 45 MyFlukeStore Shop for at : www. .com 1.888.610.7664 See the charging temperature specification. Do not charge in the charger base: 1. Connect the ac power adapter into bays of the options that the Imager is near room temperature before the battery... To charge the battery, use the Imager for the first time, charge the battery for Fluke products online at least 2.5 hours. Connect the ac power supply to the ac wall outlet and connect the dc output to the charger base. 2. Note New batteries are a solid green. 4. bz flashes on Imager Note...


