User Manual
Page 2
... Eindhoven The Netherlands 11/99 Fluke's warranty obligation is limited, at Fluke's option, to refund of the purchase price, free of charge repair, or replacement of a defective product which , in Fluke's opinion, has been misused, altered, neglected, contaminated, or damaged by use and service. P.O. If Fluke determines that it has been properly recorded on non-defective media. If any other decision...
... Eindhoven The Netherlands 11/99 Fluke's warranty obligation is limited, at Fluke's option, to refund of the purchase price, free of charge repair, or replacement of a defective product which , in Fluke's opinion, has been misused, altered, neglected, contaminated, or damaged by use and service. P.O. If Fluke determines that it has been properly recorded on non-defective media. If any other decision...

User Manual
Page 3
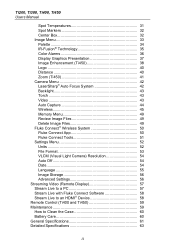
... Contact Fluke 2 Safety Information 3 Radio Frequency Data 6 Accessories 6 Before You Start 8 Battery 9 Two-Bay Battery Charger Base 9 On-Imager AC Power Socket 10 Optional 12 V Vehicle Charger 11 SmartView Software 11 Download SmartView Software 11 Download Firmware 12 Enable the Radio 12 Turn On and Off the Imager 14 Operation in Extreme Conditions 14 Features and Controls 15 Primary and Secondary Triggers 17 Focus 18 Control Buttons 19 Touch Screen 19 How to Use...
... Contact Fluke 2 Safety Information 3 Radio Frequency Data 6 Accessories 6 Before You Start 8 Battery 9 Two-Bay Battery Charger Base 9 On-Imager AC Power Socket 10 Optional 12 V Vehicle Charger 11 SmartView Software 11 Download SmartView Software 11 Download Firmware 12 Enable the Radio 12 Turn On and Off the Imager 14 Operation in Extreme Conditions 14 Features and Controls 15 Primary and Secondary Triggers 17 Focus 18 Control Buttons 19 Touch Screen 19 How to Use...
User Manual
Page 4
... Files 49 Fluke Connect Wireless System 50 Fluke Connect App 50 Fluke Connect Tools 51 Settings Menu 52 Units 52 File Format 53 VLCM (Visual Light Camera) Resolution 54 Auto Off 54 Date 54 Language 55 Image Storage 56 Advanced Settings 56 Streaming Video (Remote Display 57 Stream Live to a PC 57 Stream Live with Fluke Connect Software 58 Stream Live to an HDMI Device 58 Remote Control (Ti400 and Ti450 59...
... Files 49 Fluke Connect Wireless System 50 Fluke Connect App 50 Fluke Connect Tools 51 Settings Menu 52 Units 52 File Format 53 VLCM (Visual Light Camera) Resolution 54 Auto Off 54 Date 54 Language 55 Image Storage 56 Advanced Settings 56 Streaming Video (Remote Display 57 Stream Live to a PC 57 Stream Live with Fluke Connect Software 58 Stream Live to an HDMI Device 58 Remote Control (Ti400 and Ti450 59...

User Manual
Page 5
... a direct USB connection to the PC or by wireless transfer to a USB storage device. Saved images and data stored in many useful features and functions associated with IR-Fusion® technology with the included AC power adapter. The Imagers also include many applications. Introduction The Fluke Ti200, Ti300, Ti400, and Ti450 Thermal Imagers (the Product or Imager) are handheld, infrared imaging cameras...
... a direct USB connection to the PC or by wireless transfer to a USB storage device. Saved images and data stored in many useful features and functions associated with IR-Fusion® technology with the included AC power adapter. The Imagers also include many applications. Introduction The Fluke Ti200, Ti300, Ti400, and Ti450 Thermal Imagers (the Product or Imager) are handheld, infrared imaging cameras...
User Manual
Page 10
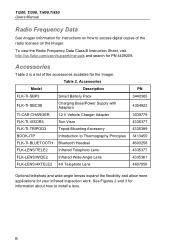
... allow more applications for PN 4409209. Table 2. Accessories Model Description FLK-TI-SBP3 Smart Battery Pack FLK-TI-SBC3B Charging Base/Power Supply with Adapters TI-CAR CHARGER 12 V Vehicle Charger Adapter FLK-TI-VISOR3 Sun Visor FLK-TI-TRIPOD3 Tripod Mounting Accessory BOOK-ITP Introduction to install a lens. 6 To view the Radio Frequency Data Class B Instruction Sheet, visit http://us.fluke.com/usen/support/manuals and search for your infrared inspection...
... allow more applications for PN 4409209. Table 2. Accessories Model Description FLK-TI-SBP3 Smart Battery Pack FLK-TI-SBC3B Charging Base/Power Supply with Adapters TI-CAR CHARGER 12 V Vehicle Charger Adapter FLK-TI-VISOR3 Sun Visor FLK-TI-TRIPOD3 Tripod Mounting Accessory BOOK-ITP Introduction to install a lens. 6 To view the Radio Frequency Data Class B Instruction Sheet, visit http://us.fluke.com/usen/support/manuals and search for your infrared inspection...

User Manual
Page 13
... outlet and connect the dc output to its maximum capacity. Specify the product name and language preference in sunlight. Battery Before you use the Imager for the first time, charge the battery for a minimum of the options that is supplied with the Imager or available from Fluke. To charge the battery, use or reliability of aftermarket memory cards of charger base. 3. Remove...
... outlet and connect the dc output to its maximum capacity. Specify the product name and language preference in sunlight. Battery Before you use the Imager for the first time, charge the battery for a minimum of the options that is supplied with the Imager or available from Fluke. To charge the battery, use or reliability of aftermarket memory cards of charger base. 3. Remove...

User Manual
Page 15
....fluke.com/downloads/smartview. Connect the output to install SmartView software. (Administrator privileges are available through SmartView software. The SmartView installer downloads automatically to analyze images, organize data and information, and make professional reports. You can use with SmartView. Charge until the indicator shows full on a PC. W Caution To prevent damage to review audio annotations and photos from the DC car charger before you start or jump start...
....fluke.com/downloads/smartview. Connect the output to install SmartView software. (Administrator privileges are available through SmartView software. The SmartView installer downloads automatically to analyze images, organize data and information, and make professional reports. You can use with SmartView. Charge until the indicator shows full on a PC. W Caution To prevent damage to review audio annotations and photos from the DC car charger before you start or jump start...
User Manual
Page 16
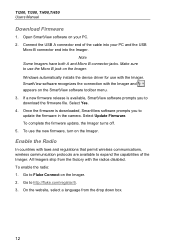
... sure to Fluke Connect on the SmartView software toolbar menu. 3. Select Yes. 4. To complete the firmware update, the Imager turns off. 5. To enable the radio: 1. Go to update the firmware in the camera. To use with laws and regulations that permit wireless communications, wireless communication protocols are available to download the firmware file. Enable the Radio In countries with the Imager. Windows automatically installs the device driver for use the new firmware, turn on...
... sure to Fluke Connect on the SmartView software toolbar menu. 3. Select Yes. 4. To complete the firmware update, the Imager turns off. 5. To enable the radio: 1. Go to update the firmware in the camera. To use with laws and regulations that permit wireless communications, wireless communication protocols are available to download the firmware file. Enable the Radio In countries with the Imager. Windows automatically installs the device driver for use the new firmware, turn on...
User Manual
Page 24
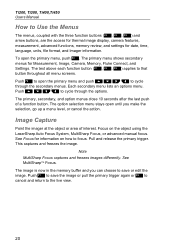
... each function button applies to Use the Menus The menus, coupled with the three function buttons and arrow buttons, are the access for thermal image display, camera features, measurement, advanced functions, memory review, and settings for Measurement, Image, Camera, Memory, Fluke Connect, and Settings. Push to focus. Pull and release the primary trigger. Ti200, Ti300, Ti400,Ti450 Users Manual How to that button throughout all menu screens.
... each function button applies to Use the Menus The menus, coupled with the three function buttons and arrow buttons, are the access for thermal image display, camera features, measurement, advanced functions, memory review, and settings for Measurement, Image, Camera, Memory, Fluke Connect, and Settings. Push to focus. Pull and release the primary trigger. Ti200, Ti300, Ti400,Ti450 Users Manual How to that button throughout all menu screens.
User Manual
Page 31
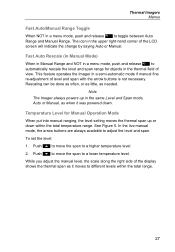
... the span to automatically rescale the level and span range for Manual Operation Mode When put into manual ranging, the level setting moves the thermal span up in a menu mode, push and release to adjust the level and span. To set the level: 1. Fast Auto Rescale (in Manual Mode) When in Manual Range and NOT in a menu mode, push and release to a lower temperature level. Note...
... the span to automatically rescale the level and span range for Manual Operation Mode When put into manual ranging, the level setting moves the thermal span up in a menu mode, push and release to adjust the level and span. To set the level: 1. Fast Auto Rescale (in Manual Mode) When in Manual Range and NOT in a menu mode, push and release to a lower temperature level. Note...
User Manual
Page 32
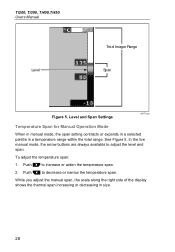
... for Manual Operation Mode When in manual mode, the span setting contracts or expands in a selected palette in size. 28 In the live manual mode, the arrow buttons are always available to increase or widen the temperature span. 2. While you adjust the manual span, the scale along the right side of the display shows the thermal span increasing or decreasing in a temperature range within...
... for Manual Operation Mode When in manual mode, the span setting contracts or expands in a selected palette in size. 28 In the live manual mode, the arrow buttons are always available to increase or widen the temperature span. 2. While you adjust the manual span, the scale along the right side of the display shows the thermal span increasing or decreasing in a temperature range within...

User Manual
Page 39
...potential problem might be customized or separated in -Picture (PIP) AutoBlend (PIP 25%, PIP 50%, PIP 75%, PIP 100%) Full AutoBlend (IR 25%, IR 50%, IR 75%, IR 100%). Push / to Measurement > Image > IR-Fusion. 2. Thermal Imagers Menus To change ...use the .is2 file format. Saturation Colors is an option that you use of an aligned visible image and infrared image. IR-Fusion technology has different modes: Picture-in SmartView and Fluke Connect Software when you can be , and then allows you to more effectively communicate it easier to set the new...
...potential problem might be customized or separated in -Picture (PIP) AutoBlend (PIP 25%, PIP 50%, PIP 75%, PIP 100%) Full AutoBlend (IR 25%, IR 50%, IR 75%, IR 100%). Push / to Measurement > Image > IR-Fusion. 2. Thermal Imagers Menus To change ...use the .is2 file format. Saturation Colors is an option that you use of an aligned visible image and infrared image. IR-Fusion technology has different modes: Picture-in SmartView and Fluke Connect Software when you can be , and then allows you to more effectively communicate it easier to set the new...

User Manual
Page 51
...; to highlight an option: • Name (SSID) to change the channel 5. The Fluke CNX system was replaced by Fluke Connect software in all regions). Thermal Imagers Menus 4. Enter a password if you can discover up to 10 3000 Series wireless tools up to use the camera. To turn the password on/off or to change the password • Channel to change the SSID • Password to turn on the Imager display.
...; to highlight an option: • Name (SSID) to change the channel 5. The Fluke CNX system was replaced by Fluke Connect software in all regions). Thermal Imagers Menus 4. Enter a password if you can discover up to 10 3000 Series wireless tools up to use the camera. To turn the password on/off or to change the password • Channel to change the SSID • Password to turn on the Imager display.
User Manual
Page 52
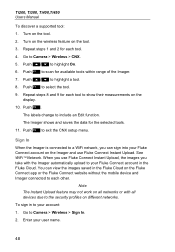
... not work on all networks or with the Imager automatically upload to Camera > Wireless > Sign In. 2. Ti200, Ti300, Ti400,Ti450 Users Manual To discover a supported tool: 1. Turn on the wireless feature on different networks. To sign in the Fluke Cloud on the Imager and use Fluke Connect Instant Upload, the images you can view the images saved in to Camera > Wireless > CNX. 5. Go to your Fluke Connect account on the Fluke Connect...
... not work on all networks or with the Imager automatically upload to Camera > Wireless > Sign In. 2. Ti200, Ti300, Ti400,Ti450 Users Manual To discover a supported tool: 1. Turn on the wireless feature on different networks. To sign in the Fluke Cloud on the Imager and use Fluke Connect Instant Upload, the images you can view the images saved in to Camera > Wireless > CNX. 5. Go to your Fluke Connect account on the Fluke Connect...

User Manual
Page 55
... SD card or USB storage device may not be available on the wireless tool starts to Fluke Connect Tools. 4. The Imager starts to save or edit. 7. Live streaming may not transfer to use the app. Go to www.flukeconnect.com for more information about how to the Fluke Connect app. 6. The Fluke Connect button on all devices. On the Imager, go to Menu > Fluke Connect > Pair to flash. Push...
... SD card or USB storage device may not be available on the wireless tool starts to Fluke Connect Tools. 4. The Imager starts to save or edit. 7. Live streaming may not transfer to use the app. Go to www.flukeconnect.com for more information about how to the Fluke Connect app. 6. The Fluke Connect button on all devices. On the Imager, go to Menu > Fluke Connect > Pair to flash. Push...

User Manual
Page 56
By default, the Imager shows and saves the data for user preferences such as model number, serial number, and firmware versions. Push to highlight the tool name. 2. Select Done. The display updates to show the wireless icon and live measurement for each tool. 9. Push / to set an option. 52 This menu also has a section that displays information about the Imager such as units of...
By default, the Imager shows and saves the data for user preferences such as model number, serial number, and firmware versions. Push to highlight the tool name. 2. Select Done. The display updates to show the wireless icon and live measurement for each tool. 9. Push / to set an option. 52 This menu also has a section that displays information about the Imager such as units of...

User Manual
Page 59
Push to highlight Set Date. 5. To set the time format: 2. Push to open the Set Date menu. 6. Push / to set a new format. 4. Push to a different language: 1. Push to Settings > Time. To set the time: 1. Go to set the time as AM or PM. 7. Push or to change the display to open the Set Time menu. 6. Time displays in two different formats: 24 hour...
Push to highlight Set Date. 5. To set the time format: 2. Push to open the Set Date menu. 6. Push / to set a new format. 4. Push to a different language: 1. Push to Settings > Time. To set the time: 1. Go to set the time as AM or PM. 7. Push or to change the display to open the Set Time menu. 6. Time displays in two different formats: 24 hour...

User Manual
Page 60
... model number, serial numbers, and firmware versions. 4. Reset Filename You can access information about the version, certifications, and licenses for the Imager from the Settings Menu. To display the Imager Info: 1. Push to a different 3-character name with the touch screen keyboard. You have the option to change the setting. 3. Factory Defaults Erases all user-set preferences and restores all of the factory default settings. Push to select the new...
... model number, serial numbers, and firmware versions. 4. Reset Filename You can access information about the version, certifications, and licenses for the Imager from the Settings Menu. To display the Imager Info: 1. Push to a different 3-character name with the touch screen keyboard. You have the option to change the setting. 3. Factory Defaults Erases all user-set preferences and restores all of the factory default settings. Push to select the new...
User Manual
Page 61
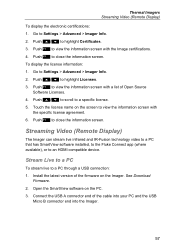
... view the information screen with a list of Open Source Software Licenses. 4. Push to Settings > Advanced > Imager Info. 2. Touch the license name on the screen to an HDMI compatible device. Streaming Video (Remote Display) The Imager can stream live to close the information screen. Install the latest version of the cable into your PC and the USB Micro B connector end into the Imager. 57 See Download Firmware. 2. Open the SmartView software...
... view the information screen with a list of Open Source Software Licenses. 4. Push to Settings > Advanced > Imager Info. 2. Touch the license name on the screen to an HDMI compatible device. Streaming Video (Remote Display) The Imager can stream live to close the information screen. Install the latest version of the cable into your PC and the USB Micro B connector end into the Imager. 57 See Download Firmware. 2. Open the SmartView software...

User Manual
Page 69
... or 5000 basic (.bmp, .jpg) files USB Storage Device USB port available (USB storage device not included) Note The addition of IR-PhotoNotes or other saved items can be stored in auto mode 3.0 °C (5.4 °F) Image Capture and Data Storage Image Capture, Review, Save Mechanism ........ Thermal Imagers Detailed Specifications Image Presentation Standard Palettes Blue-Red, Grayscale, Inverted Grayscale, High Contrast, Amber...
... or 5000 basic (.bmp, .jpg) files USB Storage Device USB port available (USB storage device not included) Note The addition of IR-PhotoNotes or other saved items can be stored in auto mode 3.0 °C (5.4 °F) Image Capture and Data Storage Image Capture, Review, Save Mechanism ........ Thermal Imagers Detailed Specifications Image Presentation Standard Palettes Blue-Red, Grayscale, Inverted Grayscale, High Contrast, Amber...


