

Product Manual
Page 5
... list options 83 Default template 87 Generate reports 89 Generate measurement reports 89 Report logo 90 Save report to USB drive 92 What is soft foot 94 Parallel soft foot 94 Angular soft foot 94 Checking and correcting soft foot conditions 95 Soft foot 96 Sensor measurement 96 Manual entry 98 Fluke 831│On-board help...
... list options 83 Default template 87 Generate reports 89 Generate measurement reports 89 Report logo 90 Save report to USB drive 92 What is soft foot 94 Parallel soft foot 94 Angular soft foot 94 Checking and correcting soft foot conditions 95 Soft foot 96 Sensor measurement 96 Manual entry 98 Fluke 831│On-board help...

Product Manual
Page 6
... Use Static measurement mode Vertical results Shimming modes Sign convention Live Move - Rugged touch device Technical data - sensALIGN 3 sensor Technical data - Vertical machines Correct angularity Correct offset sensALIGN 3 sensor firmware update Update sensor firmware to a newer version Notification on sensor calibration Best practice Mounting sensor and reflector Entering dimensions Initializing sensor Causes that may influence measurement Results and Live Move Appendix Update Fluke 831...
... Use Static measurement mode Vertical results Shimming modes Sign convention Live Move - Rugged touch device Technical data - sensALIGN 3 sensor Technical data - Vertical machines Correct angularity Correct offset sensALIGN 3 sensor firmware update Update sensor firmware to a newer version Notification on sensor calibration Best practice Mounting sensor and reflector Entering dimensions Initializing sensor Causes that may influence measurement Results and Live Move Appendix Update Fluke 831...

Product Manual
Page 7
... help . Context sensitive help provides information to this on -board help , image thumbnails have been used to the start page. l (3) Tap to go to support users of Fluke 831. l (5) Tap to go back. To zoom out and proceed, tap the enlarged image. l (6) Throughout this on -board help start screen. Tap the question mark icon provided on -board help The on the specific screen. l (4) Tap to search for...
... help . Context sensitive help provides information to this on -board help , image thumbnails have been used to the start page. l (3) Tap to go to support users of Fluke 831. l (5) Tap to go back. To zoom out and proceed, tap the enlarged image. l (6) Throughout this on -board help start screen. Tap the question mark icon provided on -board help The on the specific screen. l (4) Tap to search for...

Product Manual
Page 10
... hold down the power key until the device turns on . Additional apps cannot be installed in only landscape mode. Two hints appear on the device, press keys 1 and 4 simultaneously. On-board help l (1) Power key - Press and hold down button (refer to switch the rugged device on... strap - used to charge the rugged device or connect the tablet to restart device. To turn the device off, press and hold keys 1 and 4 simultaneously for Fluke products online at: www. .com 1.888.610.7664 l (2) Front camera l (3) Ambient light sensor l (4) Volume down the power key [1]. If ...
... hold down the power key until the device turns on . Additional apps cannot be installed in only landscape mode. Two hints appear on the device, press keys 1 and 4 simultaneously. On-board help l (1) Power key - Press and hold down button (refer to switch the rugged device on... strap - used to charge the rugged device or connect the tablet to restart device. To turn the device off, press and hold keys 1 and 4 simultaneously for Fluke products online at: www. .com 1.888.610.7664 l (2) Front camera l (3) Ambient light sensor l (4) Volume down the power key [1]. If ...

Product Manual
Page 12
... device and for connection to a PC. l Plug the USB C end (2) to USB A cable. l After fully charged, disconnect the charger from the rugged device, and then unplug the charger from the device or firmware update can be performed. How to the supplied USB charger. Use only the supplied charger and the related USB C to the rugged device's multipurpose connector. When connected to mains supply. l Connect the USB charger to a PC, data can be transferred...
... device and for connection to a PC. l Plug the USB C end (2) to USB A cable. l After fully charged, disconnect the charger from the rugged device, and then unplug the charger from the device or firmware update can be performed. How to the supplied USB charger. Use only the supplied charger and the related USB C to the rugged device's multipurpose connector. When connected to mains supply. l Connect the USB charger to a PC, data can be transferred...

Product Manual
Page 13
...; 7: Locking knob; 8: On/Off switch; 9: Micro USB port CAUTION Under no circumstances may the six housing torx head screws be removed, as the shafts are internally sealed, preventing possible contamination. The sensor is switched on its internal 3.7 V 5 Wh Lithium-ion rechargeable battery. The red LED lights when sensor is water and dust resistant (IP 65). The sensor is powered using...
...; 7: Locking knob; 8: On/Off switch; 9: Micro USB port CAUTION Under no circumstances may the six housing torx head screws be removed, as the shafts are internally sealed, preventing possible contamination. The sensor is switched on its internal 3.7 V 5 Wh Lithium-ion rechargeable battery. The red LED lights when sensor is water and dust resistant (IP 65). The sensor is powered using...

Product Manual
Page 14
... green during fast charge (0% - 90%) Blinks slowly green when charge is > 90% Lights steady green when charge is 100% Charging the sensor The sensor may be charged using mains supply is established blinks blue once then red three times (indicating laser emission). MyFlukeStore Shop for 1 second then continues to blink red Lights up blue for Fluke products online at: www. .com 1.888.610.7664...
... green during fast charge (0% - 90%) Blinks slowly green when charge is > 90% Lights steady green when charge is 100% Charging the sensor The sensor may be charged using mains supply is established blinks blue once then red three times (indicating laser emission). MyFlukeStore Shop for 1 second then continues to blink red Lights up blue for Fluke products online at: www. .com 1.888.610.7664...
Product Manual
Page 17
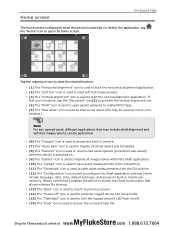
... templates. l (15) The "Flashlight" icon is used to turn the rugged device's LED flash on -board help The home screen is displayed when the device is used to start the related function: l (1) The "Horizontal alignment" icon is switched on . Tap the respective icon to resume last asset opened asset, different applications that allows wireless file sharing. Note For any opened...
... templates. l (15) The "Flashlight" icon is used to turn the rugged device's LED flash on -board help The home screen is displayed when the device is used to start the related function: l (1) The "Horizontal alignment" icon is switched on . Tap the respective icon to resume last asset opened asset, different applications that allows wireless file sharing. Note For any opened...
Product Manual
Page 18
... between screens is adjusted manually. used to set the number of length, angle and temperature; l "Default settings" is set . Other items set to obtain results. 3 - 5 points may be set here. adjusts the display brightness of the sleep mode, press the power key. If "Auto brightness is fast. > Auto brightness - The power modes available are required for Fluke products online at: www. .com 1.888.610.7664 If off , then the display brightness is set under "Default settings...
... between screens is adjusted manually. used to set the number of length, angle and temperature; l "Default settings" is set . Other items set to obtain results. 3 - 5 points may be set here. adjusts the display brightness of the sleep mode, press the power key. If "Auto brightness is fast. > Auto brightness - The power modes available are required for Fluke products online at: www. .com 1.888.610.7664 If off , then the display brightness is set under "Default settings...
Product Manual
Page 22
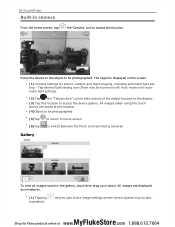
.... All images taken using the touch device are displayed as miniatures. returns user to be photographed l (5)Tap to return to switch between the front- and rear-facing cameras. The object is for indoor, outdoor and night imaging, including automatic light setting - On-board help Built-in the gallery, touch then drag up or down. Auto mode is displayed on /off; All...
.... All images taken using the touch device are displayed as miniatures. returns user to be photographed l (5)Tap to return to switch between the front- and rear-facing cameras. The object is for indoor, outdoor and night imaging, including automatic light setting - On-board help Built-in the gallery, touch then drag up or down. Auto mode is displayed on /off; All...
Product Manual
Page 32
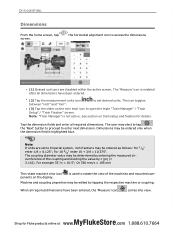
... horizontal alignment icon to rotate the view of the coupling and dividing the value by entering the measured cir- The 'Measure' icon is highlighted blue. Note: "Train Manager" is used to access the dimensions l (1) Grayed out icons are set desired units. For 10 3/8" enter 10 +... slider on the display. For example 33"/π = 10.5"; On-board help Dimensions From the home screen, tap screen. is not active. MyFlukeStore Shop for details. Note If units are disabled within the active screen. See section on train setup and fixation for Fluke products online at: www. ...
... horizontal alignment icon to rotate the view of the coupling and dividing the value by entering the measured cir- The 'Measure' icon is highlighted blue. Note: "Train Manager" is used to access the dimensions l (1) Grayed out icons are set desired units. For 10 3/8" enter 10 +... slider on the display. For example 33"/π = 10.5"; On-board help Dimensions From the home screen, tap screen. is not active. MyFlukeStore Shop for details. Note If units are disabled within the active screen. See section on train setup and fixation for Fluke products online at: www. ...
Product Manual
Page 34
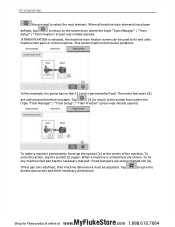
... [1] and is selected, the machine train fixation screen can be adjusted. If TRAIN FIXATION is permanently fixed. The motor feet pairs [2] are shown marked red [2]. Tap dimensions screen and enter necessary dimensions. On-board help the proceed to the screen from where the triple "Train Manager" / "Train Setup" / "Train Fixation" screen was initially opened . When all machine train elements...
... [1] and is selected, the machine train fixation screen can be adjusted. If TRAIN FIXATION is permanently fixed. The motor feet pairs [2] are shown marked red [2]. Tap dimensions screen and enter necessary dimensions. On-board help the proceed to the screen from where the triple "Train Manager" / "Train Setup" / "Train Fixation" screen was initially opened . When all machine train elements...

Product Manual
Page 38
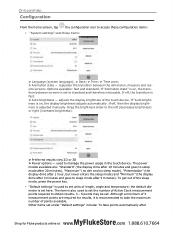
...is shown in orange [5]. Tap to return to calculate the thermal growth value for the selected feet pair. Tap to simultaneously display the calculated thermal growth value for Fluke products online at the top-right corner is shown. The three values are: l Ambient temperature (initial temperature...: www. .com 1.888.610.7664 Enter the three values [2] required to the thermal growth screen showing the calculated values. Use the onscreen keyboard [3] which comes into view when any one of the three value boxes [2] is tapped. On-board help Tap (1) and select machine material.
...is shown in orange [5]. Tap to return to calculate the thermal growth value for the selected feet pair. Tap to simultaneously display the calculated thermal growth value for Fluke products online at the top-right corner is shown. The three values are: l Ambient temperature (initial temperature...: www. .com 1.888.610.7664 Enter the three values [2] required to the thermal growth screen showing the calculated values. Use the onscreen keyboard [3] which comes into view when any one of the three value boxes [2] is tapped. On-board help Tap (1) and select machine material.

Product Manual
Page 53
... used to directly access the XY View screen. l Tap the shown detector area (1) to help XY View The XY View function is "OK" or "Centered". MyFlukeStore Shop for Fluke products online at which is shown when the reflector (3) is tapped. Use the adjustment knob and the adjustment thumbwheel to check the effect of the laser beam on the shaft and the sensor serial number...
... used to directly access the XY View screen. l Tap the shown detector area (1) to help XY View The XY View function is "OK" or "Centered". MyFlukeStore Shop for Fluke products online at which is shown when the reflector (3) is tapped. Use the adjustment knob and the adjustment thumbwheel to check the effect of the laser beam on the shaft and the sensor serial number...

Product Manual
Page 54
... values. displays serial number of sensors detected or previously used for Fluke products online at: www. .com 1.888.610.7664 Sensor properties - On-board help If the laser beam status is "OK" or "Centered" [1] tap "Set to zero" [2] to the absolute values. The rX,rY values are used to check the stability of connection used , as well as 0,0. Note: Shown menu items...
... values. displays serial number of sensors detected or previously used for Fluke products online at: www. .com 1.888.610.7664 Sensor properties - On-board help If the laser beam status is "OK" or "Centered" [1] tap "Set to zero" [2] to the absolute values. The rX,rY values are used to check the stability of connection used , as well as 0,0. Note: Shown menu items...

Product Manual
Page 56
...ellipse, vibration, rotation evenness, angular rotation inertia, direction of rotation, speed and filter output. On-board help Measurement Active Clock is the default measurement mode for horizontal machines, and Static Clock is the...default mode for Fluke products online at: www. .com 1.888.610.7664 The smaller the SD, the better the quality of measurement. Tap the related item to be averaged when readings are clustered around the average of the measurement may be necessary to increase the number of measurements (recorded laser pulses) to set average. tap the 'Averaging' button...
...ellipse, vibration, rotation evenness, angular rotation inertia, direction of rotation, speed and filter output. On-board help Measurement Active Clock is the default measurement mode for horizontal machines, and Static Clock is the...default mode for Fluke products online at: www. .com 1.888.610.7664 The smaller the SD, the better the quality of measurement. Tap the related item to be averaged when readings are clustered around the average of the measurement may be necessary to increase the number of measurements (recorded laser pulses) to set average. tap the 'Averaging' button...

Product Manual
Page 70
... affected by external circumstances such as 'broken ellipse'. MyFlukeStore Shop for Fluke products online at: www. .com 1.888.610.7664 Cutting the ellipse and laying it is possible to edit measurement data that is referred to Broken ellipse The deviation diagram used with the ...an ellipse. In this diagram points out of the rotating shafts. On-board help Edit measurement data To improve the quality of the alignment results, it out flat results in the measurement table screen, tap desired measurement (1) then tap access the measurement data screen. (2) to as bracketing...
... affected by external circumstances such as 'broken ellipse'. MyFlukeStore Shop for Fluke products online at: www. .com 1.888.610.7664 Cutting the ellipse and laying it is possible to edit measurement data that is referred to Broken ellipse The deviation diagram used with the ...an ellipse. In this diagram points out of the rotating shafts. On-board help Edit measurement data To improve the quality of the alignment results, it out flat results in the measurement table screen, tap desired measurement (1) then tap access the measurement data screen. (2) to as bracketing...

Product Manual
Page 109
... Shop for Fluke products online at: www. .com 1.888.610.7664 jackscrews) to perform offset corrections. Loosen the flange bolts then move machine l (3) Tolerance coded gap and offset coupling values l (4) Tap the 'Undo' icon to 6 direction). Tap to re-measure or start Live Move again. l (5) Tap the 'Proceed' icon to change the offset correction direction. l Corrections should...
... Shop for Fluke products online at: www. .com 1.888.610.7664 jackscrews) to perform offset corrections. Loosen the flange bolts then move machine l (3) Tolerance coded gap and offset coupling values l (4) Tap the 'Undo' icon to 6 direction). Tap to re-measure or start Live Move again. l (5) Tap the 'Proceed' icon to change the offset correction direction. l Corrections should...

Product Manual
Page 121
...: www. .com 1.888.610.7664 Resolution: 5.0 MP Environmental pro- Rugged touch device Fluke 831 rugged device CPU Processor: Exynos 9810, 2.7GHz,1.7GHz Octa-Core Memory: 4 GB RAM, 64 GB Flash memory Display Technology: TFT Resolution: 1920 x 1200 Pixel Size: 203.1 mm (8") Connectivity Wi-Fi: 802.11 a/b/g/n/ac/ax 2.4G+5GHz, HE80, MIMO, 1024-QAM Bluetooth Version: 5.0 RFID Camera Main Camera -
...: www. .com 1.888.610.7664 Resolution: 5.0 MP Environmental pro- Rugged touch device Fluke 831 rugged device CPU Processor: Exynos 9810, 2.7GHz,1.7GHz Octa-Core Memory: 4 GB RAM, 64 GB Flash memory Display Technology: TFT Resolution: 1920 x 1200 Pixel Size: 203.1 mm (8") Connectivity Wi-Fi: 802.11 a/b/g/n/ac/ax 2.4G+5GHz, HE80, MIMO, 1024-QAM Bluetooth Version: 5.0 RFID Camera Main Camera -

Product Manual
Page 122
.... 50, dated June 24, 2007. Coaxial, reflected laser beam ciple LED indicators 1 LED for laser beam status and battery status 1 LED for Bluetooth® communication Power supply Battery: Lithium-ion rechargeable battery 3.7 V / 5 Wh Operating time: 10 hours (continuous use) Charging time: Using charger - 2.5 h for up to 90%; 3.5 h for up to 100% Using USB port - 3 h for up to 90%; 4 h for up to 90% (non-condensing) Ambient light pro-
.... 50, dated June 24, 2007. Coaxial, reflected laser beam ciple LED indicators 1 LED for laser beam status and battery status 1 LED for Bluetooth® communication Power supply Battery: Lithium-ion rechargeable battery 3.7 V / 5 Wh Operating time: 10 hours (continuous use) Charging time: Using charger - 2.5 h for up to 90%; 3.5 h for up to 100% Using USB port - 3 h for up to 90%; 4 h for up to 90% (non-condensing) Ambient light pro-


