Quick Guide
Page 6
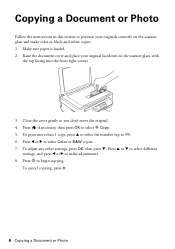
... the cover gently so you don't move the original. 4. Make sure paper is loaded. 2. Raise the document cover and place your originals correctly on the scanner glass, with the top facing into the front right corner. 3. Copying a Document or Photo Follow the instructions in this section to position your original facedown...
... the cover gently so you don't move the original. 4. Make sure paper is loaded. 2. Raise the document cover and place your originals correctly on the scanner glass, with the top facing into the front right corner. 3. Copying a Document or Photo Follow the instructions in this section to position your original facedown...
Quick Guide
Page 19
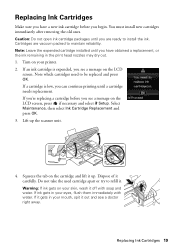
... can continue printing until you have a new ink cartridge before you see a message on the cartridge and lift it carefully. Dispose of it up the scanner unit. 4.
... can continue printing until you have a new ink cartridge before you see a message on the cartridge and lift it carefully. Dispose of it up the scanner unit. 4.
Quick Guide
Page 20
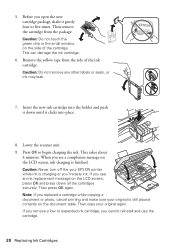
... small window on the document table. This can damage the ink cartridge. 6. Insert the new ink cartridge into place. 8. Then press OK again. Lower the scanner unit. 9. If you remove a low or expended ink cartridge, you open the new cartridge package, shake it clicks into the holder and push it down... cartridge from the side of the cartridge. Press OK to begin charging the ink. Caution: Never turn off the your original again. Then copy your EPSON printer while ink is still placed correctly on the side of the ink cartridge.
... small window on the document table. This can damage the ink cartridge. 6. Insert the new ink cartridge into place. 8. Then press OK again. Lower the scanner unit. 9. If you remove a low or expended ink cartridge, you open the new cartridge package, shake it clicks into the holder and push it down... cartridge from the side of the cartridge. Press OK to begin charging the ink. Caution: Never turn off the your original again. Then copy your EPSON printer while ink is still placed correctly on the side of the ink cartridge.
Quick Guide
Page 21
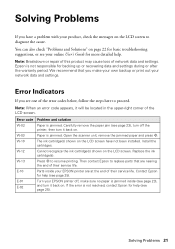
...is not responsible for help (see page 23), turn off , make your own backup or print out your EPSON printer off the printer, then turn it back on . Open the scanner unit, remove the jammed paper and press x. E-01 E-02 Turn your network data and settings. Error ...code Problem and solution W-02 Paper is jammed. E-10 Parts inside (see page 23), and turn it back on . Epson is not resolved, contact Epson for more detailed help...
...is not responsible for help (see page 23), turn off , make your own backup or print out your EPSON printer off the printer, then turn it back on . Open the scanner unit, remove the jammed paper and press x. E-01 E-02 Turn your network data and settings. Error ...code Problem and solution W-02 Paper is jammed. E-10 Parts inside (see page 23), and turn it back on . Epson is not resolved, contact Epson for more detailed help...
Quick Guide
Page 24
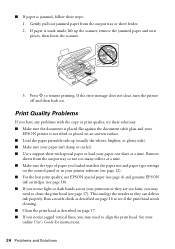
...described on . ■ If paper is jammed, follow these solutions: ■ Make sure the document is placed flat against the document table glass and your EPSON printer is stuck inside, lift up (usually the whiter, brighter, or glossy side). ■ Make sure your paper isn't damp or curled. ■ ... collect at a time. If paper is not tilted or placed on an uneven surface. ■ Load the paper printable side up the scanner, remove the jammed paper and torn pieces, then lower the scanner. 3. Press x to align the print head. Remove sheets from the output tray or sheet feeder. 2.
...described on . ■ If paper is jammed, follow these solutions: ■ Make sure the document is placed flat against the document table glass and your EPSON printer is stuck inside, lift up (usually the whiter, brighter, or glossy side). ■ Make sure your paper isn't damp or curled. ■ ... collect at a time. If paper is not tilted or placed on an uneven surface. ■ Load the paper printable side up the scanner, remove the jammed paper and torn pieces, then lower the scanner. 3. Press x to align the print head. Remove sheets from the output tray or sheet feeder. 2.
Quick Guide
Page 25
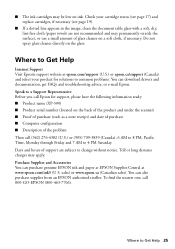
... drivers and documentation, get FAQs and troubleshooting advice, or e-mail Epson. You can also purchase supplies from an EPSON authorized reseller. Do not spray glass cleaner directly on the back of the product and under the scanner) ■ Proof of purchase (such as a store receipt) ...Pacific Time, Monday through Friday and 7 AM to a Support Representative Before you call Epson for solutions to Get Help 25 Check your product for support, please have the following information ready: ■ Product name (XP-300) ■ Product serial number (located on the glass. ■ The ink ...
... drivers and documentation, get FAQs and troubleshooting advice, or e-mail Epson. You can also purchase supplies from an EPSON authorized reseller. Do not spray glass cleaner directly on the back of the product and under the scanner) ■ Proof of purchase (such as a store receipt) ...Pacific Time, Monday through Friday and 7 AM to a Support Representative Before you call Epson for solutions to Get Help 25 Check your product for support, please have the following information ready: ■ Product name (XP-300) ■ Product serial number (located on the glass. ■ The ink ...
Quick Guide
Page 27
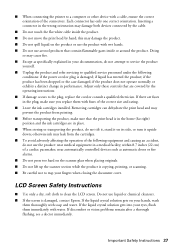
... cause fire. ■ Except as automatic doors or fire alarms. ■ Do not press too hard on the scanner glass when placing originals. ■ Do not lift up the scanner section while the product is in the home (far right) position and the ink cartridges are fuses in place. &#...white cable inside or around the product. within 8.7 inches (22 cm) of the following conditions: if the power cord or plug is damaged, contact Epson. near medical equipment in your hands, wash them immediately with wet hands. ■ Do not use the product: near automatically controlled devices such as...
... cause fire. ■ Except as automatic doors or fire alarms. ■ Do not press too hard on the scanner glass when placing originals. ■ Do not lift up the scanner section while the product is in the home (far right) position and the ink cartridges are fuses in place. &#...white cable inside or around the product. within 8.7 inches (22 cm) of the following conditions: if the power cord or plug is damaged, contact Epson. near medical equipment in your hands, wash them immediately with wet hands. ■ Do not use the product: near automatically controlled devices such as...

Start Here
Page 1
...information, see the online User's Guide. 3 Install ink cartridges Note: Don't load paper yet. 1 Lift up the scanner unit, and wait until it , then press OK. XP-300 Small-in the holder for Spanish speakers/Nota para hispanohablantes: Para obtener instrucciones de configuración en españ...;ol, consulte la Guía de instalación en www.epson.com/support/xp300sp (requiere una conexión a ...
...information, see the online User's Guide. 3 Install ink cartridges Note: Don't load paper yet. 1 Lift up the scanner unit, and wait until it , then press OK. XP-300 Small-in the holder for Spanish speakers/Nota para hispanohablantes: Para obtener instrucciones de configuración en españ...;ol, consulte la Guía de instalación en www.epson.com/support/xp300sp (requiere una conexión a ...

Start Here
Page 2
... feeder guard back. 3 Pull out the output tray, then raise the paper stopper. 4 Slide the edge guide to prime the ink delivery system. 5 Lower the scanner unit. 5 Load paper against the left . Note: The cartridges included with the printer are designed for priming, the rest is priming or you'll waste...
... feeder guard back. 3 Pull out the output tray, then raise the paper stopper. 4 Slide the edge guide to prime the ink delivery system. 5 Lower the scanner unit. 5 Load paper against the left . Note: The cartridges included with the printer are designed for priming, the rest is priming or you'll waste...
User Guide
Page 3
... Changing the Power Off Timer Setting - Top...17 Product Parts - Mac OS X 22 Epson Connect Solutions for Smartphones, Tablets, and More 23 Using Epson Email Print ...23 Using the Epson iPrint Mobile App 24 Using Google Cloud Print ...24 Loading Paper ...26 Loading Paper for Documents... ...32 Paper Loading Capacity ...35 Available EPSON Papers...35 Borderless Paper Type Compatibility 37 Paper or Media Type Settings ...38 Placing Originals on the Product ...39 Placing Originals on the Scanner Glass 39 3 Inside ...19 Product Parts - Contents XP-300 User's Guide...11 Product Basics ...12 ...
... Changing the Power Off Timer Setting - Top...17 Product Parts - Mac OS X 22 Epson Connect Solutions for Smartphones, Tablets, and More 23 Using Epson Email Print ...23 Using the Epson iPrint Mobile App 24 Using Google Cloud Print ...24 Loading Paper ...26 Loading Paper for Documents... ...32 Paper Loading Capacity ...35 Available EPSON Papers...35 Borderless Paper Type Compatibility 37 Paper or Media Type Settings ...38 Placing Originals on the Product ...39 Placing Originals on the Scanner Glass 39 3 Inside ...19 Product Parts - Contents XP-300 User's Guide...11 Product Basics ...12 ...
User Guide
Page 18
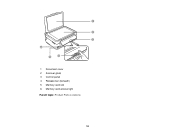
1 Document cover 2 Scanner glass 3 Control panel 4 Release bar (beneath) 5 Memory card slot 6 Memory card access light Parent topic: Product Parts Locations 18
1 Document cover 2 Scanner glass 3 Control panel 4 Release bar (beneath) 5 Memory card slot 6 Memory card access light Parent topic: Product Parts Locations 18
User Guide
Page 39
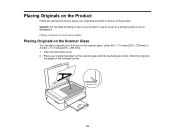
Placing Originals on the Product Follow the instructions here to place your original facedown on the scanner glass with the top facing as a writing surface to this size on top of the indicated corner. 39 Slide the original to the edges of ...your product or use its cover as shown. Open the document cover. 2. Caution: Do not place anything on the scanner glass: Letter (8.5 × 11 inches [216 × 279 mm]) or A4 (8.3 × 11.7 inches [210 × 297 mm]). 1. Place your original documents or photos on...
Placing Originals on the Product Follow the instructions here to place your original facedown on the scanner glass with the top facing as a writing surface to this size on top of the indicated corner. 39 Slide the original to the edges of ...your product or use its cover as shown. Open the document cover. 2. Caution: Do not place anything on the scanner glass: Letter (8.5 × 11 inches [216 × 279 mm]) or A4 (8.3 × 11.7 inches [210 × 297 mm]). 1. Place your original documents or photos on...
User Guide
Page 40
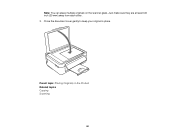
Close the document cover gently to keep your original in place. Parent topic: Placing Originals on the scanner glass. Just make sure they are at least 0.8 inch (20 mm) away from each other. 3. Note: You can place multiple originals on the Product Related topics Copying Scanning 40
Close the document cover gently to keep your original in place. Parent topic: Placing Originals on the scanner glass. Just make sure they are at least 0.8 inch (20 mm) away from each other. 3. Note: You can place multiple originals on the Product Related topics Copying Scanning 40
User Guide
Page 74
... > Event Manager. • Mac OS X: Open the Applications folder, click Epson Software, and click Event Manager. 2. Open the Edit Job Settings drop-down list and select your product, if necessary. 3. downloads or Canadian downloads). 74 Open the Scanner (Windows) or Select Scanner (Mac OS X) drop-down list and select the scan button settings...
... > Event Manager. • Mac OS X: Open the Applications folder, click Epson Software, and click Event Manager. 2. Open the Edit Job Settings drop-down list and select your product, if necessary. 3. downloads or Canadian downloads). 74 Open the Scanner (Windows) or Select Scanner (Mac OS X) drop-down list and select the scan button settings...
User Guide
Page 110
... PRINT Image Matching II (*.jpg or *.tif) File formats that include Epson PRINT Image Matching II data for enhanced quality and a wider color range (does not affect the way the image displays on the scanner glass, your product begins a preview scan. 110 Open image folder after... scanning If you can download and install Epson Scan scanning software. Epson Scan provides additional image adjustment and photo correction features for enhancing scanned...
... PRINT Image Matching II (*.jpg or *.tif) File formats that include Epson PRINT Image Matching II data for enhanced quality and a wider color range (does not affect the way the image displays on the scanner glass, your product begins a preview scan. 110 Open image folder after... scanning If you can download and install Epson Scan scanning software. Epson Scan provides additional image adjustment and photo correction features for enhancing scanned...
User Guide
Page 134
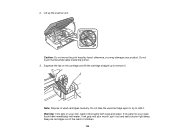
... water. Do not touch the flat white cable inside the printer. 3. Warning: If ink gets on the cartridge and lift the cartridge straight up the scanner unit. Lift up to refill it out and see a doctor right away. If ink gets into your skin, wash it . If ink gets into your...
... water. Do not touch the flat white cable inside the printer. 3. Warning: If ink gets on the cartridge and lift the cartridge straight up the scanner unit. Lift up to refill it out and see a doctor right away. If ink gets into your skin, wash it . If ink gets into your...
User Guide
Page 136
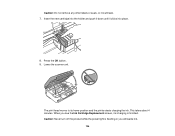
The print head moves to its home position and the printer starts charging the ink. Caution: Never turn off the product while the power light is flashing or you see the Ink Cartridge Replacement screen, ink charging is finished. Insert the new cartridge into the holder and push it down until it clicks into place. 8. This takes about 4 minutes. Lower the scanner unit. Press the OK button. 9. Caution: Do not remove any other labels or seals, or ink will waste ink. 136 When you will leak. 7.
The print head moves to its home position and the printer starts charging the ink. Caution: Never turn off the product while the power light is flashing or you see the Ink Cartridge Replacement screen, ink charging is finished. Insert the new cartridge into the holder and push it down until it clicks into place. 8. This takes about 4 minutes. Lower the scanner unit. Press the OK button. 9. Caution: Do not remove any other labels or seals, or ink will waste ink. 136 When you will leak. 7.

User Guide
Page 137
...cartridge before it is low or expended (if it is too old, for example). 1. Always store ink cartridges with the label facing up the scanner unit and press the ink cartridge down . do not touch the ink supply port or surrounding area. Do one of the following: • ... Select Print & Fax or Print & Scan, select your product, and select Open Print Queue. Parent topic: Replacing Ink Cartridges Related concepts Purchase Epson Ink Cartridges Replacing Ink Cartridges Using a Computer Utility You can use the Ink Cartridge Replacement utility to contain any excess ink, but do not store...
...cartridge before it is low or expended (if it is too old, for example). 1. Always store ink cartridges with the label facing up the scanner unit and press the ink cartridge down . do not touch the ink supply port or surrounding area. Do one of the following: • ... Select Print & Fax or Print & Scan, select your product, and select Open Print Queue. Parent topic: Replacing Ink Cartridges Related concepts Purchase Epson Ink Cartridges Replacing Ink Cartridges Using a Computer Utility You can use the Ink Cartridge Replacement utility to contain any excess ink, but do not store...

User Guide
Page 155
Parent topic: Adjusting Print Quality Related topics Copying 155 Repeat as necessary until the paper comes out clean. Use the product control panel to see if it is clean. 4. 2. Check the back of the ejected paper to make a copy, but without placing a document on the scanner glass. 3.
Parent topic: Adjusting Print Quality Related topics Copying 155 Repeat as necessary until the paper comes out clean. Use the product control panel to see if it is clean. 4. 2. Check the back of the ejected paper to make a copy, but without placing a document on the scanner glass. 3.
User Guide
Page 156
... Product If you need to protect it . 1. Caution: During transportation and storage, follow these sections if you should clean it . Disconnect any force. 6. Clean the scanner glass with a soft, lint-free cloth (microfiber is recommended), moistened with a soft, dry cloth. Clean the outer case and control panel with a little glass cleaner...
... Product If you need to protect it . 1. Caution: During transportation and storage, follow these sections if you should clean it . Disconnect any force. 6. Clean the scanner glass with a soft, lint-free cloth (microfiber is recommended), moistened with a soft, dry cloth. Clean the outer case and control panel with a little glass cleaner...


