Quick Guide
Page 9
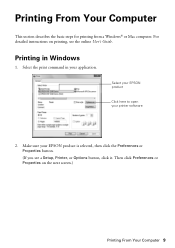
Select the print command in Windows 1. Make sure your application. Printing in your EPSON product is selected, then click the Preferences or Properties button. (If you see the online User's Guide. Select your EPSON product Click here to open your printer software 2. For detailed instructions on the next screen.) Printing From Your Computer 9 Then click Preferences or Properties on printing, see a Setup, Printer, or Options button, click it. Printing From Your Computer This section describes the basic steps for printing from a Windows® or Mac computer.
Select the print command in Windows 1. Make sure your application. Printing in your EPSON product is selected, then click the Preferences or Properties button. (If you see the online User's Guide. Select your EPSON product Click here to open your printer software 2. For detailed instructions on the next screen.) Printing From Your Computer 9 Then click Preferences or Properties on printing, see a Setup, Printer, or Options button, click it. Printing From Your Computer This section describes the basic steps for printing from a Windows® or Mac computer.
Quick Guide
Page 10
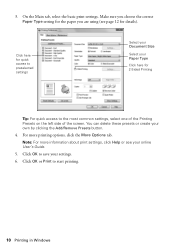
.... 6. For more information about print settings, click Help or see page 12 for 2-Sided Printing Tip: For quick access to start printing. 10 Printing in Windows Click OK or Print to the most common settings, select one of the Printing Presets on the left side of the screen. On the Main...
.... 6. For more information about print settings, click Help or see page 12 for 2-Sided Printing Tip: For quick access to start printing. 10 Printing in Windows Click OK or Print to the most common settings, select one of the Printing Presets on the left side of the screen. On the Main...

Quick Guide
Page 11
Select your EPSON product 3. You can also select a custom setting to expand the print window, if necessary. 4. Click the arrow or Show Details to create a custom paper size. Select basic copy and page settings. For borderless printing, choose a Paper Size ... settings Application settings Pop-up menu in your application from Mac OS X. 1. Select your EPSON product as the Printer setting. Note: If the setting you want isn't shown (for example, Scale), check for it in this window and check if the setting is available. Open the File menu and select Print. 2. Printing...
Select your EPSON product 3. You can also select a custom setting to expand the print window, if necessary. 4. Click the arrow or Show Details to create a custom paper size. Select basic copy and page settings. For borderless printing, choose a Paper Size ... settings Application settings Pop-up menu in your application from Mac OS X. 1. Select your EPSON product as the Printer setting. Note: If the setting you want isn't shown (for example, Scale), check for it in this window and check if the setting is available. Open the File menu and select Print. 2. Printing...
Quick Guide
Page 12
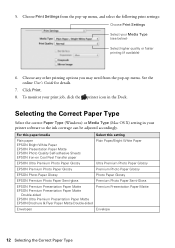
... EPSON Brochure & Flyer Paper Matte Double-sided Premium Presentation Paper Matte Envelopes Envelope 12 Selecting the Correct Paper Type Click Print. 8. To monitor your printer software so the ink coverage can be adjusted accordingly. 5. See the online User's Guide for details. 7. Selecting the Correct Paper Type Select the correct Paper Type (Windows...
... EPSON Brochure & Flyer Paper Matte Double-sided Premium Presentation Paper Matte Envelopes Envelope 12 Selecting the Correct Paper Type Click Print. 8. To monitor your printer software so the ink coverage can be adjusted accordingly. 5. See the online User's Guide for details. 7. Selecting the Correct Paper Type Select the correct Paper Type (Windows...

Quick Guide
Page 13
...You can use this feature, you must first set up WSD (Web Services for Devices) on the computer you have it automatically included in Windows 7 or Windows Vista® (English only). Quick Scanning With the Scan Button Use the u Scan button to PC automatically creates a JPG image and saves ..., but not web-based email such as shown on page 6. 2. Note: For detailed scanning instructions, see the online User's Guide. This works with EPSON Connect. ■ Scan to quickly scan a document or photo and save them on your computer. ideal for scanning documents. ■ Scan to PC ...
...You can use this feature, you must first set up WSD (Web Services for Devices) on the computer you have it automatically included in Windows 7 or Windows Vista® (English only). Quick Scanning With the Scan Button Use the u Scan button to PC automatically creates a JPG image and saves ..., but not web-based email such as shown on page 6. 2. Note: For detailed scanning instructions, see the online User's Guide. This works with EPSON Connect. ■ Scan to quickly scan a document or photo and save them on your computer. ideal for scanning documents. ■ Scan to PC ...

Quick Guide
Page 14
You can scan original documents and photos and save them as shown on your desktop. ■ Mac OS X 10.5: Double-click EPSON Scan in Applications > Epson Software. ■ To scan from any TWAINcompliant application. Then open the File menu, choose Import or Acquire, and select your original ...x Start button to start your product is connected by a USB cable, or select the name of your computer if your application. Scanning With EPSON Scan Software You can also launch EPSON Scan from an application, start EPSON Scan: ■ Windows: Double-click the EPSON Scan icon on page 6. 2.
You can scan original documents and photos and save them as shown on your desktop. ■ Mac OS X 10.5: Double-click EPSON Scan in Applications > Epson Software. ■ To scan from any TWAINcompliant application. Then open the File menu, choose Import or Acquire, and select your original ...x Start button to start your product is connected by a USB cable, or select the name of your computer if your application. Scanning With EPSON Scan Software You can also launch EPSON Scan from an application, start EPSON Scan: ■ Windows: Double-click the EPSON Scan icon on page 6. 2.
Quick Guide
Page 25
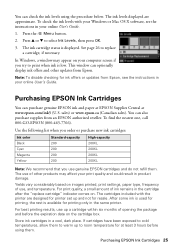
... the expiration date on . Press the x Menu button. 2. See page 26 to select Ink Levels, then press OK. 3. In Windows, a window may affect your online User's Guide. 1. This window can also purchase supplies from Epson. You can optionally display ink offers and other products may appear on images printed, print settings, paper type, frequency...
... the expiration date on . Press the x Menu button. 2. See page 26 to select Ink Levels, then press OK. 3. In Windows, a window may affect your online User's Guide. 1. This window can also purchase supplies from Epson. You can optionally display ink offers and other products may appear on images printed, print settings, paper type, frequency...
Quick Guide
Page 27
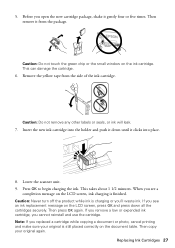
... off the product while ink is charging or you cannot reinstall and use the cartridge. Caution: Do not touch the green chip or the small window on the LCD screen, ink charging is still placed correctly on the LCD screen, press OK and press down until it clicks into place. 8. Caution...
... off the product while ink is charging or you cannot reinstall and use the cartridge. Caution: Do not touch the green chip or the small window on the LCD screen, ink charging is still placed correctly on the LCD screen, press OK and press down until it clicks into place. 8. Caution...
Quick Guide
Page 37
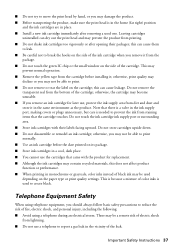
... a telephone during an electrical storm. Do not remove the transparent seal from the package. ■ Do not touch the green IC chip or the small window on the cartridge; Do not store cartridges upside down. ■ Do not disassemble or remodel an ink cartridge; otherwise, you may prevent the product from...
... a telephone during an electrical storm. Do not remove the transparent seal from the package. ■ Do not touch the green IC chip or the small window on the cartridge; Do not store cartridges upside down. ■ Do not disassemble or remodel an ink cartridge; otherwise, you may prevent the product from...

Start Here
Page 1
... press OK. 7 Press the number keys to select AM or PM, if necessary. 8 Press OK. WF-2540 Start Here Read these instructions before using the printer's control panel. Cartridges are ready to select it, then...de configuración en español, consulte la Guía de instalación en www.epson.com/support/wf2540sp (requiere una conexión a Internet). 1 Unpack French control panel stickers (included...Time is in effect; otherwise, select Winter. Caution: Don't touch the green chip or small window on 1 Connect the power cord to the back of the printer and to change the date ...
... press OK. 7 Press the number keys to select AM or PM, if necessary. 8 Press OK. WF-2540 Start Here Read these instructions before using the printer's control panel. Cartridges are ready to select it, then...de configuración en español, consulte la Guía de instalación en www.epson.com/support/wf2540sp (requiere una conexión a Internet). 1 Unpack French control panel stickers (included...Time is in effect; otherwise, select Winter. Caution: Don't touch the green chip or small window on 1 Connect the power cord to the back of the printer and to change the date ...
Start Here
Page 3
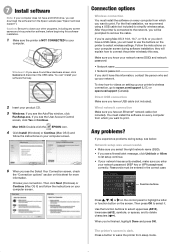
...the software on the control panel to wake the printer from which you can 't install your software that way. 2 Insert your product CD. 3 Windows: If you 're finished, highlight Done and press OK. Function buttons Press , , , or on every computer from sleep mode. When... has security enabled, make sure you don't have this sheet for more information. Any problems? Windows®: If you see "Epson technical support"). Mac OS X: Double-click the EPSON icon. 4 Click Install (Windows) or Continue (Mac OS X) and follow the instructions on setting up your network. Make sure...
...the software on the control panel to wake the printer from which you can 't install your software that way. 2 Insert your product CD. 3 Windows: If you 're finished, highlight Done and press OK. Function buttons Press , , , or on every computer from sleep mode. When... has security enabled, make sure you don't have this sheet for more information. Any problems? Windows®: If you see "Epson technical support"). Mac OS X: Double-click the EPSON icon. 4 Click Install (Windows) or Continue (Mac OS X) and follow the instructions on setting up your network. Make sure...
User Guide
Page 3
...Windows 24 Changing the Sleep Timer Setting - Contents WF-2540 User's Guide...13 Product Basics ...14 Setting Up the Control Panel ...14 Control Panel Buttons and Lights 14 Changing LCD Screen Language 15 Turning Off Control Panel Sounds 16 Product Parts Locations ...17 Product Parts - Inside ...21 Product Parts - Mac OS X 25 Epson... Loading Paper for Documents ...32 Loading Paper for Photos ...35 Loading Envelopes ...38 Paper Loading Capacity ...41 Available EPSON Papers...42 Borderless Paper Type Compatibility 43 3 Back...22 Scanning, Copying, and Faxing from the Control Panel 22 ...
...Windows 24 Changing the Sleep Timer Setting - Contents WF-2540 User's Guide...13 Product Basics ...14 Setting Up the Control Panel ...14 Control Panel Buttons and Lights 14 Changing LCD Screen Language 15 Turning Off Control Panel Sounds 16 Product Parts Locations ...17 Product Parts - Inside ...21 Product Parts - Mac OS X 25 Epson... Loading Paper for Documents ...32 Loading Paper for Photos ...35 Loading Envelopes ...38 Paper Loading Capacity ...41 Available EPSON Papers...42 Borderless Paper Type Compatibility 43 3 Back...22 Scanning, Copying, and Faxing from the Control Panel 22 ...
User Guide
Page 4
... Default Print Settings - Mac OS X 72 Print Quality Options - Windows 60 Selecting Double-sided Printing Settings - Windows 57 Print Quality Options - Windows 62 Selecting Additional Layout and Print Options - Mac OS X 77 Managing Color - Windows 60 Multi-Page Printing Options - Windows 62 Custom Color Correction Options - Windows 68 Changing the Language of the Printer Software Screens...
... Default Print Settings - Mac OS X 72 Print Quality Options - Windows 60 Selecting Double-sided Printing Settings - Windows 57 Print Quality Options - Windows 62 Selecting Additional Layout and Print Options - Mac OS X 77 Managing Color - Windows 60 Multi-Page Printing Options - Windows 62 Custom Color Correction Options - Windows 68 Changing the Language of the Printer Software Screens...
User Guide
Page 6
... the Product Control Panel 154 Creating Speed Dial List Entries 155 Printing Your Speed Dial List 157 Creating Group Dial List Entries 158 6 Windows 127 Scanning Using OCR - Windows 151 Setting Up Fax Features Using the Fax Utility - Mac OS X Image Capture 123 Scanning Special Projects...123 Scanning to a PDF File...123...
... the Product Control Panel 154 Creating Speed Dial List Entries 155 Printing Your Speed Dial List 157 Creating Group Dial List Entries 158 6 Windows 127 Scanning Using OCR - Windows 151 Setting Up Fax Features Using the Fax Utility - Mac OS X Image Capture 123 Scanning Special Projects...123 Scanning to a PDF File...123...
User Guide
Page 7
... Removing a USB Flash Drive...181 Transferring Files on the LCD Screen 184 Checking Cartridge Status with Windows 185 Checking Cartridge Status with Mac OS X 188 Purchase Epson Ink Cartridges...190 Ink Cartridge Part Numbers ...190 Removing and Installing Ink Cartridges 191 Replacing Ink Cartridges... Using a Computer Utility 197 Printing With Black Ink and Expended Color Cartridges 198 7 Windows 173 Sending Faxes Using the Fax...
... Removing a USB Flash Drive...181 Transferring Files on the LCD Screen 184 Checking Cartridge Status with Windows 185 Checking Cartridge Status with Mac OS X 188 Purchase Epson Ink Cartridges...190 Ink Cartridge Part Numbers ...190 Removing and Installing Ink Cartridges 191 Replacing Ink Cartridges... Using a Computer Utility 197 Printing With Black Ink and Expended Color Cartridges 198 7 Windows 173 Sending Faxes Using the Fax...
User Guide
Page 8
Mac OS X 199 Conserving Low Black Ink with Windows 201 Adjusting Print Quality...203 Print Head Maintenance...203 Print Head Nozzle Check...203 Checking the Nozzles Using the Product Control Panel 203 Checking the ... Cannot Connect to a Wireless Router or Access Point 229 Network Software Cannot Find Product on a Network 230 Product Does Not Appear in Mac OS X Printer Window 231 Cannot Print Over a Network...231 Cannot Scan Over a Network ...232 8 Windows 199 Printing With Expended Color Cartridges - Printing With Expended Color Cartridges -
Mac OS X 199 Conserving Low Black Ink with Windows 201 Adjusting Print Quality...203 Print Head Maintenance...203 Print Head Nozzle Check...203 Checking the Nozzles Using the Product Control Panel 203 Checking the ... Cannot Connect to a Wireless Router or Access Point 229 Network Software Cannot Find Product on a Network 230 Product Does Not Appear in Mac OS X Printer Window 231 Cannot Print Over a Network...231 Cannot Scan Over a Network ...232 8 Windows 199 Printing With Expended Color Cartridges - Printing With Expended Color Cartridges -

User Guide
Page 9
... in the Automatic Document Feeder 237 Paper Ejection Problems ...241 Solving Problems Printing from a Computer 241 Nothing Prints ...242 Product Icon Does Not Appear in Windows Taskbar 243 Error After Cartridge Replacement 243 Printing is Slow ...244 Solving Page Layout and Content Problems 245 Inverted Image...245 Too Many Copies Print... Printout or Printout Has Gaps 251 Grainy Printout...252 Incorrect Colors ...253 Solving Scanning Problems ...254 Scanning Software Does Not Operate Correctly 254 Cannot Start Epson Scan ...254 Solving Scanned Image Quality Problems 255 9
... in the Automatic Document Feeder 237 Paper Ejection Problems ...241 Solving Problems Printing from a Computer 241 Nothing Prints ...242 Product Icon Does Not Appear in Windows Taskbar 243 Error After Cartridge Replacement 243 Printing is Slow ...244 Solving Page Layout and Content Problems 245 Inverted Image...245 Too Many Copies Print... Printout or Printout Has Gaps 251 Grainy Printout...252 Incorrect Colors ...253 Solving Scanning Problems ...254 Scanning Software Does Not Operate Correctly 254 Cannot Start Epson Scan ...254 Solving Scanned Image Quality Problems 255 9

User Guide
Page 10
Windows 262 Uninstalling Product Software - Image Consists of a Few Dots Only 256 Line of Dots Appears in All Scanned Images 256 Straight Lines in an Image ... to Your Product 261 Cannot Transfer Files To or From a USB Flash Drive 261 When to Get Help...263 Technical Specifications ...265 EPEAT Registration ...265 Windows System Requirements ...266 Mac System Requirements ...266 Printing Specifications ...266 Scanning Specifications ...267 Automatic Document Feeder (ADF) Specifications 267 Fax Specifications ...268 Paper Specifications ...268...
Windows 262 Uninstalling Product Software - Image Consists of a Few Dots Only 256 Line of Dots Appears in All Scanned Images 256 Straight Lines in an Image ... to Your Product 261 Cannot Transfer Files To or From a USB Flash Drive 261 When to Get Help...263 Technical Specifications ...265 EPEAT Registration ...265 Windows System Requirements ...266 Mac System Requirements ...266 Printing Specifications ...266 Scanning Specifications ...267 Automatic Document Feeder (ADF) Specifications 267 Fax Specifications ...268 Paper Specifications ...268...
User Guide
Page 23
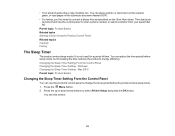
... can adjust the time period before the product enters sleep mode. 1. • Your product works like a copy machine too. Then load your speed dial list. Windows Changing the Sleep Timer Setting - You can use the product's control panel to enter a phone number or select a number from your document and use the...
... can adjust the time period before the product enters sleep mode. 1. • Your product works like a copy machine too. Then load your speed dial list. Windows Changing the Sleep Timer Setting - You can use the product's control panel to enter a phone number or select a number from your document and use the...
User Guide
Page 24
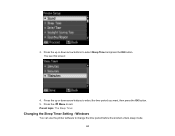
You see this screen: 4. Press the Menu to select the time period you want, then press the OK button. 5. Parent topic: The Sleep Timer Changing the Sleep Timer Setting - Press the up or down arrow buttons to exit. Press the up or down arrow buttons to change the time period before the product enters sleep mode. 24 3. Windows You can use the printer software to select Sleep Timer and press the OK button.
You see this screen: 4. Press the Menu to select the time period you want, then press the OK button. 5. Parent topic: The Sleep Timer Changing the Sleep Timer Setting - Press the up or down arrow buttons to exit. Press the up or down arrow buttons to change the time period before the product enters sleep mode. 24 3. Windows You can use the printer software to select Sleep Timer and press the OK button.


