
Brochure
Page 1
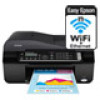
...your paper supply with ISO print speeds of the product4 Hassle-free • Easy wireless printing - speed dial storage up to 70% less power than laser printers5 • Save paper - one-year limited warranty; WorkForce® 520 Print | Copy | Scan | Fax | Wi-Fi® Engineered for the ...life of 15 ISO ppm (black) and 5.4 ISO ppm (color)† • High-speed faxing - Features and Benefits Fast • Get performance - get about 2x more prints with Easy Epson Wi-Fi2 •...
...your paper supply with ISO print speeds of the product4 Hassle-free • Easy wireless printing - speed dial storage up to 70% less power than laser printers5 • Save paper - one-year limited warranty; WorkForce® 520 Print | Copy | Scan | Fax | Wi-Fi® Engineered for the ...life of 15 ISO ppm (black) and 5.4 ISO ppm (color)† • High-speed faxing - Features and Benefits Fast • Get performance - get about 2x more prints with Easy Epson Wi-Fi2 •...
Brochure
Page 2
... 18.1" x 21.3" x 11.9" Storage: 18.1" x 15.9" x 9.3" Weight: 16.3 lb What's In The Box WorkForce 520 all rights in these marks. For details, see www.epson.com/cartridgeinfo 9 Display permanence based on -demand MicroPiezo® ink jet technology Epson ESC/P-R 5760 x 1440 optimized dpi Black 15 ISO ppm Color 5.4 ISO ppm 3 droplet sizes, as...options at $199 or less, as 3 sec per page Memory: Up to 180 pages Speed dials: 60 (max.) PC-Fax7 Hi-Speed USB 2.0 Wireless Wi-Fi (802.11 b/g/n2) Wired Ethernet (10/100 Mbps) Windows® 7, Windows Vista®, Windows XP, Windows XP x64, Mac6 OS...
... 18.1" x 21.3" x 11.9" Storage: 18.1" x 15.9" x 9.3" Weight: 16.3 lb What's In The Box WorkForce 520 all rights in these marks. For details, see www.epson.com/cartridgeinfo 9 Display permanence based on -demand MicroPiezo® ink jet technology Epson ESC/P-R 5760 x 1440 optimized dpi Black 15 ISO ppm Color 5.4 ISO ppm 3 droplet sizes, as...options at $199 or less, as 3 sec per page Memory: Up to 180 pages Speed dials: 60 (max.) PC-Fax7 Hi-Speed USB 2.0 Wireless Wi-Fi (802.11 b/g/n2) Wired Ethernet (10/100 Mbps) Windows® 7, Windows Vista®, Windows XP, Windows XP x64, Mac6 OS...

Quick Guide
Page 2
Contents Network Setup 4 Wireless Network Setup 4 Wired (Ethernet) Network Setup 18 Loading Paper 25 Using Special Papers 26 Placing Originals for Copying, Scanning, or Faxing 28 Using the Scanner ... 37 Sending a Fax From the Control Panel 39 Receiving Faxes 40 Scanning a Document or Photo 41 Quick Scanning With the Scan Button 41 Scanning With Epson Scan Software 42 Scanning With Mac OS X 10.6 43 2 Contents
Contents Network Setup 4 Wireless Network Setup 4 Wired (Ethernet) Network Setup 18 Loading Paper 25 Using Special Papers 26 Placing Originals for Copying, Scanning, or Faxing 28 Using the Scanner ... 37 Sending a Fax From the Control Panel 39 Receiving Faxes 40 Scanning a Document or Photo 41 Quick Scanning With the Scan Button 41 Scanning With Epson Scan Software 42 Scanning With Mac OS X 10.6 43 2 Contents
Quick Guide
Page 4
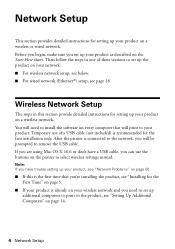
..., see below. ■ For wired network (Ethernet®) setup, see "Installing for the First Time" on page 5. ■ If your product is already on your wireless network and you will need to set up your product, see "Network Problems" on page 50. ■ If this is the first time that will... print to your product. After the printer is recommended for the first installation only. Wireless Network Setup The steps in one of a USB cable (not included) is connected to the network, you need to install the software on page 14...
..., see below. ■ For wired network (Ethernet®) setup, see "Installing for the First Time" on page 5. ■ If your product is already on your wireless network and you will need to set up your product, see "Network Problems" on page 50. ■ If this is the first time that will... print to your product. After the printer is recommended for the first installation only. Wireless Network Setup The steps in one of a USB cable (not included) is connected to the network, you need to install the software on page 14...

Quick Guide
Page 5
...that you have the following information ready and write it in the space provided below: ■ Network name (SSID Network password Note: If your wireless network. 1. If you see the Software Installation screen, continue with step 4. Windows® 7 and Windows Vista®: If you don't know...lowercase (abc) letters, be sure to note them correctly. When you see this screen, click Install. Wireless Network Setup 5 Insert the product software CD. 3. Mac OS® X: Double-click the Epson icon. 4. When you see the User Account Control screen, click Yes or Continue. Make sure your ...
...that you have the following information ready and write it in the space provided below: ■ Network name (SSID Network password Note: If your wireless network. 1. If you see the Software Installation screen, continue with step 4. Windows® 7 and Windows Vista®: If you don't know...lowercase (abc) letters, be sure to note them correctly. When you see this screen, click Install. Wireless Network Setup 5 Insert the product software CD. 3. Mac OS® X: Double-click the Epson icon. 4. When you see the User Account Control screen, click Yes or Continue. Make sure your ...
Quick Guide
Page 6
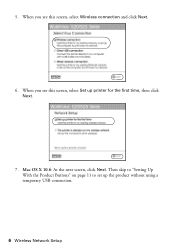
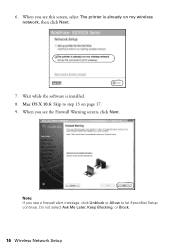
5. When you see this screen, select Set up the product without using a temporary USB connection. 6 Wireless Network Setup Mac OS X 10.6: At the next screen, click Next. When you see this screen, select Wireless connection and click Next. 6. Then skip to "Setting Up With the Product Buttons" on page 11 to set up printer for the first time, then click Next. 7.
5. When you see this screen, select Set up the product without using a temporary USB connection. 6 Wireless Network Setup Mac OS X 10.6: At the next screen, click Next. When you see this screen, select Wireless connection and click Next. 6. Then skip to "Setting Up With the Product Buttons" on page 11 to set up printer for the first time, then click Next. 7.
Quick Guide
Page 7
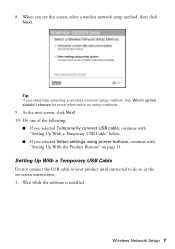
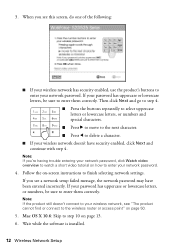
...Up With a Temporary USB Cable Do not connect the USB cable to your product until instructed to do so in the on setup methods. 9. Wireless Network Setup 7 Wait while the software is installed. At the next screen, click Next. 10. When you selected Select settings using printer buttons..., continue with "Setting Up With a Temporary USB Cable" below. ■ If you see this screen, select a wireless network setup method, then click Next. Do one of the following: ■ If you selected Temporarily connect USB cable, continue with "Setting Up With...
...Up With a Temporary USB Cable Do not connect the USB cable to your product until instructed to do so in the on setup methods. 9. Wireless Network Setup 7 Wait while the software is installed. At the next screen, click Next. 10. When you selected Select settings using printer buttons..., continue with "Setting Up With a Temporary USB Cable" below. ■ If you see this screen, select a wireless network setup method, then click Next. Do one of the following: ■ If you selected Temporarily connect USB cable, continue with "Setting Up With...
Quick Guide
Page 8
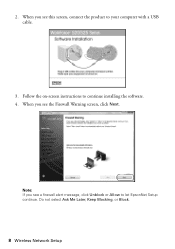
Note: If you see this screen, connect the product to your computer with a USB cable. 3. When you see the Firewall Warning screen, click Next. 2. Follow the on-screen instructions to let EpsonNet Setup continue. Do not select Ask Me Later, Keep Blocking, or Block. 8 Wireless Network Setup When you see a firewall alert message, click Unblock or Allow to continue installing the software. 4.
Note: If you see this screen, connect the product to your computer with a USB cable. 3. When you see the Firewall Warning screen, click Next. 2. Follow the on-screen instructions to let EpsonNet Setup continue. Do not select Ask Me Later, Keep Blocking, or Block. 8 Wireless Network Setup When you see a firewall alert message, click Unblock or Allow to continue installing the software. 4.
Quick Guide
Page 9
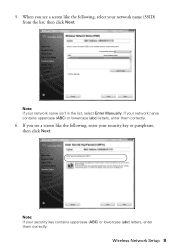
When you see a screen like the following , select your network name isn't in the list, select Enter Manually. If you see a screen like the following , enter your security key or passphrase, then click Next. If your security key contains uppercase (ABC) or lowercase (abc) letters, enter them correctly. 6. Wireless Network Setup 9 Note: If your network name contains uppercase (ABC) or lowercase (abc) letters, enter them correctly. 5. Note: If your network name (SSID) from the list, then click Next.
When you see a screen like the following , select your network name isn't in the list, select Enter Manually. If you see a screen like the following , enter your security key or passphrase, then click Next. If your security key contains uppercase (ABC) or lowercase (abc) letters, enter them correctly. 6. Wireless Network Setup 9 Note: If your network name contains uppercase (ABC) or lowercase (abc) letters, enter them correctly. 5. Note: If your network name (SSID) from the list, then click Next.
Quick Guide
Page 10
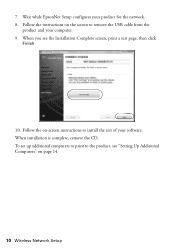
Wait while EpsonNet Setup configures your software. When you see "Setting Up Additional Computers" on -screen instructions to install the rest of your product for the network. 8. To set up additional computers to print to remove the USB cable from the product and your computer. 9. Follow the on page 14. 10 Wireless Network Setup When installation is complete, remove the CD. Follow the instructions on the screen to the product, see the Installation Complete screen, print a test page, then click Finish. 10. 7.
Wait while EpsonNet Setup configures your software. When you see "Setting Up Additional Computers" on -screen instructions to install the rest of your product for the network. 8. To set up additional computers to print to remove the USB cable from the product and your computer. 9. Follow the on page 14. 10 Wireless Network Setup When installation is complete, remove the CD. Follow the instructions on the screen to the product, see the Installation Complete screen, print a test page, then click Finish. 10. 7.

Quick Guide
Page 11
..., then press OK. When you 're finished, click Next. If your network name isn't listed, try the following: ■ Make sure that your wireless network, follow these steps to select the name of your router or access point is turned on the screen to select Other SSIDs, then press ...OK. Press u or d to start the product's wireless Setup Wizard. 2. Wireless Network Setup 11 When you see this screen, use the product's buttons to set it up using Mac OS X 10.6, or you still can...
..., then press OK. When you 're finished, click Next. If your network name isn't listed, try the following: ■ Make sure that your wireless network, follow these steps to select the name of your router or access point is turned on the screen to select Other SSIDs, then press ...OK. Press u or d to start the product's wireless Setup Wizard. 2. Wireless Network Setup 11 When you see this screen, use the product's buttons to set it up using Mac OS X 10.6, or you still can...
Quick Guide
Page 12
... network password, click Watch video overview to enter them correctly. Mac OS X 10.6: Skip to step 10 on -screen instructions to enter your wireless network doesn't have been entered incorrectly. Follow the on page 13. 6. When you see this screen, do one of the following: ■ If... your wireless network has security enabled, use the product's buttons to finish selecting network settings. If you see a network setup failed message, the network password...
... network password, click Watch video overview to enter them correctly. Mac OS X 10.6: Skip to step 10 on -screen instructions to enter your wireless network doesn't have been entered incorrectly. Follow the on page 13. 6. When you see this screen, do one of the following: ■ If... your wireless network has security enabled, use the product's buttons to finish selecting network settings. If you see a network setup failed message, the network password...
Quick Guide
Page 13
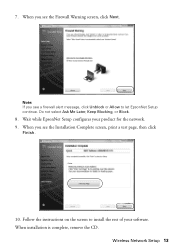
Wireless Network Setup 13 Do not select Ask Me Later, Keep Blocking, or Block. 8. When you see the Firewall Warning screen, click Next. Wait while EpsonNet Setup configures your software. When installation is complete, remove the CD. 7. Note: If you see the Installation Complete screen, print a test page, then click Finish. 10. Follow the instructions on the screen to let EpsonNet Setup continue. When you see a firewall alert message, click Unblock or Allow to install the rest of your product for the network. 9.
Wireless Network Setup 13 Do not select Ask Me Later, Keep Blocking, or Block. 8. When you see the Firewall Warning screen, click Next. Wait while EpsonNet Setup configures your software. When installation is complete, remove the CD. 7. Note: If you see the Installation Complete screen, print a test page, then click Finish. 10. Follow the instructions on the screen to let EpsonNet Setup continue. When you see a firewall alert message, click Unblock or Allow to install the rest of your product for the network. 9.
Quick Guide
Page 14
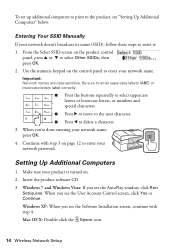
... CD. 3. When you 're done entering your network name, press OK. 4. When you see "Setting Up Additional Computers" below. Mac OS X: Double-click the Epson icon. 14 Wireless Network Setup Important: Network names are case-sensitive. Use the numeric keypad on the control panel to enter your product is turned on the...
... CD. 3. When you 're done entering your network name, press OK. 4. When you see "Setting Up Additional Computers" below. Mac OS X: Double-click the Epson icon. 14 Wireless Network Setup Important: Network names are case-sensitive. Use the numeric keypad on the control panel to enter your product is turned on the...

Quick Guide
Page 15
When you see this screen, click Install. 5. Wireless Network Setup 15 When you see this screen, select Wireless connection and click Next. 4.
When you see this screen, click Install. 5. Wireless Network Setup 15 When you see this screen, select Wireless connection and click Next. 4.
Quick Guide
Page 16
Mac OS X 10.6: Skip to let EpsonNet Setup continue. Note: If you see the Firewall Warning screen, click Next. When you see this screen, select The printer is installed. 8. Do not select Ask Me Later, Keep Blocking, or Block. 16 Wireless Network Setup When you see a firewall alert message, click Unblock or Allow to step 13 on my wireless network, then click Next. 7. Wait while the software is already on page 17. 9. 6.
Mac OS X 10.6: Skip to let EpsonNet Setup continue. Note: If you see the Firewall Warning screen, click Next. When you see this screen, select The printer is installed. 8. Do not select Ask Me Later, Keep Blocking, or Block. 16 Wireless Network Setup When you see a firewall alert message, click Unblock or Allow to step 13 on my wireless network, then click Next. 7. Wait while the software is already on page 17. 9. 6.

Quick Guide
Page 17
Follow the instructions on the screen to set up, then click Next. 11. When installation is complete, remove the CD. Wireless Network Setup 17 Wait while EpsonNet Setup configures your software. When you see a screen like this one, select the product you see the Installation Complete screen, print a test page, then click Finish. 13. If you would like to install the rest of your product for the network. 12. 10.
Follow the instructions on the screen to set up, then click Next. 11. When installation is complete, remove the CD. Wireless Network Setup 17 Wait while EpsonNet Setup configures your software. When you see a screen like this one, select the product you see the Installation Complete screen, print a test page, then click Finish. 13. If you would like to install the rest of your product for the network. 12. 10.
Quick Guide
Page 18
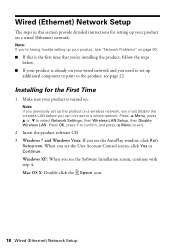
..., you must disable the wireless LAN before you can connect to set up your product on a wired (Ethernet) network. Make sure your product is already on your wired network and you need to a wired network. Mac OS X: Double-click the Epson icon. 18 Wired (Ethernet) Network Setup Press ...OK, press 1 to confirm, and press x Menu to select Network Settings, then Wireless LAN Setup, then Disable Wireless LAN. Windows XP: When you see the User Account Control screen, click...
..., you must disable the wireless LAN before you can connect to set up your product on a wired (Ethernet) network. Make sure your product is already on your wired network and you need to a wired network. Mac OS X: Double-click the Epson icon. 18 Wired (Ethernet) Network Setup Press ...OK, press 1 to confirm, and press x Menu to select Network Settings, then Wireless LAN Setup, then Disable Wireless LAN. Windows XP: When you see the User Account Control screen, click...
Quick Guide
Page 41
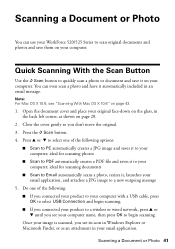
... With the Scan Button Use the u Scan button to quickly scan a photo or document and save them on your computer name, then press OK to a wireless or wired network, press u or d until you see its icon in Windows Explorer or Macintosh Finder, or as an attachment in your original face-down... Photo You can even scan a photo and have it automatically included in the back left corner, as shown on page 28. 2. You can use your WorkForce 520/525 Series to your computer. Press the u Scan button. 4.
... With the Scan Button Use the u Scan button to quickly scan a photo or document and save them on your computer name, then press OK to a wireless or wired network, press u or d until you see its icon in Windows Explorer or Macintosh Finder, or as an attachment in your original face-down... Photo You can even scan a photo and have it automatically included in the back left corner, as shown on page 28. 2. You can use your WorkForce 520/525 Series to your computer. Press the u Scan button. 4.

Quick Guide
Page 50
... if you will also need to contact Epson (see page 54) to replace ink pads and continue printing. Then see your router or access point's documentation for instructions. ■ If your computer or another device to your wireless network name. Network Problems The product cannot... (such as MAC address filtering) set , register the product's MAC address on manually entering your wireless network, the WEP key or WPA passphrase may have been entered incorrectly. Please contact Epson Support. Problem and solution When the ink pads are set on . 50 Problems and Solutions
... if you will also need to contact Epson (see page 54) to replace ink pads and continue printing. Then see your router or access point's documentation for instructions. ■ If your computer or another device to your wireless network name. Network Problems The product cannot... (such as MAC address filtering) set , register the product's MAC address on manually entering your wireless network, the WEP key or WPA passphrase may have been entered incorrectly. Please contact Epson Support. Problem and solution When the ink pads are set on . 50 Problems and Solutions


