Users Guide
Page 3
... - Full Auto Mode 39 Scanning in Office Mode...45 Selecting a Scan Area - Office Mode 47 3 Contents Perfection V550 Photo User's Guide...7 Scanner Basics...8 Scanner Parts Locations ...8 Scanner Parts...8 Scanner Buttons and Lights...12 Changing the Power Off Timer Setting 13 Placing Originals on the...Scanning ...28 Starting a Scan...28 Starting a Scan from a Scanner Button 28 Changing Default Scan Button Settings 30 Starting a Scan Using the Epson Scan Icon 31 Starting a Scan from a Scanning Program 32 Selecting Epson Scan Settings ...34 Scan Modes...35 Selecting the Scan Mode...35...
... - Full Auto Mode 39 Scanning in Office Mode...45 Selecting a Scan Area - Office Mode 47 3 Contents Perfection V550 Photo User's Guide...7 Scanner Basics...8 Scanner Parts Locations ...8 Scanner Parts...8 Scanner Buttons and Lights...12 Changing the Power Off Timer Setting 13 Placing Originals on the...Scanning ...28 Starting a Scan...28 Starting a Scan from a Scanner Button 28 Changing Default Scan Button Settings 30 Starting a Scan Using the Epson Scan Icon 31 Starting a Scan from a Scanning Program 32 Selecting Epson Scan Settings ...34 Scan Modes...35 Selecting the Scan Mode...35...
Users Guide
Page 4
...70 Uploading Scanned Images to a Web Folder 71 Uploading Scanned Images to Email 73 Saving Scanned Images to a PDF File Using a Scanner Button 81 Available Image Adjustments - Copy Utility 91 Source Type Settings - Scan to PDF Settings 86 Convert Scanned Documents to an Email ... Mode 52 Available Image Adjustments - Available Image Adjustments - Professional Mode 53 Selecting a Scan Size - Mac OS X 89 Using the Scanner as You Scan 76 Removing Dust and Scratch Marks Using DIGITAL ICE Technology 77 DIGITAL ICE Technology Specifications 78 Scanning to a PDF File...79...
...70 Uploading Scanned Images to a Web Folder 71 Uploading Scanned Images to Email 73 Saving Scanned Images to a PDF File Using a Scanner Button 81 Available Image Adjustments - Copy Utility 91 Source Type Settings - Scan to PDF Settings 86 Convert Scanned Documents to an Email ... Mode 52 Available Image Adjustments - Available Image Adjustments - Professional Mode 53 Selecting a Scan Size - Mac OS X 89 Using the Scanner as You Scan 76 Removing Dust and Scratch Marks Using DIGITAL ICE Technology 77 DIGITAL ICE Technology Specifications 78 Scanning to a PDF File...79...
Users Guide
Page 5
... - Cleaning and Transporting Your Scanner 95 Cleaning Your Scanner ...95 Transporting Your Scanner ...95 Solving Problems ...97 Scanner Light Status ...97 Solving Scanning Problems ...98 Scanner Does Not Turn On or Turns Off Unexpectedly 99 Scanner Buttons Do Not Work as Expected 99 Scanning Software Does Not Operate Correctly 99 Cannot Start Epson Scan ...100 Scanning is...
... - Cleaning and Transporting Your Scanner 95 Cleaning Your Scanner ...95 Transporting Your Scanner ...95 Solving Problems ...97 Scanner Light Status ...97 Solving Scanning Problems ...98 Scanner Does Not Turn On or Turns Off Unexpectedly 99 Scanner Buttons Do Not Work as Expected 99 Scanning Software Does Not Operate Correctly 99 Cannot Start Epson Scan ...100 Scanning is...
Users Guide
Page 8
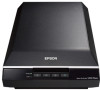
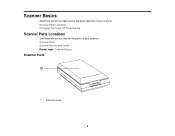
Scanner Parts Scanner Buttons and Lights Parent topic: Scanner Basics Scanner Parts 1 Scanner cover 8 Scanner Basics See these sections to learn about the basic features of your scanner. Scanner Parts Locations Changing the Power Off Timer Setting Scanner Parts Locations See these sections to identify the parts on your scanner.
Scanner Parts Scanner Buttons and Lights Parent topic: Scanner Basics Scanner Parts 1 Scanner cover 8 Scanner Basics See these sections to learn about the basic features of your scanner. Scanner Parts Locations Changing the Power Off Timer Setting Scanner Parts Locations See these sections to identify the parts on your scanner.
Users Guide
Page 11
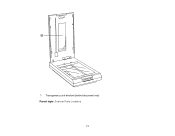
1 Transparency unit window (behind document mat) Parent topic: Scanner Parts Locations 11
1 Transparency unit window (behind document mat) Parent topic: Scanner Parts Locations 11
Users Guide
Page 12
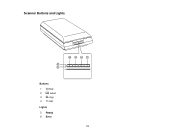
Scanner Buttons and Lights Buttons 1 PDF 2 email 3 copy 4 start Lights 5 Ready 6 Error 12
Scanner Buttons and Lights Buttons 1 PDF 2 email 3 copy 4 start Lights 5 Ready 6 Error 12
Users Guide
Page 13
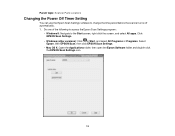
... and select All Programs or Programs. Select Epson, then EPSON Scan, then click EPSON Scan Settings. • Mac OS X: Open the Applications folder, then open the Epson Software folder and double-click the EPSON Scan Settings icon. 13 Parent topic: Scanner Parts Locations Changing the Power Off Timer Setting... You can use the Epson Scan Settings software to the Start screen, right-click the screen...
... and select All Programs or Programs. Select Epson, then EPSON Scan, then click EPSON Scan Settings. • Mac OS X: Open the Applications folder, then open the Epson Software folder and double-click the EPSON Scan Settings icon. 13 Parent topic: Scanner Parts Locations Changing the Power Off Timer Setting... You can use the Epson Scan Settings software to the Start screen, right-click the screen...
Users Guide
Page 14
Parent topic: Scanner Basics 14 Enter the time period you want before the scanner turns off automatically as the Power Off Timer setting. (To disable the Power Off Timer setting, enter 0 (zero).) 4. Click OK. Click Power Off Timer. 3. 2.
Parent topic: Scanner Basics 14 Enter the time period you want before the scanner turns off automatically as the Power Off Timer setting. (To disable the Power Off Timer setting, enter 0 (zero).) 4. Click OK. Click Power Off Timer. 3. 2.
Users Guide
Page 15
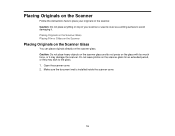
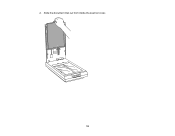
... place heavy objects on the scanner glass and do not press on the scanner glass. Make sure the document mat is installed inside the scanner cover. 15 Caution: Do not place anything on the scanner. Open the scanner cover. 2. Placing Originals on the Scanner Follow the instructions here to place... your originals on top of your scanner or use its cover as a writing surface ...
... place heavy objects on the scanner glass and do not press on the scanner glass. Make sure the document mat is installed inside the scanner cover. 15 Caution: Do not place anything on the scanner. Open the scanner cover. 2. Placing Originals on the Scanner Follow the instructions here to place... your originals on top of your scanner or use its cover as a writing surface ...
Users Guide
Page 16
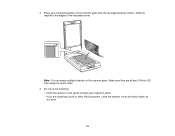
Slide the original to keep your original facedown on the scanner glass. Do one of the following: • Close the scanner cover gently to the edges of the indicated corner. 3. Make sure they are scanning a book or other . 4. Note: You can place multiple originals on the scanner glass with the top edge facing as you are at least 0.8 inch (20 mm) away from each other thick document, close the scanner cover and hold it down as shown. Place your original in place. • If you scan. 16
Slide the original to keep your original facedown on the scanner glass. Do one of the following: • Close the scanner cover gently to the edges of the indicated corner. 3. Make sure they are scanning a book or other . 4. Note: You can place multiple originals on the scanner glass with the top edge facing as you are at least 0.8 inch (20 mm) away from each other thick document, close the scanner cover and hold it down as shown. Place your original in place. • If you scan. 16
Users Guide
Page 17
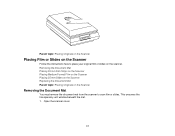
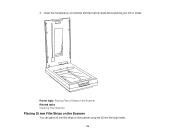
Removing the Document Mat Placing 35 mm Film Strips on the Scanner Placing Medium Format Film on the Scanner Placing 35 mm Slides on the Scanner Replacing the Document Mat Parent topic: Placing Originals on the Scanner Removing the Document Mat You must remove the document mat from the scanner to place your original film or slides on the Scanner Follow the instructions here to scan film or slides. Parent topic: Placing Originals on the Scanner Placing Film or Slides on the scanner. This uncovers the transparency unit window beneath the mat. 1. Open the scanner cover. 17
Removing the Document Mat Placing 35 mm Film Strips on the Scanner Placing Medium Format Film on the Scanner Placing 35 mm Slides on the Scanner Replacing the Document Mat Parent topic: Placing Originals on the Scanner Removing the Document Mat You must remove the document mat from the scanner to place your original film or slides on the Scanner Follow the instructions here to scan film or slides. Parent topic: Placing Originals on the Scanner Placing Film or Slides on the scanner. This uncovers the transparency unit window beneath the mat. 1. Open the scanner cover. 17
Users Guide
Page 18
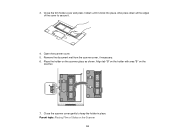
2. Slide the document mat out from inside the scanner cover. 18
2. Slide the document mat out from inside the scanner cover. 18
Users Guide
Page 19
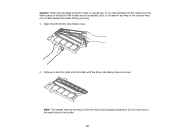
Clean the transparency unit window and the scanner glass before placing your film or slides. Parent topic: Placing Film or Slides on the Scanner Related tasks Cleaning Your Scanner Placing 35 mm Film Strips on the Scanner You can place 35 mm film strips on the scanner using the 35 mm film strip holder. 19 3.
Clean the transparency unit window and the scanner glass before placing your film or slides. Parent topic: Placing Film or Slides on the Scanner Related tasks Cleaning Your Scanner Placing 35 mm Film Strips on the Scanner You can place 35 mm film strips on the scanner using the 35 mm film strip holder. 19 3.
Users Guide
Page 20
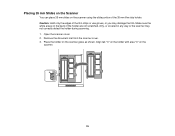
Slide up to two film strips into the holder with the shiny side facing down as shown. Caution: Hold only the edges of the small holes in any way or the scanner may damage the film. Open the 35 mm film strip holder cover. 2. Note: The images and any of the film strips or use gloves, or you may not correctly detect the holder during scanning. 1. Make sure the white areas on the film strips should appear backward. Do not cover any wording on the back of the holder are not scratched, dirty, or covered in the holder. 20
Slide up to two film strips into the holder with the shiny side facing down as shown. Caution: Hold only the edges of the small holes in any way or the scanner may damage the film. Open the 35 mm film strip holder cover. 2. Note: The images and any of the film strips or use gloves, or you may not correctly detect the holder during scanning. 1. Make sure the white areas on the film strips should appear backward. Do not cover any wording on the back of the holder are not scratched, dirty, or covered in the holder. 20
Users Guide
Page 21
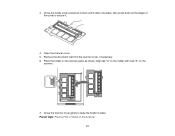
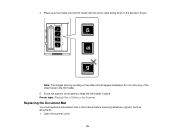
Place the holder on the Scanner 21 Close the scanner cover gently to secure it clicks into place. Open the scanner cover. 5. Parent topic: Placing Film or Slides on the scanner glass as shown. Also press down until it . 4. Align tab "A" on the holder with area "A" on the scanner. 7. Close the holder cover and press it down all the edges of the cover to keep the holder in place. Remove the document mat from the scanner cover, if necessary. 6. 3.
Place the holder on the Scanner 21 Close the scanner cover gently to secure it clicks into place. Open the scanner cover. 5. Parent topic: Placing Film or Slides on the scanner glass as shown. Also press down until it . 4. Align tab "A" on the holder with area "A" on the scanner. 7. Close the holder cover and press it down all the edges of the cover to keep the holder in place. Remove the document mat from the scanner cover, if necessary. 6. 3.
Users Guide
Page 22
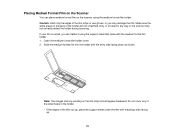
... medium format film holder cover. 2. If your film is curled, you may not correctly detect the holder during scanning. Placing Medium Format Film on the Scanner You can flatten it using the medium format film holder. Caution: Hold only the edges of the film strips or use gloves, or you can... place medium format film on the scanner using the support sheet that came with the medium format film holder. 1. Slide the medium format film into the holder with the glossy side facing...
... medium format film holder cover. 2. If your film is curled, you may not correctly detect the holder during scanning. Placing Medium Format Film on the Scanner You can flatten it using the medium format film holder. Caution: Hold only the edges of the film strips or use gloves, or you can... place medium format film on the scanner using the support sheet that came with the medium format film holder. 1. Slide the medium format film into the holder with the glossy side facing...
Users Guide
Page 24
Parent topic: Placing Film or Slides on the scanner glass as shown. 3. Open the scanner cover. 5. Place the holder on the Scanner 24 Remove the document mat from the scanner cover, if necessary. 6. Also press down until it clicks into place. Align tab "B" on the holder with area "B" on the scanner. 7. Close the film holder cover and press it . 4. Close the scanner cover gently to secure it down all the edges of the cover to keep the holder in place.
Parent topic: Placing Film or Slides on the scanner glass as shown. 3. Open the scanner cover. 5. Place the holder on the Scanner 24 Remove the document mat from the scanner cover, if necessary. 6. Also press down until it clicks into place. Align tab "B" on the holder with area "B" on the scanner. 7. Close the film holder cover and press it . 4. Close the scanner cover gently to secure it down all the edges of the cover to keep the holder in place.
Users Guide
Page 25
... dirty, or covered in any way or the scanner may damage the film. Remove the document mat from the scanner cover. 3. Align tab "C" on the holder with area "C" on the scanner glass as shown. Place the holder on the scanner. 25 Open the scanner cover. 2. Make sure the white areas on ...the scanner using the slide portion of the 35 mm film ...
... dirty, or covered in any way or the scanner may damage the film. Remove the document mat from the scanner cover. 3. Align tab "C" on the holder with area "C" on the scanner glass as shown. Place the holder on the scanner. 25 Open the scanner cover. 2. Make sure the white areas on ...the scanner using the slide portion of the 35 mm film ...
Users Guide
Page 26
4. Note: The images and any of the small holes in place. Parent topic: Placing Film or Slides on the slides should appear backward. Close the scanner cover gently to four slides into the film holder with the shiny sides facing down in the scanner before scanning reflective originals, such as documents. 1. Open the scanner cover. 26 Do not cover any wording on the Scanner Replacing the Document Mat You must replace the document mat in the direction shown. Place up to keep the film holder in the film holder. 5.
4. Note: The images and any of the small holes in place. Parent topic: Placing Film or Slides on the slides should appear backward. Close the scanner cover gently to four slides into the film holder with the shiny sides facing down in the scanner before scanning reflective originals, such as documents. 1. Open the scanner cover. 26 Do not cover any wording on the Scanner Replacing the Document Mat You must replace the document mat in the direction shown. Place up to keep the film holder in the film holder. 5.
Users Guide
Page 27
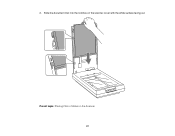
2. Parent topic: Placing Film or Slides on the scanner cover with the white surface facing out. Slide the document mat into the notches on the Scanner 27
2. Parent topic: Placing Film or Slides on the scanner cover with the white surface facing out. Slide the document mat into the notches on the Scanner 27

