Technical Reference
Page 14
.../U210/U300 Appendix B How to Install the Printer on a Wall with the WH-10 B.1 The Procedure B-1 B.1.1 Precautions B-1 B.1.2 Unpacking B-2 B.1.3 Installation B-2 B.1.3.1 Installing the wall-mount B-3 B.1.4 Affixing the operation panel sheet B-3 B.1.5 Changing the roll-paper detector position B-3 B.1.6 Installing the brackets B-8 B.1.7 Mounting the printer on the wall B-9 B.2 Exterior Overviews B-10 B.2.1 TM-U220 (Type B B-10 B.2.2 TM-U220 (Type D B-11 Appendix C Character Code Table C.1 Page...
.../U210/U300 Appendix B How to Install the Printer on a Wall with the WH-10 B.1 The Procedure B-1 B.1.1 Precautions B-1 B.1.2 Unpacking B-2 B.1.3 Installation B-2 B.1.3.1 Installing the wall-mount B-3 B.1.4 Affixing the operation panel sheet B-3 B.1.5 Changing the roll-paper detector position B-3 B.1.6 Installing the brackets B-8 B.1.7 Mounting the printer on the wall B-9 B.2 Exterior Overviews B-10 B.2.1 TM-U220 (Type B B-10 B.2.2 TM-U220 (Type D B-11 Appendix C Character Code Table C.1 Page...

Technical Reference
Page 126
... other TM printer series. This may be sure that it contains all of the printer. B.1.3 Installation Before installation, be removed with the WH-10 Rev. B-2 How to the printer is turned off. If any parts are packed for brackets (3×12) (4 pieces) screws (3×10) screws (3×6) (5 pieces) Note: 4 of the wall-mount or brackets. wall-mount (note...
... other TM printer series. This may be sure that it contains all of the printer. B.1.3 Installation Before installation, be removed with the WH-10 Rev. B-2 How to the printer is turned off. If any parts are packed for brackets (3×12) (4 pieces) screws (3×10) screws (3×6) (5 pieces) Note: 4 of the wall-mount or brackets. wall-mount (note...

Technical Reference
Page 127
... panel sheet with 4 mm diameter and length of 12 mm or more . B.1.3.1 Installing the wall-mount TM-U220 Technical Reference Guide CAUTION: The weight of the printer is recommended. These screws are used . 1. Open the roll paper cover. A screw with ...Two types of the ten holes. A Attach the wall-mount to the wall in the position illustrated to step 3 Rev. For a model that the wall-mount can properly support the weight of the printer, please secure it with screws appropriate to the wall with ten screws. Be sure to fasten the wall-mount securely to the type of wall...
... panel sheet with 4 mm diameter and length of 12 mm or more . B.1.3.1 Installing the wall-mount TM-U220 Technical Reference Guide CAUTION: The weight of the printer is recommended. These screws are used . 1. Open the roll paper cover. A screw with ...Two types of the ten holes. A Attach the wall-mount to the wall in the position illustrated to step 3 Rev. For a model that the wall-mount can properly support the weight of the printer, please secure it with screws appropriate to the wall with ten screws. Be sure to fasten the wall-mount securely to the type of wall...
Technical Reference
Page 133
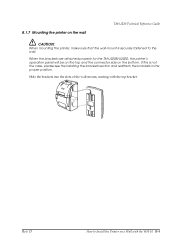
...-10 B-9 When the brackets are attached properly for the TM-U220B/U220D, the printer's operation panel will be on the top and the connector side on a Wall with the top bracket. B.1.7 Mounting the printer on the wall TM-U220 Technical Reference Guide CAUTION: When mounting the printer, make sure that the wall-mount is not the case, please see the installing the...
...-10 B-9 When the brackets are attached properly for the TM-U220B/U220D, the printer's operation panel will be on the top and the connector side on a Wall with the top bracket. B.1.7 Mounting the printer on the wall TM-U220 Technical Reference Guide CAUTION: When mounting the printer, make sure that the wall-mount is not the case, please see the installing the...