User Manual
Page 3
... SEIKO EPSON Corporation could void your authority to correct the interference at his own expense. Operation of this printer will be liable against harmful interference when the equipment is operated in which case the user will invalidate the EMC standards of the FCC Rules. TM-U200 Series User's... of the information contained herein. Copyright © 2001 by any form or by Seiko Epson Corporation, Nagano, Japan. EMC and Safety Standards Applied Printer Product Name: TM-U200A/TM-U200B/TM-U200D Model Name: M119A/M119B/M119D The following standards are applied only to the AC ...
... SEIKO EPSON Corporation could void your authority to correct the interference at his own expense. Operation of this printer will be liable against harmful interference when the equipment is operated in which case the user will invalidate the EMC standards of the FCC Rules. TM-U200 Series User's... of the information contained herein. Copyright © 2001 by any form or by Seiko Epson Corporation, Nagano, Japan. EMC and Safety Standards Applied Printer Product Name: TM-U200A/TM-U200B/TM-U200D Model Name: M119A/M119B/M119D The following standards are applied only to the AC ...
User Manual
Page 4
Immediately unplug the equipment and contact your equipment immediately if it unused for an extended period. 2 TM-U200 Series User's Manual Tampering with this manual. Connection to an improper power source may lead to fire. Do not allow foreign matter to fall ... result in an accessible location. Be sure to set this equipment, unplug the power cord immediately, and then contact your dealer or a SEIKO EPSON service center for advice. To ensure safety, unplug this product. Different connections may lead to fire. English Safety Precautions This section presents important information...
Immediately unplug the equipment and contact your equipment immediately if it unused for an extended period. 2 TM-U200 Series User's Manual Tampering with this manual. Connection to an improper power source may lead to fire. Do not allow foreign matter to fall ... result in an accessible location. Be sure to set this equipment, unplug the power cord immediately, and then contact your dealer or a SEIKO EPSON service center for advice. To ensure safety, unplug this product. Different connections may lead to fire. English Safety Precautions This section presents important information...
User Manual
Page 5
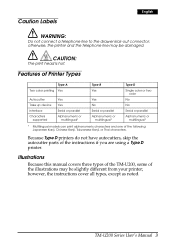
... print alphanumeric characters and one of the instructions if you are using a Type D printer. Illustrations Because this manual covers three types of the TM-U200, some of the illustrations may be slightly different from your printer; TM-U200 Series User's Manual 3 Because Type D printers do not have autocutters, skip the autocutter parts of the following: Japanese Kanji, Chinese...
... print alphanumeric characters and one of the instructions if you are using a Type D printer. Illustrations Because this manual covers three types of the TM-U200, some of the illustrations may be slightly different from your printer; TM-U200 Series User's Manual 3 Because Type D printers do not have autocutters, skip the autocutter parts of the following: Japanese Kanji, Chinese...
User Manual
Page 6
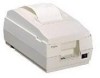
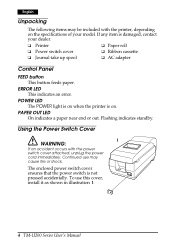
... following items may cause fire or shock. The enclosed power switch cover ensures that the power switch is on the specifications of your dealer. ❏ Printer ❑ Paper roll ❏ Power switch cover ❑ Ribbon cassette ❏ Journal take up spool ❑ AC adapter Control Panel FEED button ...This button feeds paper. ERROR LED This indicates an error. POWER LED The POWER light is on when the printer is not pressed accidentally. Continued use this cover, install it as shown in illustration 1. 4 TM-U200 Series User's Manual
... following items may cause fire or shock. The enclosed power switch cover ensures that the power switch is on the specifications of your dealer. ❏ Printer ❑ Paper roll ❏ Power switch cover ❑ Ribbon cassette ❏ Journal take up spool ❑ AC adapter Control Panel FEED button ...This button feeds paper. ERROR LED This indicates an error. POWER LED The POWER light is on when the printer is not pressed accidentally. Continued use this cover, install it as shown in illustration 1. 4 TM-U200 Series User's Manual
User Manual
Page 7
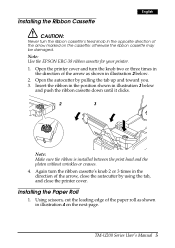
... the Paper Roll 1. Open the autocutter by using the tab, and close the autocutter by pulling the tab up and toward you. 3. TM-U200 Series User's Manual 5 Installing the Ribbon Cassette English CAUTION: Never turn the ribbon cassette's feed knob in the opposite direction of the paper roll...ribbon in the position shown in the direction of the arrow, close the printer cover. Note: Use the EPSON ERC-38 ribbon cassette for your printer. 1. Again turn the knob two or three times in illustration 3 below . 2. Open the printer cover and turn the ribbon cassette's knob 2 or 3 times in ...
... the Paper Roll 1. Open the autocutter by using the tab, and close the autocutter by pulling the tab up and toward you. 3. TM-U200 Series User's Manual 5 Installing the Ribbon Cassette English CAUTION: Never turn the ribbon cassette's feed knob in the opposite direction of the paper roll...ribbon in the position shown in the direction of the arrow, close the printer cover. Note: Use the EPSON ERC-38 ribbon cassette for your printer. 1. Again turn the knob two or three times in illustration 3 below . 2. Open the printer cover and turn the ribbon cassette's knob 2 or 3 times in ...
User Manual
Page 8
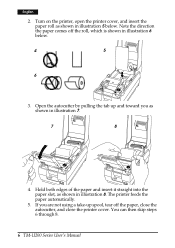
..., and insert the paper roll as shown in illustration 6 below . You can then skip steps 6 through 8. 6 TM-U200 Series User's Manual English 2. Note the direction the paper comes off the paper, close the autocutter, and close the printer cover. Hold both edges of the paper and insert it straight into the paper slot, as... by pulling the tab up and toward you are not using a take-up spool, tear off the roll, which is shown in illustration 5 below . 4 5 6 3. The printer feeds the paper automatically. 5. If you as shown in illustration 7. 7 8 4.
..., and insert the paper roll as shown in illustration 6 below . You can then skip steps 6 through 8. 6 TM-U200 Series User's Manual English 2. Note the direction the paper comes off the paper, close the autocutter, and close the printer cover. Hold both edges of the paper and insert it straight into the paper slot, as... by pulling the tab up and toward you are not using a take-up spool, tear off the roll, which is shown in illustration 5 below . 4 5 6 3. The printer feeds the paper automatically. 5. If you as shown in illustration 7. 7 8 4.
User Manual
Page 9
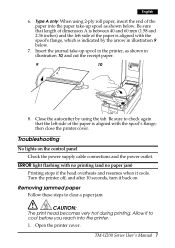
... the autocutter by the arrow in illustration 10, and cut the receipt paper. 9 10 A 8. ERROR light flashing with the spool's flange; Open the printer cover. Removing jammed paper Follow these steps to check again that length of dimension A is between 40 and 60 mm (1.58 and 2.36 inches) and... if the head overheats and resumes when it to cool before you reach into the paper take -up spool as shown in illustration 9 below . TM-U200 Series User's Manual 7 then close the printer cover. Type A only: When using the tab. English 6. Insert the journal take -up spool in the...
... the autocutter by the arrow in illustration 10, and cut the receipt paper. 9 10 A 8. ERROR light flashing with the spool's flange; Open the printer cover. Removing jammed paper Follow these steps to check again that length of dimension A is between 40 and 60 mm (1.58 and 2.36 inches) and... if the head overheats and resumes when it to cool before you reach into the paper take -up spool as shown in illustration 9 below . TM-U200 Series User's Manual 7 then close the printer cover. Type A only: When using the tab. English 6. Insert the journal take -up spool in the...
User Manual
Page 10
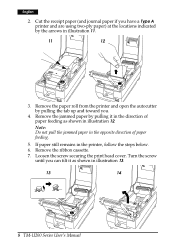
Note: Do not pull the jammed paper in the printer, follow the steps below. 6. Turn the screw until you . 4. If paper still remains in the opposite direction of paper feeding as shown in illustration 13. 13 14 8 TM-U200 Series User's Manual Loosen the screw securing the print head cover. Remove ...the paper roll from the printer and open the autocutter by pulling the tab up and toward you can tilt it in ...
Note: Do not pull the jammed paper in the printer, follow the steps below. 6. Turn the screw until you . 4. If paper still remains in the opposite direction of paper feeding as shown in illustration 13. 13 14 8 TM-U200 Series User's Manual Loosen the screw securing the print head cover. Remove ...the paper roll from the printer and open the autocutter by pulling the tab up and toward you can tilt it in ...

User Manual
Page 11
... illustration 14 on the previous page. 9. English Note: Do not remove the screw from the print head cover. 8. Replace the ribbon cassette and close the printer cover. TM-U200 Series User's Manual 9 Remove all the jammed paper. Replace the paper roll and close the autocutter. 12.
... illustration 14 on the previous page. 9. English Note: Do not remove the screw from the print head cover. 8. Replace the ribbon cassette and close the printer cover. TM-U200 Series User's Manual 9 Remove all the jammed paper. Replace the paper roll and close the autocutter. 12.
User Manual
Page 12
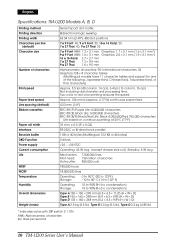
... Receive buffer DKD Function Power supply Current consumption Life MTBF MCBF Temperature Humidity Overall dimensions Weight (mass) Serial impact dot-matrix Bidirectional logic seeking 63.34 mm {2.49"}, 400 dot positions 7 × 9 Font: 40, 9 × 9 Font: 33, 16 × 16 Kanji:...6.4 lps (16 column, 16 cpi) Not including data transfer and processing time. English Specifications: TM-U200 Models A, B, D Printing method Printing direction Printing width Characters per second 10 TM-U200 Series User's Manual Approx. 106 mm/s {approx. 4.17"/s} continuous paper feed 4.23 mm {1/6"}...
... Receive buffer DKD Function Power supply Current consumption Life MTBF MCBF Temperature Humidity Overall dimensions Weight (mass) Serial impact dot-matrix Bidirectional logic seeking 63.34 mm {2.49"}, 400 dot positions 7 × 9 Font: 40, 9 × 9 Font: 33, 16 × 16 Kanji:...6.4 lps (16 column, 16 cpi) Not including data transfer and processing time. English Specifications: TM-U200 Models A, B, D Printing method Printing direction Printing width Characters per second 10 TM-U200 Series User's Manual Approx. 106 mm/s {approx. 4.17"/s} continuous paper feed 4.23 mm {1/6"}...