

Technical Reference
Page 3
... taken in the future. ESC/POS" Command System EPSON has been taking industry's initiatives with all types of EPSON POS printers and displays. Moreover, its flexibility make it easy to the purchaser of this product or third parties for damages resulting from around the world. TM-T88II/T88III Technical Reference Guide Cautions ❏ No part of...
... taken in the future. ESC/POS" Command System EPSON has been taking industry's initiatives with all types of EPSON POS printers and displays. Moreover, its flexibility make it easy to the purchaser of this product or third parties for damages resulting from around the world. TM-T88II/T88III Technical Reference Guide Cautions ❏ No part of...

Technical Reference
Page 7
... longer available. However, even though the TM-T88II is described only for the purpose of document TM-T88II User's Manual TM-T88III User's Manual ESC/POS Application Programming Guide TM-T88II/T88III Technical Reference Guide EPSON OPOS ADK Description Provides information to enable POS operators to obtain this Manual This manual describes the TM-T88III, a current EPSON thermal printer product. This manual is an OCX...
... longer available. However, even though the TM-T88II is described only for the purpose of document TM-T88II User's Manual TM-T88III User's Manual ESC/POS Application Programming Guide TM-T88II/T88III Technical Reference Guide EPSON OPOS ADK Description Provides information to enable POS operators to obtain this Manual This manual describes the TM-T88III, a current EPSON thermal printer product. This manual is an OCX...
Technical Reference
Page 9
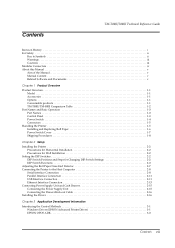
...TM-T88II/T88III Technical Reference Guide Revision History i For Safety ii Key to Symbols ii Warnings iii Cautions iii Modular Connectors iv About this Manual v Aim of the Manual v Manual Content v Related Software and Documents v Chapter 1 Product Overview Product Structure 1-1 Model 1-1 Accessories 1-1 Options 1-1 Consumable products 1-1 TM-T88II/TM...-88III Comparison Table 1-2 Part Names and Basic Operation 1-3 Part Names 1-3 Control Panel 1-3 Power Switch 1-4 Connectors 1-5 Handling the Printer 1-5 Installing and Replacing ...
...TM-T88II/T88III Technical Reference Guide Revision History i For Safety ii Key to Symbols ii Warnings iii Cautions iii Modular Connectors iv About this Manual v Aim of the Manual v Manual Content v Related Software and Documents v Chapter 1 Product Overview Product Structure 1-1 Model 1-1 Accessories 1-1 Options 1-1 Consumable products 1-1 TM-T88II/TM...-88III Comparison Table 1-2 Part Names and Basic Operation 1-3 Part Names 1-3 Control Panel 1-3 Power Switch 1-4 Connectors 1-5 Handling the Printer 1-5 Installing and Replacing ...
Technical Reference
Page 10
... 4-1 Using NV Memory 4-1 Printer Status 4-2 Precautions When the Printer Is Offline 4-2 Outputting Hex Dumps 4-2 Chapter 5 Product Specifications Product Specifications (TM-T88II/TM-T88III 5-1 Print Specifications (TM-T88II/TM-T88III 5-2 Character Specifications (TM-T88II/TM-T88III 5-3 Paper Specifications (TM-T88II/TM-T88III 5-3 Printable Area (TM-T88II/TM-T88III 5-4 Print Position versus Cutter Position (TM-88II/TM88III 5-5 Overview of External Dimensions (TM-T88II/TM-T88III 5-6 External Dimensions 5-6 Operating Specifications (TM-T88II/TM-T88III 5-7 Appendix A Interfaces and...
... 4-1 Using NV Memory 4-1 Printer Status 4-2 Precautions When the Printer Is Offline 4-2 Outputting Hex Dumps 4-2 Chapter 5 Product Specifications Product Specifications (TM-T88II/TM-T88III 5-1 Print Specifications (TM-T88II/TM-T88III 5-2 Character Specifications (TM-T88II/TM-T88III 5-3 Paper Specifications (TM-T88II/TM-T88III 5-3 Printable Area (TM-T88II/TM-T88III 5-4 Print Position versus Cutter Position (TM-88II/TM88III 5-5 Overview of External Dimensions (TM-T88II/TM-T88III 5-6 External Dimensions 5-6 Operating Specifications (TM-T88II/TM-T88III 5-7 Appendix A Interfaces and...
Technical Reference
Page 13
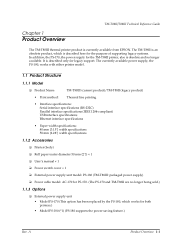
... EPSON. Chapter 1 Product Overview TM-T88II/T88III Technical Reference Guide The TM-T88III thermal printer product is described only for both printers.) • Model PS-180 (*1) (PS-180 supports the power-saving feature.) Rev. The currently available power supply, the PS-180, works with either printer model. 1.1 Product Structure 1.1.1 Model ❏ Product Name TM-T88III (current product)/TM-T88II (legacy product) • Print method: Thermal...
... EPSON. Chapter 1 Product Overview TM-T88II/T88III Technical Reference Guide The TM-T88III thermal printer product is described only for both printers.) • Model PS-180 (*1) (PS-180 supports the power-saving feature.) Rev. The currently available power supply, the PS-180, works with either printer model. 1.1 Product Structure 1.1.1 Model ❏ Product Name TM-T88III (current product)/TM-T88II (legacy product) • Print method: Thermal...
Technical Reference
Page 14
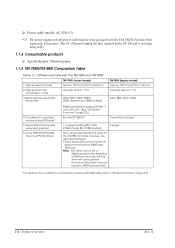
... rate. A Conditions for - High-speed print mode Approx. 150 mm/s (4.72") maximum 2. Driver (EPSON OPOS ADK, Advanced Printer Driver) 38400 is no longer being sold.) 1.1.4 Consumable products ❏ Specified paper: Thermal paper 1.1.5 TM-T88II/TM-88III Comparison Table Table 1-1 Differences between the TM-T88II and TM-T88III TM-T88III (current model) 1. ❏ Power cable (model: AC-170) (*1) (*1) The power supply unit and...
... rate. A Conditions for - High-speed print mode Approx. 150 mm/s (4.72") maximum 2. Driver (EPSON OPOS ADK, Advanced Printer Driver) 38400 is no longer being sold.) 1.1.4 Consumable products ❏ Specified paper: Thermal paper 1.1.5 TM-T88II/TM-88III Comparison Table Table 1-1 Differences between the TM-T88II and TM-T88III TM-T88III (current model) 1. ❏ Power cable (model: AC-170) (*1) (*1) The power supply unit and...
Technical Reference
Page 15
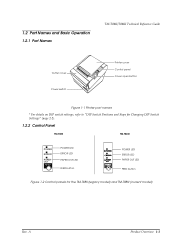
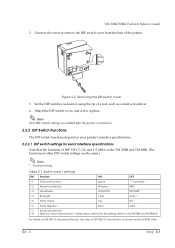
1.2 Part Names and Basic Operation 1.2.1 Part Names TM-T88II/T88III Technical Reference Guide Cutter cover Power switch FOEEUPDATPEERRRPOORWER Printer cover Control panel Cover open button Figure 1-1 Printer part names * For details on DIP switch settings, refer to "DIP Switch Positions and Steps for Changing DIP Switch Settings" (page 2-2). 1.2.2 Control Panel TM-T88II TM-T88III POWER ERROR PAPER OUT FEED POWER...
1.2 Part Names and Basic Operation 1.2.1 Part Names TM-T88II/T88III Technical Reference Guide Cutter cover Power switch FOEEUPDATPEERRRPOORWER Printer cover Control panel Cover open button Figure 1-1 Printer part names * For details on DIP switch settings, refer to "DIP Switch Positions and Steps for Changing DIP Switch Settings" (page 2-2). 1.2.2 Control Panel TM-T88II TM-T88III POWER ERROR PAPER OUT FEED POWER...
Technical Reference
Page 17
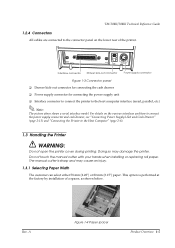
... connecting the power supply unit ❏ Interface connector to connect the printer to the Host Computer" (page 2-8). 1.3 Handling the Printer WARNING: Do not open the printer cover during printing. The manual cutter is performed at the factory by installation of the printer. Rev. TM-T88II/T88III Technical Reference Guide 1.2.4 Connectors All cables are connected to the connector...
... connecting the power supply unit ❏ Interface connector to connect the printer to the Host Computer" (page 2-8). 1.3 Handling the Printer WARNING: Do not open the printer cover during printing. The manual cutter is performed at the factory by installation of the printer. Rev. TM-T88II/T88III Technical Reference Guide 1.2.4 Connectors All cables are connected to the connector...
Technical Reference
Page 19
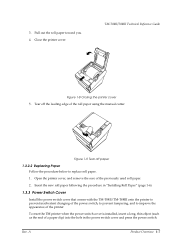
... appearance of a paper clip) into the hole in "Installing Roll Paper" (page 1-6). 1.3.3 Power Switch Cover Install the power switch cover that comes with the TM-T88II/TM-T88III onto the printer to prevent inadvertent changing of the power switch, to prevent tampering, and to replace roll paper. 1. FOEEUPDTAPEERRRPOORWER Figure 1-9 Tear off the leading edge of...
... appearance of a paper clip) into the hole in "Installing Roll Paper" (page 1-6). 1.3.3 Power Switch Cover Install the power switch cover that comes with the TM-T88II/TM-T88III onto the printer to prevent inadvertent changing of the power switch, to prevent tampering, and to replace roll paper. 1. FOEEUPDTAPEERRRPOORWER Figure 1-9 Tear off the leading edge of...
Technical Reference
Page 21
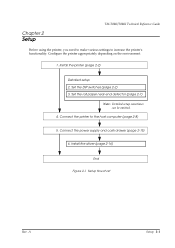
... supply and cash drawer (page 2-15) 6. Install the printer (page 2-2) Detailed setup 2. A Setup 2-1 Install the driver (page 2-16) End Figure 2-1 Setup flowchart Rev. Set the DIP switches (page 2-2) 3. Configure the printer appropriately depending on the environment. 1. Chapter 2 Setup TM-T88II/T88III Technical Reference Guide Before using the printer, you need to make various settings to the...
... supply and cash drawer (page 2-15) 6. Install the printer (page 2-2) Detailed setup 2. A Setup 2-1 Install the driver (page 2-16) End Figure 2-1 Setup flowchart Rev. Set the DIP switches (page 2-2) 3. Configure the printer appropriately depending on the environment. 1. Chapter 2 Setup TM-T88II/T88III Technical Reference Guide Before using the printer, you need to make various settings to the...
Technical Reference
Page 23
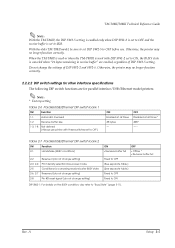
... such as a small screwdriver. 4. Set the DIP switches as desired, using the tip of the printer. Rev. DSW1 DSW2 Figure 2-2 Removing the DIP switch cover 3. TM-T88II/T88III Technical Reference Guide 2. Attach the DIP switch cover, and screw in place. is turned on. ... DIP Switch Functions The DIP switch functions depend on your printer's interface specifications. 2.2.2.1 DIP switch settings for serial interface specifications Note that the settings differ on the TM-T88II and TM-T88III.)) For details on the TM-T88II and TM-88III. (The functions of receive buffer full BUSY state. ...
... such as a small screwdriver. 4. Set the DIP switches as desired, using the tip of the printer. Rev. DSW1 DSW2 Figure 2-2 Removing the DIP switch cover 3. TM-T88II/T88III Technical Reference Guide 2. Attach the DIP switch cover, and screw in place. is turned on. ... DIP Switch Functions The DIP switch functions depend on your printer's interface specifications. 2.2.2.1 DIP switch settings for serial interface specifications Note that the settings differ on the TM-T88II and TM-T88III.)) For details on the TM-T88II and TM-88III. (The functions of receive buffer full BUSY state. ...
Technical Reference
Page 24
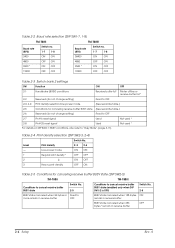
...TM-T88II TM-T88III Baud rate (BPS) Switch no. 1-7 1-8 Baud rate (BPS) Switch no. 1-7 1-8 2400 ON ON 38400 ON ON 4800 OFF ON 4800 OFF ON 9600 * ON OFF 9600 * ON OFF 19200 OFF OFF 19200 OFF OFF Table 2-3 Switch bank 2 settings SW Function ON OFF 2-1 Handshake (BUSY) conditions Receive buffer full Printer... selection/low-power mode (See separate table.) 2-5 Conditions for canceling receive buffer BUSY state (DIP SW2-5) TM-T88II TM-T88III Conditions to cancel receive buffer BUSY state Switch No. 2-5 Conditions to cancel receive buffer BUSY state (enabled ...
...TM-T88II TM-T88III Baud rate (BPS) Switch no. 1-7 1-8 Baud rate (BPS) Switch no. 1-7 1-8 2400 ON ON 38400 ON ON 4800 OFF ON 4800 OFF ON 9600 * ON OFF 9600 * ON OFF 19200 OFF OFF 19200 OFF OFF Table 2-3 Switch bank 2 settings SW Function ON OFF 2-1 Handshake (BUSY) conditions Receive buffer full Printer... selection/low-power mode (See separate table.) 2-5 Conditions for canceling receive buffer BUSY state (DIP SW2-5) TM-T88II TM-T88III Conditions to cancel receive buffer BUSY state Switch No. 2-5 Conditions to cancel receive buffer BUSY state (enabled ...
Technical Reference
Page 25
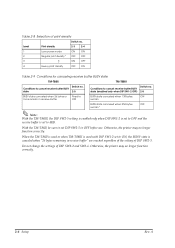
... to OFF Fixed to ON DIP SW2-1: For details on the BUSY condition, also refer to "Busy State" (page 3-11). With the older TM-T88II model, be sure to set DIP SW2-5 to OFF before use printer with DIP SW1-2 set to ON, the BUSY state is set to 4KB. Otherwise, the... used with these switches set to OFF.) ON Enabled at all times 45 bytes - A Setup 2-5 Otherwise, the printer may no longer function correctly. TM-T88II/T88III Technical Reference Guide Note: With the TM-T88III, the DIP SW2-5 setting is enabled only when DIP SW1-2 is set to OFF and the receive buffer is canceled when ...
... to OFF Fixed to ON DIP SW2-1: For details on the BUSY condition, also refer to "Busy State" (page 3-11). With the older TM-T88II model, be sure to set DIP SW2-5 to OFF before use printer with DIP SW1-2 set to ON, the BUSY state is set to 4KB. Otherwise, the... used with these switches set to OFF.) ON Enabled at all times 45 bytes - A Setup 2-5 Otherwise, the printer may no longer function correctly. TM-T88II/T88III Technical Reference Guide Note: With the TM-T88III, the DIP SW2-5 setting is enabled only when DIP SW1-2 is set to OFF and the receive buffer is canceled when ...
Technical Reference
Page 26
Conditions to OFF before use. Otherwise, the printer may no . When the TM-T88II is used or when TM-T88III is used with DIP SW1-2 set to ON, the BUSY state is canceled when "26 bytes remaining in receive buffer Fixed to OFF BUSY state...* OFF OFF ↔ 3 ON OFF 4 Heavy print density OFF ON Table 2-9 Conditions for canceling receive buffer BUSY state TM-T88II TM-T88III Switch no longer function correctly. Otherwise, the printer may no . Conditions to 4KB. With the TM-T88II, be sure to set to cancel receive buffer BUSY state (enabled only when DIP SW1-2 OFF) 2-5 BUSY state...
Conditions to OFF before use. Otherwise, the printer may no . When the TM-T88II is used or when TM-T88III is used with DIP SW1-2 set to ON, the BUSY state is canceled when "26 bytes remaining in receive buffer Fixed to OFF BUSY state...* OFF OFF ↔ 3 ON OFF 4 Heavy print density OFF ON Table 2-9 Conditions for canceling receive buffer BUSY state TM-T88II TM-T88III Switch no longer function correctly. Otherwise, the printer may no . Conditions to 4KB. With the TM-T88II, be sure to set to cancel receive buffer BUSY state (enabled only when DIP SW1-2 OFF) 2-5 BUSY state...
Technical Reference
Page 32
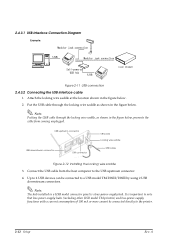
...: Putting the USB cable through the locking wire saddle as shown in the figure below , prevents the cable from the host computer to the printer. 2-12 Setup Rev. Note: The hub installed in the figure below. 2. Attach the locking wire saddle at the location shown in a ... bus-power-supply hubs (including other USB model TM printers) and bus-power-supply functions with a current consumption of 100 mA or more cannot be connected to a USB model TM-T88III/T88III by using 2 USB downstream connectors. Up to 2 USB devices can be connected directly to the USB upstream connector. 4.
...: Putting the USB cable through the locking wire saddle as shown in the figure below , prevents the cable from the host computer to the printer. 2-12 Setup Rev. Note: The hub installed in the figure below. 2. Attach the locking wire saddle at the location shown in a ... bus-power-supply hubs (including other USB model TM printers) and bus-power-supply functions with a current consumption of 100 mA or more cannot be connected to a USB model TM-T88III/T88III by using 2 USB downstream connectors. Up to 2 USB devices can be connected directly to the USB upstream connector. 4.
Technical Reference
Page 35
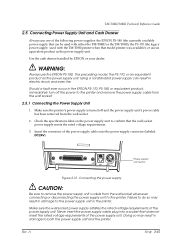
... to do so may result in damage to the printer. TM-T88II/T88III Technical Reference Guide 2.5 Connecting Power Supply Unit and Cash Drawer Always use one of the following power supplies: the EPSON PS-180 (the currently available power supply that can result in electric shock and even fire. Power ... an equivalent product as the power supply unit. Use the cash drawer handled by EPSON or your dealer. Rev. A Setup 2-15 Using a nonstandard power supply can be used with either the TM-T88III or the TM-T88II); Never insert the power supply cable plug into a socket that the wall socket ...
... to do so may result in damage to the printer. TM-T88II/T88III Technical Reference Guide 2.5 Connecting Power Supply Unit and Cash Drawer Always use one of the following power supplies: the EPSON PS-180 (the currently available power supply that can result in electric shock and even fire. Power ... an equivalent product as the power supply unit. Use the cash drawer handled by EPSON or your dealer. Rev. A Setup 2-15 Using a nonstandard power supply can be used with either the TM-T88III or the TM-T88II); Never insert the power supply cable plug into a socket that the wall socket ...
Technical Reference
Page 36
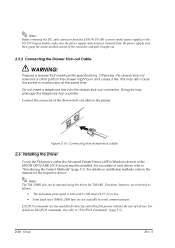
... a fire. Note: The TM-T88III also can be installed. Functions, however, are restricted as follows: • The maximum print speed is restricted to 120 mm/s {4.72"/s} or less. • Some baud rates (38400, 2400 bps) are also available for directly controlling the printer without the user of the ...the connector and pull straight out. 2.5.2 Connecting the Drawer Kick-out Cable WARNING: Prepare a drawer that meets printer specifications. Note: Before removing the DC cable connector from the EPSON PS-180 (current model power supply) or the PS-170 (legacy model), make sure the power supply ...
... a fire. Note: The TM-T88III also can be installed. Functions, however, are restricted as follows: • The maximum print speed is restricted to 120 mm/s {4.72"/s} or less. • Some baud rates (38400, 2400 bps) are also available for directly controlling the printer without the user of the ...the connector and pull straight out. 2.5.2 Connecting the Drawer Kick-out Cable WARNING: Prepare a drawer that meets printer specifications. Note: Before removing the DC cable connector from the EPSON PS-180 (current model power supply) or the PS-170 (legacy model), make sure the power supply ...
Technical Reference
Page 39
TM-T88II/T88III Technical Reference Guide • EPSON customer display • EPSON cash drawer Note: A separate USB device driver is required for a USB model printer, and a separate IP setup utility is required for the APD. Printing with parameters, power-on notification, offline... "Application Programmers Guide Specification" provided by EPSON-original Direct IO with TrueType fonts on ) Technology Association to use the printer-resident fonts. If this control method to consider. EPSON's OPOS ADK has the following web site: http://www.epson-pos.com/ Select the product name from...
TM-T88II/T88III Technical Reference Guide • EPSON customer display • EPSON cash drawer Note: A separate USB device driver is required for a USB model printer, and a separate IP setup utility is required for the APD. Printing with parameters, power-on notification, offline... "Application Programmers Guide Specification" provided by EPSON-original Direct IO with TrueType fonts on ) Technology Association to use the printer-resident fonts. If this control method to consider. EPSON's OPOS ADK has the following web site: http://www.epson-pos.com/ Select the product name from...
Technical Reference
Page 56
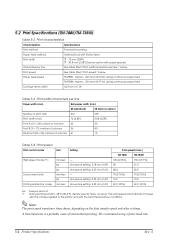
...24 × 24) number of intermittent printing. Note, however, the print speed automatically changes with the voltage applied to the printer and with paper spacer) Characters per line See table titled "Print width/characters per line," below . A slow baud rate ...lps mm/sec lps mm/sec - Print speed See table titled "Print speed," below . 5.2 Print Specifications (TM-T88II/TM-T88III) Table 5-2 Print characteristics Characteristics Specifications Print method Thermal line printing Paper feed method Unidirectional with friction feed Print width ❐ 72 mm {2.84"} ❐ 50.8...
...24 × 24) number of intermittent printing. Note, however, the print speed automatically changes with the voltage applied to the printer and with paper spacer) Characters per line See table titled "Print width/characters per line," below . A slow baud rate ...lps mm/sec lps mm/sec - Print speed See table titled "Print speed," below . 5.2 Print Specifications (TM-T88II/TM-T88III) Table 5-2 Print characteristics Characteristics Specifications Print method Thermal line printing Paper feed method Unidirectional with friction feed Print width ❐ 72 mm {2.84"} ❐ 50.8...

Technical Reference
Page 85
... [Latin2]) 8 pages Also can be used in serial communications (38400 bps, 2400 bps). High-speed power consumption mode 3. Driver (EPSON OPOS ADK, Advanced Printer Driver ) TM-T88III Approx. 150 mm/s {5.91"/s} (4.72") maximum Average approx. 1.8 A TM-T88II Approx. 120 mm/s {4.72"/s} (4.72") maximum Average approx. 1.7 A 4800, 9600, 19200, 38400, (2400 discontinued; 38400 added). 38400 selected by...
... [Latin2]) 8 pages Also can be used in serial communications (38400 bps, 2400 bps). High-speed power consumption mode 3. Driver (EPSON OPOS ADK, Advanced Printer Driver ) TM-T88III Approx. 150 mm/s {5.91"/s} (4.72") maximum Average approx. 1.8 A TM-T88II Approx. 120 mm/s {4.72"/s} (4.72") maximum Average approx. 1.7 A 4800, 9600, 19200, 38400, (2400 discontinued; 38400 added). 38400 selected by...

