
Warranty Statement
Page 1
.../pos/support.do not allow limits on an exchange basis the defective unit, without charge for nonperformance due to the Epson standard of a part, the item replaced becomes Epson property. UNLESS STATED HEREIN, ANY STATEMENTS OR REPRESENTATION MADE BY ANY OTHER PERSON OR FIRM ARE VOID. Epson also warrants that the product, if purchased and used in certain transactions. Epson is manufactured from new components and parts...
.../pos/support.do not allow limits on an exchange basis the defective unit, without charge for nonperformance due to the Epson standard of a part, the item replaced becomes Epson property. UNLESS STATED HEREIN, ANY STATEMENTS OR REPRESENTATION MADE BY ANY OTHER PERSON OR FIRM ARE VOID. Epson also warrants that the product, if purchased and used in certain transactions. Epson is manufactured from new components and parts...
Start Here
Page 6
... errors or omissions. Manual cutter 3. Cover open lever 6. Cable hook 8. Thermal head 12. Caution All rights reserved. Ethernet connector 16. USB connector 17. All rights reserved. 6 TM-L500A Ticket User's Manual Paper path 10. Platen frame 20. NOTICE: The contents of Seiko Epson Corporation. See the list below for damages resulting from the use in any liability assumed for the meaning of Seiko Epson...
... errors or omissions. Manual cutter 3. Cover open lever 6. Cable hook 8. Thermal head 12. Caution All rights reserved. Ethernet connector 16. USB connector 17. All rights reserved. 6 TM-L500A Ticket User's Manual Paper path 10. Platen frame 20. NOTICE: The contents of Seiko Epson Corporation. See the list below for damages resulting from the use in any liability assumed for the meaning of Seiko Epson...

Start Here
Page 8
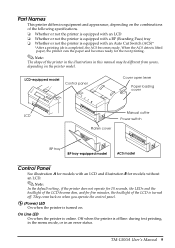
... web site: http://download.epson-biz.com/?service=pos Part Names See illustration A for the printer part names. 8 TM-L500A Ticket User's Manual Operation check with the paper loading cover open the covers during printing or autocutting. ❏ Make sure that the printer is not subjected to the following items are included. Setting the paper width (See "Setting the Paper Width" on page 10.) 4. Turning on the printer (See "Turning On/Off the Printer" on page 10...
... web site: http://download.epson-biz.com/?service=pos Part Names See illustration A for the printer part names. 8 TM-L500A Ticket User's Manual Operation check with the paper loading cover open the covers during printing or autocutting. ❏ Make sure that the printer is not subjected to the following items are included. Setting the paper width (See "Setting the Paper Width" on page 10.) 4. Turning on the printer (See "Turning On/Off the Printer" on page 10...
Start Here
Page 9
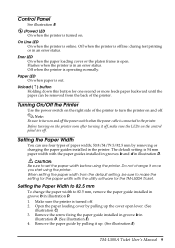
... paper is online. Off when the printer is turned off . Open the paper loading cover by pulling it once you start using the printer. English Control Panel See illustration B. (Power) LED On when the printer is operating normally. The default setting is in illustration D. 1. Setting the Paper Width to 82.5 mm, remove the paper guide installed in groove b in an error status. Remove the paper guide by pulling up . (See illustration E) TM-L500A Ticket User's Manual 9 Flashes when the printer...
... paper is online. Off when the printer is turned off . Open the paper loading cover by pulling it once you start using the printer. English Control Panel See illustration B. (Power) LED On when the printer is operating normally. The default setting is in illustration D. 1. Setting the Paper Width to 82.5 mm, remove the paper guide installed in groove b in an error status. Remove the paper guide by pulling up . (See illustration E) TM-L500A Ticket User's Manual 9 Flashes when the printer...

Start Here
Page 10
.... Remove the paper guide installed in grooves b by following the same steps as "Setting the Paper Width to 82.5 mm." 2. Close the paper loading cover. 10 TM-L500A Ticket User's Manual Note: Available interfaces vary by pulling up the cover open lever. (See illustration C) 3. When using the USB interface, install the cable hook and fix the USB cable to prevent it in groove a. 1. Fix the paper guide with the screw. Insert the power...
.... Remove the paper guide installed in grooves b by following the same steps as "Setting the Paper Width to 82.5 mm." 2. Close the paper loading cover. 10 TM-L500A Ticket User's Manual Note: Available interfaces vary by pulling up the cover open lever. (See illustration C) 3. When using the USB interface, install the cable hook and fix the USB cable to prevent it in groove a. 1. Fix the paper guide with the screw. Insert the power...

Start Here
Page 11
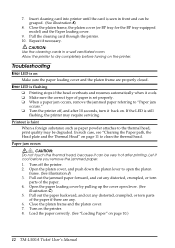
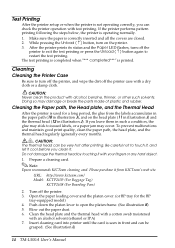
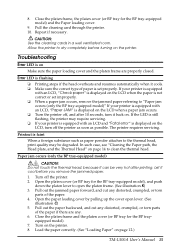
.... Note: Epson recommends KICTeam cleaning card. Cleaning the Paper path, the Head plate and the Thermal Head After the printer is used for the BP tray-equipped model) 4. Open the paper loading cover and the platen cover. (or BP tray for a long period, the glue from KICTeam's web site. Test Printing After the printer setup or when the printer is printed. Make sure the paper is operating normally...
.... Note: Epson recommends KICTeam cleaning card. Cleaning the Paper path, the Head plate and the Thermal Head After the printer is used for the BP tray-equipped model) 4. Open the paper loading cover and the platen cover. (or BP tray for a long period, the glue from KICTeam's web site. Test Printing After the printer setup or when the printer is printed. Make sure the paper is operating normally...
Start Here
Page 12
..., crumpled, or torn parts of the paper. 4. Turn on page 10.) 12 TM-L500A Ticket User's Manual Allow the printer to the thermal head, print quality may require servicing. Printout is still flashing, the printer may be very hot after 10 seconds, turn it cool before turning on . Open the platen cover, and push down the platen lever to clean the thermal head. Close the platen frame...
..., crumpled, or torn parts of the paper. 4. Turn on page 10.) 12 TM-L500A Ticket User's Manual Allow the printer to the thermal head, print quality may require servicing. Printout is still flashing, the printer may be very hot after 10 seconds, turn it cool before turning on . Open the platen cover, and push down the platen lever to clean the thermal head. Close the platen frame...

Users Manual
Page 6
... the meaning of the numbers in the illustrations. 1. Ethernet connector 5. Platen frame 15. Exceed Your Vision is a registered trademark of Seiko Epson Corporation. Power supply connector 4. Cable hook 9. NOTICE: The contents of this product is used for use of the information contained herein. All rights reserved. 6 TM-L500A User's Manual Paper guide 2. Platen lever 14. various safety devices, etc.; Because this book, Seiko Epson Corporation...
... the meaning of the numbers in the illustrations. 1. Ethernet connector 5. Platen frame 15. Exceed Your Vision is a registered trademark of Seiko Epson Corporation. Power supply connector 4. Cable hook 9. NOTICE: The contents of this product is used for use of the information contained herein. All rights reserved. 6 TM-L500A User's Manual Paper guide 2. Platen lever 14. various safety devices, etc.; Because this book, Seiko Epson Corporation...

Users Manual
Page 8
... (Model: M159B/M159D)] ❑ User's manual (this product. Setting up the Printer To set up the printer, follow the steps below. 1. Turning on the printer (See "Turning On/Off the Printer" on page 8.) 2. For customers in North America, go to the following web site: http://download.epson-biz.com/?service=pos 8 TM-L500A User's Manual Never stand or lean on this manual) Downloading Drivers, Utilities, and Manuals Drivers, utilities, and manuals can be closed unexpectedly. ❏ To prevent a paper...
... (Model: M159B/M159D)] ❑ User's manual (this product. Setting up the Printer To set up the printer, follow the steps below. 1. Turning on the printer (See "Turning On/Off the Printer" on page 8.) 2. For customers in North America, go to the following web site: http://download.epson-biz.com/?service=pos 8 TM-L500A User's Manual Never stand or lean on this manual) Downloading Drivers, Utilities, and Manuals Drivers, utilities, and manuals can be closed unexpectedly. ❏ To prevent a paper...
Users Manual
Page 9
... menu mode, or in an error status. Off when the printer is online. They come back on when you operate the control panel. (Power) LED On when the printer is turned on the printer model. TM-L500A User's Manual 9 Note: The shape of the printer in the illustrations in this manual may be different from yours, depending on . Note: In the default setting, if the printer does not operate for...
... menu mode, or in an error status. Off when the printer is online. They come back on when you operate the control panel. (Power) LED On when the printer is turned on the printer model. TM-L500A User's Manual 9 Note: The shape of the printer in the illustrations in this manual may be different from yours, depending on . Note: In the default setting, if the printer does not operate for...
Users Manual
Page 10
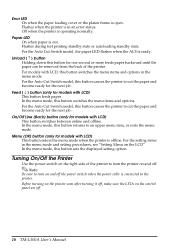
... ACS is open. Turning On/Off the Printer Use the power switch on the right side of the printer. For models with LCD) This button enters the menu mode when the printer is offline. Note: Be sure to turn the printer on and off . 10 TM-L500A User's Manual Flashes during test printing standby state or autoloading standby state. Before turning on the printer soon after turning it off . English Error LED On...
... ACS is open. Turning On/Off the Printer Use the power switch on the right side of the printer. For models with LCD) This button enters the menu mode when the printer is offline. Note: Be sure to turn the printer on and off . 10 TM-L500A User's Manual Flashes during test printing standby state or autoloading standby state. Before turning on the printer soon after turning it off . English Error LED On...
Users Manual
Page 11
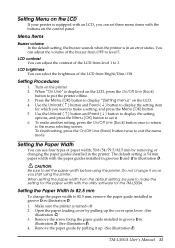
... 5. Open the paper loading cover by removing or changing the paper guides installed in illustration D. When "On Line" is displayed on the control panel. Setting the Paper Width to 82.5 mm To change it once you start using the printer. LCD contrast You can use four types of the LCD from the default setting, be sure to make the setting for the TM-L500A. Use the Unload ( ↑ ) button and Feed ( ↓ ) button to display the setting...
... 5. Open the paper loading cover by removing or changing the paper guides installed in illustration D. When "On Line" is displayed on the control panel. Setting the Paper Width to 82.5 mm To change it once you start using the printer. LCD contrast You can use four types of the LCD from the default setting, be sure to make the setting for the TM-L500A. Use the Unload ( ↑ ) button and Feed ( ↓ ) button to display the setting...
Users Manual
Page 12
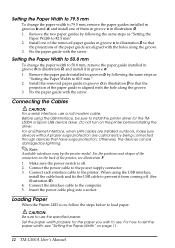
.... 12 TM-L500A User's Manual When using the USB interface, be damaged by following the same steps as "Setting the Paper Width to 82.5 mm" 2. Connect the interface cable to the printer. Set the paper width properly for the TML500A or Epson USB device driver. Remove the two paper guides by lightning. Install the removed paper guide in groove a in groove a. 1. For an Ethernet interface, when LAN cables are installed outdoors, make sure devices...
.... 12 TM-L500A User's Manual When using the USB interface, be damaged by following the same steps as "Setting the Paper Width to 82.5 mm" 2. Connect the interface cable to the printer. Set the paper width properly for the TML500A or Epson USB device driver. Remove the two paper guides by lightning. Install the removed paper guide in groove a in groove a. 1. For an Ethernet interface, when LAN cables are installed outdoors, make sure devices...
Users Manual
Page 14
... check the printer operation with your fingers or any hard object. 1. CAUTION: The thermal head can be grasped. (See illustration L) 14 TM-L500A User's Manual Turn off the printer to exit the test printing or press the Unload ( ↑ ) button again to issued labels, or a paper jam may damage or break the parts made of plastic and rubber. Blow out the paper dust. 6. Make sure the paper...
... check the printer operation with your fingers or any hard object. 1. CAUTION: The thermal head can be grasped. (See illustration L) 14 TM-L500A User's Manual Turn off the printer to exit the test printing or press the Unload ( ↑ ) button again to issued labels, or a paper jam may damage or break the parts made of plastic and rubber. Blow out the paper dust. 6. Make sure the paper...
Users Manual
Page 15
... printer requires servicing. In such case, see "Cleaning the Paper path, the Head plate, and the Thermal Head" on the printer. Turn on page 12.) TM-L500A User's Manual 15 CAUTION: Use the cleaning cards in a well ventilated room. Printout is displayed on the LCD when a paper jam occurs. ❏ Turn the printer off, and after printing. Turn off the printer as soon as paper powder attaches to clean the thermal head. Open...
... printer requires servicing. In such case, see "Cleaning the Paper path, the Head plate, and the Thermal Head" on the printer. Turn on page 12.) TM-L500A User's Manual 15 CAUTION: Use the cleaning cards in a well ventilated room. Printout is displayed on the LCD when a paper jam occurs. ❏ Turn the printer off, and after printing. Turn off the printer as soon as paper powder attaches to clean the thermal head. Open...
Technical Reference Guide: RFID
Page 5
... your fingers on the manual cutter: When you remove printed paper. When you can result in injury from the autocutter fixed blade. To ensure safety, unplug this product before leaving it falls. Do not use the TM-L500A RFID, see the information sheet included with your design to maintain safety and total system reliability. Restriction...
... your fingers on the manual cutter: When you remove printed paper. When you can result in injury from the autocutter fixed blade. To ensure safety, unplug this product before leaving it falls. Do not use the TM-L500A RFID, see the information sheet included with your design to maintain safety and total system reliability. Restriction...
Technical Reference Guide: RFID
Page 8
... Power Supply Unit ...43 ■ Setting the Memory Switches 45 Functions ...46 ■ Setting Menu on the LCD 50 Application Development Information 51 ■ How to Control the Printer 51 AEA Commands ...51 ■ Software and Manuals ...51 ■ Self-Test Mode ...52 Starting the Self-Test ...52 Handling 53 ■ Usage Precautions ...53 ■ Installing and Replacing Paper 54 Installing Paper ...54 Replacing Paper ...55 ■ Removing Jammed Paper...
... Power Supply Unit ...43 ■ Setting the Memory Switches 45 Functions ...46 ■ Setting Menu on the LCD 50 Application Development Information 51 ■ How to Control the Printer 51 AEA Commands ...51 ■ Software and Manuals ...51 ■ Self-Test Mode ...52 Starting the Self-Test ...52 Handling 53 ■ Usage Precautions ...53 ■ Installing and Replacing Paper 54 Installing Paper ...54 Replacing Paper ...55 ■ Removing Jammed Paper...
Technical Reference Guide: RFID
Page 45
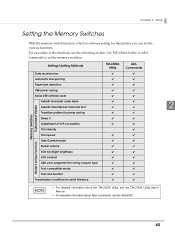
Chapter 2 Setup Setting the Memory Switches With the memory switch function, which is software setting for this printer, you can set the memory switches. Use TM-L500A Utility or AEA commands to set the various functions. Settings\Setting Methods TM-L500A Utility AEA Commands Customized Values Memory Switches Data receive error ✔ ✔ Automatic line spacing ✔ ✔ Paper jam detection ✔ ✔ USB power saving ✔ ✔ Serial DSR software reset ✔ ✔ Default character code table Default international character font ...
Chapter 2 Setup Setting the Memory Switches With the memory switch function, which is software setting for this printer, you can set the memory switches. Use TM-L500A Utility or AEA commands to set the various functions. Settings\Setting Methods TM-L500A Utility AEA Commands Customized Values Memory Switches Data receive error ✔ ✔ Automatic line spacing ✔ ✔ Paper jam detection ✔ ✔ USB power saving ✔ ✔ Serial DSR software reset ✔ ✔ Default character code table Default international character font ...
Technical Reference Guide: RFID
Page 50
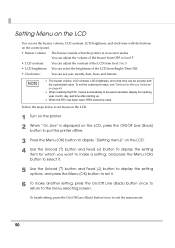
... (OK) button to display "[Setting menu]" on the LCD. 4 Use the Unload () button and Feed () button to display the setting item for inputting year, month, day, and time after starting up. When the RTC has been reset, RFID cannot be set also with the buttons on page 45. When resetting the RTC, moves automatically to the panel operation display for which you want to make a setting, and...
... (OK) button to display "[Setting menu]" on the LCD. 4 Use the Unload () button and Feed () button to display the setting item for inputting year, month, day, and time after starting up. When the RTC has been reset, RFID cannot be set also with the buttons on page 45. When resetting the RTC, moves automatically to the panel operation display for which you want to make a setting, and...
Technical Reference Guide: RFID
Page 66
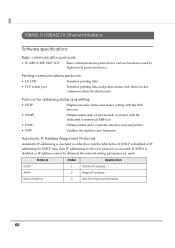
...). Automatic IP Address Assignment Protocols Automatic IP addressing is executed in order shown in the table below ) Printing communications protocols • LP, LPR: Transfers printing data. • TCP socket port: Transfers printing data and printer status with the dedicated/commercial MIB tool. • ENPC: Obtains status and/or sets the interface unit and printer. • TFTP: Updates the interface unit firmware. APIPA 2 Assigns IP address.
...). Automatic IP Address Assignment Protocols Automatic IP addressing is executed in order shown in the table below ) Printing communications protocols • LP, LPR: Transfers printing data. • TCP socket port: Transfers printing data and printer status with the dedicated/commercial MIB tool. • ENPC: Obtains status and/or sets the interface unit and printer. • TFTP: Updates the interface unit firmware. APIPA 2 Assigns IP address.


