
Technical Reference
Page 7
... of document TM-T88II User's Manual TM-T88III User's Manual ESC/POS Application Programming Guide TM-T88II/T88III Technical Reference Guide EPSON OPOS ADK Description Provides information to enable POS operators to provide all the information necessary for system planning, design, installation, and application of POS system. This guide.* This is packed in use the TM-T88II/TM-T88III safely and correctly. TM-T88II/T88III Technical Reference Guide About this guide...
... of document TM-T88II User's Manual TM-T88III User's Manual ESC/POS Application Programming Guide TM-T88II/T88III Technical Reference Guide EPSON OPOS ADK Description Provides information to enable POS operators to provide all the information necessary for system planning, design, installation, and application of POS system. This guide.* This is packed in use the TM-T88II/TM-T88III safely and correctly. TM-T88II/T88III Technical Reference Guide About this guide...
Technical Reference
Page 9
... Part Names and Basic Operation 1-3 Part Names 1-3 Control Panel 1-3 Power Switch 1-4 Connectors 1-5 Handling the Printer 1-5 Installing and Replacing Roll Paper 1-6 Power Switch Cover 1-7 Shipping Procedures 1-8 Chapter 2 Setup Installing the Printer 2-2 Precautions for Horizontal Installation 2-2 Precautions for Wall Installation 2-2 Setting the DIP Switches 2-2 DIP Switch Positions and Steps for Changing DIP Switch Settings 2-2 DIP Switch Functions 2-3 Adjusting the Roll Paper Near-End Detector 2-7 Connecting the Printer to the Host Computer 2-8 Serial Interface Connection...
... Part Names and Basic Operation 1-3 Part Names 1-3 Control Panel 1-3 Power Switch 1-4 Connectors 1-5 Handling the Printer 1-5 Installing and Replacing Roll Paper 1-6 Power Switch Cover 1-7 Shipping Procedures 1-8 Chapter 2 Setup Installing the Printer 2-2 Precautions for Horizontal Installation 2-2 Precautions for Wall Installation 2-2 Setting the DIP Switches 2-2 DIP Switch Positions and Steps for Changing DIP Switch Settings 2-2 DIP Switch Functions 2-3 Adjusting the Roll Paper Near-End Detector 2-7 Connecting the Printer to the Host Computer 2-8 Serial Interface Connection...
Technical Reference
Page 10
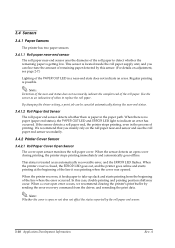
... 3-5 Various Utilities 3-6 Switches and Buttons 3-6 Paper FEED Button 3-6 Panel LEDs and Error Status 3-7 Power LED 3-7 No Roll Paper (PAPER OUT) LED 3-7 Error LED 3-7 Sensors 3-10 Paper Sensors 3-10 Printer Cover Sensor 3-10 Offline 3-11 Busy State 3-11 NVRAM (Non-volatile Memory 3-12 Bar Code Printing 3-12 Operating Mode (Switch Panel Operation 3-13 Self-test Mode 3-13 FAQ List 3-14 Q: Why has my print data dropped out 3-14 Q: Why does the drawer kick-out not operate properly 3-15 Q: I cannot print part of each...
... 3-5 Various Utilities 3-6 Switches and Buttons 3-6 Paper FEED Button 3-6 Panel LEDs and Error Status 3-7 Power LED 3-7 No Roll Paper (PAPER OUT) LED 3-7 Error LED 3-7 Sensors 3-10 Paper Sensors 3-10 Printer Cover Sensor 3-10 Offline 3-11 Busy State 3-11 NVRAM (Non-volatile Memory 3-12 Bar Code Printing 3-12 Operating Mode (Switch Panel Operation 3-13 Self-test Mode 3-13 FAQ List 3-14 Q: Why has my print data dropped out 3-14 Q: Why does the drawer kick-out not operate properly 3-15 Q: I cannot print part of each...
Technical Reference
Page 13
...; Print method: Thermal line printing • Interface specifications: Serial interface specifications (RS-232C) Parallel interface specifications (IEEE 1284-compliant) USB interface specifications Ethernet interface specifications • Paper width specifications: 80 mm {3.15"} width specifications 58 mm {2.28"} width specifications 1.1.2 Accessories ❏ Printer (body) ❏ Roll paper (outer diameter 50 mm {2"}) × 1 ❏ User's manual × 1 ❏ Power switch cover × 1 ❏ External power supply unit model: PS-180 (TM-T88III: packaged power supply...
...; Print method: Thermal line printing • Interface specifications: Serial interface specifications (RS-232C) Parallel interface specifications (IEEE 1284-compliant) USB interface specifications Ethernet interface specifications • Paper width specifications: 80 mm {3.15"} width specifications 58 mm {2.28"} width specifications 1.1.2 Accessories ❏ Printer (body) ❏ Roll paper (outer diameter 50 mm {2"}) × 1 ❏ User's manual × 1 ❏ Power switch cover × 1 ❏ External power supply unit model: PS-180 (TM-T88III: packaged power supply...
Technical Reference
Page 14
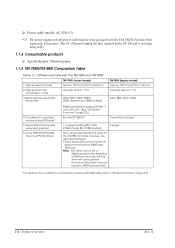
... cannot be operated by the PS-180 and is no longer being sold.) 1.1.4 Consumable products ❏ Specified paper: Thermal paper 1.1.5 TM-T88II/TM-88III Comparison Table Table 1-1 Differences between the TM-T88II and TM-T88III TM-T88III (current model) 1. ❏ Power cable (model: AC-170) (*1) (*1) The power supply unit and power cable may not come packaged with the driver will cause garbled characters (the printer does not support a 2400 bps...
... cannot be operated by the PS-180 and is no longer being sold.) 1.1.4 Consumable products ❏ Specified paper: Thermal paper 1.1.5 TM-T88II/TM-88III Comparison Table Table 1-1 Differences between the TM-T88II and TM-T88III TM-T88III (current model) 1. ❏ Power cable (model: AC-170) (*1) (*1) The power supply unit and power cable may not come packaged with the driver will cause garbled characters (the printer does not support a 2400 bps...
Technical Reference
Page 15
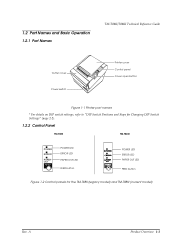
...1.2 Part Names and Basic Operation 1.2.1 Part Names TM-T88II/T88III Technical Reference Guide Cutter cover Power switch FOEEUPDATPEERRRPOORWER Printer cover Control panel Cover open button Figure 1-1 Printer part names * For details on DIP switch settings, refer to "DIP Switch Positions and Steps for Changing DIP Switch Settings" (page 2-2). 1.2.2 Control Panel TM-T88II TM-T88III POWER ERROR PAPER OUT FEED POWER LED ERROR LED PAPER OUT LED FEED button POWER LED ERROR LED PAPER OUT LED FEED button Figure 1-2 Control panels for the TM-T88II (legacy model) and TM-T88III (current model...
...1.2 Part Names and Basic Operation 1.2.1 Part Names TM-T88II/T88III Technical Reference Guide Cutter cover Power switch FOEEUPDATPEERRRPOORWER Printer cover Control panel Cover open button Figure 1-1 Printer part names * For details on DIP switch settings, refer to "DIP Switch Positions and Steps for Changing DIP Switch Settings" (page 2-2). 1.2.2 Control Panel TM-T88II TM-T88III POWER ERROR PAPER OUT FEED POWER LED ERROR LED PAPER OUT LED FEED button POWER LED ERROR LED PAPER OUT LED FEED button Figure 1-2 Control panels for the TM-T88II (legacy model) and TM-T88III (current model...
Technical Reference
Page 16
... execution. 1.2.2.2 Buttons PAPER FEED button Pressing this button once feeds the roll paper by one line. ERROR LED Lights or flashes when the printer is offline. ❏ Lights after the power is ready. The marks on the switch (0 = on or after a while to "Error Codes" (page 3-8).) ❏ Goes out during regular operation (online). Automatically goes out after a reset (offline). Holding this happens, replace with new roll paper. ❏ Flashes when an error occurs. (For details about the flash codes, refer...
... execution. 1.2.2.2 Buttons PAPER FEED button Pressing this button once feeds the roll paper by one line. ERROR LED Lights or flashes when the printer is offline. ❏ Lights after the power is ready. The marks on the switch (0 = on or after a while to "Error Codes" (page 3-8).) ❏ Goes out during regular operation (online). Automatically goes out after a reset (offline). Holding this happens, replace with new roll paper. ❏ Flashes when an error occurs. (For details about the flash codes, refer...
Technical Reference
Page 17
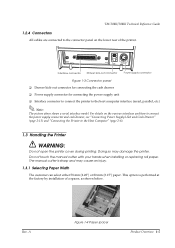
... to connect the printer to the Host Computer" (page 2-8). 1.3 Handling the Printer WARNING: Do not open the printer cover during printing. TM-T88II/T88III Technical Reference Guide 1.2.4 Connectors All cables are connected to the connector panel on the various interfaces and how to connect the power supply connector and cash drawer, see "Connecting Power Supply Unit and Cash Drawer" (page 2-15) and "Connecting the Printer to the host computer interface (serial, parallel...
... to connect the printer to the Host Computer" (page 2-8). 1.3 Handling the Printer WARNING: Do not open the printer cover during printing. TM-T88II/T88III Technical Reference Guide 1.2.4 Connectors All cables are connected to the connector panel on the various interfaces and how to connect the power supply connector and cash drawer, see "Connecting Power Supply Unit and Cash Drawer" (page 2-15) and "Connecting the Printer to the host computer interface (serial, parallel...
Technical Reference
Page 25
... all times 45 bytes - Otherwise, the printer may no longer function correctly. 2.2.2.2 DIP switch settings for other interface specifications The following DIP switch functions are reached, regardless of DIP SW2-2 and SW2-6. OFF Disabled at all times * 4KB * - * Table 2-7 Parallel/USB/Ethernet DIP switch bank 2 SW Function 2-1 Handshake (BUSY conditions) 2-2 Reserved (do not change setting) 2-3, 2-4 Print density selection/low-power mode 2-5 Conditions for parallel interface/USB/Ethernet model printers. A Setup 2-5
... all times 45 bytes - Otherwise, the printer may no longer function correctly. 2.2.2.2 DIP switch settings for other interface specifications The following DIP switch functions are reached, regardless of DIP SW2-2 and SW2-6. OFF Disabled at all times * 4KB * - * Table 2-7 Parallel/USB/Ethernet DIP switch bank 2 SW Function 2-1 Handshake (BUSY conditions) 2-2 Reserved (do not change setting) 2-3, 2-4 Print density selection/low-power mode 2-5 Conditions for parallel interface/USB/Ethernet model printers. A Setup 2-5
Technical Reference
Page 31
...-powered USB hub from the customer display to the DM connector (refer to "Installing the locking wire saddle" (page 2-12)). When connecting the customer display, connect the modular jack from a printer connected to the host computer. When connecting the customer display to a USB model TM-T88II/T88III, set the communication conditions of the interface cable to the host computer. 2.4.3 USB Interface Connection Connect the TM printer to the host computer with a ground line...
...-powered USB hub from the customer display to the DM connector (refer to "Installing the locking wire saddle" (page 2-12)). When connecting the customer display, connect the modular jack from a printer connected to the host computer. When connecting the customer display to a USB model TM-T88II/T88III, set the communication conditions of the interface cable to the host computer. 2.4.3 USB Interface Connection Connect the TM printer to the host computer with a ground line...
Technical Reference
Page 36
... available for directly controlling the printer without the user of the drawer kick-out cable to malfunction at the same time. Do not insert a telephone line into the drawer kick-out connector. Figure 2-16 Connecting the drawer-kick cable 2.6 Installing the Driver To use the TM printer, either the Advanced Printer Driver (APD) (Windows driver) or the EPSON OPOS ADK (OCX driver) must be operated using the driver for the respective driver. Doing so...
... available for directly controlling the printer without the user of the drawer kick-out cable to malfunction at the same time. Do not insert a telephone line into the drawer kick-out connector. Figure 2-16 Connecting the drawer-kick cable 2.6 Installing the Driver To use the TM printer, either the Advanced Printer Driver (APD) (Windows driver) or the EPSON OPOS ADK (OCX driver) must be operated using the driver for the respective driver. Doing so...
Technical Reference
Page 37
... TM printer to enable printing from a general Windows application. ❏ Can execute POS printer-specific functions, such as Visual Basic (VB), via status API. Windows printer driver (EPSON Advanced Printer Driver or APD) 2. Rev. TM-T88II/T88III Technical Reference Guide Chapter 3 Application Development Information This chapter describes how to control the printer and gives information useful for printer application development. 3.1 Introducing the Control Methods The TM printer can print using programming languages, such as cutting paper and opening...
... TM printer to enable printing from a general Windows application. ❏ Can execute POS printer-specific functions, such as Visual Basic (VB), via status API. Windows printer driver (EPSON Advanced Printer Driver or APD) 2. Rev. TM-T88II/T88III Technical Reference Guide Chapter 3 Application Development Information This chapter describes how to control the printer and gives information useful for printer application development. 3.1 Introducing the Control Methods The TM printer can print using programming languages, such as cutting paper and opening...
Technical Reference
Page 39
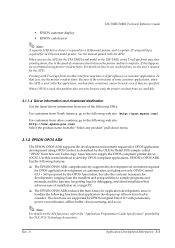
.../ For customers from other interfaces may slow printing down menu. 3.1.2 EPSON OPOS ADK The EPSON OPOS ADK supports the development environment required for OPOS application development using printer-resident fonts. Rev. TM-T88II/T88III Technical Reference Guide • EPSON customer display • EPSON cash drawer Note: A separate USB device driver is required for a USB model printer, and a separate IP setup utility is required for application development, since it...
.../ For customers from other interfaces may slow printing down menu. 3.1.2 EPSON OPOS ADK The EPSON OPOS ADK supports the development environment required for OPOS application development using printer-resident fonts. Rev. TM-T88II/T88III Technical Reference Guide • EPSON customer display • EPSON cash drawer Note: A separate USB device driver is required for a USB model printer, and a separate IP setup utility is required for application development, since it...
Technical Reference
Page 40
... connection ports and various settings (print wait time, etc.). • TM Flash logo utility Saves a bitmap file to the printer or customer display, for EPSON devices. ❏ Direct IO with parameters available: • Gets the printer maintenance counter value • Prints NVRAM-stored bit images, etc. ❏ Power-on notification function (at power on, this function automatically restores the printer to the state that was active before power off). ❏ Offline buffer clear...
... connection ports and various settings (print wait time, etc.). • TM Flash logo utility Saves a bitmap file to the printer or customer display, for EPSON devices. ❏ Direct IO with parameters available: • Gets the printer maintenance counter value • Prints NVRAM-stored bit images, etc. ❏ Power-on notification function (at power on, this function automatically restores the printer to the state that was active before power off). ❏ Offline buffer clear...
Technical Reference
Page 42
... been connected to set an IP address for a 10Base-T/ 100Base-TX Ethernet interface installed in the printer driver on the line spacing set by the control method (OPOS, Advanced Printer Driver, ESC/POS commands). Customers who have purchased the Ethernet model TM printer need this utility, for example, frees you must change the USB port in the TM printer. You can be controlled independently from the "Select any product" pull-down menu. 3.1.4.1 IP address setup...
... been connected to set an IP address for a 10Base-T/ 100Base-TX Ethernet interface installed in the printer driver on the line spacing set by the control method (OPOS, Advanced Printer Driver, ESC/POS commands). Customers who have purchased the Ethernet model TM printer need this utility, for example, frees you must change the USB port in the TM printer. You can be controlled independently from the "Select any product" pull-down menu. 3.1.4.1 IP address setup...
Technical Reference
Page 44
... be repaired. Remove the jammed paper or foreign matter in the printer, close the roll paper cover, send the error recover command, or turn the power on again or sending an error recovery command from the driver after a recoverable error occurs, this is correctly closed . Table 3-4 Automatically recoverable errors Error Error description Error LED flash code Recovery measure Approx. 160 ms Roll paper cover open error The roll paper cover was detected. Print head temperature error A high temperature outside the head drive operating...
... be repaired. Remove the jammed paper or foreign matter in the printer, close the roll paper cover, send the error recover command, or turn the power on again or sending an error recovery command from the driver after a recoverable error occurs, this is correctly closed . Table 3-4 Automatically recoverable errors Error Error description Error LED flash code Recovery measure Approx. 160 ms Roll paper cover open error The roll paper cover was detected. Print head temperature error A high temperature outside the head drive operating...
Technical Reference
Page 46
... be canceled automatically during printing, the printer stops printing immediately and automatically goes offline. Regular printing is treated as an indication of the line it feeds paper to detect whether the remaining paper is closed, the ERROR LED goes out, and the printer goes online and starts printing at the beginning of when to indicate an error has occurred. By changing the driver setting, a print job can fine-tune the...
... be canceled automatically during printing, the printer stops printing immediately and automatically goes offline. Regular printing is treated as an indication of the line it feeds paper to detect whether the remaining paper is closed, the ERROR LED goes out, and the printer goes online and starts printing at the beginning of when to indicate an error has occurred. By changing the driver setting, a print job can fine-tune the...
Technical Reference
Page 49
...; Control software ROM version • DIP switch settings Follow the steps below to the normal mode. Check that the following message is printed: "SELF-TEST printing. With the roll paper cover open, press and hold down the paper FEED button and turn on the printer. Please press PAPER FEED button" The printer is in the self-test wait mode. 3. The printer prints various printer settings. 2. To start a self-test: 1. A Application Development Information 3-13 Rev. When the printer finishes printing the printer status, check whether...
...; Control software ROM version • DIP switch settings Follow the steps below to the normal mode. Check that the following message is printed: "SELF-TEST printing. With the roll paper cover open, press and hold down the paper FEED button and turn on the printer. Please press PAPER FEED button" The printer is in the self-test wait mode. 3. The printer prints various printer settings. 2. To start a self-test: 1. A Application Development Information 3-13 Rev. When the printer finishes printing the printer status, check whether...
Technical Reference
Page 54
... the printer send status automatically at the time of switching online/offline. Example: After using the 4KB receive buffer to get the printer status, and each line, check the printer status. 4.4 Outputting Hex Dumps TM printers can print data transmitted from the TM printer in the same way it responds with the specified printer status. To quit the hex dump mode, turn power on while holding down the paper FEED button. 2. For details, see the "ESC/POS Application Programming Guide." 4.2 Printer Status...
... the printer send status automatically at the time of switching online/offline. Example: After using the 4KB receive buffer to get the printer status, and each line, check the printer status. 4.4 Outputting Hex Dumps TM printers can print data transmitted from the TM printer in the same way it responds with the specified printer status. To quit the hex dump mode, turn power on while holding down the paper FEED button. 2. For details, see the "ESC/POS Application Programming Guide." 4.2 Printer Status...
Technical Reference
Page 56
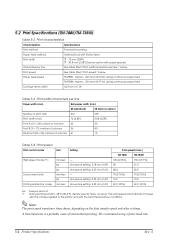
... V, 28°C {82.4°F}, density level 2). 5.2 Print Specifications (TM-T88II/TM-T88III) Table 5-2 Print characteristics Characteristics Specifications Print method Thermal line printing Paper feed method Unidirectional with friction feed Print width ❐ 72 mm {2.84"} ❐ 50.8 mm {2.28"} (factory option with the head temperature conditions. A slow baud rate is a probable cause of columns 21 15 Table 5-4 Print speed Print control mode Unit Setting High-speed mode (*1) Low-power mode Printing ladder bar codes mm/sec lps lps mm...
... V, 28°C {82.4°F}, density level 2). 5.2 Print Specifications (TM-T88II/TM-T88III) Table 5-2 Print characteristics Characteristics Specifications Print method Thermal line printing Paper feed method Unidirectional with friction feed Print width ❐ 72 mm {2.84"} ❐ 50.8 mm {2.28"} (factory option with the head temperature conditions. A slow baud rate is a probable cause of columns 21 15 Table 5-4 Print speed Print control mode Unit Setting High-speed mode (*1) Low-power mode Printing ladder bar codes mm/sec lps lps mm...


