
Quick Reference Guide
Page 4
2 | Printer Parts Printer Parts Front - S30670 Print head in maintenance position Flushing pad Wiper Media holding plate Cutter Pressure groove rollers Platen heater Wiper cleaner Nozzle caps S30670 Left maintenance cover Front cover Control panel Media loading lever Right maintenance cover USB port After heater Tensioner LAN port AC inlets Cartridge check lights Lock levers Ink cartridges Roll locking screw Roll support Auto switch Vent Waste ink tube Waste ink tank Adjuster Manual switch Caster Inside -
2 | Printer Parts Printer Parts Front - S30670 Print head in maintenance position Flushing pad Wiper Media holding plate Cutter Pressure groove rollers Platen heater Wiper cleaner Nozzle caps S30670 Left maintenance cover Front cover Control panel Media loading lever Right maintenance cover USB port After heater Tensioner LAN port AC inlets Cartridge check lights Lock levers Ink cartridges Roll locking screw Roll support Auto switch Vent Waste ink tube Waste ink tank Adjuster Manual switch Caster Inside -

Quick Reference Guide
Page 5
... Lock levers Ink cartridges Media holding plate Platen heater Cutter groove Low pressure rollers (white) High pressure rollers (green) Nozzle caps Wiper cleaners S50670 and S70670 Front cover Left maintenance cover High speed dryer After heater Control panel Media loading lever Right maintenance cover USB port LAN port AC inlets Tensioner...
... Lock levers Ink cartridges Media holding plate Platen heater Cutter groove Low pressure rollers (white) High pressure rollers (green) Nozzle caps Wiper cleaners S50670 and S70670 Front cover Left maintenance cover High speed dryer After heater Control panel Media loading lever Right maintenance cover USB port LAN port AC inlets Tensioner...

Quick Reference Guide
Page 6
... steps to avoid creases and curling. 1. WARNING: The heaters and media holding plates. Caution: Load media immediately before printing to use the built-in this manual apply to avoid burns. If you start, make sure the printer is turned on -screen User's Guide for loading and removing. be hot; Open the...
... steps to avoid creases and curling. 1. WARNING: The heaters and media holding plates. Caution: Load media immediately before printing to use the built-in this manual apply to avoid burns. If you start, make sure the printer is turned on -screen User's Guide for loading and removing. be hot; Open the...
Quick Reference Guide
Page 9
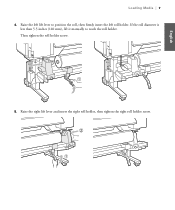
English Loading Media | 7 4. If the roll diameter is less than 5.5 inches (140 mm), lift it manually to position the roll, then firmly insert the left roll holder. Then tighten the roll holder screw. 5. Raise the right lift lever and insert the right roll holder, then tighten the right roll holder screw. Raise the left lift lever to reach the roll holder.
English Loading Media | 7 4. If the roll diameter is less than 5.5 inches (140 mm), lift it manually to position the roll, then firmly insert the left roll holder. Then tighten the roll holder screw. 5. Raise the right lift lever and insert the right roll holder, then tighten the right roll holder screw. Raise the left lift lever to reach the roll holder.
Quick Reference Guide
Page 11
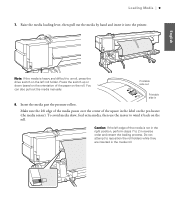
... center of the square in 8. Caution: If the left roll holder. Insert the media past the pressure rollers. You can also pull out the media manually. Loading Media | 9 7. Raise the media loading lever, then pull out the media by hand and insert it back on the left edge of the paper...
... center of the square in 8. Caution: If the left roll holder. Insert the media past the pressure rollers. You can also pull out the media manually. Loading Media | 9 7. Raise the media loading lever, then pull out the media by hand and insert it back on the left edge of the paper...
Quick Reference Guide
Page 18
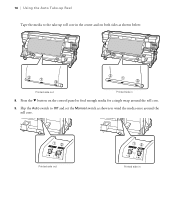
Press the d button on the control panel to the take-up Reel Tape the media to feed enough media for a single wrap around the roll core. 16 | Using the Auto Take-up roll core in the center and on both sides as shown to wind the media once around the roll core. 9. Flip the Auto switch to Off and set the Manual switch as shown below: Printed side out Printed side in Printed side out Printed side in 8.
Press the d button on the control panel to the take-up Reel Tape the media to feed enough media for a single wrap around the roll core. 16 | Using the Auto Take-up roll core in the center and on both sides as shown to wind the media once around the roll core. 9. Flip the Auto switch to Off and set the Manual switch as shown below: Printed side out Printed side in Printed side out Printed side in 8.
Quick Reference Guide
Page 20
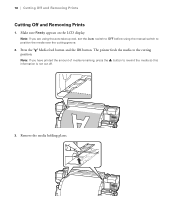
18 | Cutting Off and Removing Prints Cutting Off and Removing Prints 1. The printer feeds the media to rewind the media so this information is not cut off. 3. Press the Media feed button and the OK button. Remove the media holding plates. Note: If you are using the auto take-up reel, set the Auto switch to OFF before using the manual switch to position the media over the cutting groove. 2. Note: If you have printed the amount of media remaining, press the u button to the cutting position. Make sure Ready appears on the LCD display.
18 | Cutting Off and Removing Prints Cutting Off and Removing Prints 1. The printer feeds the media to rewind the media so this information is not cut off. 3. Press the Media feed button and the OK button. Remove the media holding plates. Note: If you are using the auto take-up reel, set the Auto switch to OFF before using the manual switch to position the media over the cutting groove. 2. Note: If you have printed the amount of media remaining, press the u button to the cutting position. Make sure Ready appears on the LCD display.
Quick Reference Guide
Page 23
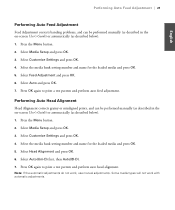
... Setup and press OK. 3. Performing Auto Head Alignment Head Alignment corrects grainy or misaligned prints, and can be performed manually (as described in the on -screen User's Guide) or automatically (as described below ). 1. Some media types will not work , use... Setup and press OK. 3. English Performing Auto Feed Adjustment | 21 Performing Auto Feed Adjustment Feed Adjustment corrects banding problems, and can be performed manually (as described in the on -screen User's Guide) or automatically (as described below ). 1. Select Feed Adjustment and press OK. 6. Select Auto ...
... Setup and press OK. 3. Performing Auto Head Alignment Head Alignment corrects grainy or misaligned prints, and can be performed manually (as described in the on -screen User's Guide) or automatically (as described below ). 1. Some media types will not work , use... Setup and press OK. 3. English Performing Auto Feed Adjustment | 21 Performing Auto Feed Adjustment Feed Adjustment corrects banding problems, and can be performed manually (as described in the on -screen User's Guide) or automatically (as described below ). 1. Select Feed Adjustment and press OK. 6. Select Auto ...

Setup Guide
Page 4
...) When choosing a place for the printer, leave adequate room for each printer: • S30670 - 483 lb (219 kg) • S50670 - 524 lb (238 kg) • S70670 - 504 lb (229 kg) WARNING: Six people are required to set up and use the printer. 2 | Unpacking and Assembling the Printer Unpacking and Assembling the...
...) When choosing a place for the printer, leave adequate room for each printer: • S30670 - 483 lb (219 kg) • S50670 - 524 lb (238 kg) • S70670 - 504 lb (229 kg) WARNING: Six people are required to set up and use the printer. 2 | Unpacking and Assembling the Printer Unpacking and Assembling the...
User Manual
Page 4
... 93 Changing Heater and Fan Settings 99 Correcting Print Misalignment (Head Alignment 101 Feed Adjustment (Manual Feed Adjustment 103 Using a Test Pattern 104 Performing Feed Adjustment During Printing 106 Printable area - S70670/S50670 107 Positioning Media of Waste Ink 133 Replacing the Wiper and Wiper Cleaner 135 Replacing...141 Regular Replacement Check Sheet 142 Replacing Ink Cartridges 143 How to replace 143 Parts That Are Periodically Replaced 145 Contents 4 S70670/S50670 39 Loading Media - Chapter 2 Basic Operations Loading and Exchanging Media 39 Loading Media -
... 93 Changing Heater and Fan Settings 99 Correcting Print Misalignment (Head Alignment 101 Feed Adjustment (Manual Feed Adjustment 103 Using a Test Pattern 104 Performing Feed Adjustment During Printing 106 Printable area - S70670/S50670 107 Positioning Media of Waste Ink 133 Replacing the Wiper and Wiper Cleaner 135 Replacing...141 Regular Replacement Check Sheet 142 Replacing Ink Cartridges 143 How to replace 143 Parts That Are Periodically Replaced 145 Contents 4 S70670/S50670 39 Loading Media - Chapter 2 Basic Operations Loading and Exchanging Media 39 Loading Media -
User Manual
Page 9
... or plugs unnecessary, but the instructions in the same environment as this product. Note: Notes contain useful or additional information on the operation of this manual apply to this product. Illustrations Unless otherwise noted, the illustrations show the S30670, but care is needed to avoid serious bodily injury. Do not touch...
... or plugs unnecessary, but the instructions in the same environment as this product. Note: Notes contain useful or additional information on the operation of this manual apply to this product. Illustrations Unless otherwise noted, the illustrations show the S30670, but care is needed to avoid serious bodily injury. Do not touch...

User Manual
Page 11
... in use . 11 Airflow vents These vents vent air from this tube. Choose Off to disable auto take-up. 9 Manual switch Use this switch to the roll core. On : An error occurred. S70670: 8 colors/10 colors S50670: 4 colors/5 colors In 8 or 4 color mode, you need to use . 14 Waste ink ...bottle Waste ink collects in place once they have been attached to select the manual take-up direction.AutoThe selected option takes effect when the...
... in use . 11 Airflow vents These vents vent air from this tube. Choose Off to disable auto take-up. 9 Manual switch Use this switch to the roll core. On : An error occurred. S70670: 8 colors/10 colors S50670: 4 colors/5 colors In 8 or 4 color mode, you need to use . 14 Waste ink ...bottle Waste ink collects in place once they have been attached to select the manual take-up direction.AutoThe selected option takes effect when the...

User Manual
Page 14
... in this holder. 12 Adjuster The adjusters keep the media in this bottle. Raise the lever to release the media prior to select the manual take-up direction. 8 Manual switch Use this switch to removal. 23 Alert lamp This lamp lights or flashes when an error occurs. Replace with a new waste ink...
... in this holder. 12 Adjuster The adjusters keep the media in this bottle. Raise the lever to release the media prior to select the manual take-up direction. 8 Manual switch Use this switch to removal. 23 Alert lamp This lamp lights or flashes when an error occurs. Replace with a new waste ink...

User Manual
Page 22
..., platen heater, and after heater. 12 W button (pause/cancel button) The printer enters pause status if this button to adjust media feed. See "Feed Adjustment (Manual Feed Adjustment)" on page 80. Introduction 22 See "Cutting Media" on page 103. When printing is in the ready state, you can feed the media...
..., platen heater, and after heater. 12 W button (pause/cancel button) The printer enters pause status if this button to adjust media feed. See "Feed Adjustment (Manual Feed Adjustment)" on page 80. Introduction 22 See "Cutting Media" on page 103. When printing is in the ready state, you can feed the media...
User Manual
Page 82
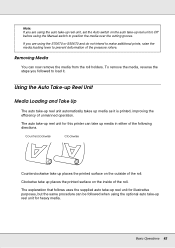
... the auto take -up reel unit automatically takes up reel unit to Off before using the Manual switch to load it is printed, improving the efficiency of the following directions. Note: If you are using the S70670 or S50670 and do not intend to make additional prints, raise the media loading lever...
... the auto take -up reel unit automatically takes up reel unit to Off before using the Manual switch to load it is printed, improving the efficiency of the following directions. Note: If you are using the S70670 or S50670 and do not intend to make additional prints, raise the media loading lever...

User Manual
Page 83
Follow the instructions in the manual when loading media or roll cores or removing media from the take-up reel unit roll core holder. 2. See "High Print Quality" on page 27. ... the auto take-up roll. Attaching the Roll Core 1. Failure to feed the media as far as expected when ink layering is performed with the S70670 or S50670, causing a decline in print quality. Basic Operations 83 Dropping media, roll cores, or take-up rolls could result in injury. Loosen the roll...
Follow the instructions in the manual when loading media or roll cores or removing media from the take-up reel unit roll core holder. 2. See "High Print Quality" on page 27. ... the auto take-up roll. Attaching the Roll Core 1. Failure to feed the media as far as expected when ink layering is performed with the S70670 or S50670, causing a decline in print quality. Basic Operations 83 Dropping media, roll cores, or take-up rolls could result in injury. Loosen the roll...
User Manual
Page 86
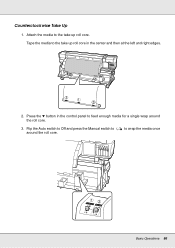
Tape the media to feed enough media for a single wrap around the roll core. Press the d button in the control panel to the take up roll core in the center and then at the left and right edges. 2. Flip the Auto switch to Off and press the Manual switch to the take up roll core. Attach the media to around the roll core. 3. Counterclockwise Take Up 1. to wrap the media once Basic Operations 86
Tape the media to feed enough media for a single wrap around the roll core. Press the d button in the control panel to the take up roll core in the center and then at the left and right edges. 2. Flip the Auto switch to Off and press the Manual switch to the take up roll core. Attach the media to around the roll core. 3. Counterclockwise Take Up 1. to wrap the media once Basic Operations 86
User Manual
Page 88
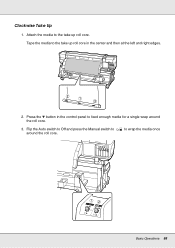
Tape the media to the take up roll core in the control panel to around the roll core. 3. Clockwise Take Up 1. Press the d button in the center and then at the left and right edges. 2. Flip the Auto switch to Off and press the Manual switch to feed enough media for a single wrap around the roll core. Attach the media to wrap the media once Basic Operations 88 to the take up roll core.
Tape the media to the take up roll core in the control panel to around the roll core. 3. Clockwise Take Up 1. Press the d button in the center and then at the left and right edges. 2. Flip the Auto switch to Off and press the Manual switch to feed enough media for a single wrap around the roll core. Attach the media to wrap the media once Basic Operations 88 to the take up roll core.
User Manual
Page 90
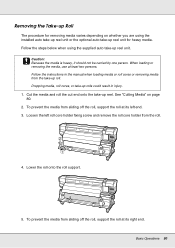
To prevent the media from the take -up rolls could result in the manual when loading media or roll cores or removing media from sliding off the roll, support the roll at its left roll core holder fixing screw ...
To prevent the media from the take -up rolls could result in the manual when loading media or roll cores or removing media from sliding off the roll, support the roll at its left roll core holder fixing screw ...

User Manual
Page 94
... banks for use. 1. Using distinctive names makes it easier to correct banding (horizontal banding, lines, or strips of uneven color). In manual feed adjustment, the user visually inspects print results and enters a correction by a sensor while a test pattern is displayed, press the r... Setting Name and press the Z button. 2. For more information on manual feed adjustment, see "Feed Adjustment (Manual Feed Adjustment)" on page 103. The Feed Adjustment menu contains two options: Auto and Manual. Note that auto feed adjustment has not completely resolved the problem. Setting...
... banks for use. 1. Using distinctive names makes it easier to correct banding (horizontal banding, lines, or strips of uneven color). In manual feed adjustment, the user visually inspects print results and enters a correction by a sensor while a test pattern is displayed, press the r... Setting Name and press the Z button. 2. For more information on manual feed adjustment, see "Feed Adjustment (Manual Feed Adjustment)" on page 103. The Feed Adjustment menu contains two options: Auto and Manual. Note that auto feed adjustment has not completely resolved the problem. Setting...


