
Quick Reference Guide
Page 3
S50670 and S70670 3 Back 4 Loading Media 4 Using the Auto Take-up Reel 13 Cutting Off and Removing Prints 18 Configuring Media 19 Pre-Printing Checklist 19 Creating Media Configurations 20 Performing Auto Feed Adjustment 21 Performing Auto Head Alignment 21 Cleaning the Media System 22 Checking and Cleaning the Print Head 23 Maintaining the Printer...32 Replacing the Wiper, Wiper Cleaner, and Flushing Pad 34 Ordering Supplies and Accessories 37 Where to Get Help 37 S30670 2 Front - S50670 and S70670 3 Inside - S30670 2 Inside - English Contents Printer Parts 2 Front -
S50670 and S70670 3 Back 4 Loading Media 4 Using the Auto Take-up Reel 13 Cutting Off and Removing Prints 18 Configuring Media 19 Pre-Printing Checklist 19 Creating Media Configurations 20 Performing Auto Feed Adjustment 21 Performing Auto Head Alignment 21 Cleaning the Media System 22 Checking and Cleaning the Print Head 23 Maintaining the Printer...32 Replacing the Wiper, Wiper Cleaner, and Flushing Pad 34 Ordering Supplies and Accessories 37 Where to Get Help 37 S30670 2 Front - S50670 and S70670 3 Inside - S30670 2 Inside - English Contents Printer Parts 2 Front -

Quick Reference Guide
Page 4
S30670 Left maintenance cover Front cover Control panel Media loading lever Right maintenance cover USB port After heater Tensioner LAN port AC inlets Cartridge check lights Lock levers Ink cartridges Roll locking screw Roll support Auto switch Vent Waste ink tube Waste ink tank Adjuster Manual switch Caster Inside - S30670 Print head in maintenance position Flushing pad Wiper Media holding plate Cutter Pressure groove rollers Platen heater Wiper cleaner Nozzle caps 2 | Printer Parts Printer Parts Front -
S30670 Left maintenance cover Front cover Control panel Media loading lever Right maintenance cover USB port After heater Tensioner LAN port AC inlets Cartridge check lights Lock levers Ink cartridges Roll locking screw Roll support Auto switch Vent Waste ink tube Waste ink tank Adjuster Manual switch Caster Inside - S30670 Print head in maintenance position Flushing pad Wiper Media holding plate Cutter Pressure groove rollers Platen heater Wiper cleaner Nozzle caps 2 | Printer Parts Printer Parts Front -

Quick Reference Guide
Page 5
...pad Wipers Cartridge check lights Lock levers Ink cartridges Media holding plate Platen heater Cutter groove Low pressure rollers (white) High pressure rollers (green) Nozzle caps Wiper cleaners S50670 and S70670 | 3 Front - S50670 and S70670 Front cover Left maintenance cover High speed dryer ...After heater Control panel Media loading lever Right maintenance cover USB port LAN port AC inlets Tensioner Roll ...
...pad Wipers Cartridge check lights Lock levers Ink cartridges Media holding plate Platen heater Cutter groove Low pressure rollers (white) High pressure rollers (green) Nozzle caps Wiper cleaners S50670 and S70670 | 3 Front - S50670 and S70670 Front cover Left maintenance cover High speed dryer ...After heater Control panel Media loading lever Right maintenance cover USB port LAN port AC inlets Tensioner Roll ...

Quick Reference Guide
Page 6
... plates may require two people for instructions. Unless otherwise noted, the illustrations show the S30670, but the instructions in media feeding unit. Caution: Load media immediately before printing to all three models. If you start, make sure the printer is turned on -screen User's Guide for loading and removing. Follow ...these steps to avoid burns. be hot; 4 | Back Back Drive switch Pre-heater Roll holder Handle Roll locking screw Lift lever Roll support Loading Media Before you are using the optional heavy roll...
... plates may require two people for instructions. Unless otherwise noted, the illustrations show the S30670, but the instructions in media feeding unit. Caution: Load media immediately before printing to all three models. If you start, make sure the printer is turned on -screen User's Guide for loading and removing. Follow ...these steps to avoid burns. be hot; 4 | Back Back Drive switch Pre-heater Roll holder Handle Roll locking screw Lift lever Roll support Loading Media Before you are using the optional heavy roll...

Quick Reference Guide
Page 7
Center the roll supports between the holders. At the back of the printer, loosen the roll locking screws and slide the roll holders apart. Note: If you don't see the right holder handle shaft, rotate the holder forward until it stops. English Loading Media | 5 2.
Center the roll supports between the holders. At the back of the printer, loosen the roll locking screws and slide the roll holders apart. Note: If you don't see the right holder handle shaft, rotate the holder forward until it stops. English Loading Media | 5 2.

Quick Reference Guide
Page 8
If the label with black squares is aligned as described in the Setup Guide. Orient the roll based on the printable side Printable side out Printable side in For the S50670/S70670, place the left edge is not in place, attach it as shown. Orient the roll based on the printable side Printable side out Printable side in back of the printer and the right edge on any of the printer. For the S30670, place the media on the roll supports and make sure the left edge of the media in any of the black squares on the back of the holes on the bar in 6 | Loading Media 3.
If the label with black squares is aligned as described in the Setup Guide. Orient the roll based on the printable side Printable side out Printable side in For the S50670/S70670, place the left edge is not in place, attach it as shown. Orient the roll based on the printable side Printable side out Printable side in back of the printer and the right edge on any of the printer. For the S30670, place the media on the roll supports and make sure the left edge of the media in any of the black squares on the back of the holes on the bar in 6 | Loading Media 3.
Quick Reference Guide
Page 9
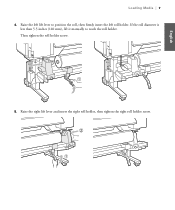
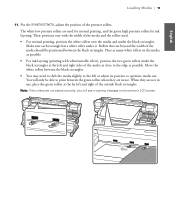
Raise the left roll holder. Raise the right lift lever and insert the right roll holder, then tighten the right roll holder screw. If the roll diameter is less than 5.5 inches (140 mm), lift it manually to position the roll, then firmly insert the left lift lever to reach the roll holder. Then tighten the roll holder screw. 5. English Loading Media | 7 4.
Raise the left roll holder. Raise the right lift lever and insert the right roll holder, then tighten the right roll holder screw. If the roll diameter is less than 5.5 inches (140 mm), lift it manually to position the roll, then firmly insert the left lift lever to reach the roll holder. Then tighten the roll holder screw. 5. English Loading Media | 7 4.
Quick Reference Guide
Page 10
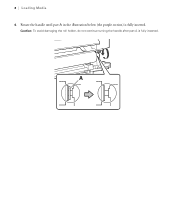
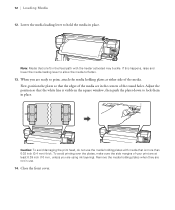
8 | Loading Media 6. Caution: To avoid damaging the roll holder, do not continue turning the handle after part A is fully inserted. Rotate the handle until part A in the illustration below (the purple section) is fully inserted.
8 | Loading Media 6. Caution: To avoid damaging the roll holder, do not continue turning the handle after part A is fully inserted. Rotate the handle until part A in the illustration below (the purple section) is fully inserted.
Quick Reference Guide
Page 11
...order and restart the loading process. To avoid media skew, feed extra media, then use the motor to 2 in the label on the pre-heater (the media sensor). Printable side out Printable side in the media roll. Raise the media loading lever, then pull out the media by hand and insert it back on the roll.... Press the switch up or down based on the orientation of the paper on the roll. English Note: If the media is not in the right ...
...order and restart the loading process. To avoid media skew, feed extra media, then use the motor to 2 in the label on the pre-heater (the media sensor). Printable side out Printable side in the media roll. Raise the media loading lever, then pull out the media by hand and insert it back on the roll.... Press the switch up or down based on the orientation of the paper on the roll. English Note: If the media is not in the right ...

Quick Reference Guide
Page 12
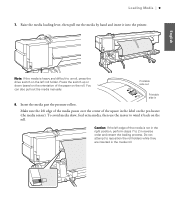
Move to the scale markings on the left side of the after heater. Keep the right edge of the media parallel to the front of the after heater. 10 | Loading Media 9. Pull the media straight forward past the label on the right side of the printer, make sure the front cover is open, and grasp the media as shown. 10.
Move to the scale markings on the left side of the after heater. Keep the right edge of the media parallel to the front of the after heater. 10 | Loading Media 9. Pull the media straight forward past the label on the right side of the printer, make sure the front cover is open, and grasp the media as shown. 10.
Quick Reference Guide
Page 13
...media slightly to the left or adjust its position to optimize media use , place the green rollers at the left and right of the media... should be able to the edge as possible. Make sure each rectangle has a white roller under the black rectangles. Place as many white rollers on the printer's LCD screen. You will see a warning message on the media... as possible. • For ink layering (printing with the width of the media as ... left and right sides of the media and the rollers used for normal printing...rollers over the media and under it. The white low pressure ...
...media slightly to the left or adjust its position to optimize media use , place the green rollers at the left and right of the media... should be able to the edge as possible. Make sure each rectangle has a white roller under the black rectangles. Place as many white rollers on the printer's LCD screen. You will see a warning message on the media... as possible. • For ink layering (printing with the width of the media as ... left and right sides of the media and the rollers used for normal printing...rollers over the media and under it. The white low pressure ...
Quick Reference Guide
Page 14
... plates at least 0.39 inch (10 mm, unless you are using ink layering). Remove the media holding plates with media that is left in the feed path with the heater activated may buckle. Lower the media loading lever to lock them in the centers of the round holes. First, position the plates so... that the white line is more than 0.02 inch (0.4 mm) thick. Adjust the position so that the edges of the media are at either side of your print are in place. To avoid printing over the plates, make sure the side margins of the...
... plates at least 0.39 inch (10 mm, unless you are using ink layering). Remove the media holding plates with media that is left in the feed path with the heater activated may buckle. Lower the media loading lever to lock them in the centers of the round holes. First, position the plates so... that the white line is more than 0.02 inch (0.4 mm) thick. Adjust the position so that the edges of the media are at either side of your print are in place. To avoid printing over the plates, make sure the side margins of the...
Quick Reference Guide
Page 15
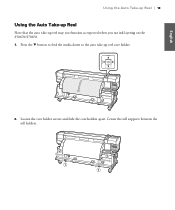
Loosen the core holder screws and slide the core holders apart. Center the roll supports between the roll holders. Press the d button to feed the media down to the auto take -up reel core holder. 2. English Using the Auto Take-up Reel | 13 Using the Auto Take-up Reel Note that the auto take -up reel may not function as expected when you use ink layering on the S50670/S70670. 1.
Loosen the core holder screws and slide the core holders apart. Center the roll supports between the roll holders. Press the d button to feed the media down to the auto take -up reel core holder. 2. English Using the Auto Take-up Reel | 13 Using the Auto Take-up Reel Note that the auto take -up reel may not function as expected when you use ink layering on the S50670/S70670. 1.
Quick Reference Guide
Page 16
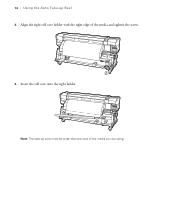
Insert the roll core onto the right holder. Note: The take-up Reel 3. 14 | Using the Auto Take-up core must be wider than the core of the media and tighten the screw. 4. Align the right roll core holder with the right edge of the media you are using.
Insert the roll core onto the right holder. Note: The take-up Reel 3. 14 | Using the Auto Take-up core must be wider than the core of the media and tighten the screw. 4. Align the right roll core holder with the right edge of the media you are using.

Quick Reference Guide
Page 17
Attach the media to the take up the media either counterclockwise (printed side out) or clockwise (printed side in the illustration is no longer visible. Insert the left holder into the roll core. Do not push the holder too far in You can take -up Reel | 15 5. English Using the Auto Take-up roll core. Printed side out Printed side in . 7. Tighten the roll core holder screw. Caution: Stop when part A is fully inserted. 6. Slide the holder in until part A in ).
Attach the media to the take up the media either counterclockwise (printed side out) or clockwise (printed side in the illustration is no longer visible. Insert the left holder into the roll core. Do not push the holder too far in You can take -up Reel | 15 5. English Using the Auto Take-up roll core. Printed side out Printed side in . 7. Tighten the roll core holder screw. Caution: Stop when part A is fully inserted. 6. Slide the holder in until part A in ).
Quick Reference Guide
Page 18
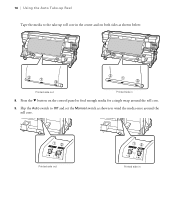
Press the d button on both sides as shown to feed enough media for a single wrap around the roll core. Flip the Auto switch to Off and set the Manual switch as shown below: Printed side out Printed side in Printed side out Printed side in 8. 16 | Using the Auto Take-up Reel Tape the media to the take-up roll core in the center and on the control panel to wind the media once around the roll core. 9.
Press the d button on both sides as shown to feed enough media for a single wrap around the roll core. Flip the Auto switch to Off and set the Manual switch as shown below: Printed side out Printed side in Printed side out Printed side in 8. 16 | Using the Auto Take-up Reel Tape the media to the take-up roll core in the center and on the control panel to wind the media once around the roll core. 9.

Quick Reference Guide
Page 19
Printed side in 12. 10. Press the d button on the control panel to feed the media until the take-up Reel | 17 English Printed side out 11. Flip the Auto switch as shown: Using the Auto Take-up roll core begins to turn. Lower the tension bar.
Printed side in 12. 10. Press the d button on the control panel to feed the media until the take-up Reel | 17 English Printed side out 11. Flip the Auto switch as shown: Using the Auto Take-up roll core begins to turn. Lower the tension bar.
Quick Reference Guide
Page 20
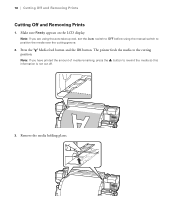
Note: If you have printed the amount of media remaining, press the u button to rewind the media so this information is not cut off. 3. Press the Media feed button and the OK button. Note: If you are using the auto take-up reel, set the Auto switch to OFF before using the manual switch to the cutting position. 18 | Cutting Off and Removing Prints Cutting Off and Removing Prints 1. The printer feeds the media to position the media over the cutting groove. 2. Remove the media holding plates. Make sure Ready appears on the LCD display.
Note: If you have printed the amount of media remaining, press the u button to rewind the media so this information is not cut off. 3. Press the Media feed button and the OK button. Note: If you are using the auto take-up reel, set the Auto switch to OFF before using the manual switch to the cutting position. 18 | Cutting Off and Removing Prints Cutting Off and Removing Prints 1. The printer feeds the media to position the media over the cutting groove. 2. Remove the media holding plates. Make sure Ready appears on the LCD display.

Quick Reference Guide
Page 21
...configuration or settings bank (a group of the cutting tool to load it. Configuring Media Before printing on that media. WARNING: Do not place your users will recognize. If you are finished using the media, remove it from the roll holders, reversing the steps you followed to avoid ...Create a configuration for as many as 30 different media types. Pre-Printing Checklist Whenever you print on a new media type, follow these guidelines to configure the media and print: • Check the media packaging for print requirements. • Select a media bank number (1 to 30) and assign an ...
...configuration or settings bank (a group of the cutting tool to load it. Configuring Media Before printing on that media. WARNING: Do not place your users will recognize. If you are finished using the media, remove it from the roll holders, reversing the steps you followed to avoid ...Create a configuration for as many as 30 different media types. Pre-Printing Checklist Whenever you print on a new media type, follow these guidelines to configure the media and print: • Check the media packaging for print requirements. • Select a media bank number (1 to 30) and assign an ...
Quick Reference Guide
Page 22
...; Print a nozzle check pattern and clean the print head, if necessary. Select the settings for this media type and press OK. 5. 20 | Creating Media Configurations • Select these settings using the information supplied with your media. Creating Media Configurations 1. See page 23. • Perform an Auto Feed Adjustment. Select Customize Settings and press OK...
...; Print a nozzle check pattern and clean the print head, if necessary. Select the settings for this media type and press OK. 5. 20 | Creating Media Configurations • Select these settings using the information supplied with your media. Creating Media Configurations 1. See page 23. • Perform an Auto Feed Adjustment. Select Customize Settings and press OK...
