Network Guide
Page 5
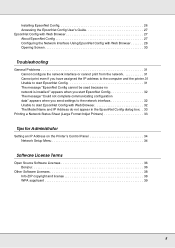
... box. . 33 Printing a Network Status Sheet (Large Format Inkjet Printers 33 Tips for Administrator Setting an IP Address on the Printer's Control Panel 34 Network Setup Menu 34 Software License Terms Open Source Software Licenses 36 Bonjour 36 Other Software Licenses 38 Info-ZIP copyright and license 38 WPA supplicant 39...
... box. . 33 Printing a Network Status Sheet (Large Format Inkjet Printers 33 Tips for Administrator Setting an IP Address on the Printer's Control Panel 34 Network Setup Menu 34 Software License Terms Open Source Software Licenses 36 Bonjour 36 Other Software Licenses 38 Info-ZIP copyright and license 38 WPA supplicant 39...

Network Guide
Page 17
...section in this chapter appropriate for use on the TCP/IP network and install the printer driver on -screen instructions to select the Epson Driver and Utilities check box and EpsonNet Configuration Utility check box, then click the Install button. Insert the Software Disc into the ...Continue. 3. Note: If your language, and then click the Next button. 5. If the software installer screen does not appear, double-click setup.exe on the computer. Select your printer is connected to install the printer driver on the Software Disc. 4. Installing the Printer Driver About ...
...section in this chapter appropriate for use on the TCP/IP network and install the printer driver on -screen instructions to select the Epson Driver and Utilities check box and EpsonNet Configuration Utility check box, then click the Install button. Insert the Software Disc into the ...Continue. 3. Note: If your language, and then click the Next button. 5. If the software installer screen does not appear, double-click setup.exe on the computer. Select your printer is connected to install the printer driver on the Software Disc. 4. Installing the Printer Driver About ...

Network Guide
Page 21
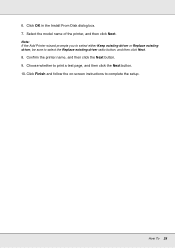
... driver radio button. If the Add Printer wizard prompts you to select either Keep existing driver or Replace existing driver, be sure to complete the setup. Select the CD/DVD drive for the drive, and navigate to start the Add Printer wizard, and then click Next. Click Open. 6. Click Finish and...
... driver radio button. If the Add Printer wizard prompts you to select either Keep existing driver or Replace existing driver, be sure to complete the setup. Select the CD/DVD drive for the drive, and navigate to start the Add Printer wizard, and then click Next. Click Open. 6. Click Finish and...
Network Guide
Page 25
Confirm the printer name, and then click the Next button. 9. 6. Click Finish and follow the on-screen instructions to print a test page, and then click the Next button. 10. Choose whether to complete the setup. How To 25 Note: If the Add Printer wizard prompts you to select either Keep existing driver or Replace existing driver, be sure to select the Replace existing driver radio button, and then click Next. 8. Click OK in the Install From Disk dialog box. 7. Select the model name of the printer, and then click Next.
Confirm the printer name, and then click the Next button. 9. 6. Click Finish and follow the on-screen instructions to print a test page, and then click the Next button. 10. Choose whether to complete the setup. How To 25 Note: If the Add Printer wizard prompts you to select either Keep existing driver or Replace existing driver, be sure to select the Replace existing driver radio button, and then click Next. 8. Click OK in the Install From Disk dialog box. 7. Select the model name of the printer, and then click Next.
Network Guide
Page 28
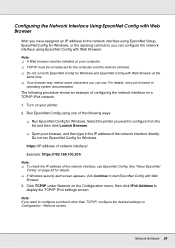
... IPv4 network. 1. Configuring the Network Interface Using EpsonNet Config with Web Browser After you have assigned an IP address to the network interface using EpsonNet Setup, EpsonNet Config for Windows, or the arp/ping command, you can use EpsonNet Config. Note: O A Web browser must be installed on your browser, and then...
... IPv4 network. 1. Configuring the Network Interface Using EpsonNet Config with Web Browser After you have assigned an IP address to the network interface using EpsonNet Setup, EpsonNet Config for Windows, or the arp/ping command, you can use EpsonNet Config. Note: O A Web browser must be installed on your browser, and then...
Network Guide
Page 33
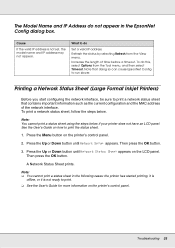
... the steps below if your printer does not have an LCD panel. Then press the OK button. 3. Press the Up or Down button until Network Setup appears. O See the User's Guide for more information on how to do Set a valid IP address. Note that contains important information such as the current...
... the steps below if your printer does not have an LCD panel. Then press the OK button. 3. Press the Up or Down button until Network Setup appears. O See the User's Guide for more information on how to do Set a valid IP address. Note that contains important information such as the current...

Network Guide
Page 34
... Then press the OK button. 5. Do one of your printer model. Press the Up or down button until Network Setup appears. Print a network status sheet to confirm the new IP address. Network Setup Menu These items are used to make network settings on the network. Tips for detailed instructions. Note: To use...
... Then press the OK button. 5. Do one of your printer model. Press the Up or down button until Network Setup appears. Print a network status sheet to confirm the new IP address. Network Setup Menu These items are used to make network settings on the network. Tips for detailed instructions. Note: To use...
Network Guide
Page 35
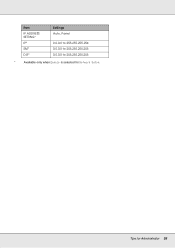
Tips for Network Setup. Item IP ADDRESS SETTING* IP* SM* DG* Settings Auto, Panel 0.0.0.0 to 255.255.255.254 0.0.0.0 to 255.255.255.255 0.0.0.0 to 255.255.255.255 * Available only when Enable is selected for Administrator 35
Tips for Network Setup. Item IP ADDRESS SETTING* IP* SM* DG* Settings Auto, Panel 0.0.0.0 to 255.255.255.254 0.0.0.0 to 255.255.255.255 0.0.0.0 to 255.255.255.255 * Available only when Enable is selected for Administrator 35
User Manual
Page 3
... Panel Menus...39 Accessing the Printer's Menus ...39 Paper Menu Settings...39 Maintenance Menu Settings...41 Setup Menu Settings ...43 Maintenance...48 Maintenance Precautions...48 Cleaning the Product...49 Stirring High Density Black Ink ...51 3 Contents Epson SureColor F6200 User's Guide ...7 Introduction to Your Printer...8 Notations Used in the Documentation 8 Printer Part Locations...8 Product...
... Panel Menus...39 Accessing the Printer's Menus ...39 Paper Menu Settings...39 Maintenance Menu Settings...41 Setup Menu Settings ...43 Maintenance...48 Maintenance Precautions...48 Cleaning the Product...49 Stirring High Density Black Ink ...51 3 Contents Epson SureColor F6200 User's Guide ...7 Introduction to Your Printer...8 Notations Used in the Documentation 8 Printer Part Locations...8 Product...
User Manual
Page 15
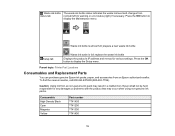
... problems with the product that may result in a malfunction. Parent topic: Printer Part Locations Consumables and Replacement Parts You can purchase genuine Epson ink packs, paper, and accessories from an non-genuine ink pack may occur when using non-genuine ink packs. Consumable High-Density Black...from status tab normal (left) to display the Setup menu. prepare a new waste ink bottle Setup tab : Waste ink bottle is almost full; To find the nearest reseller, call 800-GO-EPSON (800-463-7766). Caution: Using ink from an Epson authorized reseller. Press the OK button to display the...
... problems with the product that may result in a malfunction. Parent topic: Printer Part Locations Consumables and Replacement Parts You can purchase genuine Epson ink packs, paper, and accessories from an non-genuine ink pack may occur when using non-genuine ink packs. Consumable High-Density Black...from status tab normal (left) to display the Setup menu. prepare a new waste ink bottle Setup tab : Waste ink bottle is almost full; To find the nearest reseller, call 800-GO-EPSON (800-463-7766). Caution: Using ink from an Epson authorized reseller. Press the OK button to display the...
User Manual
Page 27
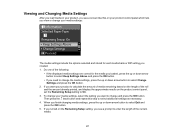
... settings: The media settings include the options selected and stored for each media bank or RIP setting you created. 1. If you turned on the Remaining Setup setting, you finish changing media settings, press the up or down arrow button to select Exit and press the OK button. 5. To change your media... to On. 3. Do one of the current media. 27 Then press the back button and repeat this on the product control panel, set the Remaining Setup setting to change and press the OK button.
... settings: The media settings include the options selected and stored for each media bank or RIP setting you created. 1. If you turned on the Remaining Setup setting, you finish changing media settings, press the up or down arrow button to select Exit and press the OK button. 5. To change your media... to On. 3. Do one of the current media. 27 Then press the back button and repeat this on the product control panel, set the Remaining Setup setting to change and press the OK button.
User Manual
Page 33
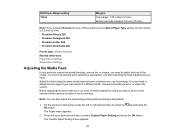
...): • Premium Glossy 250 • Premium Semigloss 250 • Premium Luster 260 • Premium Semimatte 260 Parent topic: Media Handling Related references Paper Menu Settings Setup Menu Settings Adjusting the Media Feed If your printouts contain horizontal banding, uneven tint, or stripes, you need to adjust the feed of a different width...
...): • Premium Glossy 250 • Premium Semigloss 250 • Premium Luster 260 • Premium Semimatte 260 Parent topic: Media Handling Related references Paper Menu Settings Setup Menu Settings Adjusting the Media Feed If your printouts contain horizontal banding, uneven tint, or stripes, you need to adjust the feed of a different width...
User Manual
Page 36
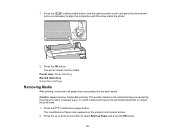
The printer slowly cuts the media. Parent topic: Media Handling Related references Setup Menu Settings Removing Media After printing, remove the roll paper from your product for the best results. Caution: Always remove media after printing. This avoids ...
The printer slowly cuts the media. Parent topic: Media Handling Related references Setup Menu Settings Removing Media After printing, remove the roll paper from your product for the best results. Caution: Always remove media after printing. This avoids ...
User Manual
Page 39
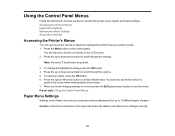
... a menu, press the pause/cancel button to access the printer menu system and select settings. Accessing the Printer's Menus Paper Menu Settings Maintenance Menu Settings Setup Menu Settings Accessing the Printer's Menus You can also use these buttons to scroll through the settings. Note: Press the back button to switch between...
... a menu, press the pause/cancel button to access the printer menu system and select settings. Accessing the Printer's Menus Paper Menu Settings Maintenance Menu Settings Setup Menu Settings Accessing the Printer's Menus You can also use these buttons to scroll through the settings. Note: Press the back button to switch between...
User Manual
Page 43
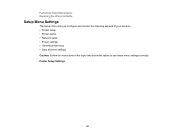
Printer Setup Settings 43 Performing Head Maintenance Replacing the Waste Ink Bottle Setup Menu Settings The Setup menu lets you configure and monitor the following aspects of your product: • Printer setup • Printer status • Network setup • Power settings • General preferences • Date and time settings Caution: Follow the instructions in the topic links below the tables to use these menu settings correctly.
Printer Setup Settings 43 Performing Head Maintenance Replacing the Waste Ink Bottle Setup Menu Settings The Setup menu lets you configure and monitor the following aspects of your product: • Printer setup • Printer status • Network setup • Power settings • General preferences • Date and time settings Caution: Follow the instructions in the topic links below the tables to use these menu settings correctly.
User Manual
Page 44
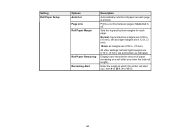
... as each page. Displays and records the amount of paper remaining on a roll (after you , from 4 to 50 ft (1 to 15 m). 44 Setting Roll Paper Setup Options Auto Cut Page Line Roll Paper Margin Roll Paper Remaining Remaining Alert Description Automatically cuts the roll paper as indicated. Prints a cut line between...
... as each page. Displays and records the amount of paper remaining on a roll (after you , from 4 to 50 ft (1 to 15 m). 44 Setting Roll Paper Setup Options Auto Cut Page Line Roll Paper Margin Roll Paper Remaining Remaining Alert Description Automatically cuts the roll paper as indicated. Prints a cut line between...
User Manual
Page 46
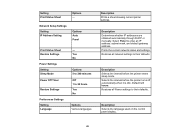
.... Restores all Power settings to 24 hours Yes No Options Various languages Description Prints a sheet showing current printer settings. Setting Print Status Sheet Options - Network Setup Settings Setting IP Address Setting Options Auto Panel Print Status Sheet Restore Settings Power Settings Setting Sleep Mode Power Off Timer Restore Settings Preferences Settings...
.... Restores all Power settings to 24 hours Yes No Options Various languages Description Prints a sheet showing current printer settings. Setting Print Status Sheet Options - Network Setup Settings Setting IP Address Setting Options Auto Panel Print Status Sheet Restore Settings Power Settings Setting Sleep Mode Power Off Timer Restore Settings Preferences Settings...
User Manual
Page 47
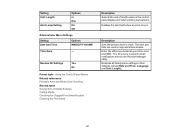
.... Description Sets the printer's built-in email notifications sent by the Remote Manager utility. Enter the difference between your time zone and GMT. Restores all Setup menu settings to their defaults (except Date and Time, Language, and Unit: Length). 47 Setting Unit: Length Alert Lamp Setting Options m ft/in logs and...
.... Description Sets the printer's built-in email notifications sent by the Remote Manager utility. Enter the difference between your time zone and GMT. Restores all Setup menu settings to their defaults (except Date and Time, Language, and Unit: Length). 47 Setting Unit: Length Alert Lamp Setting Options m ft/in logs and...

User Manual
Page 68
... button. This lets you can select how often the product performs a nozzle check in the lines. Press the OK button. Nozzles are gaps in the Setup menu. • Manually run a nozzle check from the product control panel, as described here. 1. Load roll paper and select the matching paper type on the...
... button. This lets you can select how often the product performs a nozzle check in the lines. Press the OK button. Nozzles are gaps in the Setup menu. • Manually run a nozzle check from the product control panel, as described here. 1. Load roll paper and select the matching paper type on the...

User Manual
Page 69
... light level. • Heavy: Use this cleaning level if you see faint printing or gaps in only certain rows of nozzles in the Setup menu. Press the up the product to step 5. • Selected Nozzles: Select this option when you finish, select Proceed and press the...you see the Maintenance menu. 2. You see faint printing or gaps in the check pattern. Parent topic: Print Head Maintenance Related references Setup Menu Settings Maintenance Menu Settings Related tasks Loading Media Viewing and Changing Media Settings Cleaning the Print Head Cleaning the Print Head If printouts are...
... light level. • Heavy: Use this cleaning level if you see faint printing or gaps in only certain rows of nozzles in the Setup menu. Press the up the product to step 5. • Selected Nozzles: Select this option when you finish, select Proceed and press the...you see the Maintenance menu. 2. You see faint printing or gaps in the check pattern. Parent topic: Print Head Maintenance Related references Setup Menu Settings Maintenance Menu Settings Related tasks Loading Media Viewing and Changing Media Settings Cleaning the Print Head Cleaning the Print Head If printouts are...


