Quick Reference Guide
Page 2
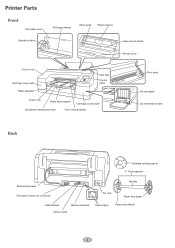
Printer Parts Front Roll paper cover Spindle holders Roll paper feeder Edge guide Paper support Rear manual feeder Printer cover Front cover Cartridge cover (left) Paper cassette Alert light Control panel Output tray Paper eject support Cartridge cover (right) Borderfree maintenance tank Front manual feeder Print head Ink cartridges Ink maintenance tank Back Bordless printing spacer 3" Core adapters Rear access panel Roll paper holder unit connector AC inlet Spindle Paper stop (gray) USB interface Network interface Airflow vents Status lights Paper stop (black) 1
Printer Parts Front Roll paper cover Spindle holders Roll paper feeder Edge guide Paper support Rear manual feeder Printer cover Front cover Cartridge cover (left) Paper cassette Alert light Control panel Output tray Paper eject support Cartridge cover (right) Borderfree maintenance tank Front manual feeder Print head Ink cartridges Ink maintenance tank Back Bordless printing spacer 3" Core adapters Rear access panel Roll paper holder unit connector AC inlet Spindle Paper stop (gray) USB interface Network interface Airflow vents Status lights Paper stop (black) 1
Quick Reference Guide
Page 3
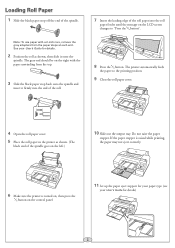
.... Note: To use paper with the paper unwinding from the paper stops at each end. Loading Roll Paper 1 Slide the black paper stop back onto the spindle and insert it firmly into the end of the roll. 7 Insert the leading edge of the roll paper into the roll paper feeder until the message ...on the LCD screen changes to the printing position. 9 Close the roll paper cover. 4 Open the roll paper cover. 5 Place the roll paper in the printer as shown, then slide...
.... Note: To use paper with the paper unwinding from the paper stops at each end. Loading Roll Paper 1 Slide the black paper stop back onto the spindle and insert it firmly into the end of the roll. 7 Insert the leading edge of the roll paper into the roll paper feeder until the message ...on the LCD screen changes to the printing position. 9 Close the roll paper cover. 4 Open the roll paper cover. 5 Place the roll paper in the printer as shown, then slide...

Quick Reference Guide
Page 4
...Make sure the roll paper is A3 or larger, extend the paper cassette to match the size of the paper. 2 Slide open the paper cassette, lift it slightly and then pull it out. 4 Slide the edge guides outward. 5 Thumb through a stack of paper, then gently tap it . 3 If your paper size is rewound... ends of the output tray to remove it on a flat surface to even the pages. 3 Removing Roll Paper 1 Open the roll paper cover. 2 Press the button. The paper rewinds automatically. Loading Paper in the Paper Cassette Make sure the printer is on. 1 Lift the edge of the spindle and lift up from ...
...Make sure the roll paper is A3 or larger, extend the paper cassette to match the size of the paper. 2 Slide open the paper cassette, lift it slightly and then pull it out. 4 Slide the edge guides outward. 5 Thumb through a stack of paper, then gently tap it . 3 If your paper size is rewound... ends of the output tray to remove it on a flat surface to even the pages. 3 Removing Roll Paper 1 Open the roll paper cover. 2 Press the button. The paper rewinds automatically. Loading Paper in the Paper Cassette Make sure the printer is on. 1 Lift the edge of the spindle and lift up from ...
Quick Reference Guide
Page 10
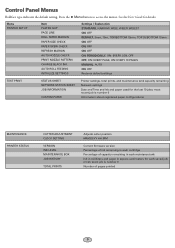
...'s Guide for the last 10 jobs; Menu PRINTER SETUP Item PLATEN GAP PAGE LINE ROLL PAPER MARGIN PAPER SIZE CHECK PAPER SKEW CHECK REFRESH MARGIN AUTO NOZZLE CHECK PRINT NOZZLE PATTERN CHANGE BLACK INK AUTO ROLL FEEDING INITIALIZE SETTINGS Settings / Explanation STANDARD, NARROW, WIDE, WIDER, WIDEST ON, OFF...in each saved job; most recent job is number 0 Number of capacity remaining in each maintance tank Ink in milliliters and paper in square centimeters for each cartridge Percentage of pages printed 9 Control Panel Menus Boldface type indicates the default setting. Press ...
...'s Guide for the last 10 jobs; Menu PRINTER SETUP Item PLATEN GAP PAGE LINE ROLL PAPER MARGIN PAPER SIZE CHECK PAPER SKEW CHECK REFRESH MARGIN AUTO NOZZLE CHECK PRINT NOZZLE PATTERN CHANGE BLACK INK AUTO ROLL FEEDING INITIALIZE SETTINGS Settings / Explanation STANDARD, NARROW, WIDE, WIDER, WIDEST ON, OFF...in each saved job; most recent job is number 0 Number of capacity remaining in each maintance tank Ink in milliliters and paper in square centimeters for each cartridge Percentage of pages printed 9 Control Panel Menus Boldface type indicates the default setting. Press ...

Quick Reference Guide
Page 11
... OFF, ON Resets all network settings 10 Control Panel Menus (continued) PAPER SETUP HEAD ALIGNMENT ROLL PAPER REMAINING REMAINING PPR SETUP ROLL PAPER LENGTH ROLL LENGTH ALERT PAPER TYPE CUSTOM PAPER PAPER TYPE PLATEN GAP THICKNESS PATTERN PAPER FEED ADJUST A PAPER FEED ADJUST B DRYING TIME PAPER SUCTION SET ROLL PAPER TENSION REMOVE SKEW PAPER THICKNESS PAPER TYPE PAPER THICKNESS ALIGNMENT AUTO MANUAL Setting appears only when no...
... OFF, ON Resets all network settings 10 Control Panel Menus (continued) PAPER SETUP HEAD ALIGNMENT ROLL PAPER REMAINING REMAINING PPR SETUP ROLL PAPER LENGTH ROLL LENGTH ALERT PAPER TYPE CUSTOM PAPER PAPER TYPE PLATEN GAP THICKNESS PATTERN PAPER FEED ADJUST A PAPER FEED ADJUST B DRYING TIME PAPER SUCTION SET ROLL PAPER TENSION REMOVE SKEW PAPER THICKNESS PAPER TYPE PAPER THICKNESS ALIGNMENT AUTO MANUAL Setting appears only when no...
User's Guide
Page 6
... the Spindle 55 Switching Between 2-Inch and 3-Inch Roll Paper 56 Cutting Roll Paper Manually with the Built-in Cutter 56 Adjusting the Platen Gap for Thick or Thin Paper 57 Optimizing the Settings for Your Paper 58 Creating Custom Paper Configurations 58 Selecting Custom Paper Configurations 60 3 Printing With Epson Drivers for Windows Sizing Images for Borderless Printing...
... the Spindle 55 Switching Between 2-Inch and 3-Inch Roll Paper 56 Cutting Roll Paper Manually with the Built-in Cutter 56 Adjusting the Platen Gap for Thick or Thin Paper 57 Optimizing the Settings for Your Paper 58 Creating Custom Paper Configurations 58 Selecting Custom Paper Configurations 60 3 Printing With Epson Drivers for Windows Sizing Images for Borderless Printing...
User's Guide
Page 7
Contents | 7 4 Printing With Epson Drivers for Macintosh Sizing Images for Borderless Printing on Roll Paper 90 Choosing Page Setup and Basic Print Options 91 Choosing Advanced Media Control Options 97 Choosing Roll Paper Settings 98 Controlling Borderless Image Expansion 100 Creating a Custom Preset and Printing 101 Choosing Advanced Black and White Photo Settings 102 Managing Print...
Contents | 7 4 Printing With Epson Drivers for Macintosh Sizing Images for Borderless Printing on Roll Paper 90 Choosing Page Setup and Basic Print Options 91 Choosing Advanced Media Control Options 97 Choosing Roll Paper Settings 98 Controlling Borderless Image Expansion 100 Creating a Custom Preset and Printing 101 Choosing Advanced Black and White Photo Settings 102 Managing Print...
User's Guide
Page 8
8 | Contents Replacing the Paper Cutter 133 Removing the Old Cutter 133 Installing the New Cutter 135 Replacing the Maintenance Tanks 137 Replacing the Ink Maintenance Tank 138 Replacing the... Problems Diagnosing Problems 143 Checking Error Messages and Lights 144 Improving Print Quality 152 Solving Operational Problems 156 Solving Miscellaneous Printing Problems 157 Solving Paper Problems 159 Clearing Paper Jams 160 Uninstalling and Reinstalling the Printer Driver 163 Macintosh OS X 163 Windows 163 A Specifications Clearing Stored Print Information 165 Environmental 165 ...
8 | Contents Replacing the Paper Cutter 133 Removing the Old Cutter 133 Installing the New Cutter 135 Replacing the Maintenance Tanks 137 Replacing the Ink Maintenance Tank 138 Replacing the... Problems Diagnosing Problems 143 Checking Error Messages and Lights 144 Improving Print Quality 152 Solving Operational Problems 156 Solving Miscellaneous Printing Problems 157 Solving Paper Problems 159 Clearing Paper Jams 160 Uninstalling and Reinstalling the Printer Driver 163 Macintosh OS X 163 Windows 163 A Specifications Clearing Stored Print Information 165 Environmental 165 ...
User's Guide
Page 16
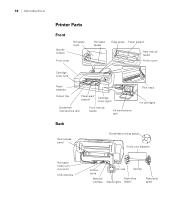
18 | Introduction Printer Parts Front Spindle holders Roll paper cover Front cover Roll paper feeder Edge guide Paper support Rear manual feeder Printer cover Cartridge cover (left) Paper cassette Output tray Paper eject support Cartridge cover (right) Borderfree maintenance tank Front manual feeder Ink maintenance tank Print head Ink cartridges Back Rear access panel Borderless printing spacer 3-inch core adapters Roll paper holder unit connector USB interface Airflow vents Network interface AC inlet Spindle Paper stop Status lights (black) Paper stop (gray) 18
18 | Introduction Printer Parts Front Spindle holders Roll paper cover Front cover Roll paper feeder Edge guide Paper support Rear manual feeder Printer cover Cartridge cover (left) Paper cassette Output tray Paper eject support Cartridge cover (right) Borderfree maintenance tank Front manual feeder Ink maintenance tank Print head Ink cartridges Back Rear access panel Borderless printing spacer 3-inch core adapters Roll paper holder unit connector USB interface Airflow vents Network interface AC inlet Spindle Paper stop Status lights (black) Paper stop (gray) 18
User's Guide
Page 17
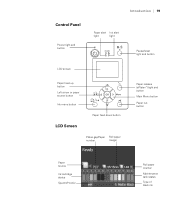
Control Panel Power light and button Introduction | 19 Paper alert Ink alert light light Pause/reset light and button LCD screen Paper feed up button Left arrow or paper source button Ink menu button Paper feed down button LCD Screen Platen gap/Paper Roll paper number margin Paper release (ePlaten™) light and button Main Menu button Paper cut button Paper source Ink cartridge status SpectroProofer 19 Roll paper counter Maintenance tank status Type of black ink
Control Panel Power light and button Introduction | 19 Paper alert Ink alert light light Pause/reset light and button LCD screen Paper feed up button Left arrow or paper source button Ink menu button Paper feed down button LCD Screen Platen gap/Paper Roll paper number margin Paper release (ePlaten™) light and button Main Menu button Paper cut button Paper source Ink cartridge status SpectroProofer 19 Roll paper counter Maintenance tank status Type of black ink

User's Guide
Page 35
... printer before purchasing large quantities or printing large jobs. The Epson Stylus Pro 4900 prints on most types of paper stock in . 37 Chapter 2: Handling Paper and Other Media Note: You can purchase additional roll paper spindles and other media. This chapter includes the following table shows the paper sizes you may need to 17 in . You can also...
... printer before purchasing large quantities or printing large jobs. The Epson Stylus Pro 4900 prints on most types of paper stock in . 37 Chapter 2: Handling Paper and Other Media Note: You can purchase additional roll paper spindles and other media. This chapter includes the following table shows the paper sizes you may need to 17 in . You can also...

User's Guide
Page 36
... (Mac OS X) or page 63 (Windows) for Using Epson Media Follow these additional guidelines for instructions. • Always select the correct paper source (roll, tray or manual feed) in the driver software. Avoid storing your paper package, when printing on many types of cut sheets. ...roll paper on the spindle when you need to load it in a cool, dry place to maintain quality. See page 106 (Mac OS X) or page 64 (Windows) for cut sheet paper: • You can print on Epson paper and other media: • Avoid touching the printable surface with your bare hands. The Epson Stylus Pro 4900...
... (Mac OS X) or page 63 (Windows) for Using Epson Media Follow these additional guidelines for instructions. • Always select the correct paper source (roll, tray or manual feed) in the driver software. Avoid storing your paper package, when printing on many types of cut sheets. ...roll paper on the spindle when you need to load it in a cool, dry place to maintain quality. See page 106 (Mac OS X) or page 64 (Windows) for cut sheet paper: • You can print on Epson paper and other media: • Avoid touching the printable surface with your bare hands. The Epson Stylus Pro 4900...

User's Guide
Page 45
Make sure the roll paper cover is not open. 47 Extend the output tray and cover if necessary to support the sheet as it comes out of the printer. Press the button. The printer automatically feeds the paper into printing position. 8. Handling Paper and Other Media | 47 7.
Make sure the roll paper cover is not open. 47 Extend the output tray and cover if necessary to support the sheet as it comes out of the printer. Press the button. The printer automatically feeds the paper into printing position. 8. Handling Paper and Other Media | 47 7.

User's Guide
Page 48
... switching from one paper roll to highlight ROLL PAPER/CUT or ROLL PAPER/NO CUT. Check the Epson Pro Imaging website (www.proimaging.epson.com) or your Epson Professional Imaging authorized reseller for roll paper: • When storing roll paper, keep it can use roll paper with a 2- Press the l Paper Source button and press d to another is torn during the printing process. Press OK. Using Roll Paper You can...
... switching from one paper roll to highlight ROLL PAPER/CUT or ROLL PAPER/NO CUT. Check the Epson Pro Imaging website (www.proimaging.epson.com) or your Epson Professional Imaging authorized reseller for roll paper: • When storing roll paper, keep it can use roll paper with a 2- Press the l Paper Source button and press d to another is torn during the printing process. Press OK. Using Roll Paper You can...
User's Guide
Page 49
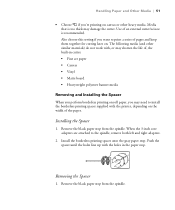
...holes line up with the printer, depending on . Handling Paper and Other Media | 51 • Choose if you're printing on roll paper, you may damage the cutter. Install the borderless printing spacer onto the gray paper stop from the spindle. Removing the Spacer 1. The following... media (and other heavy media. Remove the black paper stop . Installing the Spacer 1. Also choose...
...holes line up with the printer, depending on . Handling Paper and Other Media | 51 • Choose if you're printing on roll paper, you may damage the cutter. Install the borderless printing spacer onto the gray paper stop from the spindle. Removing the Spacer 1. The following... media (and other heavy media. Remove the black paper stop . Installing the Spacer 1. Also choose...
User's Guide
Page 50
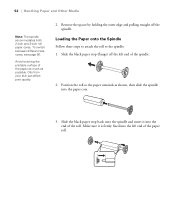
... the spindle into the paper core. 3. Loading the Paper onto the Spindle Follow these steps to attach the roll to the spindle: 1. Slide the black paper stop (flange) off the spindle. Make sure it into the left end of the paper roll. 52 Remove the spacer... by holding the outer edge and pulling straight off the left end of the spindle. 2. Position the roll so the paper unwinds as possible. To switch between different size cores, see page 56. 52 | Handling Paper and Other Media Note: The spindle accommodates both 2-inch and 3-inch roll paper...
... the spindle into the paper core. 3. Loading the Paper onto the Spindle Follow these steps to attach the roll to the spindle: 1. Slide the black paper stop (flange) off the spindle. Make sure it into the left end of the paper roll. 52 Remove the spacer... by holding the outer edge and pulling straight off the left end of the spindle. 2. Position the roll so the paper unwinds as possible. To switch between different size cores, see page 56. 52 | Handling Paper and Other Media Note: The spindle accommodates both 2-inch and 3-inch roll paper...

User's Guide
Page 51
Open the roll paper cover. 2. Handling Paper and Other Media | 53 Placing the Paper in the Printer Follow these steps to place the paper in the printer as shown. (The black end of the spindle goes on the control panel. 53 Make sure the printer is turned on, then press the button on the left.) Note: To avoid feeding excess paper, make sure you don't select when you're using roll paper. 3. Place the roll paper in the printer: 1.
Open the roll paper cover. 2. Handling Paper and Other Media | 53 Placing the Paper in the Printer Follow these steps to place the paper in the printer as shown. (The black end of the spindle goes on the control panel. 53 Make sure the printer is turned on, then press the button on the left.) Note: To avoid feeding excess paper, make sure you don't select when you're using roll paper. 3. Place the roll paper in the printer: 1.

User's Guide
Page 52
Note: The maximum page length you are not printing. 54 Press the button. To avoid indenting or creasing the paper, remove it from the paper path and roll it up when you can print on the LCD screen prompts you to the printing position. 6. Insert the leading edge of the roll paper into the roll paper feeder until the message on is limited by the printer driver, and may also be limited by your application software and/or operating system. The printer automatically feeds the paper to press the button. 5. Close the roll paper cover. 54 | Handling Paper and Other Media 4.
Note: The maximum page length you are not printing. 54 Press the button. To avoid indenting or creasing the paper, remove it from the paper path and roll it up when you can print on the LCD screen prompts you to the printing position. 6. Insert the leading edge of the roll paper into the roll paper feeder until the message on is limited by the printer driver, and may also be limited by your application software and/or operating system. The printer automatically feeds the paper to press the button. 5. Close the roll paper cover. 54 | Handling Paper and Other Media 4.
User's Guide
Page 53
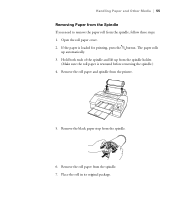
... remove the paper roll from the spindle. 6. The paper rolls up from the spindle holder. (Make sure the roll paper is loaded for printing, press the button. Remove the black paper stop from the spindle, follow these steps: 1. Hold both ends of the spindle and lift up automatically. 3. Remove the roll paper from the printer. 5. Remove the roll paper and spindle...
... remove the paper roll from the spindle. 6. The paper rolls up from the spindle holder. (Make sure the roll paper is loaded for printing, press the button. Remove the black paper stop from the spindle, follow these steps: 1. Hold both ends of the spindle and lift up automatically. 3. Remove the roll paper from the printer. 5. Remove the roll paper and spindle...
User's Guide
Page 54
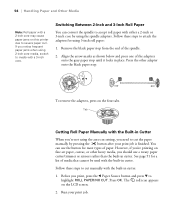
... until it locks in Cutter When you're not using the auto cut setting, you notice frequent paper jams when using 2-inch core media, switch to highlight ROLL PAPER/NO CUT. However, if you're printing on this printer due to attach the adapters for most types of the spindle. 2. ... either a 2-inch or 3-inch core by pressing the button after your print job. 56 Switching Between 2-Inch and 3-Inch Roll Paper You can use a rotary paper cutter/trimmer or scissors rather than the built-in cutter: 1. Follow these steps to cut manually with a 3-inch core. To remove the adapters, ...
... until it locks in Cutter When you're not using the auto cut setting, you notice frequent paper jams when using 2-inch core media, switch to highlight ROLL PAPER/NO CUT. However, if you're printing on this printer due to attach the adapters for most types of the spindle. 2. ... either a 2-inch or 3-inch core by pressing the button after your print job. 56 Switching Between 2-Inch and 3-Inch Roll Paper You can use a rotary paper cutter/trimmer or scissors rather than the built-in cutter: 1. Follow these steps to cut manually with a 3-inch core. To remove the adapters, ...


