
Product Brochure
Page 7
...epson.com/support/snowleopard Product/Accessories Epson Stylus Pro 3880 print engine Part Numbers CA61201-VM Epson Stylus Pro 3880 Graphic Arts Edition CA61201-GA Epson Stylus Pro 3880 TUMI® cover C3800TUMI Additional one ink color. Epson, Epson ESC/P, Epson Stylus, Epson UltraChrome K3 and MicroPiezo are registered trademarks, Epson...Language/Drivers Epson ESC/P®2 raster photographic drivers standard Optional PANTONE® licensed and SWOP® certified PostScript Language Level 3 compatible RIP by ColorBurst® (included only with Graphic Arts Edition ...
...epson.com/support/snowleopard Product/Accessories Epson Stylus Pro 3880 print engine Part Numbers CA61201-VM Epson Stylus Pro 3880 Graphic Arts Edition CA61201-GA Epson Stylus Pro 3880 TUMI® cover C3800TUMI Additional one ink color. Epson, Epson ESC/P, Epson Stylus, Epson UltraChrome K3 and MicroPiezo are registered trademarks, Epson...Language/Drivers Epson ESC/P®2 raster photographic drivers standard Optional PANTONE® licensed and SWOP® certified PostScript Language Level 3 compatible RIP by ColorBurst® (included only with Graphic Arts Edition ...

Installation Guide - Express Digital. Darkroom
Page 3
... "Configuring Your Printer" to select it, then click configure printer. 3. Select Printer Options, click your Darkroom Core Edition for Epson software. Finishing the Installation Once you have finished printing using Advanced B&W Photo mode, follow steps 2 to 6 in the Epson printer driver, click OK. Click the Printing Preferences button to C:\Program Files\ExpressDigital\ Darkroom CE...
... "Configuring Your Printer" to select it, then click configure printer. 3. Select Printer Options, click your Darkroom Core Edition for Epson software. Finishing the Installation Once you have finished printing using Advanced B&W Photo mode, follow steps 2 to 6 in the Epson printer driver, click OK. Click the Printing Preferences button to C:\Program Files\ExpressDigital\ Darkroom CE...
Getting Started - ColorBurst RIP installation
Page 6
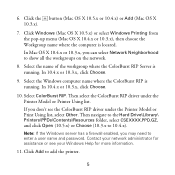
...the Windows server has a firewall enabled, you can select Network Neighborhood to enter a user name and password. 6. Then select the ColorBurst RIP driver under the Printer Model or Print Using list, select Other. If you don't see your network administrator for more information. 11. Contact your ...Windows Help for assistance or see the ColorBurst RIP driver under the Printer Model or Printer Using list. Click Add to 10.4.x). Click the button (Mac OS X 10.5.x or 10.4.x) or Add ...
...the Windows server has a firewall enabled, you can select Network Neighborhood to enter a user name and password. 6. Then select the ColorBurst RIP driver under the Printer Model or Print Using list, select Other. If you don't see your network administrator for more information. 11. Contact your ...Windows Help for assistance or see the ColorBurst RIP driver under the Printer Model or Printer Using list. Click Add to 10.4.x). Click the button (Mac OS X 10.5.x or 10.4.x) or Add ...
Getting Started - ColorBurst RIP installation
Page 8
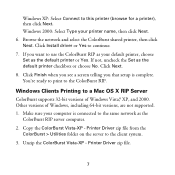
.... 1. You're ready to print to this printer (browse for a printer), then click Next. Copy the ColorBurst Vista-XP - Click Install driver or Yes to the client system. 3. Windows Clients Printing to use the ColorBurst RIP as your default printer, choose Set as the ColorBurst RIP server... computer. 2. Unzip the ColorBurst Vista-XP - Make sure your printer name, then click Next. 6. Printer Driver zip file from the ColorBurst > Utilities folder on the server to continue. 7. If not, uncheck the Set as the default printer checkbox or choose...
.... 1. You're ready to print to this printer (browse for a printer), then click Next. Copy the ColorBurst Vista-XP - Click Install driver or Yes to the client system. 3. Windows Clients Printing to use the ColorBurst RIP as your default printer, choose Set as the ColorBurst RIP server... computer. 2. Unzip the ColorBurst Vista-XP - Make sure your printer name, then click Next. 6. Printer Driver zip file from the ColorBurst > Utilities folder on the server to continue. 7. If not, uncheck the Set as the default printer checkbox or choose...
Getting Started - ColorBurst RIP installation
Page 9
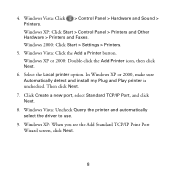
... TCP/IP Print Port Wizard screen, click Next. 8 Windows Vista: Click the Add a Printer button. Windows Vista: Uncheck Query the printer and automatically select the driver to use. 9. Windows 2000: Click Start > Settings > Printers. 5. 4. Windows Vista: Click Printers. > Control Panel > Hardware and Sound > Windows XP: Click Start > Control Panel > Printers and...
... TCP/IP Print Port Wizard screen, click Next. 8 Windows Vista: Click the Add a Printer button. Windows Vista: Uncheck Query the printer and automatically select the driver to use. 9. Windows 2000: Click Start > Settings > Printers. 5. 4. Windows Vista: Click Printers. > Control Panel > Hardware and Sound > Windows XP: Click Start > Control Panel > Printers and...
Printer Guide
Page 6
... a Custom Preset and Printing 58 Choosing Advanced Black and White Photo Settings 59 Managing Print Jobs 61 Checking Ink and Maintenance Status 62 4 Printing with Epson Drivers for Windows Choosing Basic Print Options 66 Choosing Paper and Layout Options 68 Choosing Paper Options 68 Choosing Layout Options 70 Choosing Advanced Print Options...
... a Custom Preset and Printing 58 Choosing Advanced Black and White Photo Settings 59 Managing Print Jobs 61 Checking Ink and Maintenance Status 62 4 Printing with Epson Drivers for Windows Choosing Basic Print Options 66 Choosing Paper and Layout Options 68 Choosing Paper Options 68 Choosing Layout Options 70 Choosing Advanced Print Options...
Printer Guide
Page 7
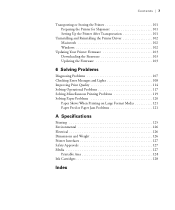
Contents | 7 Transporting or Storing the Printer 101 Preparing the Printer for Shipment 101 Setting Up the Printer After Transportation 101 Uninstalling and Reinstalling the Printer Driver 102 Macintosh 102 Windows 102 Updating Your Printer Firmware 103 Downloading the Firmware 103 Updating the Firmware 103 6 Solving Problems Diagnosing Problems 107 Checking Error ...
Contents | 7 Transporting or Storing the Printer 101 Preparing the Printer for Shipment 101 Setting Up the Printer After Transportation 101 Uninstalling and Reinstalling the Printer Driver 102 Macintosh 102 Windows 102 Updating Your Printer Firmware 103 Downloading the Firmware 103 Updating the Firmware 103 6 Solving Problems Diagnosing Problems 107 Checking Error ...

Printer Guide
Page 12
... from dusty areas. • Place the printer near a wall outlet where the plug can download drivers, firmware, and documentation, get FAQs and troubleshooting advice, or e-mail Epson with the toll-free line or your Unit ID number, call , make sure you leave enough space...number and proof of professional printing products through the World Wide Web. Where To Get Help Epson provides technical support and information on a flat, stable surface that came with the Epson Preferred Protection Plan information that is tilted or at epson.com/support. Epson also provides technical ...
... from dusty areas. • Place the printer near a wall outlet where the plug can download drivers, firmware, and documentation, get FAQs and troubleshooting advice, or e-mail Epson with the toll-free line or your Unit ID number, call , make sure you leave enough space...number and proof of professional printing products through the World Wide Web. Where To Get Help Epson provides technical support and information on a flat, stable surface that came with the Epson Preferred Protection Plan information that is tilted or at epson.com/support. Epson also provides technical ...

Printer Guide
Page 17
...octet, press r. When you have at least three sheets of your printer. 2. Turn the printer off then back on your Macintosh and your printer driver on page 22. The LCD displays the DEFAULT GATEWAY. 13. Press d to enter the printer menu. 16. Press Enter to select the next ...Turn on again. 15. Then see "Installing the Software for Macintosh" below, or "Installing the Software for Windows" on the Epson support site at epson.com/support. Double-click the Epson installer icon. 1-17 Setting Up the Printer On a Network | 17 12. Make sure that the printer displays READY and that...
...octet, press r. When you have at least three sheets of your printer. 2. Turn the printer off then back on your Macintosh and your printer driver on page 22. The LCD displays the DEFAULT GATEWAY. 13. Press d to enter the printer menu. 16. Press Enter to select the next ...Turn on again. 15. Then see "Installing the Software for Macintosh" below, or "Installing the Software for Windows" on the Epson support site at epson.com/support. Double-click the Epson installer icon. 1-17 Setting Up the Printer On a Network | 17 12. Make sure that the printer displays READY and that...

Printer Guide
Page 18
... and follow the on -screen instructions to install the EPSON LFP Remote Panel. 8. Enter your software. 7. Double-click User's Guide and Network Guide and wait while the guides are installed. 5. Click Exit to install EpsonNet Config. 9. Enter your Macintosh when prompted. 10. Double-click Stylus Pro 3800 Driver. 6. 18 | Setting Up the Printer On a Network...
... and follow the on -screen instructions to install the EPSON LFP Remote Panel. 8. Enter your software. 7. Double-click User's Guide and Network Guide and wait while the guides are installed. 5. Click Exit to install EpsonNet Config. 9. Enter your Macintosh when prompted. 10. Double-click Stylus Pro 3800 Driver. 6. 18 | Setting Up the Printer On a Network...

Printer Guide
Page 20
... printer, then wait while your Macintosh cannot find the printer, click More Printers and select the appropriate interface. 4. Note: If your Macintosh finds the printer driver and the Add button becomes available. Adding the Printer in the Printer List window. 5. Close the Printer Setup Utility. 20 | Setting Up the Printer On...
... printer, then wait while your Macintosh cannot find the printer, click More Printers and select the appropriate interface. 4. Note: If your Macintosh finds the printer driver and the Add button becomes available. Adding the Printer in the Printer List window. 5. Close the Printer Setup Utility. 20 | Setting Up the Printer On...

Printer Guide
Page 27
The installer starts automatically. (If necessary, double-click My Computer or click Start, then My Computer. Then double-click your CD-ROM icon to start the installer.) 3. Double-click Stylus Pro 3800 Driver for Ethernet. 4. Insert the printer software CD-ROM. 2. When you see a window like this one, click Manual. 1-27 Setting Up the Printer On a Network | 27 Installing the Printer Software 1.
The installer starts automatically. (If necessary, double-click My Computer or click Start, then My Computer. Then double-click your CD-ROM icon to start the installer.) 3. Double-click Stylus Pro 3800 Driver for Ethernet. 4. Insert the printer software CD-ROM. 2. When you see a window like this one, click Manual. 1-27 Setting Up the Printer On a Network | 27 Installing the Printer Software 1.

Printer Guide
Page 28
Follow the on-screen instructions. 8. When you created for the printer, then click OK. 6. Select the network port you see a message that driver installation and printer configuration were completed successfully, click OK. 7. The EPSON LFP Remote Panel begins installing. Click Exit to your desktop. 9. Double-click User's Guide and Network Guide and wait while the guides are copied to close the installer, then remove the printer software CD-ROM. 1-28 28 | Setting Up the Printer On a Network 5.
Follow the on-screen instructions. 8. When you created for the printer, then click OK. 6. Select the network port you see a message that driver installation and printer configuration were completed successfully, click OK. 7. The EPSON LFP Remote Panel begins installing. Click Exit to your desktop. 9. Double-click User's Guide and Network Guide and wait while the guides are copied to close the installer, then remove the printer software CD-ROM. 1-28 28 | Setting Up the Printer On a Network 5.
Printer Guide
Page 31
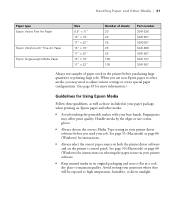
.... (See page 45 for more information.) Guidelines for instructions. • Always select the correct paper source in both the printer driver software and on Epson paper and other media, you use cotton gloves. • Always choose the correct Media Type setting in your paper package, when...When you may affect print quality. See page 53 (Macintosh) or page 66 (Windows) for Using Epson Media Follow these guidelines, as well as those included in your printer driver software before purchasing large quantities or printing large jobs. Avoid storing your job. Fingerprints may need to ...
.... (See page 45 for more information.) Guidelines for instructions. • Always select the correct paper source in both the printer driver software and on Epson paper and other media, you use cotton gloves. • Always choose the correct Media Type setting in your paper package, when...When you may affect print quality. See page 53 (Macintosh) or page 66 (Windows) for Using Epson Media Follow these guidelines, as well as those included in your printer driver software before purchasing large quantities or printing large jobs. Avoid storing your job. Fingerprints may need to ...
Printer Guide
Page 45
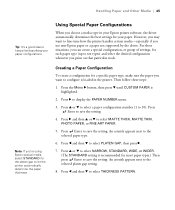
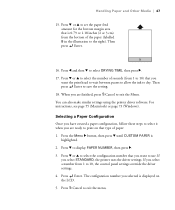
...a media type in the printer. For these steps: 1. Press the Menu r button, then press d until CUSTOM PAPER is loaded in your Epson printer software, the driver automatically determines the best settings for most paper types.) Then press Enter to display the PAPER NUMBER menu. 3. Press l and then d to... media, select STANDARD for each paper type (up to ten types) and select the desired configuration whenever you use non-Epson paper or a paper not supported by the driver. Press r and then u or d to select THICKNESS PATTERN. 2-45 Press Enter to save the setting. 4. An asterisk ...
...a media type in the printer. For these steps: 1. Press the Menu r button, then press d until CUSTOM PAPER is loaded in your Epson printer software, the driver automatically determines the best settings for most paper types.) Then press Enter to display the PAPER NUMBER menu. 3. Press l and then d to... media, select STANDARD for each paper type (up to ten types) and select the desired configuration whenever you use non-Epson paper or a paper not supported by the driver. Press r and then u or d to select THICKNESS PATTERN. 2-45 Press Enter to save the setting. 4. An asterisk ...
Printer Guide
Page 47
...to select the configuration number that is 0.79 or 1.18 inches (2 or 3 cm) from 1 to use. When you select STANDARD, the printer uses the driver settings. For instructions, see page 55 (Macintosh) or page 73 (Windows). If you are ready to print on that type of seconds (from 1 to ...10) that you selected is highlighted. 2. Then press Enter. 16. The configuration number you want to 10, the control panel settings override the driver settings. 4. Press d or u to the right). Press d or u to set the paper feed amount for the bottom margin area that you select a...
...to select the configuration number that is 0.79 or 1.18 inches (2 or 3 cm) from 1 to use. When you select STANDARD, the printer uses the driver settings. For instructions, see page 55 (Macintosh) or page 73 (Windows). If you are ready to print on that type of seconds (from 1 to ...10) that you selected is highlighted. 2. Then press Enter. 16. The configuration number you want to 10, the control panel settings override the driver settings. 4. Press d or u to the right). Press d or u to set the paper feed amount for the bottom margin area that you select a...

Printer Guide
Page 49
... 49 For the best black-and-white photography output, the Epson Stylus Pro 3800 driver offers Advanced Black and White mode. Make sure any profiles you install the Epson printer driver, the included profiles are located in the driver itself. 49 Chapter 3: Printing with Epson Drivers for Macintosh Your Epson Stylus Pro 3800 comes with drivers and utilities that may become available. Tip: Check the...
... 49 For the best black-and-white photography output, the Epson Stylus Pro 3800 driver offers Advanced Black and White mode. Make sure any profiles you install the Epson printer driver, the included profiles are located in the driver itself. 49 Chapter 3: Printing with Epson Drivers for Macintosh Your Epson Stylus Pro 3800 comes with drivers and utilities that may become available. Tip: Check the...
Printer Guide
Page 50
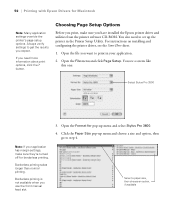
...Paper Size pop-up menu and choose a size and option, then go to set up menu and select Stylus Pro 3800. 4. Note: If your application. 2. 50 | Printing with Epson Drivers for pop-up the printer in the Printer Setup Utility. Always verify settings to get the results you use... the front manual feed slot. For instructions on installing and configuring the printer driver, see a screen like this one: Select Stylus Pro 3800 3. You see the ...
...Paper Size pop-up menu and choose a size and option, then go to set up menu and select Stylus Pro 3800. 4. Note: If your application. 2. 50 | Printing with Epson Drivers for pop-up the printer in the Printer Setup Utility. Always verify settings to get the results you use... the front manual feed slot. For instructions on installing and configuring the printer driver, see a screen like this one: Select Stylus Pro 3800 3. You see the ...

Printer Guide
Page 51
... Custom Sizes to print without borders. Click +, double-click Untitled, give your image slightly larger than the paper to create a custom paper size. Printing with Epson Drivers for printing. 3-51
... Custom Sizes to print without borders. Click +, double-click Untitled, give your image slightly larger than the paper to create a custom paper size. Printing with Epson Drivers for printing. 3-51

Printer Guide
Page 52
... : 3-52 You see a screen like this one : Select Stylus Pro 3800 2. Open the Printer pop-up menu. Select Print Settings from the pop-up menu and select Stylus Pro 3800, if necessary. 3. 52 | Printing with Epson Drivers for more control over your page setup options, you 're using Epson media. The Epson driver offers automatic settings that optimize print quality and...
... : 3-52 You see a screen like this one : Select Stylus Pro 3800 2. Open the Printer pop-up menu. Select Print Settings from the pop-up menu and select Stylus Pro 3800, if necessary. 3. 52 | Printing with Epson Drivers for more control over your page setup options, you 're using Epson media. The Epson driver offers automatic settings that optimize print quality and...


