
Printer Guide
Page 4
... the Stand 1-3 Unpacking the Printer 1-4 Mounting the Printer on the Stand 1-5 Attaching the Basket 1-8 Connecting the Power Cord 1-11 Installing the Ink Cartridges 1-12 Loading the Roll Paper 1-16 Connecting the Printer to Your Computer 1-21 Connecting to the USB Port 1-22 Connecting to the Parallel Port...Installing the Software for Macintosh 1-26 Installing the Software for Windows 1-29 Setting Up Your FireWire Port 1-32 Optimizing Print Speed 1-33 Using the Photo Printing Accelerator 1-33 Using the Speed & Progress Utility 1-34 Running a Nozzle Check 1-36 Aligning the...
... the Stand 1-3 Unpacking the Printer 1-4 Mounting the Printer on the Stand 1-5 Attaching the Basket 1-8 Connecting the Power Cord 1-11 Installing the Ink Cartridges 1-12 Loading the Roll Paper 1-16 Connecting the Printer to Your Computer 1-21 Connecting to the USB Port 1-22 Connecting to the Parallel Port...Installing the Software for Macintosh 1-26 Installing the Software for Windows 1-29 Setting Up Your FireWire Port 1-32 Optimizing Print Speed 1-33 Using the Photo Printing Accelerator 1-33 Using the Speed & Progress Utility 1-34 Running a Nozzle Check 1-36 Aligning the...
Printer Guide
Page 6
...14 Selecting Configuration Options 3-15 4 Printing with EPSON Drivers for Windows Choosing Basic Print Options 4-2 Choosing Paper and Layout Options 4-5 Choosing Advanced Print Options 4-7 Color Management Settings 4-9 Paper Configuration Settings 4-10 Managing Print Jobs 4-11 Using the Progress Meter ... the Print Head 5-7 Aligning the Print Head from the Control Panel 5-7 Replacing Ink Cartridges 5-10 Checking Ink Levels 5-10 Ordering and Replacing Cartridges 5-11 Switching Between Black Ink Modes 5-15 Preparing the Required Supplies 5-15 Replacing the Black Ink Cartridge 5-17...
...14 Selecting Configuration Options 3-15 4 Printing with EPSON Drivers for Windows Choosing Basic Print Options 4-2 Choosing Paper and Layout Options 4-5 Choosing Advanced Print Options 4-7 Color Management Settings 4-9 Paper Configuration Settings 4-10 Managing Print Jobs 4-11 Using the Progress Meter ... the Print Head 5-7 Aligning the Print Head from the Control Panel 5-7 Replacing Ink Cartridges 5-10 Checking Ink Levels 5-10 Ordering and Replacing Cartridges 5-11 Switching Between Black Ink Modes 5-15 Preparing the Required Supplies 5-15 Replacing the Black Ink Cartridge 5-17...

Printer Guide
Page 7
... the Printer 6-2 Improving Print Quality 6-4 Solving Operational Problems 6-7 Solving Miscellaneous Printing Problems 6-8 Solving Paper Problems 6-10 Solving Roll Paper Feed Problems 6-11 Clearing Paper Jams 6-13 Uninstalling and Reinstalling the Printer Software 6-14 Macintosh 6-14 Windows 6-15 A Specifications Printing A-1 Environmental A-2 Dimensions and Weight A-2 Electrical A-2 Printer Interfaces A-2 Safety Approvals A-3 Paper A-3 Printable Area A-3 Ink Cartridges A-4 Index -viii
... the Printer 6-2 Improving Print Quality 6-4 Solving Operational Problems 6-7 Solving Miscellaneous Printing Problems 6-8 Solving Paper Problems 6-10 Solving Roll Paper Feed Problems 6-11 Clearing Paper Jams 6-13 Uninstalling and Reinstalling the Printer Software 6-14 Macintosh 6-14 Windows 6-15 A Specifications Printing A-1 Environmental A-2 Dimensions and Weight A-2 Electrical A-2 Printer Interfaces A-2 Safety Approvals A-3 Paper A-3 Printable Area A-3 Ink Cartridges A-4 Index -viii
Printer Guide
Page 8
... summary of your printer using a web browser, such as ink cartridges. Your printer is backed by one of its innovative ink, print head, and print engine technologies, the Stylus Pro 10600 delivers truly photographic output at print speeds faster than you ever thought possible. It also tells you...a problem. Introduction Thank you for choosing the EPSON Stylus Pro 10600-the most technologically advanced system of the most out of procedures for daily use-loading paper, replacing ink cartridges, running cleaning cycles, aligning the print head, and clearing paper jams. Attach it ...
... summary of your printer using a web browser, such as ink cartridges. Your printer is backed by one of its innovative ink, print head, and print engine technologies, the Stylus Pro 10600 delivers truly photographic output at print speeds faster than you ever thought possible. It also tells you...a problem. Introduction Thank you for choosing the EPSON Stylus Pro 10600-the most technologically advanced system of the most out of procedures for daily use-loading paper, replacing ink cartridges, running cleaning cycles, aligning the print head, and clearing paper jams. Attach it ...
Printer Guide
Page 9
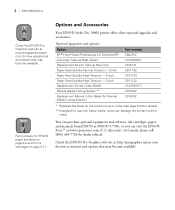
... the EPSON Pro Graphics web site at http://prographics.epson.com for new accessories and options that may become available. 2 com for new accessories and options that may become available. You can purchase optional equipment and software, ink cartridges, paper, and manuals from EPSON at...Canada, please call (800) 463-7766 for use with heavy media, which can visit the EPSON Store™ at http://prographics.epson. Options and Accessories Your EPSON Stylus Pro 10600 printer offers these optional upgrades and accessories: Optional equipment and software Option EFI® Fiery®...
... the EPSON Pro Graphics web site at http://prographics.epson.com for new accessories and options that may become available. 2 com for new accessories and options that may become available. You can purchase optional equipment and software, ink cartridges, paper, and manuals from EPSON at...Canada, please call (800) 463-7766 for use with heavy media, which can visit the EPSON Store™ at http://prographics.epson. Options and Accessories Your EPSON Stylus Pro 10600 printer offers these optional upgrades and accessories: Optional equipment and software Option EFI® Fiery®...

Printer Guide
Page 10
.... Dial (888) 377-6611, 6 AM to change without notice. You can purchase ink cartridges, paper, and accessories from EPSON at (800) 873-7766, or by visiting the EPSON Store at http://support.epson.com. Before you call, make sure you have your Unit ID number, which is ... this site, you experience difficulty with your printer serial number and proof of professional printing products through e-mail. You'll also need your printer. Introduction | 3 Where To Get Help EPSON provides technical support and information on the installation, configuration, and operation of purchase. ...
.... Dial (888) 377-6611, 6 AM to change without notice. You can purchase ink cartridges, paper, and accessories from EPSON at (800) 873-7766, or by visiting the EPSON Store at http://support.epson.com. Before you call, make sure you have your Unit ID number, which is ... this site, you experience difficulty with your printer serial number and proof of professional printing products through e-mail. You'll also need your printer. Introduction | 3 Where To Get Help EPSON provides technical support and information on the installation, configuration, and operation of purchase. ...
Printer Guide
Page 14
...with water. • Keep ink cartridges out of the reach of the devices plugged into the wall outlet does not exceed the wall outlet's ampere rating. • Except as specifically explained in your hand inside the printer or touch the cartridges during printing. • To avoid ...damaging the printer, do not move the print head by the operating instructions. Keep cartridges away from the control panel, unplug the printer and refer servicing to service ...
...with water. • Keep ink cartridges out of the reach of the devices plugged into the wall outlet does not exceed the wall outlet's ampere rating. • Except as specifically explained in your hand inside the printer or touch the cartridges during printing. • To avoid ...damaging the printer, do not move the print head by the operating instructions. Keep cartridges away from the control panel, unplug the printer and refer servicing to service ...

Printer Guide
Page 15
For best results, use an ink cartridge beyond the date printed on the cartridge package. Leaving the cartridge unpacked for a long time before use may result in damage to refill them. 8 | Introduction • Do not dismantle the ink cartridges or try to the print head. • Install the ink cartridge immediately after you remove it from its package. This could result in reduced print quality. • Do not use cartridges within six months of installation. 8
For best results, use an ink cartridge beyond the date printed on the cartridge package. Leaving the cartridge unpacked for a long time before use may result in damage to refill them. 8 | Introduction • Do not dismantle the ink cartridges or try to the print head. • Install the ink cartridge immediately after you remove it from its package. This could result in reduced print quality. • Do not use cartridges within six months of installation. 8

Printer Guide
Page 16
... speakers, cordless phones, TVs, or air conditioners. This chapter covers the following information: • Unpacking and assembly • Connecting the power cord • Installing the ink cartridges • Loading the roll paper • Connecting the printer to your computer • Installing the printer software • Optimizing...
... speakers, cordless phones, TVs, or air conditioners. This chapter covers the following information: • Unpacking and assembly • Connecting the power cord • Installing the ink cartridges • Loading the roll paper • Connecting the printer to your computer • Installing the printer software • Optimizing...
Printer Guide
Page 19
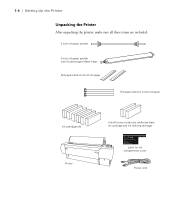
1-4 | Setting Up the Printer Unpacking the Printer After unpacking the printer, make sure all these items are included: 3-inch roll paper spindle 2-inch roll paper spindle with Doubleweight Matte Paper Roll paper belts for 2-inch roll paper Roll paper belts for 3-inch roll paper Ink cartridges (6) Printer UltraChrome model only: additional black ink cartridge and ink draining cartridge Label for ink compartment cover Power cord 1-4
1-4 | Setting Up the Printer Unpacking the Printer After unpacking the printer, make sure all these items are included: 3-inch roll paper spindle 2-inch roll paper spindle with Doubleweight Matte Paper Roll paper belts for 2-inch roll paper Roll paper belts for 3-inch roll paper Ink cartridges (6) Printer UltraChrome model only: additional black ink cartridge and ink draining cartridge Label for ink compartment cover Power cord 1-4
Printer Guide
Page 27
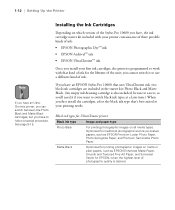
... empty ink draining cartridge is also included; Optimized for EPSON, when the highest level of photographic quality is desired. 1-12 you cannot switch it if you want to switch black ink types at a later time.) When you have an EPSON Stylus Pro 10600 that kind of ink for UltraChrome printer Black ink type Image and paper type Photo Black For printing photographic...
... empty ink draining cartridge is also included; Optimized for EPSON, when the highest level of photographic quality is desired. 1-12 you cannot switch it if you want to switch black ink types at a later time.) When you have an EPSON Stylus Pro 10600 that kind of ink for UltraChrome printer Black ink type Image and paper type Photo Black For printing photographic...

Printer Guide
Page 28
Setting Up the Printer | 1-13 Before you begin, make sure the printer is plugged into a grounded outlet. Push and release the ink compartment cover to turn on the printer. 2. Press the P Power button to open it. 1-13 Then follow these steps to install the cartridges: 1.
Setting Up the Printer | 1-13 Before you begin, make sure the printer is plugged into a grounded outlet. Push and release the ink compartment cover to turn on the printer. 2. Press the P Power button to open it. 1-13 Then follow these steps to install the cartridges: 1.
Printer Guide
Page 29
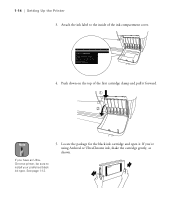
See page 1-12. 5. Locate the package for the black ink cartridge and open it forward. If you have an UltraChrome printer, be sure to the inside of the first cartridge clamp and pull it . Push down on the top of the ink compartment cover. 4. 1-14 | Setting Up the Printer 3. Attach the ink label to install your preferred black ink type. Note If you 're using Archival or UltraChrome ink, shake the cartridge gently, as shown. 1-14
See page 1-12. 5. Locate the package for the black ink cartridge and open it forward. If you have an UltraChrome printer, be sure to the inside of the first cartridge clamp and pull it . Push down on the top of the ink compartment cover. 4. 1-14 | Setting Up the Printer 3. Attach the ink label to install your preferred black ink type. Note If you 're using Archival or UltraChrome ink, shake the cartridge gently, as shown. 1-14

Printer Guide
Page 30
...or you 're ready to load the roll paper. 1-15 Hold the cartridge so the arrow mark on the control panel display, you 'll use more ink than necessary. Don't force it. When you may have the wrong cartridge. Charging takes about 10 minutes. When the Pause light stops flashing and ...Paper Out appears on its left side is charging ink. 8. If ink gets on the control panel flashes and the printer makes various sounds. If you can't insert the cartridge smoothly, you 're done, close the ink compartment cover. Caution Do not turn off the printer, change the position...
...or you 're ready to load the roll paper. 1-15 Hold the cartridge so the arrow mark on the control panel display, you 'll use more ink than necessary. Don't force it. When you may have the wrong cartridge. Charging takes about 10 minutes. When the Pause light stops flashing and ...Paper Out appears on its left side is charging ink. 8. If ink gets on the control panel flashes and the printer makes various sounds. If you can't insert the cartridge smoothly, you 're done, close the ink compartment cover. Caution Do not turn off the printer, change the position...
Printer Guide
Page 112
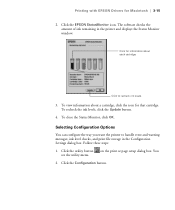
... Options You can configure the way you want the printer to recheck ink levels 3. You see the utility menu. 2. Click the utility button on the print or page setup dialog box. Click the Configuration button. 3-15 Printing with EPSON Drivers for that cartridge. To close the Status Monitor, click OK. To view information about each...
... Options You can configure the way you want the printer to recheck ink levels 3. You see the utility menu. 2. Click the utility button on the print or page setup dialog box. Click the Configuration button. 3-15 Printing with EPSON Drivers for that cartridge. To close the Status Monitor, click OK. To view information about each...

Printer Guide
Page 127
... steps: 1. Right-click your printer's ink cartridges, click the Information button. The following : • Windows XP: Click Start and select Control Panel. Setting Monitoring Preferences You can click for instructions on your printer icon and select Properties (Windows 95, 98, or Me), Document Defaults (Windows NT), or Printing Preferences (Windows 2000). 4-14 Right...
... steps: 1. Right-click your printer's ink cartridges, click the Information button. The following : • Windows XP: Click Start and select Control Panel. Setting Monitoring Preferences You can click for instructions on your printer icon and select Properties (Windows 95, 98, or Me), Document Defaults (Windows NT), or Printing Preferences (Windows 2000). 4-14 Right...
Printer Guide
Page 130
Chapter 5: Maintaining and Transporting the Printer The EPSON Stylus Pro 10600 printer requires very little maintenance to keep working its best. This chapter describes the following routine procedures: • Checking printer status and part life • Running a cleaning cycle • Aligning the print head • Replacing ink cartridges • Switching between black ink modes • Replacing the paper cutter blade • Cleaning the printer • Transporting or storing the printer • Replacing the waste ink system 1
Chapter 5: Maintaining and Transporting the Printer The EPSON Stylus Pro 10600 printer requires very little maintenance to keep working its best. This chapter describes the following routine procedures: • Checking printer status and part life • Running a cleaning cycle • Aligning the print head • Replacing ink cartridges • Switching between black ink modes • Replacing the paper cutter blade • Cleaning the printer • Transporting or storing the printer • Replacing the waste ink system 1
Printer Guide
Page 131
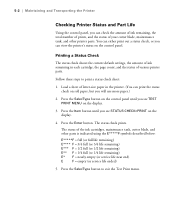
... and Transporting the Printer Checking Printer Status and Part Life Using the control panel, you can check the amount of ink remaining, the total number of prints, and the status of letter-size paper in each cartridge, the page count, and the status of the ink cartridges, maintenance tank, cutter blade, and other printer parts.
... and Transporting the Printer Checking Printer Status and Part Life Using the control panel, you can check the amount of ink remaining, the total number of prints, and the status of letter-size paper in each cartridge, the page count, and the status of the ink cartridges, maintenance tank, cutter blade, and other printer parts.

Printer Guide
Page 132
... EPSON service centers. INK LEFT-K (black) JOB HISTORY INK LEFT-C (cyan) CLEAR JOB H (clear job history) INK LEFT-M (magenta) TOTAL PRINTS INK LEFT-LC (light cyan) WASTE INK (waste ink system) INK LEFT-LM (light magenta) CUTTER LIFE (paper cutter) INK LEFT-Y (yellow) CR MOTOR (carriage motor) INK USED...menu. 5-3 Maintaining and Transporting the Printer | 5-3 Checking Ink Levels and Component Life To view printer status information on the display. 2. Press the SelecType button on the list (except the ink cartridges and paper cutter) need to display the amount remaining for ...
... EPSON service centers. INK LEFT-K (black) JOB HISTORY INK LEFT-C (cyan) CLEAR JOB H (clear job history) INK LEFT-M (magenta) TOTAL PRINTS INK LEFT-LC (light cyan) WASTE INK (waste ink system) INK LEFT-LM (light magenta) CUTTER LIFE (paper cutter) INK LEFT-Y (yellow) CR MOTOR (carriage motor) INK USED...menu. 5-3 Maintaining and Transporting the Printer | 5-3 Checking Ink Levels and Component Life To view printer status information on the display. 2. Press the SelecType button on the list (except the ink cartridges and paper cutter) need to display the amount remaining for ...
Printer Guide
Page 134
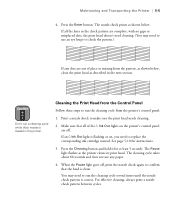
.... The cleaning cycle takes about 60 seconds and does not use an eye loupe to replace the corresponding ink cartridge instead. You may need to use any dots are off , print the nozzle check again to confirm that all the lines in the check pattern are complete, with no... is loaded in the next section. Press the Cleaning button and hold it for instructions. 3. Maintaining and Transporting the Printer | 5-5 4. Cleaning the Print Head from the pattern, as shown below . See page 5-10 for at least 3 seconds. The Pause light flashes as described in the printer. ...
.... The cleaning cycle takes about 60 seconds and does not use an eye loupe to replace the corresponding ink cartridge instead. You may need to use any dots are off , print the nozzle check again to confirm that all the lines in the check pattern are complete, with no... is loaded in the next section. Press the Cleaning button and hold it for instructions. 3. Maintaining and Transporting the Printer | 5-5 4. Cleaning the Print Head from the pattern, as shown below . See page 5-10 for at least 3 seconds. The Pause light flashes as described in the printer. ...


