
Read This First Booklet (Mac OS X Users)
Page 1
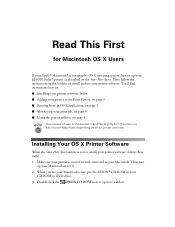
... on the Start Here sheet. Installing Your OS X Printer Software When the Start Here sheet instructs you see on your printer software. Make sure your printer is running the OS X operating system, first set up your printer software, follow the instructions in your EPSON Stylus® printer as described on which printer you have. When you to install your Macintosh in...
... on the Start Here sheet. Installing Your OS X Printer Software When the Start Here sheet instructs you see on your printer software. Make sure your printer is running the OS X operating system, first set up your printer software, follow the instructions in your EPSON Stylus® printer as described on which printer you have. When you to install your Macintosh in...

Read This First Booklet (Mac OS X Users)
Page 2
...Continue Installation. Double-click the drive icon named for your printer software, then click Continue. At the next screen, click Continue. 8. If you set up an administrator password when you installed OS X, you want to install your printer (such as SP820Series_Installer.pkg. Select the OS X drive.... 2 You must enter this icon to see this screen: Click Install 10. 4. The Disk Copy Utility places a drive icon for your printer software. 7. Double-click the OS X Driver Installer.dmg file. Read the license agreement and click Continue, then click Agree. 9. Double-click the...
...Continue Installation. Double-click the drive icon named for your printer software, then click Continue. At the next screen, click Continue. 8. If you set up an administrator password when you installed OS X, you want to install your printer (such as SP820Series_Installer.pkg. Select the OS X drive.... 2 You must enter this icon to see this screen: Click Install 10. 4. The Disk Copy Utility places a drive icon for your printer software. 7. Double-click the OS X Driver Installer.dmg file. Read the license agreement and click Continue, then click Agree. 9. Double-click the...
Read This First Booklet (Mac OS X Users)
Page 3
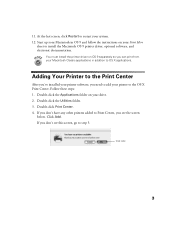
... see this screen, go to restart your printer to Print Center, you don't have any other printers added to the OS X Print Center. Double-click Print Center. 4. Adding Your Printer to the Print Center After you've installed your printer software, you need to add your system. 12.... Start up your drive. 2. Click Add 3 You must install the printer driver on your Macintosh in addition to install the Macintosh OS 9 printer driver, optional software, and electronic ...
... see this screen, go to restart your printer to Print Center, you don't have any other printers added to the OS X Print Center. Double-click Print Center. 4. Adding Your Printer to the Print Center After you've installed your printer software, you need to add your system. 12.... Start up your drive. 2. Click Add 3 You must install the printer driver on your Macintosh in addition to install the Macintosh OS 9 printer driver, optional software, and electronic ...

Printer Basics
Page 4
...Printer 37 PROBLEM SOLVING 39 Printer Parts 40 Diagnosing Printer Problems 41 Checking the Control Panel Lights 41 Running a Printer Check 43 Problems and Solutions 44 Problems Setting Up the Printer or Installing Software 44 Printing Problems 45 Print Quality Problems 46 Problems with Paper Feeding 49 Solving Miscellaneous Printout Problems 50 Uninstalling Printer Software 52 Uninstalling Windows Software... 52 Uninstalling Macintosh Software 52 Reinstalling Printer Software 53 Where To Get Help 53 EPSON ...
...Printer 37 PROBLEM SOLVING 39 Printer Parts 40 Diagnosing Printer Problems 41 Checking the Control Panel Lights 41 Running a Printer Check 43 Problems and Solutions 44 Problems Setting Up the Printer or Installing Software 44 Printing Problems 45 Print Quality Problems 46 Problems with Paper Feeding 49 Solving Miscellaneous Printout Problems 50 Uninstalling Printer Software 52 Uninstalling Windows Software... 52 Uninstalling Macintosh Software 52 Reinstalling Printer Software 53 Where To Get Help 53 EPSON ...

Printer Basics
Page 7
...; Internet Explorer 3.0 or later or Netscape Navigator™ 3.0 or later-to your CD-ROM or DVD drive icon, then double-click the EPSON icon. Notes contain important information about your printer software CD-ROM. 2. Windows: Double-click My Computer (for better printing. Tips contain additional hints for Windows XP, click Start first), double...
...; Internet Explorer 3.0 or later or Netscape Navigator™ 3.0 or later-to your CD-ROM or DVD drive icon, then double-click the EPSON icon. Notes contain important information about your printer software CD-ROM. 2. Windows: Double-click My Computer (for better printing. Tips contain additional hints for Windows XP, click Start first), double...

Printer Basics
Page 12
... see the Main menu of selecting Print from the File menu, you have paper in a software program, follow these steps to open your document in the printer, as described on your application's tool bar instead of your EPSON Stylus C80 printer is selected. 3. Then click Properties (or Preferences) on the next screen. From the File menu...
... see the Main menu of selecting Print from the File menu, you have paper in a software program, follow these steps to open your document in the printer, as described on your application's tool bar instead of your EPSON Stylus C80 printer is selected. 3. Then click Properties (or Preferences) on the next screen. From the File menu...

Printer Basics
Page 15
...shown on your screen. 2. Click OK when you 're currently using advanced printer settings, previewing your printout, or adding a watermark-see your on-screen Reference Guide (described on page 2) or your printer software online help. Remember that you can change the settings in your program when... you can always change the default printer settings for example, using . Another way to select your most frequently used ...
...shown on your screen. 2. Click OK when you 're currently using advanced printer settings, previewing your printout, or adding a watermark-see your on-screen Reference Guide (described on page 2) or your printer software online help. Remember that you can change the settings in your program when... you can always change the default printer settings for example, using . Another way to select your most frequently used ...

Printer Basics
Page 16
...C80 Series is selected. Printing on a Macintosh This section describes the basic steps for printing on page 6. Make sure you create your Paper Size, Orientation, and Printable Area settings Click OK 2. From the File menu, click Page Setup. Select the correct Paper Size, Orientation, and other settings. You see your printer software...'s page setup dialog box (your dialog box may look slightly different): Verify your printer model here Select your document in the printer, as described on the Start Here sheet. 3. ...
...C80 Series is selected. Printing on a Macintosh This section describes the basic steps for printing on page 6. Make sure you create your Paper Size, Orientation, and Printable Area settings Click OK 2. From the File menu, click Page Setup. Select the correct Paper Size, Orientation, and other settings. You see your printer software...'s page setup dialog box (your dialog box may look slightly different): Verify your printer model here Select your document in the printer, as described on the Start Here sheet. 3. ...

Printer Basics
Page 19
...-Sided Matte Paper Archival Matte Paper Ink Jet Transparencies 14 Here are the settings you should choose for your on-screen Reference Guide (described on printing-for the type of paper you select in your printer software. For more information on page 2). Heavyweight EPSON Double-Sided Matte Paper EPSON Archival Matte Paper EPSON Ink Jet Transparencies Select this paper . . .
...-Sided Matte Paper Archival Matte Paper Ink Jet Transparencies 14 Here are the settings you should choose for your on-screen Reference Guide (described on printing-for the type of paper you select in your printer software. For more information on page 2). Heavyweight EPSON Double-Sided Matte Paper EPSON Archival Matte Paper EPSON Ink Jet Transparencies Select this paper . . .

Printer Basics
Page 20
...) See page 7 (Windows) or page 11 (Macintosh) for more information about making printer software settings. 15 The printable side should be up to 15 envelopes at a time. Open the printer cover and set your printer software: I For Media Type, select Plain Paper I For Orientation, select Landscape I For... Paper Size, select Envelope #10 4 1/8 × 9 1/2 in your printer's thickness lever to the ^ position. (Remember to move ...
...) See page 7 (Windows) or page 11 (Macintosh) for more information about making printer software settings. 15 The printable side should be up to 15 envelopes at a time. Open the printer cover and set your printer software: I For Media Type, select Plain Paper I For Orientation, select Landscape I For... Paper Size, select Envelope #10 4 1/8 × 9 1/2 in your printer's thickness lever to the ^ position. (Remember to move ...

Printer Basics
Page 21
.... 16 Using PhotoEnhance, Custom, and Advanced Settings When you're printing special projects, you must select Color ink; You can customize your printer software settings, as described in these sections: I "Enhancing Photos" below I "Using Custom Project Types" on page 17 I "Using Advanced...on page 18 For additional information on these settings, see the on-screen Reference Guide, as described on page 2. Enhancing Photos The printer software includes PhotoEnhance™ options that adjust image brightness and contrast to add special effects. you may take longer on some systems. To ...
.... 16 Using PhotoEnhance, Custom, and Advanced Settings When you're printing special projects, you must select Color ink; You can customize your printer software settings, as described in these sections: I "Enhancing Photos" below I "Using Custom Project Types" on page 17 I "Using Advanced...on page 18 For additional information on these settings, see the on-screen Reference Guide, as described on page 2. Enhancing Photos The printer software includes PhotoEnhance™ options that adjust image brightness and contrast to add special effects. you may take longer on some systems. To ...

Printer Basics
Page 22
Using Custom Project Types Your printer software includes custom project types with a film camera. This lets you quickly select the best settings for your printed images the appearance of photos taken with ... open it. Macintosh Windows If your photo was taken with a digital camera, select Digital Camera Correction to give your type of specialized settings for your printer settings dialog box. For more fine-tuning, select from a list of document, or select a color-matching method for photographs, such as People or Nature, or...
Using Custom Project Types Your printer software includes custom project types with a film camera. This lets you quickly select the best settings for your printed images the appearance of photos taken with ... open it. Macintosh Windows If your photo was taken with a digital camera, select Digital Camera Correction to give your type of specialized settings for your printer settings dialog box. For more fine-tuning, select from a list of document, or select a color-matching method for photographs, such as People or Nature, or...

Printer Basics
Page 26
Click OK to open your paper from the Media Type list in your settings. 4. Windows: Open the printer software from your application. (See page 7 for details.) Choose the Media Type for your paper from the Media Type list. Then click the Layout tab ...and choose Double-Sided Printing. Select the Media Type for your printer software's page setup dialog box. Click here Macintosh Windows 3. The printer prints the odd-numbered page(s), starting with page 1. 21 2. Then click Print. Start printing. Windows: Click OK (or Print) ...
Click OK to open your paper from the Media Type list in your settings. 4. Windows: Open the printer software from your application. (See page 7 for details.) Choose the Media Type for your paper from the Media Type list. Then click the Layout tab ...and choose Double-Sided Printing. Select the Media Type for your printer software's page setup dialog box. Click here Macintosh Windows 3. The printer prints the odd-numbered page(s), starting with page 1. 21 2. Then click Print. Start printing. Windows: Click OK (or Print) ...

Printer Basics
Page 48
... end the check, turn on your printer software may have a problem with your computer. Hold down the m paper button until the Ppower light starts to work, contact your dealer or EPSON as described on page 44. Try the suggestions in its ROM version number, ink counter, and a nozzle check pattern.... Make sure both the printer and computer are turned off after it . Make sure letter-size or...
... end the check, turn on your printer software may have a problem with your computer. Hold down the m paper button until the Ppower light starts to work, contact your dealer or EPSON as described on page 44. Try the suggestions in its ROM version number, ink counter, and a nozzle check pattern.... Make sure both the printer and computer are turned off after it . Make sure letter-size or...

Printer Basics
Page 49
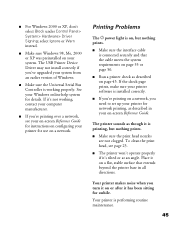
...Printer or Installing Software The printer makes noise after 5 minutes, turn off the printer or it may not have software installation privileges. I The first time you install ink cartridges, the printer must charge its ink delivery system for about 90 seconds. I If your system meets the requirements beginning on to clear the error. Also make sure your printer icon (C80... installation instructions on and the printer cable is still flashing when you see an error message or your computer. 44 I For Windows NT or 2000, if you turn it back on, contact EPSON as described on .
...Printer or Installing Software The printer makes noise after 5 minutes, turn off the printer or it may not have software installation privileges. I The first time you install ink cartridges, the printer must charge its ink delivery system for about 90 seconds. I If your system meets the requirements beginning on to clear the error. Also make sure your printer icon (C80... installation instructions on and the printer cable is still flashing when you see an error message or your computer. 44 I For Windows NT or 2000, if you turn it back on, contact EPSON as described on .
Printer Basics
Page 50
... requirements on -screen Reference Guide. select Ignore or Warn instead. The USB Printer Device Driver may not install correctly if you need to set up your printer software is connected securely and that extends beyond the printer base in your on page 55 or page 56. If the check page prints..., make sure your printer for details. I Make sure the Universal Serial Bus Controller is...
... requirements on -screen Reference Guide. select Ignore or Warn instead. The USB Printer Device Driver may not install correctly if you need to set up your printer software is connected securely and that extends beyond the printer base in your on page 55 or page 56. If the check page prints..., make sure your printer for details. I Make sure the Universal Serial Bus Controller is...

Printer Basics
Page 51
...on page 55. I Printing using . I Try using the parallel port, enable ECP/DMA mode. see page 14 for instructions. To replace an outdated ink cartridge, see banding (light lines). Make sure your system's memory (RAM). I Set the Quality/Speed slider to : I If you 're using ...the Media Type setting matches the paper you need to Speed. See page 7 (Windows) or page 12 (Macintosh) for guidelines. I In the printer software's Advanced dialog box, turn MicroWeave® off and/or turn High Speed on your hard disk or run a defragmentation utility. I Close open applications...
...on page 55. I Printing using . I Try using the parallel port, enable ECP/DMA mode. see page 14 for instructions. To replace an outdated ink cartridge, see banding (light lines). Make sure your system's memory (RAM). I Set the Quality/Speed slider to : I If you 're using ...the Media Type setting matches the paper you need to Speed. See page 7 (Windows) or page 12 (Macintosh) for guidelines. I In the printer software's Advanced dialog box, turn MicroWeave® off and/or turn High Speed on your hard disk or run a defragmentation utility. I Close open applications...

Printer Basics
Page 52
...of genuine EPSON inks. See page 34 for thicker paper or envelopes and your printer. I Remove each sheet from the output tray after printing, especially when you're printing on -screen Reference Guide, and that it 's in your paper meets the specifications listed in the printer software. I Use... a support sheet with your image may produce ink bleeding or pooling. I Run the Print Head Alignment utility. If it 's compatible with special paper, or...
...of genuine EPSON inks. See page 34 for thicker paper or envelopes and your printer. I Remove each sheet from the output tray after printing, especially when you're printing on -screen Reference Guide, and that it 's in your paper meets the specifications listed in the printer software. I Use... a support sheet with your image may produce ink bleeding or pooling. I Run the Print Head Alignment utility. If it 's compatible with special paper, or...

Printer Basics
Page 53
...circled in the image. I For best results, use genuine EPSON ink cartridges. I Make sure the Media Type setting matches the paper you still have a problem, ink may have leaked inside the printer. You see page 25. To replace an ink cartridge, see wrong or missing colors. If it is, ...is usually whiter or shinier than the other side. I The print head nozzles may need cleaning; I The ink cartridges may be old or low on ink. I Make sure your application and printer software are set for instructions. I Load a new sheet of paper with a soft, clean cloth. Do this several...
...circled in the image. I For best results, use genuine EPSON ink cartridges. I Make sure the Media Type setting matches the paper you still have a problem, ink may have leaked inside the printer. You see page 25. To replace an ink cartridge, see wrong or missing colors. If it is, ...is usually whiter or shinier than the other side. I The print head nozzles may need cleaning; I The ink cartridges may be old or low on ink. I Make sure your application and printer software are set for instructions. I Load a new sheet of paper with a soft, clean cloth. Do this several...

Printer Basics
Page 54
...illuminated with greater pigment saturation. Press the m paper button to get as close as others. Your printer software was designed to the nature of pigment inks, lighting conditions can affect the appearance of gloss may appear to have set the wrong paper size...correctly. Make sure that your monitor is grainy. I The color profiles built into your printer software automatically reference your application or printer software. Because of the nature of pigment inks, the degree of printer output. I Try experimenting with Paper Feeding Paper doesn't eject fully or is wrinkled....
...illuminated with greater pigment saturation. Press the m paper button to get as close as others. Your printer software was designed to the nature of pigment inks, lighting conditions can affect the appearance of gloss may appear to have set the wrong paper size...correctly. Make sure that your monitor is grainy. I The color profiles built into your printer software automatically reference your application or printer software. Because of the nature of pigment inks, the degree of printer output. I Try experimenting with Paper Feeding Paper doesn't eject fully or is wrinkled....


