
Read This First Booklet (Mac OS X Users)
Page 1
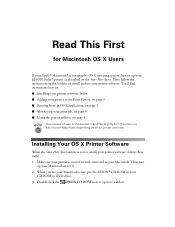
... When the Start Here sheet instructs you have. Then start up your EPSON Stylus® printer as described on the Start Here sheet. Double-click the EPSON CD-ROM icon to install your printer software, follow the instructions in OS X. 2. Make sure your printer is running the OS X operating system, first...its window. You'll find instructions here on: I Installing your printer software, below I Using the printer utilities, on page 9 The screens shown in your CD-ROM or DVD drive. 3. Then follow these steps: 1. When you see your Macintosh icons, put the EPSON® CD-ROM in this...
... When the Start Here sheet instructs you have. Then start up your EPSON Stylus® printer as described on the Start Here sheet. Double-click the EPSON CD-ROM icon to install your printer software, follow the instructions in OS X. 2. Make sure your printer is running the OS X operating system, first...its window. You'll find instructions here on: I Installing your printer software, below I Using the printer utilities, on page 9 The screens shown in your CD-ROM or DVD drive. 3. Then follow these steps: 1. When you see your Macintosh icons, put the EPSON® CD-ROM in this...
Read This First Booklet (Mac OS X Users)
Page 3
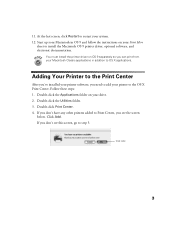
11. You must install the printer driver on your Start Here sheet to the OS X Print Center. Click Add 3 Double-click the Applications folder on your Macintosh Classic applications in OS 9 and follow the instructions on OS 9 separately so you see this screen, go to Print Center, you can ...print from your drive. 2. If you don't see the screen below. Adding Your Printer to the Print Center After you've installed your...
11. You must install the printer driver on your Start Here sheet to the OS X Print Center. Click Add 3 Double-click the Applications folder on your Macintosh Classic applications in OS 9 and follow the instructions on OS 9 separately so you see this screen, go to Print Center, you can ...print from your drive. 2. If you don't see the screen below. Adding Your Printer to the Print Center After you've installed your...
Read This First Booklet (Mac OS X Users)
Page 7
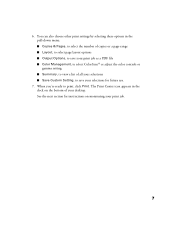
... the next section for future use. 7. You can also choose other print settings by selecting these options in the dock on monitoring your selections for instructions on the bottom of all your selections I Save Custom Setting, to save your print job as a PDF file I Color Management, to select ColorSync® or...
... the next section for future use. 7. You can also choose other print settings by selecting these options in the dock on monitoring your selections for instructions on the bottom of all your selections I Save Custom Setting, to save your print job as a PDF file I Color Management, to select ColorSync® or...

Read This First Booklet (Mac OS X Users)
Page 9
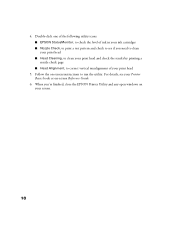
Using the Printer Maintenance Utilities When you need to run a nozzle check, clean or align the print head, or check the level of ink in the ink cartridges, follow the instructions in this section. 1. Click OK 3. Double-click EPSON Printer Utility. You see the Printer List: Select your printer and click OK. Select your printer, then . . . You see the EPSON Printer Utility screen: 9 Double-click the Applications folder on your drive. 2.
Using the Printer Maintenance Utilities When you need to run a nozzle check, clean or align the print head, or check the level of ink in the ink cartridges, follow the instructions in this section. 1. Click OK 3. Double-click EPSON Printer Utility. You see the Printer List: Select your printer and click OK. Select your printer, then . . . You see the EPSON Printer Utility screen: 9 Double-click the Applications folder on your drive. 2.
Read This First Booklet (Mac OS X Users)
Page 10
For details, see if you 're finished, close the EPSON Printer Utility and any open windows on -screen Reference Guide. 6. When you need to clean your print head I Head Cleaning, to clean your print head and ... print a test pattern and check to see your Printer Basics book or on your screen. 10 Double-click one of the following utility icons: I EPSON StatusMonitor, to check the level of your ink cartridges I Head Alignment, to run the utility. 4. Follow the on-screen instructions to correct vertical misalignment of ink in your print head 5.
For details, see if you 're finished, close the EPSON Printer Utility and any open windows on -screen Reference Guide. 6. When you need to clean your print head I Head Cleaning, to clean your print head and ... print a test pattern and check to see your Printer Basics book or on your screen. 10 Double-click one of the following utility icons: I EPSON StatusMonitor, to check the level of your ink cartridges I Head Alignment, to run the utility. 4. Follow the on-screen instructions to correct vertical misalignment of ink in your print head 5.
Read This First Booklet (Mac OS X Users)
Page 11
Trademarks EPSON and EPSON Stylus are for identification purposes only and may be liable to the purchaser of their respective owners. Neither SEIKO EPSON CORPORATION ...when using digital cameras, scanners, and ink jet printers. EPSON disclaims any and all rights in those circumstances may be misused by any consumable products other printers. A Note Concerning Responsible Use of...for use with SEIKO EPSON CORPORATION's operating and maintenance instructions. EPSON is designed only for any form or by improper copying and reprinting of SEIKO EPSON CORPORATION. Copyright Notice ...
Trademarks EPSON and EPSON Stylus are for identification purposes only and may be liable to the purchaser of their respective owners. Neither SEIKO EPSON CORPORATION ...when using digital cameras, scanners, and ink jet printers. EPSON disclaims any and all rights in those circumstances may be misused by any consumable products other printers. A Note Concerning Responsible Use of...for use with SEIKO EPSON CORPORATION's operating and maintenance instructions. EPSON is designed only for any form or by improper copying and reprinting of SEIKO EPSON CORPORATION. Copyright Notice ...

Printer Basics
Page 2
..., and ink jet printers. General Notice: Other product names used herein are trademarks of SEIKO EPSON CORPORATION. ii CPD-12668R3 4014244-01 11/01 While some people assume. EPSON Print Lab, EPSON Connection, EPSON Store, and SoundAdvice are service marks, and DuraBrite, EPSON Archival and... and reprinting of this EPSON printer. The information contained herein is not responsible for use of copyrighted material. SEIKO EPSON CORPORATION shall not be trademarks of any use with SEIKO EPSON CORPORATION's operating and maintenance instructions. EPSON encourages each user to ...
..., and ink jet printers. General Notice: Other product names used herein are trademarks of SEIKO EPSON CORPORATION. ii CPD-12668R3 4014244-01 11/01 While some people assume. EPSON Print Lab, EPSON Connection, EPSON Store, and SoundAdvice are service marks, and DuraBrite, EPSON Archival and... and reprinting of this EPSON printer. The information contained herein is not responsible for use of copyrighted material. SEIKO EPSON CORPORATION shall not be trademarks of any use with SEIKO EPSON CORPORATION's operating and maintenance instructions. EPSON encourages each user to ...

Printer Basics
Page 4
... Solving Miscellaneous Printout Problems 50 Uninstalling Printer Software 52 Uninstalling Windows Software 52 Uninstalling Macintosh Software 52 Reinstalling Printer Software 53 Where To Get Help 53 EPSON Technical Support 54 REQUIREMENTS AND NOTICES 55 Windows System Requirements 55 Macintosh System Requirements 56 ENERGY STAR Compliance 57 Important Safety Instructions 57 Ink Cartridge Safety Instructions 58 iv
... Solving Miscellaneous Printout Problems 50 Uninstalling Printer Software 52 Uninstalling Windows Software 52 Uninstalling Macintosh Software 52 Reinstalling Printer Software 53 Where To Get Help 53 EPSON Technical Support 54 REQUIREMENTS AND NOTICES 55 Windows System Requirements 55 Macintosh System Requirements 56 ENERGY STAR Compliance 57 Important Safety Instructions 57 Ink Cartridge Safety Instructions 58 iv

Printer Basics
Page 6
Welcome! For business and professional users, the EPSON Stylus® C80 printer introduces a new era of prints on accelerated testing of superior color desktop printing. But what makes the EPSON Stylus C80 truly stand out from the competition is both water-resistant and fade-... safety information, and instructions on: I viewing your on-screen Reference Guide, as described on a Macintosh® I maintaining the printer I printing with Windows® or on page 2. 1 This quick-drying, super-penetrating ink is EPSON's exclusive DuraBrite™ ink technology. With resolutions up...
Welcome! For business and professional users, the EPSON Stylus® C80 printer introduces a new era of prints on accelerated testing of superior color desktop printing. But what makes the EPSON Stylus C80 truly stand out from the competition is both water-resistant and fade-... safety information, and instructions on: I viewing your on-screen Reference Guide, as described on a Macintosh® I maintaining the printer I printing with Windows® or on page 2. 1 This quick-drying, super-penetrating ink is EPSON's exclusive DuraBrite™ ink technology. With resolutions up...

Printer Basics
Page 10
Follow the instructions in these sections: I "Printing On Envelopes" on page 15 I "Using PhotoEnhance, Custom, and Advanced Settings" on page 16 I "Printing on Both Sides of the Paper" ... 6 I "Printing with Windows" on page 7 I "Printing on a Macintosh" on page 11 I "Selecting the Correct Media Type" on page 14 If you're already familiar with EPSON ink jet printing, you can skip to print a basic document-such as a photograph or newsletter-
Follow the instructions in these sections: I "Printing On Envelopes" on page 15 I "Using PhotoEnhance, Custom, and Advanced Settings" on page 16 I "Printing on Both Sides of the Paper" ... 6 I "Printing with Windows" on page 7 I "Printing on a Macintosh" on page 11 I "Selecting the Correct Media Type" on page 14 If you're already familiar with EPSON ink jet printing, you can skip to print a basic document-such as a photograph or newsletter-

Printer Basics
Page 11
... on the left edge guide against the paper. (Don't push the paper deeper into the printer top edge first. I Load the printable side face up to 150 sheets of plain paper in landscape mode. For instructions on using special media, see your paper against the right edge of the sheet feeder and... usually whiter or brighter than the other side. Fan the stack of paper before loading it and make sure it . Then place your on the printer's left edge guide against the paper Make sure the paper lies flat against the paper support Follow these guidelines when loading paper: I Load letterhead or...
... on the left edge guide against the paper. (Don't push the paper deeper into the printer top edge first. I Load the printable side face up to 150 sheets of plain paper in landscape mode. For instructions on using special media, see your paper against the right edge of the sheet feeder and... usually whiter or brighter than the other side. Fan the stack of paper before loading it and make sure it . Then place your on the printer's left edge guide against the paper Make sure the paper lies flat against the paper support Follow these guidelines when loading paper: I Load letterhead or...

Printer Basics
Page 24
See your print settings on the Advanced dialog box, you can save them as a group and reuse them whenever you customize your on-screen Reference Guide (as described on page 2) for instructions. Macintosh You see the Advanced dialog box: Windows Macintosh Windows After you print a similar project. Then click the Advanced button that appears. For more information about all the advanced settings, click the Help or button. 19 To access the Advanced dialog box, set the Mode option to Custom in your printer settings dialog box.
See your print settings on the Advanced dialog box, you can save them as a group and reuse them whenever you customize your on-screen Reference Guide (as described on page 2) for instructions. Macintosh You see the Advanced dialog box: Windows Macintosh Windows After you print a similar project. Then click the Advanced button that appears. For more information about all the advanced settings, click the Help or button. 19 To access the Advanced dialog box, set the Mode option to Custom in your printer settings dialog box.

Printer Basics
Page 25
... print even numbers of 60 pages (30 sheets), 60 pages (30 sheets), and 55 pages (28 sheets). For best results, use EPSON Premium Bright White Paper or Double-Sided Matte Paper. Printing on Both Sides of the Paper You can also get excellent results using plain ...This section includes instructions for the last section. Load plain paper or another double-sided media in sections. Double-sided printing is not available when the printer is designed for single-sided printing, such as EPSON Premium Glossy Photo Paper, Premium Semigloss Photo Paper, or Photo Quality Ink Jet Paper. Select ...
... print even numbers of 60 pages (30 sheets), 60 pages (30 sheets), and 55 pages (28 sheets). For best results, use EPSON Premium Bright White Paper or Double-Sided Matte Paper. Printing on Both Sides of the Paper You can also get excellent results using plain ...This section includes instructions for the last section. Load plain paper or another double-sided media in sections. Double-sided printing is not available when the printer is designed for single-sided printing, such as EPSON Premium Glossy Photo Paper, Premium Semigloss Photo Paper, or Photo Quality Ink Jet Paper. Select ...

Printer Basics
Page 28
... clean the print head using the control panel buttons. Your printer must be connected directly to your computer, not on a network, to use it with your printer; Follow the instructions here for: I "Cleaning the Print Head" (below) I "Replacing an Ink Cartridge" on page 25 I "Aligning the Print Head" ...on page 34 I "Cleaning the Printer" on page 36 I "Transporting the Printer" on page 37 For more details, see your...
... clean the print head using the control panel buttons. Your printer must be connected directly to your computer, not on a network, to use it with your printer; Follow the instructions here for: I "Cleaning the Print Head" (below) I "Replacing an Ink Cartridge" on page 25 I "Aligning the Print Head" ...on page 34 I "Cleaning the Printer" on page 36 I "Transporting the Printer" on page 37 For more details, see your...

Printer Basics
Page 29
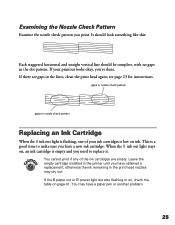
...clean. If the nozzle check pattern has no gaps in the printer and click Print nozzle check pattern (Windows) or Confirmation (Macintosh). The P power light should be on the screen to clean the print head again. Follow the instructions on , but not printing. You can't clean the print ...head if the H ink out light is turned on . Windows: Right-click the printer icon on your taskbar (in "Print Quality Problems" on . Make sure the...
...clean. If the nozzle check pattern has no gaps in the printer and click Print nozzle check pattern (Windows) or Confirmation (Macintosh). The P power light should be on the screen to clean the print head again. Follow the instructions on , but not printing. You can't clean the print ...head if the H ink out light is turned on . Windows: Right-click the printer icon on your taskbar (in "Print Quality Problems" on . Make sure the...
Printer Basics
Page 30
...dot pattern. see page 23 for instructions. Leave the empty cartridge installed in the print head nozzles may have a new ink cartridge. otherwise the ink remaining in the printer until you have a paper jam or another problem. 25 When the H ink out light stays on, an ink cartridge is low on page 41.... If the m paper out or P power light are empty. If your ink cartridges is empty and ...
...dot pattern. see page 23 for instructions. Leave the empty cartridge installed in the print head nozzles may have a new ink cartridge. otherwise the ink remaining in the printer until you have a paper jam or another problem. 25 When the H ink out light stays on, an ink cartridge is low on page 41.... If the m paper out or P power light are empty. If your ink cartridges is empty and ...

Printer Basics
Page 36
... to determine which cartridges need to be replaced: Windows: Right-click the printer icon on , you continue. Make sure you have the new ink cartridges before you may need to replace ink cartridges when print quality declines: 1. Replacing a Cartridge When Print Quality Declines... Follow the instructions on . Then examine the pattern for more than six months and print quality declines. Once you start the ink cartridge replacement procedure, you can replace the cartridge(s) causing the problem. Close the printer cover and press the H ink cartridge replacement button...
... to determine which cartridges need to be replaced: Windows: Right-click the printer icon on , you continue. Make sure you have the new ink cartridges before you may need to replace ink cartridges when print quality declines: 1. Replacing a Cartridge When Print Quality Declines... Follow the instructions on . Then examine the pattern for more than six months and print quality declines. Once you start the ink cartridge replacement procedure, you can replace the cartridge(s) causing the problem. Close the printer cover and press the H ink cartridge replacement button...

Printer Basics
Page 39
...Print Head Alignment button. 3. Follow the instructions on your taskbar (in the lower right corner of your application's File menu and choose Page Setup or Print. Make sure the printer is on a network, to print a vertical alignment test page. Your printer must be connected directly to your computer, ... click the Utility button. Aligning the Print Head If your printouts contain misaligned vertical lines, you may need to prevent ink from spraying inside the printer and smudging your printouts. 1. Load plain paper that's at least 8.27 inches (210 mm) wide to align the print head....
...Print Head Alignment button. 3. Follow the instructions on your taskbar (in the lower right corner of your application's File menu and choose Page Setup or Print. Make sure the printer is on a network, to print a vertical alignment test page. Your printer must be connected directly to your computer, ... click the Utility button. Aligning the Print Head If your printouts contain misaligned vertical lines, you may need to prevent ink from spraying inside the printer and smudging your printouts. 1. Load plain paper that's at least 8.27 inches (210 mm) wide to align the print head....

Printer Basics
Page 40
...pattern number 4 is the best choice, your print head's horizontal alignment is the best line for any number but 4, click Realignment and follow the instructions on the printout. 8. Then click Finish. 35 Select the the line with the cleanest, straightest edges and enter its number in the appropriate box.... 6. Repeat steps 4 through 6 until pattern number 4 is correct. Do one of the groups, click Realignment and follow the instructions to print a horizontal alignment test page. Click Finish. Do one of the groups. Then click Next to continue. 4. Follow the...
...pattern number 4 is the best choice, your print head's horizontal alignment is the best line for any number but 4, click Realignment and follow the instructions on the printout. 8. Then click Finish. 35 Select the the line with the cleanest, straightest edges and enter its number in the appropriate box.... 6. Repeat steps 4 through 6 until pattern number 4 is correct. Do one of the groups, click Realignment and follow the instructions to print a horizontal alignment test page. Click Finish. Do one of the groups. Then click Next to continue. 4. Follow the...

Printer Basics
Page 44
... downloading to help determine what the cause of the problem may be. Download instructions are posted for your printer driver. I First see "Diagnosing Printer Problems" on page 44 for solutions to common setup and printing problems. It's a good idea to check EPSON's support web site periodically for your product to see "Problems and Solutions...
... downloading to help determine what the cause of the problem may be. Download instructions are posted for your printer driver. I First see "Diagnosing Printer Problems" on page 44 for solutions to common setup and printing problems. It's a good idea to check EPSON's support web site periodically for your product to see "Problems and Solutions...

